Internet connection. It is not possible to log into the web interface of the AC51U router from ASUS through a browser.
A few years ago, ASUS released the RT-AC51U, another router model. It was positioned as the most budget router in the ASUS line with support for the 802.11ac protocol. Since then, many inexpensive routers with similar characteristics have appeared on the market. Let’s figure out whether it’s worth taking a closer look at this equipment or whether it’s better to choose something more modern.
The RT router version AC51U has everything basic functions necessary for the average user. It runs on the latest 802.11ac standard.
There is support for two frequency ranges: 2.4 GHz and 5 GHz, as well as outdated xDSL access technology.
ASUS router assembled on the MediaTek platform with an MT7620A processor and a radio unit for 802.11a/n/ac at 5 GHz MT7610E. Speed: 300 Mbit/s and 433 Mbit/s. RAM AC51U is 64 MB, for firmware there is a 16 MB flash chip. Installed in the main processor network switch for five 100 Mbit/s ports, radio block for protocols - 802.11b/g/n at 2.4 GHz with a maximum connection speed of 300 Mbit/s.
Among the functions not implemented in the AC51U from ASUS, the following are repeater, amplifier and adapter modes, the presence of an antivirus, the ability to customization user connections, as well as firmware updates via mobile app or USB port.
Appearance
 The router comes in a cardboard box. The kit includes a small switching power supply 12 V 1 A, a short Rj45 network cable, a disk with software and documentation.
The AC51U router is made in a proprietary ASUS style: Black body with sharp edges and a diagonal pattern on the main panel. At the top there are two external non-removable antennas with a coefficient of 5 dBi. The router is quite compact and does not take up much space. Device dimensions: 189 x 129 x 36 mm, weight - 270 g.
 For use in a horizontal position, the AC51U has rubber feet on the bottom. For vertical placement, there are two holes for screws on the bottom of the device, and the external antennas can be rotated 180 degrees and fixed in three positions.
The Asus logo and model name are visible at the top of the main panel of the AC51U. At the bottom there are nine blue LEDs that display the router’s operating modes: power connection, two indicators for operation in the 5 GHz and 2.4 GHz bands, peripheral connections via a USB connector, WAN connection activity, plus four indicators for each of the LAN ports.
There are holes for ventilation on the sides and bottom of the AC51U router. All buttons and connectors are located on the back of the equipment: RESET button, power button, charging socket, USB port 2.0., WPS secure setup button, WAN port and four LAN ports.
Connection and preparation for work
To install the AC51U, you need to insert the Internet cable into the WAN port and connect the computer through one of the LAN ports using a network cable. In the future, it is possible to connect a PC and an ASUS router
via a wireless network, but when connecting the AC51U router for the first time, it is better to do it via cable. 
Settings
Setting up the AC51U router from Asus is easy.
Modern routers of the brand have a convenient graphical web interface AsusWRT, which allows you to configure via Wi-Fi from any digital equipment in a web browser.
 The ASUS RT AC51U router is configured via wifi as follows. You need to open your browser, enter the router’s IP address in the address bar, and press Enter. The address, login and password are on the device sticker. A web interface will open, in the upper left corner of which you need to click the “Quick Internet Setup” button and follow the instructions on the screen. If the router is ASUS
have not configured it before, the “Quick Setup Wizard” will appear automatically after entering your login and password.
The ASUS RT AC51U router is configured via wifi as follows. You need to open your browser, enter the router’s IP address in the address bar, and press Enter. The address, login and password are on the device sticker. A web interface will open, in the upper left corner of which you need to click the “Quick Internet Setup” button and follow the instructions on the screen. If the router is ASUS
have not configured it before, the “Quick Setup Wizard” will appear automatically after entering your login and password.
Connecting to the Internet manually using the example of some providers
 "Home ru"
- To set up a connection with the provider, you need to log into the AC51U web interface, enter the IP of the ASUS router into the address bar of the browser, and also enter the default login and password - admin/admin.
- If the Settings Wizard page opens, skip it.
- Next go to the section “ Additional settings» > “Internet” and open the “Connection” tab.
- In the “Basic Settings” column, select PPPoE - WAN connection type.
- Tick “Yes” for automatic receipt IP addresses and DNS server connections.
- Then enter the data provided by the provider in the “Username” and “Password” fields.
- Click the “Apply” button at the bottom of the page.
Rostelecom
Most Rostelecom branches also use the access protocol Internet PPPoE, so the connection setup for AC51U is the same as described above.
 "Beeline"
- Login to AC51U web interface — ASUS router, skip the “Settings Wizard”.
- Select the “Internet” section and the “Connections” tab.
- Here, in the “Basic Settings” block, select L2TP as the WAN connection type.
- Next, check “Yes” in the “Enable WAN”, “Obtain WAN IP address automatically” and “Connect to DNS server automatically” fields.
- In the “Username” field, enter your Beeline personal account number and fill in the “Password” field.
- Then enter tp.internet.beeline.ru in the “VPN server” field at the bottom of the page.
- Click the “Apply” button.
NetByNet
Go to “Advanced settings” -> “Internet” > “Connection”. Select “Automatic IP” in the “WAN connection type” column and check “Yes” for automatic connection AC51U to the DNS server. Next, at the bottom of the menu, click “Clone MAC” and the “Apply” button.

It is possible to configure network access with AC51U through a backup communication channel. A list of compatible 3G and 4G modems is available on the page at https://www.asus.com/event/networks_3G4G_support/.
How to set up: in the “General” section of the ASUS router web interface, select “USB application” > 3G/4G. In the “Enable USB Modem” field, click “Yes”, then select the provider location from the list. In the ISP field, select the name of the provider, the “APN service” column will be filled in automatically. But you can check the information with your provider. Next, in the Dial Number field, enter the provider number, below - the PIN code for connection. The username and password are provided by your Internet Service Provider. Finally, select the adapter name from the list. If the required model is not available, select “Auto”. For changes to take effect on AC51U click the “Apply” button at the bottom of the page.
Wireless network

After connecting and setting up AC51U from ASUS you need to configure wi-fi.
- To do this, go to the “Advanced Settings” section of the web interface, select “Wireless Network” > “General” tab.
- The “Range” field should be set to 2.4 GHz - the standard range visible to all wireless adapters.
- You need to come up with a network name and enter it in the SSID field. It is better to hide the name to prevent detection by other wireless devices by clicking “Yes” in the corresponding column. Then to connect to the SSID network you will have to enter the data manually.
- In the “Authentication Method” column, select WPA2-Personal, and in the “WEP Encryption” column - AES.
- Then come up with a password for wi-fi, type it in the “Preliminary” field WPA key».
- Save the changes by clicking the "Apply" button.
To configure the AC51U connection in the 5GHz range, repeat the same steps and click the “Apply” button.
Configuration in access point mode
In this mode AC51U from ASUS creates a new wireless network. Enabled in the “Advanced Settings” > “Administration” > “Operation Mode” tab. By selecting desired mode, you need to click the “Save” button, then connect the router to another via a network cable (insert into the LAN ports).
IPTV
Router AC51U from ASUS supports connection digital television By local network through the provider. To do this, go to the “Local Network” section > IPTV tab.
IPv6 protocol
Router AC51U from ASUS supports IPv6 addressing. Enable it in the “Advanced Settings” > IPv6 section by filling in the appropriate fields. Information to fill out and support this standard check with your provider.
Dynamic DNS
 To configure DDNS on the AC51U router from ASUS, you need to go to the “Advanced settings” > “Internet” > DDNS tab. Enable the DDNS function and select a server: when using an ASUS server, enter the host name in the format xxx.asuscomm.com, where xxx is the name. If you use another DDNS, you must select a free one trial version(right) and register on the site, and then fill out the remaining fields in the field.
Security Settings
ASUS AC51U security features include firewall, URL filters, keywords and network services + firewall for IPv6 protocol.

 The settings of the ASUS AC51U router also control the client’s network access time to the nearest hour. Configured in the “General” > “ Parental control" You need to select a router from the list of available ones or enter the MAC address of the device manually, then click on the plus sign in the “Add/Remove” column, configure the allowed time in the “Time Management” column. Apply changes to AC51U by clicking the “Apply” button.
Changing the function of the buttons
The ASUS AC51U router has the ability to change the function of the WPS button. In the “Wireless Network” section > WPS tab it is possible to switch the button action to disable wireless points access. There is also an option to add a PIN here.
 Connect the printer to the AC51U USB port of the ASUS router ,
You can configure the print server using ASUS utilities EZ Printing. The function is supported on Windows XP/Vista/7.
Connect the printer to the AC51U USB port of the ASUS router ,
You can configure the print server using ASUS utilities EZ Printing. The function is supported on Windows XP/Vista/7.
To install the program, go to the “General” > “USB Application” > “Print Server” section and click “Download Now!”
The utility is supported only by the operating systems listed above + MAC OS, for which select the “Use LPR protocol for general printing (MAC)”.
 The AC51U has the ability to run a DLNA media server. To do this, you need to connect the drive you need access to to the router’s USB port. Then in the router settings, open the “USB Application” section > “File/Media Server”/Servers Center, enable the server in the Enable DLNA column Media Server. Here you can change the server name, choose access to the entire disk, or certain folders. At the end you need to click the “Apply” button.
The above manipulations allow you to access the drive from a TV with wi-fi. In order to gain access from a computer, phone, etc., open the “Network Neighborhood” tab and allow shared access to the resource in the column of the same name. Click the “Apply” button.
 AC51U router supports VPN connection with PPTP and OpenVPN protocols and VPN client for PPTP protocols, L2TP and OpenVPN.
To configure access to the server, you need to go to “Advanced settings” > “VPN server”. Next, mark “Yes” in the columns “Enable PPTP server” and “Support Network Neighborhood(Samba)”/Support Your network, below enter the username and password to access the server, click the “Add” button. Click "Apply".
Setting up a torrent client on the router
 Utility Download Master allows you to download files even when the computer is turned off. To use the program, you need to connect a USB drive to the ASUS AC51U router. Then go to “General” > “USB Drive” > Download Master, and click “Add” to add a download, select the type BitTorrent, HTTP or FTP to start downloading.
To configure BitTorrent parameters, you must select the appropriate settings item. Here, select the download port, limit the maximum speed and number of allowed peers, and enable or disable file encryption.
In the next settings section, adjust the USENET server parameters for downloading NZB files.
QoS service
Quality of Service feature allows you to set priority and manage network traffic. Enable in General > Traffic Manager > QoS by filling in the incoming and outgoing speed fields.
The service can be useful when using a powerful platform and 100 Mbit/s ports, but it places a heavy load on the processor.
 The program combines your home network and cloud services, allowing you to store, sync and share files between all hosts. You can access the data through a browser or mobile application (download from Google Play Store or Apple Store).
For creating cloud drive connect USB drive to ASUS — AC51U router, enable Cloud Disk in the AiCloud settings section. Then go to https://router.asus.com/, enter the router login and password.
Smart Access gives you access to home network via the router's domain name. Enabled in the same settings section.
With Smart Sync you can synchronize folders across external storage, connected to an RT router model AC51U from ASUS, with folders in cloud storage. After enabling the function in the router settings, click “Add a new account”, enter the password for ASUS WebStorage, select the directory for synchronization and click the “Apply” button.
Occurrence of malfunctions and methods for their elimination
It is not possible to log into the web interface of the AC51U router from ASUS through a browser:
- First you need to check the connection Ethernet cable: The WAN indicator on the router should be lit.
- Check login and password, default: admin/admin.
- Clear cookies in your browser.
- Disable proxy server usage, connection remote access, configure TCP/IP to automatically obtain an IP address.
- Make sure you are using CAT5e and CAT6 Ethernet cables.
The equipment cannot establish a wireless connection with the AC51U:

No Internet access with AC51U from ASUS:
- Make sure that the router can connect to the provider: “General” > “Network Map” > “Internet Status”. If the router does not connect, a network restart will be required.
- The router may be blocked by Parental Controls. Unblock in the “General” > “Parental Control” section by removing the device from the list of clients.
- It is also worth checking the IP address, gateway address and cable connections.
User forgot SSID or password:

Default system parameters:
Username: admin
Password: admin
DCHP Enabled: "Yes" if WAN cable is connected
IP address: 192.168.1.1
Domain: (empty)
Subnet mask: 255.255.255.0
DNS server 1: 192.168.1.1
DNS server 2: (empty)
SSID (2.4 GHz): ASUS
SSID (5 GHz): ASUS_5G
AC51U firmware update error from ASUS:
- Disconnect power from the router.
- While holding the RESET button, connect the power.
- Release the reset button when the power light starts flashing slowly, indicating that the router has entered recovery mode.
- Set a static IP on your computer and the following settings:
IP address: 192.168.x
Subnet mask: 255.255.255.0

 If you encounter problems with ASUS —
The manufacturer of the AC51U router recommends, first of all, updating the firmware to the latest version.
If you encounter problems with ASUS —
The manufacturer of the AC51U router recommends, first of all, updating the firmware to the latest version.
How to find it: Advanced Settings > Administration > Firmware Update tab. Here click “Check” to test for updates. If new firmware available, download from: http://www.asus.com/Networks/Wireless_Routers/RTAC53U/#download.
Then upload the firmware file from your computer by clicking the “Select file” button in the same “Firmware Update” tab and click the “Submit” button.
Resetting the AC51U router to factory settings
To easily reset settings on back side The AC51U router from ASUS has a RESET button, which you can hold down for 10 seconds. Also, in the “Advanced settings” > “Administration” > “Manage settings” section, select “Factory settings”.
Conclusion
Model AC51U from ASUS —
not new on the market, but the device supports modern standards data transmission, has small dimensions and an attractive price, which has decreased significantly in recent years. The device is not suitable for building a high-speed wired network, but it is quite suitable for basic home use. 
pros
The AC51U router, according to consumers, has the following advantages:
- practical design and high quality workmanship;
- multifunctional firmware and the ability to replace it with an alternative one;
- the ability to expand capabilities thanks to the presence of console access and a USB port;
- the most affordable router with support for the 802.11ac protocol among ASUS models;
- support for two frequency ranges is provided;
Minuses
The AC51U router from ASUS is marked with the following negative ratings, namely:
- budget MediaTek chipset MT7620A, considered obsolete;
- lack of gigabit network ports;
- AC51U from ASUS — not the most budget network equipment with these characteristics on the market;
- Standard firmware with flaws.
Before we start setting up the router, let's check the local network connection settings. For this:
Windows 7
1. Click on " Start", "Control Panel".
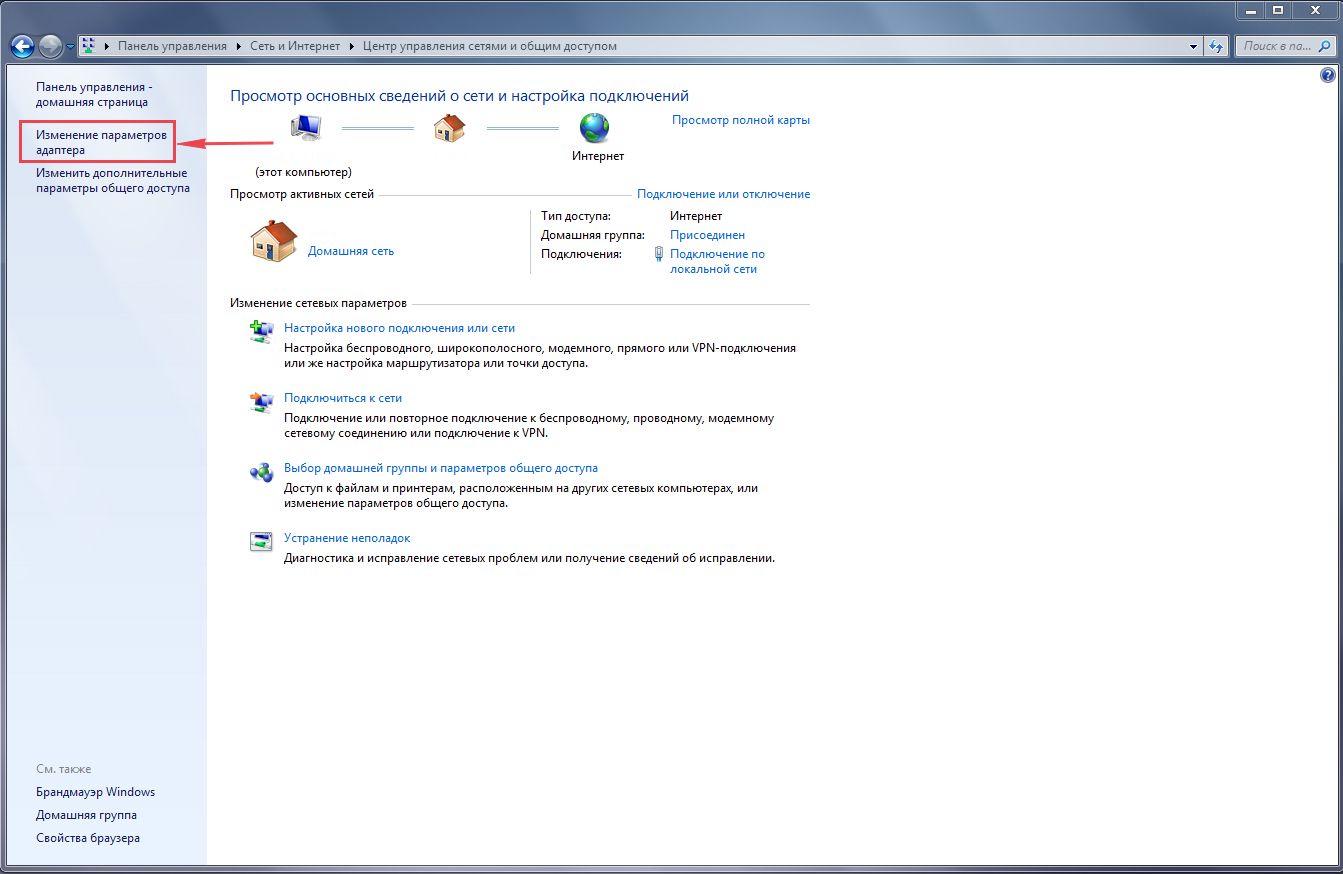
2. Click on " View network status and tasks".

3. Click on " Change adapter settings".
4. LAN connectionProperty".

5. From the list select " Internet Protocol Version 4 (TCP/IPv4)" and press " Property".

6. " and "", then press the " button Ok".

Windows 10
1. Click on " Start", "Options".

2. Click on " Network and Internet".

3. Select " Ethernet" and click on " Configuring adapter settings".

4. In the window that opens we see " Ethernet". Click on it right click mouse, select " Property".

5. From the list select " IP version 4 (TCP/IPv4)" and press " Property".

6. In the window that opens, you need to check the box " Obtain an IP address automatically" And " Obtain DNS server address automatically", then press the button " Ok".

Connecting the ASUS RT-AC51U router to a computer
The next step is to connect the router ASUS RT-AC51U to your Laptop or Personal Computer (PC). To do this, you need to connect the cable that your provider provided to you to the WAN port of the router (that is, this is the cable that goes to your apartment, house, office, etc. from outside), and the cable that came with router, connect one end to one of the four LAN ports, and connect the other end to your laptop or PC. And yes, don't forget to connect the power cable.

Authorization of ASUS RT-AC51U router
So, we connected the router, now you need to use any browser (be it Google Chrome, Mozilla Firefox, Internet Explorer, etc.) get into its web interface. To do this, open the browser and address bar enter the router address: router.asus.com or 192.168.1.1 and press the button " Enter" on your keyboard.
- Username - admin
- Password - admin
So, enter the data and press " Sing in"


Setting up the ASUS RT-AC51U router
And finally we got to the router’s Web interface. Now you need to configure the equipment. First of all, let's secure the wireless network by setting a password for wi-fi. Then you will need to find out what type of connection is used to access the Internet, is it PPTP, L2TP or PPPOE. You can find out by calling your provider (this is the organization with which you entered into an agreement to provide Internet services). So, let's start setting up the router. First, let's change the language of the Web interface to Russian. To do this, go to the right top corner interface and click on " English"and choose" Russian"

Setting a password for wi-fi
The ASUS RT-AC51U router is dual-band, which means that the router supports 2 operating frequencies for wireless connections, 2.4 GHz and 5 GHz. 5 GHz allows you to achieve higher bandwidth, but has a shorter range than 2.4 GHz, 2.4 GHz is more susceptible to interference. 5 GHz is not supported by all devices. Therefore, which frequency to choose is up to you. You can select both, and depending on the circumstances, change the wireless connection on your devices.
I bring to your attention Video instructions for setting a password for wi-fi on a router ASUS RT-AC51U
Let's also take a written and illustrative look at setting up a Wi-Fi password on a router ASUS RT-AC51U in two frequencies.
1.
On the Web interface, go to the menu in the "tab" Wireless network".
2.
Go to the column " frequency range"choose" 2.4GHz".
3.
In the column " SSID“come up with and indicate the name of your wireless network; this name will be displayed in the future when you connect to the network. I advise you to indicate the frequency used in the name of the network, for example: “imya seti 2.4”.
4.
"Channel width" - 20 MHz.
5.
Authentication method" - WPA2-Personal".
6.
In field " WPA Preshared KeyApply".

7.
Go to the column " frequency range"choose" 5GHz".
8.
In the column " SSID“come up with and indicate the name of your wireless network; this name will be displayed in the future when you connect to the network. I advise you to indicate the frequency used in the name of the network, for example: “imya seti 5”.
9.
"Channel width" - 20/40/80 MHz.
10.
Now you need to set a password for the wireless network. To do this, select " Authentication method" - WPA2-Personal".
11.
In field " WPA Preshared Key"we come up with and enter a password. Then click " Apply".

Setting up PPTP
PPTP on the router ASUS RT-AC51U using the ASUS RT-N56U router as an example.
Let's also write and illustrate PPTP on the router ASUS RT-AC51U.
1.
Internet".
2.
IN " WAN connection type"choose" PPTP".
3.
"" and "" select " Yes".
4.
Username"), password (in line " PasswordVPN server
5.
"Hostname
6.
Apply".

Setting up PPTP with a static IP address
Let's look at the connection setup PPTP with static IP address on the router ASUS RT-AC51U.
1.
Go to the menu in the tab " Internet".
2.
IN " WAN connection type"choose" PPTP".
3.
No" against " Obtain WAN IP address automatically" And " Connect to DNS server automatically".
4.
IP address"), subnet mask (in line " Subnet mask"), default gateway (in line " Main gate") and DNS (in the line " DNS server 1" And " DNS server 2").
All this data is usually specified in the contract with the provider. If for some reason you could not find them, you need to call hotline Your provider and find out how you can get them.
5.
Below you are asked to indicate your user name (in the line " Username"), password (in line " Password"). You will also need to specify the server IP address (in the line " VPN server"). All of the above data is provided to you by the provider (the organization that provided you with the Internet).
6.
"Hostname" - any word in Latin, for example "Host".
7.
After you have entered all the necessary data, press the button " Apply".

L2TP setup
Let's look at the connection setup L2TP on the router ASUS RT-AC51U.
1.
Go to the menu in the tab " Internet".
2.
IN " WAN connection type"choose" L2TP".
3.
"Obtain WAN IP address automatically" And " Connect to DNS server automatically"choose" Yes".
4.
Below you are asked to indicate your user name (in the line " Username"), password (in line " Password"). You will also need to specify the server IP address (in the line " VPN server"). All of the above data is provided to you by the provider (the organization that provided you with the Internet).
All this data is usually specified in the contract with the provider. If for some reason you could not find them, you need to call your provider's hotline and find out how you can get them.
5.
"Hostname" - any word in Latin, for example "Host".
6.
After you have entered all the necessary data, press the button " Apply".

Setting up L2TP with a static IP address
Let's look at the connection setup L2TP with static IP address on the router ASUS RT-AC51U.
Typically, a static IP address is provided to legal entities, or as an additional service to the basic tariff to individuals.
1.
Go to the menu in the tab " Internet".
2.
IN " WAN connection type"choose" L2TP".
3.
Since the connection uses a static IP address, set " No" against " Obtain WAN IP address automatically" And " Connect to DNS server automatically".
4.
Specify the server IP address (in the line " IP address"), subnet mask (in line " Subnet mask"), default gateway (in line " Main gate") and DNS (in the line " DNS server 1" And " DNS server 2").
All of the above data is provided to you by the provider (the organization that provided you with the Internet).
All this data is usually specified in the contract with the provider. If for some reason you could not find them, you need to call your provider's hotline and find out how you can get them.
5.
Below you are asked to indicate your user name (in the line " Username"), password (in line " Password"). You will also need to specify the server IP address (in the line " VPN server"). All of the above data is provided to you by the provider (the organization that provided you with the Internet).
All this data is also specified in the contract with the provider.
6.
"Hostname" - any word in Latin, for example "Host".
7.
After you have entered all the necessary data, press the button " Apply".

Setting up PPPOE
I bring to your attention Video instructions for setting up the connection type PPPOE on the router ASUS RT-AC51U using the ASUS RT-N56U router as an example.
PPPOE on the router ASUS RT-AC51U.
1.
Go to the menu in the tab " Internet".
2.
IN " WAN connection type"choose" PPPOE".
3.
"Obtain WAN IP address automatically" And " Connect to DNS server automatically"choose" Yes".
4.
Below you are asked to indicate your user name (in the line " Username"), password (in line " Password"All of the above data is provided to you by the provider (the organization that provided you with the Internet).
All this data is usually specified in the contract with the provider. If for some reason you could not find them, you need to call your provider's hotline and find out how you can get them.
5.
After you have entered all the necessary data, press the button " Apply".

Setting up PPPOE with a static IP address
Let's look at the connection setup PPPOE with static IP address on the router ASUS RT-AC51U.
Typically, a static IP address is provided to legal entities, or as an additional service to the basic tariff to individuals.
1.
Go to the menu in the tab " Internet".
2.
IN " WAN connection type"choose" PPPOE".
3.
Since the connection uses a static IP address, set " No" against " Obtain WAN IP address automatically" And " Connect to DNS server automatically".
4.
Specify the server IP address (in the line " IP address"), subnet mask (in line " Subnet mask"), default gateway (in line " Main gate") and DNS (in the line " DNS server 1" And " DNS server 2").
All of the above data is provided to you by the provider (the organization that provided you with the Internet).
All this data is usually specified in the contract with the provider. If for some reason you could not find them, you need to call your provider's hotline and find out how you can get them.
5.
Below you are asked to indicate your user name (in the line " Username"), password (in line " Password"). All of the above data is provided to you by the provider (the organization that provided you with the Internet).
All this data is also specified in the contract with the provider.
6.
After you have entered all the necessary data, press the button " Apply".

Connecting a computer to wi-fi
After connecting and setting up the router, you need to connect the computer to a wireless network (wi-fi), consider connecting to wi-fi in two operating systems ah, these are Windows 7 and Windows 10:
Windows 7
Video instruction
1.

2. Sultan

3.
Check the box next to " Connect automatically" and press
"Connection".

4. Specify " Security KeyOK".

5.

Windows 10
Video instruction
1. In the lower right corner of the desktop, find the wireless network (wi-fi) icon and click on it with the left mouse button.

2. A window pops up with a list of available wireless networks. Select a wireless network, in my case it is the network " Sultanova"(You select the network whose name was given at ).

3.
Check the box next to " Connect automatically" and press
"Connect".

4. Specify " Security Key"This is the wireless network password that you specified when . After you have specified the key, click " Further".

5. We wait perhaps a couple of seconds and you are connected to your wireless network.

ASUS is constantly expanding its range of wireless devices. The hero of today's article; ASUS RT-AC51U router. Its role, judging by the index, is to become the most accessible dual-band router in the line, ahead of the RT-AC52U, which was not particularly popular due to its high price and a number of existing shortcomings. The developers tried to do a little work on the bugs, but, in my opinion, they didn’t succeed. Firstly, the price turned out to be about the same; the difference of 200-300 rubles is not important. At the same time, the predecessor also included a USB adapter, which this model is not equipped with. So, it’s clear to say whether there is a benefit here or not; hard.
The hardware base of the ASUS RT-AC51U router is the same economical MediaTek MT7620A chipset, which is also now considered outdated. It works in tandem with the MT7610E radio module, which is responsible for supporting the 5 GHz band.
On the outside, the router was made in a classic case with a horizontal layout and 2 external antennas with a coefficient of 5 dBi. Unfortunately, they are not removable and it will not be possible to expand the coverage range of the WiFi network by installing more powerful or directional antennas.

The ports are also nothing outstanding; 5 Ethernet 10/100 (4 LAN+1WAN) + 1 USB 2.0
The bottom line is that we get an economical router with support for the 5 GHz band, the ability to connect 3G/4G modems and create home media server at a price of 4500 rubles. Expensive! Even if we take into account good quality materials and assembly of the case, the best firmware functionality, good stability; still expensive. This faster will be the choice of fans of the Asus brand. For 500 rubles cheaper you can buy a gigabit TP-Link TL-WDR3600 with 2 USB connectors or a Totolink A2004NS.
Setting up and connecting the router:
To log into the web interface of the ASUS RT-AC51U router, you need to open a web browser and enter the address in the address bar; 192.168.1.1. Login for access: admin;, default password: admin;. If the device has not been changed before or was reset to factory settings using the Reset button, then a special Quick Internet setup wizard should automatically appear. It's very standard for AsusWRT; simple and quite understandable. I have already spoken about it more than once and therefore they will not dwell on it. Therefore, we immediately go to the fully functional web interface of the router.
Internet connection
In order to set up connections with your provider, go to the Internet section; -; Connection;.
To this day, often found among Russian operators communications protocol that provides subscribers with access to the global web; PPP over Ethernet. For example, it is used in most branches of PJSC Rostelecom, as well as Dom.ru and TTK. To change it, you need to use the WAN connection type drop-down list; select this PPPoE option;:

Please make sure that Yes is checked; to automatically obtain IP addresses and DNS WAN. Next, you need to enter the authorization data that you were given upon connection in the Username fields; and Password;. Click the Apply button.
2nd most popular connection type; Dynamic IP. In order to configure it on the Asus router, just select the option from the list: Automatic IP;:

In the Connect to DNS server automatically field; the flag must be Yes;. Apply configuration properties.
Configuring the RT-AC51U router for Beeline deserves special attention. In this case, you must select the L2TP type;:

In parameters account you must enter a Username; (usually this is the number personal account Beeline) and password. In the VPN server field; you must enter the following:
Tp.internet.beeline.ru
Leave all other properties at their default values and click the Apply button.
WiFi network
For the Wi-Fi function on the router, you need to select the Wireless network section in the menu on the left; -; General tab;:

By default, in the Range list; The value is 2.4 GHz; this is an ordinary range that all devices can see; laptops, tablets and phones. Let's start with it. In the SSID field; We enter the name of the Wi-Fi network that clients will see. It can be any word, a set of Latin letters or numbers. Go down to the Authentication method; parameter. It is most accurate to set it to WPA2-Personal; With AES encryption;. After that, in the WPA Pre-Shared Key field; you need to come up with and register a password for WiFi. It will be requested from clients when attempting to connect. It is better to make it more complex and not shorter than 8 characters. Save the properties and select the 5GHz range;:

In principle, here it is necessary to repeat the same actions 100 percent; register the SSID and configure security. That's all.
Connecting digital television
If you are a subscriber interactive television from Rostelecom, Dom.ru or Beeline, then for its function on ASUS RT-AC51U, you need to go to the Local network menu;, IPTV tab;:

There are two possible options here:
1st; choose your own provider in a rather big list profiles of digital TV operators.
2nd; set properties manually. In this situation, you need to select an IPTV STB port in the list; select the number of the connector in which the set-top box is included. In some cases, it is also necessary to enable multicast routing.
But if your provider requires you to additionally specify a VLAN identifier for IPTV, then this will not work. At least on this version of the RT-AC51U firmware, since it does not support 802.1Q tagging. Maybe, naturally, support will be implemented later in other versions, but I don’t have identical information.
A year ago we got acquainted with the Asus RT-AC52U router, which was positioned by the manufacturer as the most affordable solution with 802.11ac protocol. This router offered a “100+300+433” scheme, so there was no talk of a significant increase in performance, but the presence of the 5 GHz band made it more comfortable to use wireless connection on modern smartphones, and the maximum advantage was given to models with a built-in 802.11ac controller. IN budget segment it is difficult to do without the restrictions and compromises that in this case wired ports and a 5 GHz access point configuration with a single antenna were performed. But, despite these features, it is difficult to call this model affordable. In this article we will get acquainted with the Asus RT-AC51U router, which, as the name suggests, is slightly lower in the line and has a lower price.
The device received the company’s traditional “diamond” case with two external antennas and one internal, a standard set of ports, expanded by one USB 2.0, and the MediaTek platform. Today, the MT7620A SoC, despite its age, is one of the most popular solutions in the entry-level segment, and the MT7610E radio unit is installed here to implement 802.11ac.
In the current product line, which includes more than sixty models, almost a third of devices support the 802.11ac protocol. The spread of this standard is also indicated by the use of such adapters not only in top smartphone models largest producers, but also in mid-level devices. Note that the configuration of the router in question is interesting for use specifically with smartphones, which in the vast majority of cases are equipped with only one antenna.
Contents of delivery
The device is packed in simple cardboard box. But even in the case of this inexpensive model The manufacturer used a combination of matte and glossy varnish in the design to attract attention. Also on it you will find photographs of the device, detailed specifications, connection diagram, description of main functions and other useful information.

The delivery set is traditionally minimal - a router, a switching power supply 12 V 1 A, one network patch cord, brief instructions, VIP registration card, CD with electronic versions of documents and utilities.

The warranty period for the router is three years, which is rare in such devices.
On the manufacturer's website in the technical support section you can find firmware updates, a recovery utility, electronic versions documentation.
Appearance
For this segment of devices, given the lack of need to pay special attention to cooling, it is quite reasonable that the manufacturer did not come up with anything new in design.

The router case is made of dark matte plastic and has dimensions of 190x124x31 mm excluding antennas.

The latter in this case are non-removable, with two degrees of freedom. They increase the depth of space required by the router by about three centimeters, and the length of the moving part is 145 mm.

The top cover of the case has a characteristic combination of rough polishing “metal-like” and “diamond” structure.

At the top we see the company logo and the name of the device printed in regular paint, and in the center, closer to the front edge, there are nine dim blue LEDs. In this model, among them there are individual indicators for each wired port.

At the bottom of the router you can see ventilation grilles, rubber feet and special holes for wall mounting. The latter allow you to secure the model in any position. There are grilles on the sides, but the front end is empty.

On the back there are two wireless antennas, four LAN ports, one WAN port, a WPS button, a USB 2.0 port, an input and a power switch, hidden button reset. The location of the ports is quite convenient, but for large USB devices you may need to use an extension cable.

In general, we can say that the case was chosen well for this device.
Hardware configuration
As we said above, the router is built on the MediaTek platform - the main processor MT7620A and a radio unit for 802.11a/n/ac at 5 GHz MT7610E with a maximum connection speed of 433 Mbit/s (channels 36 to 48 are supported). Volume random access memory The device size is 64 MB; a 16 MB flash chip is installed for firmware. The main processor contains a network switch with five 100 Mbit/s ports, a radio unit for 802.11b/g/n protocols at 2.4 GHz with a maximum connection speed of 300 Mbit/s, and a USB controller with one port version 2.0. The device is equipped with three antennas - two external ones are connected to different radio units, and the internal one is connected to a 2.4 GHz module built into the processor.
The microcircuits are not covered with radiators. Traditionally, the board has a console connector. However, given the availability of telnet access in the firmware, in most cases it will not be needed.
The main testing of the router was carried out with firmware version 3.0.0.4.376.3754.
Settings and features
Modern Asus routers use unified software, and we have long been familiar with its capabilities. AsusWRT is a fairly convenient, stable and multifunctional version of the firmware, which may be the envy of some other manufacturers.
For configuration, a web interface is traditionally used, designed in dark colors. At the top of the window there are quick links for changing the language (Russian is present), rebooting, changing the mode, updating the firmware, setting up wireless networks, managing external devices and others. It supports working with it via the Internet, using the HTTPS protocol, and quick setup assistants.

After logging in, the user sees a convenient “Network Map” page, which allows you to quickly assess the status of the device, determine the number of connected clients and external devices, check the CPU and RAM load.

To access the Internet via cable, IPoE, PPPoE, PPTP, L2TP modes are supported. The router can be used with IPTV services with a dedicated port or two for set-top boxes, Multicast broadcasts, and UDP proxy service. There is support for DDNS, IPv6, adding your own routes, NAT Passthrough for popular protocols. Providing access to local services via the Internet can be achieved through DMZ, UPnP and configuration own rules port broadcasts.

Settings for the local network segment include selecting the IP address of the router itself and specifying the operating parameters of the built-in DHCP server, including reserving addresses for clients.

Wireless access points have separate parameters for the 2.4 and 5 GHz bands. In addition to the standard set of network name, channel number and width, protection, it is possible to set the operating time of access points and other advanced parameters. Note that we did not find transmitter power adjustment in this model.

In the system options you can find an item to switch the action of the WPS button to disable wireless access points. There is support for WPS technology with a button and a PIN code, client MAC address filters and the implementation of guest networks (three additional networks With own parameters protection in each range).

Let us mention the presence of the QoS service. For the relatively powerful platform and 100 Mbit/s ports used, it may well be in demand, although it causes a significant increase in the load on the device’s processor. Also in the “Traffic Manager” section there are beautiful graphs for assessing current data transfer rates across interfaces.

Security features include a firewall, URL filters, keyword filters, and network service filters. Additionally, a firewall for the IPv6 protocol has been implemented. The Parental Control service allows you to set a weekly schedule, accurate to the hour, for Internet access for specified clients, determined by their MAC addresses.

From additional services This model also includes a VPN server with support for the PPTP and OpenVPN protocols and a VPN client for the PPTP, L2TP and OpenVPN protocols.

IN system settings provides for managing settings, updating firmware (including via the Internet), switching to access point mode, changing the administrator password, setting the clock, enabling telnet and remote access to the web interface.

Traditionally, there is a system event log (it is saved only in the device itself), a list of wireless clients indicating their operating modes, a list of leased IP addresses, a routing table, a list of ports forwarded via UPnP, a list of current sessions and IPv6 status.

There is also a section with network utilities useful for diagnostics. network connections. We also note the presence of the WOL service for “waking up” systems on the local network.

The router is equipped with one USB 2.0 port, to which you can connect storage devices, 3G/4G modems, printers and MFPs. If you need to work with several devices simultaneously, you should use a USB hub. In some situations, an active model with additional external power may be required.

For drives, you can use such popular file systems as FAT32, NTFS and EXT3. Access to data is provided via SMB and FTP protocols. In the second case, you can work with the server from the Internet. When the user rights control mode is enabled, each folder on the connected volumes is an independent separate shared resource, the rights to which are assigned to the accounts programmed in the router.

Support for a proprietary package management system (analogous to the popular Optware) allows you to implement two more functions - a DLNA media server and a file download system. In the first case, the user can select one folder to index, and the list of compatible formats includes most popular options, including jpeg, mp3, m4a, flac, avi, mp4, mkv and mpeg.
Uploading files by router to a connected HDD carried out via HTTP, FTP, magnet, ed2k, BitTorrent and NZB protocols. To manage the corresponding programs, a common web interface of the Download Master utility has been implemented.
The USB port is also compatible with 3G/4G modems, through which you can organize a main or backup connection to the Internet. The list of officially compatible models is relatively small, so you will need to be careful when choosing them.
There are two modes for working with printers and MFPs - only printing by standard protocol LPR or full access via a virtual USB port using a proprietary client for Windows operating systems.

Asus routers with USB ports also implement a set of AiCloud 2.0 services. They allow you to access data on connected drives and servers on a local network via the Internet from computers and mobile devices, and also synchronize information with cloud storage Asus Webstorage. Note that there were certain complaints about their work from a safety point of view.
Performance
With the connection configured to " Home Beeline“The router had no problems using the L2TP protocol. The access speed corresponded to the tariff plan and was more than 92 Mbit/s according to the website www.speedtest.net. Downloading files from the p2p network was also carried out on maximum speed more than 10 MB/s. However, 1000 or more connections combined with an L2TP connection is still a heavy load for the device. You will no longer be able to comfortably use other applications, the router interface becomes inaccessible, and the IPTV picture “scatters.” But if you limit the download speed and the number of connections in the client, the situation will be completely normalized. Note also that IPTV multicast broadcasts also work over a wireless connection.
We have already encountered the processor used in this router more than once. When running high-quality firmware, it is capable of providing routing in all modes with speeds close to 100 Mbit/s. Let's see how Asus managed to approach this. In the first graph we show the results of Internet speed testing for all connection modes.

As we can see, in most scenarios the device is capable of showing performance of more than 90 Mbit/s. Slightly lower than the expected speed in duplex modes, but we must take into account that in reality such a load is very rare, especially if we talk about the entry-level segment.
The model supports simultaneous work with the Internet and the provider’s network when working through an access server and does this quite efficiently, as confirmed by the second graph.

The following test allows you to evaluate the capabilities of providing remote access through the router’s built-in VPN server. Three options were tested: PPTP with and without encryption, as well as OpenVPN - on four Internet connection modes. The graph shows indicators averaged over three scenarios (reception, transmission and full duplex).

In the absence of encryption, this task is not very difficult - depending on the type of connection, you can count on 50-95 Mbit/s. Enabling MPEE 128 significantly reduces the performance - to 25-35 Mbit/s. The most complex option is deservedly OpenVPN, where the speed is about 10 Mbit/s. In this case, the speed is determined precisely by the capabilities of the router processor.
To test the network drive scenario, we used a USB 2.0 adapter connected solid state drive. Sections were created on it with file systems NTFS, FAT32 and EXT3. The testing consisted of measuring the speed of writing and reading a large file.

We see the maximum performance for EXT3, the implementation of which is, for obvious reasons, more efficient in firmware. Here the maximum results for 100 Mbit/s ports of about 10 MB/s are almost achieved. In second place is FAT32, which lags behind quite a bit. The rating ends with NTFS, which cannot boast of high write speeds due to the lack of this device commercial driver.
To test the speed of wireless access points, four devices were used - a computer with Asus PCE-AC68 adapters (802.11a/b/g/n/ac up to 600 Mbit/s at 2.4 GHz and up to 1300 Mbit/s at 5 GHz) and TP -Link TL-WDN4800 (802.11a/b/g/n up to 450 Mbps), as well as Zopo ZP920 smartphones (802.11a/b/g/n/ac up to 150 Mbps at 2.4 GHz and up to 433 Mbit/s at 5 GHz) and Apple iPhone 5S (802.11a/b/g/n, up to 72 Mbit/s at 2.5 GHz and up to 150 Mbit/s at 5 GHz). Clients were placed at a distance of about four meters of line of sight from the router. The last one was tuned to maximum performance(WPA2-PSK, 40 and 80 MHz channels in the 2.4 and 5 GHz bands, respectively, short guard interval). Let's look at the 2.4 GHz band first.

As we can see, the TP-Link adapter performed most effectively here, showing speeds close to the capabilities of the router’s wired ports. Second place goes to the Zopo smartphone, despite using only one antenna. The Asus adapter did not perform very well in this scenario. This was probably influenced by a significant difference in the configurations of the router and client, as well as the non-standard configuration of the router antennas. Completes iPhone list 5S, which in this case operates on a 20 MHz channel and has a connection speed of 72 Mbit/s.

The transition to the 5 GHz band does not have a significant impact on maximum results, which is due to limitations of wired ports. Three of the four participants performed almost perfectly here, but the Apple iPhone 5S lagged behind. However, for mobile devices the speeds shown are quite sufficient for all popular use cases.
In addition to our set of tests on the official firmware, we have carried out several measurements since version 3.4.3.9-095_full. The first graph shows routing speed indicators.

In single-threaded scenarios for transmitting and receiving data, the differences between the firmwares are not visible at all. Some difference appears in full-duplex modes, but given the synthetic nature of the tests used and the rarity of such loads in real work, we would not pay much attention to this. Much more important, in our opinion, is that alternative firmware easier to set up, has more features and is actively supported by the community.
Products third party developers Sometimes they may have problems implementing support for new equipment, in particular the 802.11ac wireless controller. Fortunately, this does not apply to the solution under discussion, which is confirmed by the test results of the Asus PCE-AC68 adapter and the Zopo ZP920 smartphone in the 2.4 and 5 GHz bands.

Differences in performance of access points compared to official firmware are observed, but, as with routing speed, we would not recommend considering them significant when choosing. Interestingly, the Asus adapter performed significantly better here in the 2.4 GHz range than on the official firmware.
conclusions
As we wrote at the beginning of the article, the share of devices supporting 802.11ac on the market is steadily growing. The cost of modern models of high-end routers with dual-core processors, three or even four antennas, USB ports 3.0 and support for gigabit connections has not changed much recently, except for the dynamics of the exchange rate, and these devices continue to be solutions “not for everyone.” At the same time, in most cases, if we talk directly about wireless communication, the real effect of powerful 802.11ac configurations is very difficult to achieve. This is due, first of all, to the fact that the choice of appropriate fast client adapters is relatively small. The demand for top-end routers could increase thanks to MU-MIMO technology, but so far we have only encountered it on paper.
At the same time, this generation of wireless protocols in itself may be of interest to many users. Firstly, the 5 GHz band is still quite free, and secondly, the use of four channels allows you to get high speeds even with one antenna, which is in demand among mobile clients.
In this situation, solutions with the configuration discussed in this article will be in demand. Asus router RT-AC51U - 100 Mbit/s wired ports and 300 and 433 Mbit/s access points. There’s not much to say about the router itself: convenient and practical design, high quality workmanship, multifunctional firmware. All this is consistent with the manufacturer's reputation and is not news to those who follow the market.
In terms of routing performance, the model matches its hardware characteristics and can be used on any popular tariff plans and connection options. As for the speed of wireless access points, tests show quite expected limitations due to 100 Mbps wired ports.
Separately, it is worth mentioning the possibility of installing an alternative firmware version on this model, as well as expanding the capabilities of the device thanks to the presence of console access and a USB port.
Unfortunately, simplifying the configuration did not lead to a drastic reduction in cost, but in this case this is due to the manufacturer’s brand. Among Asus models with 802.11ac support, the RT-AC51U router is the most affordable today. Note that competitors can find similar devices much cheaper, including those with gigabit network ports. However, firmware is also something to consider in this segment, and Asus certainly has one of the best.