Download the program and price list. Printing price tags, receipts, coupons from MS Excel database
Free program for printing price tags from the invoice in electronic form. Receive invoices from suppliers in Excel format, calculate markups and discounts, and print price tags.
The program for printing price tags "Price Tag" is the "ancestor" of the program for recording the movement of goods in the warehouse and retail trade "Movement of Goods" (DT). All the capabilities of the “Price Tag” program for importing invoices (Excel), calculating markups, designing templates and printing price tags are included in the “Goods Movement” program. Instructions for proper operation are covered in the built-in DT help.
The Price Tag program is simple, does not use databases, and does not store previously processed information, except for the last invoice. The program allows you to save the “graphic” result of your work - printed forms - in the form of files and transfer them to another computer for printing.
Download the archive with the program.
Installation
Unpack the archive to any location that is writable (the program saves the configuration in INI files).
You can go to your desktop, “My Documents,” but it’s better to go to a separate folder on your disk.
The program does not require installation and does not write to the registry.
Program description
The program allows you to:
Note The system must have MS Office or only MS Excel installed.
Changes in versions.
04.02.2015
Added functions for separate printing of rubles and kopecks in price tags.
The setting is made in the configurator (Menu - File - Settings - Variables) in the "Price type..." positions.
It is possible to separately set the price display type for
- price tags
- statements
- list of goods in the invoice.
When applying the price "in the style of" 123 rub. 45 kopecks." Some price tags will require modification, since the length of the line has increased and will not fit on the price tag. You will need to change the font size of the price print element for such price tags.
NOTE. In some price display elements, the font size is set by the tag
The values of the names of monetary units ("rub.", "kopecks") are changed on the same tab of the configurator.
Entering an electronic invoice

Click the "New invoice" button or select the appropriate menu item. In the window that opens, select an Excel file containing the invoice in electronic form. If there is no such invoice, then it can be made manually and then “pumped” into the program.
Note If the program took the wrong columns, incorrectly determined the first line in the electronic invoice or the number of lines, then these parameters can be set manually by clicking on the “Configure XL” button. If MS Office is installed correctly, a window with Excel will open in an additional form.
After receiving the list of goods from the electronic invoice, each line can be adjusted. To switch to the line editing mode, just double-click on the line or click the "Edit" button
You can edit all fields except quantity and wholesale (purchase) price. If the retail price is edited, a markup percentage will be calculated based on it.
Note The \Examples folder contains sample invoice files.
Invoice calculation
After entering the electronic invoice, you must select the markup percentage and discount percentage. You can select a markup/discount pair on the toolbar, in the “Markup” field. The button on the right allows you to enter a new percentage pair or delete unused ones.
If the discount percentage is specified as 0%, then the retail price will be the same as the discounted price.
The calculation is performed based on the list of selected products. Product selection is made by pressing the space bar in the line editing mode that is turned off (the button at the top). You can select all products or cancel selection using the buttons on the panel.
Price calculations can be carried out with or without rounding by checking the "Round prices" checkbox. If rounding is enabled, you can select "Large rounding" or "Rounding to 1 ruble"
If different discounts are assigned to different products, highlight those that need to be calculated and indicate the markup percentages. Click on the "Recalculation" button.
Formation of internal invoices

In small stores without division into departments and having one materially responsible person (MRP), it is not necessary to split the invoice by department.
If a retail outlet has two or more departments with different MOLs, then it is necessary to create several internal invoices for each MOL separately from one large incoming invoice.
To generate internal invoices from a list of goods with calculation results, select the goods from the list that should be included in a separate internal invoice.
Click the "Print statement" button, indicate the department where the goods will be sent and the person in charge who will receive the goods.
The first time you just need to enter a new value in the edit field, then you can select this value from the list.
The list generated from the list of selected goods is displayed in the preview window.
If you want to save the result for future printing, you can click on the “Save” button in the viewing form (the button with a floppy disk icon). You can print a previously saved form or file with price tags directly from this form (the "Open" button) or from the main program window through the menu
"File" -> "Print external forms"
Printing price tags

Before printing price tags, select the ones you are going to print. If no item is selected, price tags will be printed for all items in the list.
Select the type of price tag in the panel on the left. Click on the "Print price tags" button.
The program supports up to 9 types of price tags. During startup, the program scans the TXT\ directory for price tag template files of the following type:
.\TXT\ticket*.dcr, where * is a number from 1 to 9
For display, the name of the template is taken from its settings. The name can be changed in the designer in the template parameters
Note For proper printing, at least one printer must exist in the system, because... the program uses the printed sheet dimensions from the characteristics of the current printer.
Designer of templates for printing statements and price tags

You can launch the designer from the "Tools" menu. When you run "change price tag template", the template that is indicated in the left half of the main form in the "Price Tag View" panel will be selected.
There is only one form for the statement, so there is no need to select it.
Note Before you start changing templates, I advise you to save the existing ones. All templates are located in the \TXT folder and have the extension .DCR
Support
You can contact the author with questions. First of all, please read the material on this page.
To make and print price tags yourself, we want to please you - you can download a huge number of useful and convenient applications. For example, you should pay attention to an application such as MiniMax-plus - it will allow you to develop and print clear, beautiful, stylish, professionally made ones within a few minutes. One of the positive properties of the software is that users can add a logo and advertising of their own company, as well as key features of the product to attract buyers.
If you download the MiniMax-plus program for free, you can use ready-made templates and designs, the number of which exceeds two dozen. It should be remembered that the MiniMax-plus utility has flexible settings and parameters, as a result of which users can develop their own unique design, using their own drawings, images, and design elements. If you download the software, it can be used as a program for printing regular labels and labels. In general, MiniMax-plus is a high-quality program for printing price tags that will leave the most positive emotions.

If you wish, you can install another free utility that allows you to create manually or semi-automatically. The software is intended for use in both large enterprises and small companies. Among the positive qualities, we should highlight the possibility of adding company logos and advertising, which will have a positive impact on the image of the trading enterprise. If you need a simple and convenient utility for creating price tags, then try to install the specified application - you will not be disappointed.
A few words need to be said about the e-Price Tag program. This is a specialized software whose capabilities include keeping records of goods and price lists. If you download the utility, you will be able to maintain an automated directory, as well as store large amounts of information related to products, storing it in the most convenient form for further use.

The e-Price Book allows you to synchronize prices for goods in directories and price lists. Users can choose a unique font for each label, as well as add descriptions and barcodes. So, once installed, you will be able to create and print beautiful and informative ones for a wide variety of products.
We all know how important the price tag is for a product. It is important for the buyer that the price tag is clear and beautiful. You can order wonderful price tags from professional designers, or you can download ready-made beautiful templates for free and print them yourself.
Simple black and white price tags
In this section you can select a price tag with the number of digits you need. Any of them is filled in with a marker after printing. Price tags have already been reproduced on A4 sheet.
By printing such a price tag on colored paper or cardboard, you can match the interior or product of your store. If you need smaller price tags, this one contains 24 pieces. Very large price tags, of which there are 6 pieces on an A4 sheet, are in.
Price tags in Word
The price tags are made in bright red. In total, there were 9 price tags on the sheet with discount increments of 10, from 10, to 90%.
Yellow price tags
This price tag can be made reusable. To do this, you need to roll up the price tags in film (laminate) or cover them with tape. Then you can write the price on them with a marker, which can be easily erased with a cotton swab dipped in alcohol.
More posts on the same topic:
 Blank monthly calendar: download and print in...
e-Price Tag - a specialized program for printing price tags and labels. Allows you to maintain a directory of goods and record price lists.
Main features of the program:
- Maintaining a directory of goods and price lists: the program allows you to automate the process of maintaining a directory of goods, including storing data on goods, searching and sorting goods in the directory. Price lists are created based on data from the product directory. The program provides work with both one - the current price list, and with multiple price lists, saving price list data in files.
- Price control in price lists: the system ensures control of the relevance of prices in price lists. For example, if the current price in the product directory differs from the price in the price list, then such a product will be highlighted as a product with an inappropriate price. This allows you to avoid mistakes when setting the price of a product.
- Printing several price tags for one product: the program allows you to specify in the price list how many price tags to print for each product.
- Improved printing mechanism: e-Price Tag has an improved report printing mechanism, which allows you to automatically select the optimal font size depending on the volume of text printed on the price tag or label. This makes it possible to create the most informative price tags using large fonts to print product prices, names and other important information.
- Printing various formats of price tags: the program allows you to print various formats of price tags, labels and similar documents. The basic package of the program includes a set of price tags of various sizes and design styles. In addition, it is possible to create additional price tag templates of original design, in accordance with customer requirements. It is possible to place graphic images, logos and barcodes on price tags.
- Easy to use and install: the program has an intuitive user interface. To install e-Price Book, no additional settings are required, or the presence of any additional databases or other systems on the computer.
- Integration with other software products: e-Price Book allows you to download directory data from other systems. Price list data is stored in the generally accepted XML format, which ensures integration with other software products, including the ability to import from MS Excel spreadsheets.
Allows you to send MS Excel spreadsheet data to a MS Word document.
This article discusses the option when you need to place data from several table records on a Word document page. Using the above algorithm, you can generate pages for printing receipts, coupons, business cards, cards and other similar small-sized documents
Let's look at an example. Suppose there is a certain price list for the furniture store “World of Sofas”.
Let's also assume that there has been a price change and new price tags need to be printed. You can place six price tags on an A4 sheet. Like that

Let's look at the process of creating price tags step by step. It is assumed that the Excel database on the basis of which price tags will be created already exists. How to prepare an Excel file for merging can be found in the article. In short, the table intended for merging must meet certain requirements:
- there should be no merged cells in the table;
- all columns must have unique names to be used when merging.
It should be remembered that for more convenient further work when merging, it is recommended to set the parameter in Word Options - Advanced -Field shading to position Alwaysto distinguish inserted merge fields from plain text. When enabled, fields appear with a gray background. Naturally, this background is not printed.
Step 1. Design the document layout
On the tab Newsletters under the button Start merge choose an option Stickers. A dialog box opens Sticker Options, in which you can select a layout or create a new one based on existing ones.

Select the most suitable layout and press the button Create(or Settings). A dialog box opens in which the quantity, size and location of future price tags are specified. For our example, the values indicated in the figure were set

If the vertical and horizontal pitch is equal to the height and width of the sticker, respectively, then they will be located close to each other. In our case, there will be a gap of 5 mm between the stickers.
Click OK, return to the previous window and there too OK. After this, markup appears on the page in accordance with the specified parameters. Strictly speaking, the markup is a table in the cells of which the price tags will be located.
Step 2. Select a data source
On the tab Newsletters under the button Selecting Recipients choose an option Use existing list, in the dialog box we find the prepared Excel file and click Open. If there are several sheets in the Excel workbook, then in the next window you should select one with the table of interest to us -- OK. After this, merge service fields will appear on the sheet in the markup NEXT. They are necessary to move on to the next entry, so they CANNOT be deleted!

In addition, after selecting a source under the button Insert merge field on the tab Newsletters A list of fields in the record source table appears.
Step 3. Formatting the price tag
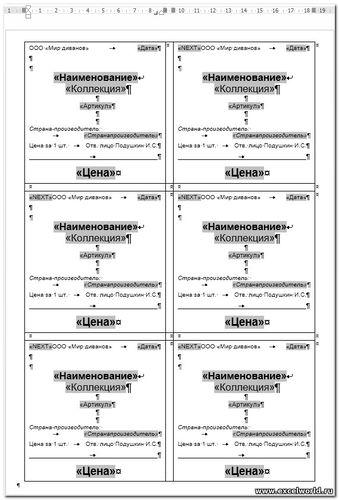
This step is the longest, since it is here that we form the appearance of the future price tag. Since the content is not automatically distributed to all table cells at once, it is recommended to completely format the price tag in one cell and then copy it to the rest. To view the appearance of the price tag while working, use the button View results on the tab Newsletters.
We type the text from the keyboard that will be present in all price tags, insert merge fields in the right places using the button Insert merge field, format the price tag, edit the merge field codes if necessary. For example, in our document we will need to modify the field codes date And Price.
Merge fields are code that can be seen by right-clicking on the field and selecting the command Codes/Field Values. For example, field code date it will look like this (MERGEFIELD "Date") . Let's add a format to the code to display the date in the usual form (MERGEFIELD "Date"\@"DD.MM.YYYY"}
Field code Price edit so that the price is displayed in monetary format (MERGEFIELD "Price"\# "# ##0.00 RUR." ) .
After the desired result is achieved, copy the contents of the first cell to other table cells without deleting the field NEXT.
 - click to enlarge image
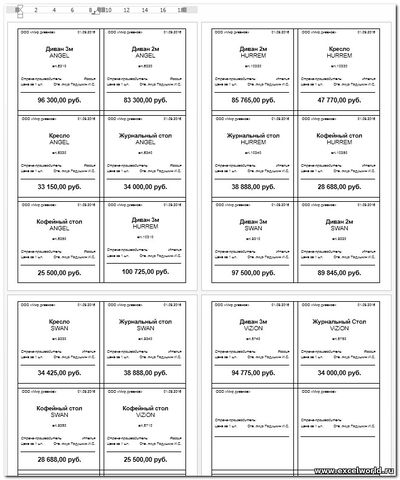
Step 4. Generating the final file with price tags for printing
In the last step under the button Find and Merge select the option either Printing documents, and then all sheets are immediately sent to the printer, or Edit individual documents, and then a new Word document is created, in which you can see and, if necessary, edit the completed price tags
 - click to enlarge image
In conclusion, we can add that the same steps can be performed using Merge Masters, which is launched from under the button Start merge.