Download changing the appearance of windows 7. How to return the standard theme to Windows? detailed instructions
IN latest version his operating system Microsoft has done a lot to improve the appearance of Windows 7. However, everything, even the best, gradually becomes boring and users begin to look for an opportunity to change their usual working environment. A banal change of desktop wallpaper does not count - today we will talk about a deeper change in the “windows”.
Themes and styles
The program does not require installation, but you must run it as an administrator ( Right click - Run as administrator). After this, the utility will automatically patch your system by doing available installation various topics registration Then you need to specify the path to the necessary files from the theme you downloaded and click on the Install Theme button. The topic will appear on the right in the list installed themes. Now you just need to select from the list the right option registration and click Apply Theme to change the appearance of your system.
Start button
To change the appearance of the Start button, use the program Windows 7 Start Button Changer. The utility comes with ten design options for the start button. After selecting the appropriate option, Explorer will restart and you will see the updated Start button.

Program icons
Change icons installed applications it is possible standard means Windows - by selecting the desired image in the file properties. But for everyone installed programs this will take quite a long time, so it’s better to use the application 7conifier, which not only allows you to change many icons in one fell swoop, but also comes with several eye-pleasing themes.

You can easily switch between sets of icons in the program interface, and also restore the default set if you followed the program’s advice and did backup copy at first start. With 7conifier you can create your own icon sets.
Well, as a result, after applying all the above programs, your system will become completely the new kind. For example, this one.
Some users are not satisfied with the standard view "Taskbars" in Windows 7. Some of them strive to make it more unique, while others, on the contrary, want to return the familiar look of earlier operating systems. But do not forget that having correctly configured this element interface to suit you, you can also improve the convenience of interacting with your computer, which provides more productive work. Let's see how we can change "Task bar" on computers with the specified OS.
Before moving on to describing options for changing the interface object under study, let's find out which specific elements in it can be changed:
- Color;
- Icon size;
- Grouping order;
- Position relative to the screen.
Method 1: Windows XP style display
Some users are so used to operating Windows systems XP or Vista, that even on the newer Windows 7 OS they want to see familiar interface elements. There is an opportunity for them to change "Task bar" according to wishes.


But in the properties window "Taskbars" you can make other changes to the specified element; it is not at all necessary to adjust it to Windows interface XP. You can change the icons, making them standard or small, by unchecking or checking the corresponding checkbox; apply different grouping orders (always group, group when filling, do not group), selecting the desired option from the drop-down list; automatically hide the panel by checking the box opposite this parameter; activate the AeroPeek option.
Method 2: Change color
There are also users who are not satisfied with the current color of the interface element they are studying. Windows 7 has tools with which you can change the color of a given object.
- Click on "Desktop" RMB. In the menu that opens, navigate to the item "Personalization".
- At the bottom of the displayed tool shell "Personalization" navigate by element "Window color".
- A tool is launched in which you can change not only the color of the windows, but also "Taskbars", which is what we need. At the top of the window, you must specify one of the sixteen colors available to choose from by clicking on the corresponding square. Below, by checking the checkbox, you can activate or deactivate transparency "Taskbars". Using the slider located even lower, you can adjust the intensity of the color. To get more options for adjusting the coloring display, click on the element "Show color settings".
- Additional tools will open in the form of sliders. By moving them left and right you can adjust the level of brightness, saturation and hue. After completing all necessary settings click "Save changes".
- Colors "Taskbars" will change to the selected option.


In addition, there are a number third party programs, which also allow you to change the color of the interface element we are studying.
Method 3: Moving the “Taskbar”
Some users are not satisfied with the position "Taskbars" in Windows 7 by default and they want to move it to the right, left or top part screen. Let's see how this can be done.


Method 4: Adding a "Toolbar"
"Task bar" can also be changed by adding a new one to it "Toolbars". Now let's see how this is done using a specific example.


As you can see, there are many options for changing "Toolbars" in Windows 7. You can change the color, arrangement of elements and general positioning relative to the screen, as well as add new objects. But this change does not always pursue only aesthetic goals. Some elements can make operating your computer more convenient. But of course, the final decision regarding whether to change the default view and how exactly to do this rests with the individual user.
In the latest version of its operating system, Microsoft has done a lot to improve the appearance of Windows 7. However, everything, even the best, gradually gets boring and users begin to look for an opportunity to change their usual working environment. A banal change of desktop wallpaper does not count - today we will talk about a deeper change in the “windows”.
Themes and styles
The program does not require installation, but you must run it as an administrator ( Right click - Run as administrator). After this, the utility will automatically patch your system, making it possible to install various themes. Then you need to specify the path to the necessary files from the theme you downloaded and click on the Install Theme button. The theme will appear on the right in the list of installed themes. Now just select the desired design option from the list and click Apply Theme to change the appearance of your system.
Start button
To change the appearance of the Start button, use the program Windows 7 Start Button Changer. The utility comes with ten design options for the start button. After selecting the appropriate option, Explorer will restart and you will see the updated Start button.
Program icons
You can change the icons of installed applications using standard ones. using Windows— by selecting the desired image in the file properties. But for all installed programs this will take quite a long time, so it’s better to use the application 7conifier, which not only allows you to change many icons in one fell swoop, but also comes with several eye-pleasing themes.
You can easily switch between sets of icons in the program interface, and also restore the default set if you followed the program's advice and made a backup copy when you first launched it. With 7conifier you can create your own icon sets.
Well, as a result, after applying all the above programs, your system will take on a completely new look. For example, this one.
I continue my series of articles about the appearance of Windows OS. This time I'll talk about customizing the appearance of windows, their borders, fonts and sizes.
There are many settings to change the design Windows windows. Perhaps not all users are satisfied with the standard window appearance, font or border. Or you just want to delve into the system appearance settings.
Windows has the ability to change themes. To do this, just click right click mouse over an empty area of the desktop and select Personalization. This menu provides a choice of different design themes, changing the color of windows, turning it on and off.
 Themes
 For expansion standard list themes, you can download any design themes you like from the Internet, but most of these themes do not have digital signature, so installing them will require some manipulation. I will talk about this in the following articles.
 Window color
 By clicking on the Window color button you can configure color scheme windows Can choose ready-made templates and configure the color set manually. Also, in this window you can turn transparency on and off.
On the menu Extra options design contains a huge range of functions for customizing windows.
 Appearance windows
 Now we will look at only some of these settings.
Scroll bar - the width of the scroll bar that is located on the right of each window
How does she look:
Window - Set the color of the window and the text inside the window.
 Changing the text color inside a window
 Framing—Changes the size of the frame around windows.
 Small frame
  Large frame
 Window control buttons - size of close, minimize, and full screen and windowed buttons
Example change:


Icon spacing (horizontal, vertical) - the distance between shortcuts on the desktop.
 Spacing between icons
 Icon—Change the font under icons and inside windows. The ability to select any font from the list and specify a more appropriate font size. If the names are not fully displayed, then you should refer to the previous paragraph and change the font size to a smaller one.
 Changing the font
 Selected menu item - the color of the cursor when selecting several files, as well as one selected element.
The design of Windows 10 contains elements of both versions 7 and 8 of the operating system. For example, the Start menu returned again, but in a slightly modified form. On the left side are recently open source software, and on the right side, instead of the list of applications, live tiles appeared.
Despite the fact that the developers listened to users and made the design more familiar - they changed the start screen, returned the Start menu, and so on, not everyone is satisfied with the existing system design. Therefore, there are several ways to make Windows 10 look like Windows 7.
Appearance
When the user first logs in to the desktop, they will see nothing but the Recycle Bin. In version 7 of the system, in addition to it, there were desktop shortcuts on the screen, network environment and user folders.
IN new version The system's themes and icons have changed. This parameter is the easiest to change. The Internet is full of topics, among which there is Aero 7 - the standard design of the seven. It changes in the same place as the shortcuts - in the “Personalization” section.
Taskbar Settings
In Windows 10, the taskbar contains some elements that were not there in version 7 - the search bar and task view. These functions are more convenient for tablets than for the desktop version and therefore can be hidden.
The search bar takes up a significant amount of space on the panel. To save space and so that the worker Windows table 10 was more similar in design to the seven, you can do two things: either remove the search bar completely, or make it in the form of a small icon that will be pinned to the taskbar.
For the first option, you need to right-click on the panel, click on “Search” and check the box next to “Hidden”. If necessary, you can call it with the Win button. To leave the search on the panel as an icon, instead of “Hidden”, select “Show search icon”.
View tasks button shows everything open processes and allows you to create a virtual desktop. You can remove it by right-clicking on the taskbar and unchecking the box next to “Show task view button”. You can see open programs and windows using standard command Alt+Win.
Returning the standard Start menu
You can make the Start menu like Windows 7 either using system tools or using third-party programs. You can return the Start menu using system tools or using additional utilities. In the first case, you just need to remove all the extra tiles from the right side of Start.
Open Start and right-click on the icons, selecting “Unpin from” home screen" The tiles will disappear and the menu will become more similar to version 7 of the operating system. You can also resize the menu to empty place The tiles didn't take up much space.

For quick access You can pin them to programs on the left side. Right-click on any empty space in the menu and select Properties. In the window that appears, go to the “Start Menu” and select “Settings”. Next, another window will appear with a list of applications that can be placed in the menu. This could be the Control Panel, Documents, and so on.
If this method does not suit you and you want standard menu Start, then only help here special programs. For example, you can use Classic Shell- This is the most popular utility.
Download any of the above programs, run installation file and follow the program instructions. Many of them have flexible Start settings. 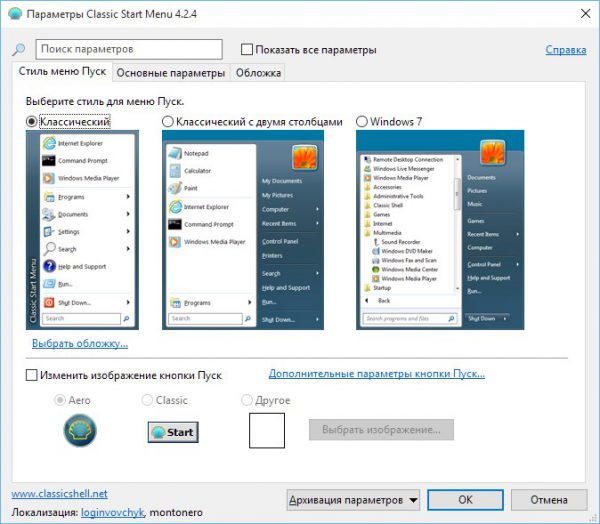
Windows 10 provides more opportunities to return to a familiar look than Windows 8. Users may like some innovations and decide to leave everything as is, some decide to completely redo the appearance.
Video