Firmware or flashing of HTC phone, smartphone and tablet. How to flash HTC Sensation phone with official firmware? this can only be done if you have s-off Firmware for the phone htc desire
Every smartphone owner wants to make their device better, turn it into a more functional and modern solution. If the user cannot do anything with the hardware, then anyone can improve the software. HTC One X is a high-end phone with excellent technical characteristics. How to reinstall or replace the system software on this device will be discussed in the article.
Considering the NTS One X from the point of view of the firmware capabilities, it should be noted that the device in every possible way “resists” interference in its software part. This state of affairs is due to the manufacturer’s policy, therefore, before installing the firmware, you should pay special attention to studying the concepts and instructions and only after fully understanding the essence of the processes proceed to direct manipulations with the device.
Every action carries a potential danger to the device! Responsibility for the results of manipulations with the smartphone lies entirely with the user who carries them out!
As with other Android devices, the success of HTC One X firmware procedures is largely determined by proper preparation. We carry out the following preparatory operations, and before carrying out actions with the device, we thoroughly study the proposed instructions, download the necessary files, and prepare the tools that are supposed to be used.

Drivers
The easiest way to add components to the system for interacting software tools with One X memory sections is to install HTC Sync Manager, the manufacturer’s proprietary program for working with your smartphones.


Backing up information
Using the methods described below for installing system software into the device in question involves erasing user data contained in the smartphone. After installing the OS, you will have to restore the information, which is impossible without a previously created backup. The official way to save data is as follows.


Necessary
To operate with HTC One X memory partitions, in addition to drivers, the PC as a whole will need functional and convenient software tools. Be sure to download and unpack to the root of drive C: the package with ADB and Fastboot. Below in the description of methods we will not dwell on this issue, implying that Fastboot is present in the user’s system.

Run in different modes
To install various system software, you will need to switch the phone to special operating modes - "BootLoader" And "Recovery".


Unlocking the bootloader
The instructions for installing modified firmware below assume that the device's bootloader is unlocked. It is recommended to carry out the procedure in advance, and this is done using the official method offered by HTC. And it is also assumed that before performing the following, Sync Manager and Fastboot are installed on the user’s computer, and the phone is fully charged.
- Follow the link to the official website of HTC Developer Center and press the button "Register".
- Fill out the form fields and press the green button "Register".
- Go to your mail, open the letter from the HTCDev team and click on the link to activate your account.
- After activating your account, enter your username and password into the appropriate fields on the HTC Developer Center web page and click "Login".
- In area "Unlock bootloader" click "Get Started".
- On the list "Supported Devices" you need to select all supported models and then use the button "Begin Unlock Bootloader" to proceed to further steps.
- We confirm our awareness of the potential danger of the procedure by clicking "Yes" in the request window.
- Next, check both checkboxes and press the button to go to unlocking instructions.
- In the instructions that open, skip all the steps

and scroll through the instructions to the very end. We only need a field to insert an identifier.
- We put the phone into mode "Bootloader". In the list of commands that opens, select "FASTBOOT", then connect the device to the PC using a USB cable.
- Open the command line and write the following:
cd C:\ADB_Fastboot

- The next step is to find out the device ID value required to obtain unlock permission from the developer. To obtain information, you need to enter the following in the console:
fastboot oem get_identifier_token

and start executing the command by pressing "Enter".
- Select the resulting set of characters using the arrow buttons on the keyboard or with the mouse,

and copy the information (using the combination "Ctrl" + "WITH") in the appropriate field on the HTCDev web page. It should look like this:

To go to the next step, click "Submit".
- If the above steps are completed successfully, we receive an email from HTCDev containing Unlock_code.bin– a special file for transferring to the device. Download the file from the letter and place the downloaded file in the Fastboot directory.
- We send the command via the console:
fastboot flash unlocktoken Unlock_code.bin
- Executing the command above will result in a prompt appearing on the device screen: "Unlock bootloader?". Place a mark next to "Yes" and confirm readiness to start the process using the button "Inclusion" on the device.
- As a result, the procedure will continue and the Bootloader will be unlocked.
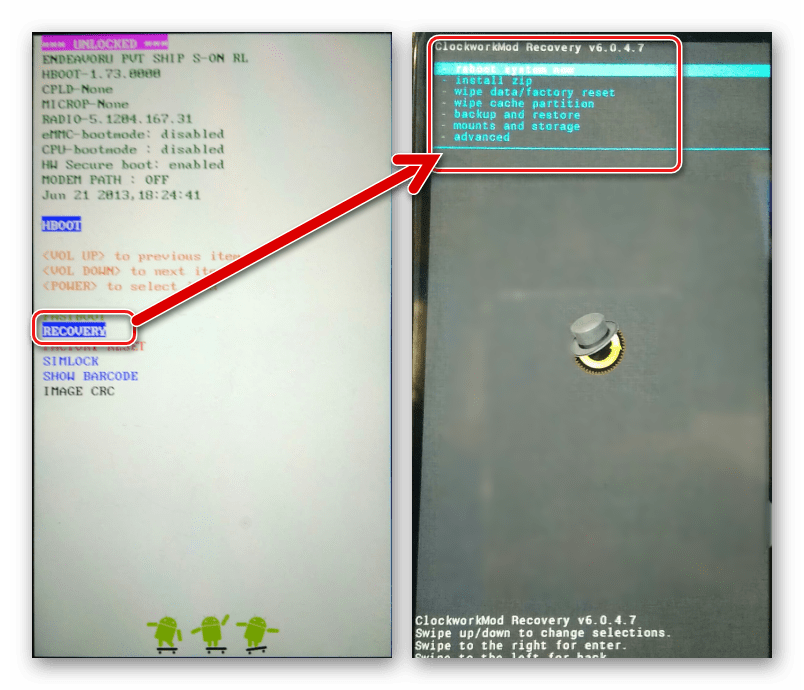
- Confirmation of successful unlocking is the inscription "***UNLOCKED***" at the top of the main mode screen "Bootloader".


Installing custom recovery
For any serious manipulations with the HTC One X system software, you will need a modified recovery environment (custom recovery). ClockworkMod Recovery (CWM) provides a lot of possibilities for the model in question. Let's install one of the ported versions of this recovery environment into the device.


Firmware
In order to bring certain improvements to the software part of the device in question, upgrade the Android version to a more or less current one, and also diversify the functionality, you should resort to using unofficial firmware.
To install custom and ports, you will need a modified environment, which can be installed according to the instructions above in the article, but first you can simply update the version of the official software.
Method 1: Android application “Software Updates”
The only method of working with the smartphone system software officially approved by the manufacturer is to use the tool built into the official firmware "Software Updates". During the life cycle of the device, that is, while system updates were released from the manufacturer, this feature regularly reminded itself of itself with persistent notifications on the device screen.

Today, in order to update the official version of the OS or make sure the latest one is up to date, you need to do the following.


Method 2: Android 4.4.4 (MIUI)
Software from third-party developers can breathe new life into your device. The choice of a modified solution lies entirely with the user; the available set of different packages for installation is quite wide. The example below uses MIUI 7 firmware ported to HTC One X, which is based on Android 4.4.4.
- We install the modified recovery using the method described above in the preparatory procedures.
- Download the software package from the following link:
- Place the zip package in the internal memory of the device.
- Loading the phone into "Bootloader", further in "RECOVERY". And we ALWAYS make a backup by selecting the corresponding items in CWM one by one.
- We do wipes (cleaning) of the main system partitions. To do this you will need an item "wipe data/factory reset".
- Let's go to "install zip" on the main CWM screen, indicate to the system the path to the zip package with the software, after selecting “choose zip from storage/sdcard” and start installing MIUI by clicking “Yes – Install...”.
- We are waiting for the success confirmation message to appear - "Install from sd card complete", return to the main screen of the environment and select "advanced", and then reboot the device into Bootloader.
- Unpack the firmware with an archiver and copy it boot.img to the catalog from Fastboot.
- We put the device into mode "FASTBOOT" from the Bootloader, connect it to the PC if it was disconnected. Run the Fastboot command line and flash the image boot.img:
fastboot flash boot boot.img
- Reboot into the updated Android using the item "REBOOT" on the menu "Bootloader".
- You will have to wait a bit for the MIUI 7 components to initialize, and then carry out the initial system setup.

It is worth noting that MIUI on HTC One X works very well.

Additionally. If the smartphone does not boot into Android, which makes it impossible to copy packages into memory for further installation, you can use OTG capabilities. That is, copy the package from the OS to a USB flash drive, connect it via an adapter to the device and, during further manipulations in recovery, indicate the path to "OTG-Flash".


Method 3: Android 5.1 (CyanogenMod)
In the world of Android devices, there are not many smartphones that have successfully performed their functions for more than 5 years and at the same time are popular with enthusiastic developers who successfully continue to create and port firmware based on new versions of Android.

Probably, HTC One X owners will be pleasantly surprised that a fully functional Android 5.1 can be installed on the device, but by doing the following, we get exactly this result.
Step 1: Install TWRP and new partition
Among other things, Android 5.1 brings with it the need to re-partition the device’s memory, that is, change the size of partitions to achieve better results in terms of stability and the ability to perform functions added by developers to the new version of the system. You can repartition and install a custom version based on Android 5 only using a special version of TeamWin Recovery (TWRP).


Step 2: Installation of custom
So, the new markup is already installed on the phone, you can proceed to installing custom firmware with Android 5.1 as the basis. Let's install CyanogenMod 12.1 - an unofficial firmware port from a team that needs no introduction.


- "Platform" - "ARM";
- "Andriod" — "5.1";
- "Variant" - "nano".
To start downloading, press the round button with the image of an arrow pointing down.


Unpack the package cm-12.1-20160905-UNOFFICIAL-endeavoru.zip and move boot.img from it to the catalog with Fastboot.

Fastboot flash boot boot.img

Then we clear the cache by sending the command:
fastboot erase cache


and enjoy the new version of Android, modified for the smartphone in question.

Method 4: Official firmware
If there is a desire or need to return to the official firmware from HTC after installing custom ones, you need to again turn to the capabilities of modified recovery and Fastboot.
We put the file there recovery_4.18.401.3.img.img, containing stock recovery.

fastboot flash boot boot.img

fastboot flash recovery twrp2810.img


fastboot flash recovery recovery_4.18.401.3.img
And also block the bootloader:
fastboot oem lock

In conclusion, I would like to once again note the importance of scrupulously following the instructions when installing system software on the HTC One X. Carry out the firmware carefully, evaluating each step before implementing it, and achieving the desired result is guaranteed!
To unlock the bootloader you need to do the following:
1) Remove and reinstall the battery.

2) Press and hold the Power and Volume Down buttons at the same time.

3) Using the sound keys, select “Fastboot” and press the power button.

4) Connect your smartphone to your computer using a USB cable.

5) Download and install the Android SDK (Software development kit). You can take the archive on the official site, there are versions for Windows, MacOS X and Linux. You may also need Java (you can download from the official website) and program HTC Sync, which includes the necessary drivers.

6) Unzip the Android SDK, create a new folder (for example, C:\Android) and copy three files into it:

a) To find these files, run SDK Manager.exe from the \android-sdk-windows folder.
b) Wait, after a couple of minutes the packages available for download will be displayed. Install Android SDK Platform and Android SDK Tools from them (or update if your SDK version is r11).
c) Once the installation is complete you will be able to find:
Adb.exe and adbWinApi.dll in the \android-sdk-windows\platform-tools folder.
Fastboot.exe in the \android-sdk-windows\tools folder.
MacOS and Linux users can download fastboot binary files from the following links:
- fastboot-mac
- fastboot linux

7) Open the command prompt (Start > Run > enter CMD or Start > Run > enter CMD, Win7 users can find the command prompt in Start > All Programs > Accessories > Command Prompt).
8) Go to the folder with the created files (for example, if the folder is C:\Android, then enter “cd c:\Android” in the command line).

9) Enter “fastboot oem get_identifier_token” in the command line.


10) You will see one of the screens above - this is the key. You need to right-click, select “mark”, select the block and right-click to copy. The key must start with
<<<< Identifier Token Start >>>>
and end
<<<<< Identifier Token End >>>>>
Then you need to go to the official website (registration is required), scroll to Step 10, insert your key into the My Device Identifier Token field, and click Submit.

11) After a few seconds, a message with the unlock key in the attachment - Unlock_code.bin - will be sent to the email address specified during registration.
We save the file in the folder with other necessary software (in the example - C:\Android).

12) Enter “fastboot flash unlocktoken Unlock_code.bin” into the command line and see a message similar to that shown in the screenshot above. Another message will appear on the smartphone screen:

It is a must read. In short, the meaning comes down to another repetition of “The dark side are they.” Once you start down the dark path, forever will it dominate your destiny”, which in Russian translation sounds like the well-known “Once you take the first step along the dark path, you will no longer be able to turn away from it...”:)
We read the notice about possible problems with third-party firmware, possible loss of warranty, deletion of all information from the device and other warnings and, if you have not changed your mind, use the volume control key to select “Yes” and press the power button. Ready! The smartphone will be returned to factory settings and the bootloader will be unlocked.
If you select “No”, the smartphone will reboot and no changes will be applied.
13) To lock the bootloader, enter “fastboot oem lock” in the command line. This will not restore the default lock, but will simply lock it, preventing any further changes. To reopen, you will need to repeat step 12.
Information taken from the site http://www.youhtc.ru
How to do it firmware you will find the answer in the question "HTC Wildfire firmware. How?"
- Liked answer: 1
How to flash HTC Desire?


HTC Desire is a communicator (smartphone) with the Android operating system. It was developed by HTC. Let's talk in more detail about how to flash HTC Desire in various ways.
Preparing for firmware
Firmware is the replacement or updating of a phone's software with a new one. Flashing a phone's firmware is the same as reinstalling Windows on a personal computer. To successfully install the firmware, you must complete the following steps:
- To obtain superuser rights (root rights) on the website unrevoked.com, download the “Unrevoked” program. Root rights are a special account in UNIX systems. The owner of such an account can perform all operations without exception.
- Launch the downloaded program and select the “Hboot Driver” file. Next, follow the instructions to install the HBOOT driver. You can download drivers for self-installation at unrevoked.com.
- Next, you need to disable Desire and enable it in the HBOOT system. This can be done using the Power and Volume Down buttons. Press them at the same time.
- Then the smartphone must be connected to the PC using a USB cable. We wait until the word HBOOT USB PLUG appears and go to “Device Manager”. Right-click on the Android 1.0 device and select the “Update drivers” section.
- Click on “Search for drivers on this computer.” Next, you need to select the folder into which the drivers were unpacked.
- Exit the HBOOT menu. The Volume Up, Volume Down buttons (moving through menu items) and the Enter button will help you with this.
- In normal mode, start your smartphone and enable USB debugging mode.
If you installed the HTC Sync application, uninstall it, but leave the drivers. Next, launch Unrevoked and connect your device to your PC. Give your consent when asked for information. After that, wait. The device will reboot and the message “Unrevoked 3 Painless root and reflash” should appear.
How to flash HTC Desire: main part
The procedure will be as follows: first download the firmware. You can download it on the website 4pda.ru. Recommended firmwares are RuHD and InsertCoin.
Next, you need to clear all user data. To do this, in the device menu, select “Settings” -> “Privacy” -> “Reset data”. This can also be done using the firmware recovery mode. To do this, go to the Recovery menu, select the “Wipe data/factory reset -> “Yes” section. Due to this, the firmware modules will not match.
How to install the firmware file for HTC Desire?
- In the Recovery menu, select the “install zip from sd-card” file. If necessary, disable or enable signature verification (Clockwork).
- Next, find the firmware zip, select it and run it.
- When the installation is complete, you will see “Installation completed”. Restart your smartphone and wait for the download to start.
Firmware installation usually takes about fifteen to thirty minutes. As a result, you should get a new version of Android.
How to expand memory for applications?
The phone firmware itself takes up a lot of free space. In order to download various applications, your smartphone may not have enough free memory. In this case, a special program will help you. For this:
- Download the "ROM Manager" program from the Market and run it.
- Next, find the item “Create partitions on the SD card.” Select ext partition size.
- The device should reboot and the partition will be created.
You can also read other articles on our site on similar topics: and.
HTC, while releasing multifunctional, stylish, reliable and practical gadgets, does not always care about long-term software support. In other words, a purchased new smartphone may, in practice, be left without operating system updates within a year. Based on this, it is not surprising that do-it-yourself Android firmware on HTC remains one of the very popular topics among owners of famous brand gadgets. In this article you will learn how to flash HTC at home without special skills and a lot of time.
The essence of the firmware
At the end of the process, you will see a green checkmark in the program window, indicating that the bootloader has been successfully unlocked.
A longer way to unlock the bootloader
To implement this method of opening the bootloader, you will need to download and unpack the HTC Sync and Fastboot archives into one directory. After that you go to the official HTC website to the “Bootloader” section and download the necessary additional software for your gadget model.
If your smartphone is not in the list, select “All Other Supported Models”. Next, you will be asked to register, after which you can begin unlocking the bootloader. For this:

Installation of recovery and subsequent uploading of a new operating system
The standard HTC recovery will not please many people. If you are aiming to change the firmware, take care of the new version of the recovery menu.
In practice, most custom recoveries provide their users with more functionality than standard software. Moreover, custom options greatly simplify working not only with official builds of the operating system, but also with custom options that require separate installation instructions.
Smartphone firmware via Flashtool
In order not to bother with firmware for a long time and quickly install the latest software on your smartphone, pay attention to the Flashtool program.
A distinctive feature of the program is its intuitive interface and the almost complete absence of the need for additional measures to prepare the gadget for installation of new firmware.
Installing firmware via SD card
A popular way to update software is to flash the firmware via an external SD card. This method of installing fresh software is perfect even for those users whose gadgets no longer turn on after a serious failure.
Moreover, this method involves taking into account some subtleties. These include the need to charge the gadget to at least 50%, as well as obtaining open access to the installation from external sources.
Firmware via ADB Run
Another excellent way to flash HTC smartphone firmware is to use the ADB Run program.
To flash the device with this utility, the user does not need to waste time learning any commands. All you need to do is use the intuitive interface, download the firmware and enable debugging of the device via USB.
Risks associated with reinstalling firmware
If you get deeply involved in the process of reinstalling or updating software manually, be prepared to encounter a number of serious errors that can have an adverse effect on the performance of the gadget. If the latest firmware is installed incorrectly or if the installation archive is irresponsibly selected during operation, failures may occur even in standard utilities.
Moreover, users who do the firmware themselves quite often encounter a “bricked” gadget, which requires a colossal amount of time to restore normal operating characteristics. To protect yourself from serious problems, use the recommendations of professionals and download additional software from trusted sources.
Restoring firmware on Android
Are you experiencing slowdowns, crashes, freezes, and rapid battery drain? Have you noticed that the gadget no longer works as quickly as the day it was purchased? Try restoring it to its original characteristics by resetting the user data.
The implementation of normal operating conditions for a gadget is not always associated with updating the firmware. Often, the user only needs to reset the device to return it to the required performance indicators.
Firmware for HTC HD2 smartphone on Android
HD2 is a cult gadget that, unfortunately, was produced by HTC exclusively with the Windows Mobile operating system. It has solid hardware performance, which is why its re-flashing on Android remains more than relevant.
Moreover, the procedure for changing software takes relatively little time. All you need to do is obtain the necessary archive for installation and use the instructions.
The need to flash a smartphone arises in two cases: if it starts to “glitch” (here we include “stopped turning on”) and if you have a desire to transform its functionality.
Types of firmware
There are several types of firmware:
- Official via computer. To install it, you will need to connect your device to your computer, go from your computer to the official website of the HTC Desire V company, download the executable file, run it and “obey” the instructions.
- Official via phone. You will need free Wi-Fi. Go to the “Phone Settings” menu and select “About Phone” → “Phone Update”. The firmware will be installed automatically.
- Alternative. This is an unofficial version created by smart users. It offers a lot more features for the HTC Desire V. Most likely, it's the one you'll choose. Therefore, we will talk about it further.
Possible risks
Firmware for HTC Desire V is a serious matter that requires care. Especially if you decide to flash Android using an alternative version.
There are a number of risks that you should be aware of before you handle your smartphone:
- Loss of warranty. Any unofficial HTC Desire V updates lead to the fact that no one at the service center will help you for free. Therefore, you take full responsibility for the operation of the phone only on yourself.
- The situation is getting worse. If you do something wrong or something goes wrong when installing the firmware, your smartphone may become a non-working device. This chance is small - 3 cases out of 100, but it is possible.
So be prepared for anything. If you are not confident in your abilities, then do not rush to flash HTC Desire V yourself.

Preparing for the firmware process
To begin with, it is advisable for you to obtain special Root rights. You can do this by downloading “Unrevoked” to your computer and installing the drivers.
- You need to turn off HTC Desire V and put it in HBOOT mode. To do this, hold down the combination of the “Power” and “Volume Down” buttons.
- Now you need to connect to your computer using a USB cable. HBOOT USB PLUG should appear.
- Open Device Manager and right-click on the unidentified Android 1.0 device. In the secondary menu that appears, select “Update drivers.”
- Now you need to click “Search for drivers on this computer” and select the folder in which the unzipped drivers are located.
- Exit HBOOT mode. To navigate through its items, use the “Volume Up” and “Volume Down” buttons, and the “Power” button replaces “Enter” - you can use it to select the desired menu item.
- Next, launch HTC Desire V in standard mode and enable the “USB Storage” feature.
If HTC Sync is installed on your device, you need to remove it, leaving the drivers behind.
- Launch “Unrevoked” and connect your smartphone to your computer. Check the “I agree to the terms” checkbox and wait while the program does its job. During this time, the android may be rebooted several times.

Main part
Now the HTC Desire V is ready for flashing the firmware. Then follow the following instructions:
- Download the firmware you like. We recommend RuHD.
- Check if everything is ready:
- you have Root rights;
- The firmware file has been downloaded and placed on the memory card;
- important data is saved to backup media;
- everything is fine with the USB cable;
- The smartphone is charged 70-100%.
To avoid mismatches between firmware modules, clear all data on HTC Desire V (full wipe). To do this, go to “Phone Settings”, select “Privacy” and “Reset Data”.
You can also do this through Recovery. Go to Recovery and select “wipe data/factory reset” → “Yes”.
- If you have already entered Recovery, then select the “install zip from sd-card” command. If not, launch it and click the desired item.
- Enable or disable (if required) signature verification (Clockwork) – the “toggle verification mode” item.
- Find the firmware zip. Launch it. Whatever is required in the instructions for the firmware, be sure to follow all the steps. Their order cannot be changed.
The correctness of the actions can be checked at this stage. The installation should begin and messages should appear on the screen. At the end of the installation, the message “Installation completed” should appear.
- Now you need to restart HTC Desire V and wait for the download to start.
Standard firmware installation takes about 15-30 minutes. If you decide to flash your device for the first time, the installation may take longer.

Memory expansion for applications
If you follow the correct steps described above, your smartphone should update to the latest version of Android.
However, after these manipulations, no more than 18 MB of free space will remain in the phone’s memory, which is needed to install peripheral applications.
To increase this figure to 512 MB, you need to create an additional partition on the memory card. There are many ways to do this. There are only a few of the most reliable ones.
The data from the memory card will be deleted! Don't forget to transfer them to another storage medium.
Method 1 – via smartphone
Download the special program “ROM Manager” from the Market. Launch it and find the option “Create partitions on SD card”. Select ext partition size. If necessary, also select a size for the swap partition. HTC Desire V will reboot and create the partition.
Method 2 - via computer
Download and install any of the programs for working with partitions on your hard drive. Remove all partitions from the memory card and create the following (do not change the sequence):
- main partition (FAT32 file system);
- if needed - swap partition (SWAP);
- ext partition 512 MB (file system Ext 3 or Ext 4).
Finally
With the correct firmware, your HTC Desire V should start working better, use less battery power, and gain several more useful features.
If something goes wrong, try to “reanimate” your smartphone yourself. We will tell you how to do this in the article. Sometimes it is worth contacting a service center for help.