Program for partitioning a Windows 10 hard drive. How to partition a hard drive and create a partition on it
Read, how to partition an HDD or SSD disk using the tools built into Windows 10. Detailed step-by-step instructions. The hard drive is one of the main elements modern computers, allowing you to record, process and store all information from the user and the computer control system. For user convenience, space on the internal hard drives segmented (“split” into sections). Partitioning is usually used for the purpose of separating files. operating system from other user files.
Content:
Hard disk partitions
Perhaps yours internal hard the disk already has two or three partitions. Computer specialist initially did all the work of creating the partitions for you. But there are times when you need to change the configuration existing section or split it into two or more sections. As it may seem at first, this is a very complicated process, but it’s not like that. And although the procedure hard section disk requires special care and caution, it is still simple enough that any responsible user can perform it. It also does not require the installation of third-party applications, which makes its use more convenient.
Device Manager has a built-in feature called "Disk Management", which allows you to divide your disk into partitions, and is quite easy to use. If you are using the Windows 10 Creators Update or higher version of the operating system, then you can use the function "Disk Management" to partition a USB drive or SD card. However, in this article we will only talk about the method division of hard disk.
So using our algorithm you can separate both internal and external hard disk. If you have installed solid state hard disk (SSD), it can also be partitioned in the same way.
Prerequisites
To partition a hard drive into "Windows 10" you must have administrator rights and have access to the hard drive connected to your operating system. If you plan to partition your external hard drive, make sure it is placed comfortably on a surface that will prevent it from accidentally being disconnected during the partitioning process.
Understanding Concepts
A hard drive is a mechanical element. To understand the principle of partitioning a hard drive, let's draw an analogy with an apartment. Imagine a studio apartment in front of you, when the entire space around is one large room and an adjacent bathroom. This is a blank hard drive when it is not yet partitioned, representing one large amount of storage space with one small partition for the recovery drive.
Suppose now you decide to turn this one-room studio apartment into a regular apartment, that is, add additional rooms. Essentially, what you decided to do is to divide your apartment into different parts, by analogy - to divide your HDD into sections. When you start laying walls to divide your studio apartment space, you have complete freedom of choice to decide where the first wall will go, that is, how big or small your first section will be. Once you have successfully partitioned your hard drive into two partitions, your options for partitioning your hard drive are reduced. And you need to be careful when you divide the next section.
Please remember that there is a limit to the number of partitions you can create. If your hard drive has a way to store disk partition information "MBR", you can create up to four partitions and no more. If your disk's storage method is "GPT", then you can create an infinite number of partitions.
Check how disk partition information is stored
To determine how information about disk partitions is stored, run the following actions. On your desktop, click right click mouse on shortcut "This computer" "Device Manager".

In the dialog box that opens, select the section « Disk devices» . You will see a list hard drives installed on your computer. Check required disk and right-click on it, select the link in the menu that appears "Properties".

In the dialog box " Properties" In chapter "Tom" click the button "Fill in".

All available information about your disk will be listed in the section "Disk Information". Review the line to see which disk partition information storage method is used on your drive.

Hard drive partitioning
To begin, on your desktop, right-click on the shortcut "This computer" and select the link from the pop-up menu "Control".

A dialog box will open in front of you "Computer Management". Select a section from the side menu on the left side of the screen "Disk Management".

In the middle pane of the dialog box, you will see a list of all partitions on the selected hard drive. In our case, we will create a section in an existing section "E". If you have a disk without partitions, then follow the same algorithm for it. Click on your unpartitioned drive (in our case, partition "E") right-click and select the link. Computer Management Service "Windows 10" will check which one maximum size disk space you can use to create a new partition. It does this to ensure that none of your files are lost after the splitting procedure is complete. The newly created partition will not contain any files.

For example, if you have a 1 TB hard drive with 800 GB of stored files, then you cannot and should not attempt to make partitions of 500 GB each. Computer Management Service "Windows" will not be able to shrink the volume beyond the area where the non-movable files are located. Therefore, after receiving the results of the available space for compression, select the size of the future partition, taking into account the proposed options. It's best if you don't have any saved files on disk, although this isn't always the case (as in our case).
Be careful when choosing the partition size - this is really the only tricky part. Make sure that the size of the new partition does not exceed the dimensions indicated in the line "Space available for compression (MB)". Next, the whole process is no longer difficult, click the button "Compress" to launch it.

Then grant Computer Management permission to assign new section, that is, assign a letter designation to the section. And also answer the service’s question about the need to format the newly created partition. It is better to format it right away to fully prepare the partition for work. Upon completion, a new section will appear in the middle menu bar "Computer Management" next to existing sections.
If the new partition appears as space "RAW", right-click on it and select format from the context menu. This completes the hard drive partitioning procedure. If you want you can share disk space your hard drive for the number of partitions you need. However, remember that the number of partitions you can create directly depends on how you store information on your hard drive (no more than four partitions for "MBR" and an unlimited number of sections for "GPT").
New computers or laptops are sold with an operating system installed, but often not divided into logical HDDs. In the Explorer or My Computer menu, only System C is displayed. But even if the hard drive is divided into partitions, their number and capacity characteristics often do not meet the user's needs. Tune comfortable work With technology you can if you divide the HDD into logical partitions yourself. Let's find out what needs to be done to partition the hard drive in Windows 10, and how to perform this procedure when reinstalling the operating system.
Built-in utility for partitioning a disk
The Windows 10 operating system gives users the ability to independently manage their disks using the built-in Disk Management feature. You can access it in several ways:Working with the built-in utility is simple. After downloading it, you need to do the following:  Formatting and creation process file structure on a new disk it will take some time - from 1 minute. up to 3-7 min. This is fine. The duration of the procedure depends on how long ago the user carried out defragmentation and cleaning. In order for everything to go quickly and without errors, it is better to complete these activities before dividing the space.
Using third party programs
Can be used to divide a hard drive into partitions and functional software products. For example: Acronis Disk Director, MiniTool Partition Wizard, Paragon Partition Manager and other tools. Among all the products offered for beginners, the AOMEI software will be the most understandable and easy to use. Partition Assistant. It has a Russian-language interface, a system of commands and folders similar to Windows. But most importantly - software It is distributed free of charge on the Internet and can be installed on the hard drive of a computer or laptop in the standard way.After installing AOMEI, it is better to reboot the equipment. Then open the program and follow these steps:  During the process, the computer or laptop will restart. You should not interfere with the operation of the program, otherwise the partition will fail with errors, which may lead to data loss and even reinstallation of the OS. The completion of the procedure will be signaled by the main program window appearing on the screen with active disks, including the new one.
Important! In Windows 10 (starting from the seventh version of the family) any systemic actions can only be performed by an administrator - a user with Administrator rights. If they are not there, the program will start running the process, but the space will not be partitioned.
Partitioning a disk into logical partitions when installing/reinstalling Windows OS
Easier and safer to share HDD space at the time of installation of the operating system. The process is simple and will take no more than 25-35 minutes. After installing the flash drive into the USB connector (or installation disk) and assigning it to the BIOS as “main”, the download of files will begin. At the stage “Where do you want to install Windows” proceed as follows: Important! When dividing local C, the above procedure is usually repeated 2-3 times. Depends on the required number of sections. Each new object is assigned its own volume. As soon as central block installer was displayed required by the user number of system objects, click “Next” to continue the installation.
When choosing a method of dividing into logical partitions, it is better to prefer the built-in functionality, especially for those users who are encountering the procedure for the first time. OS utilities will perform the operation without errors, since they carry it out under the guidance of the OS itself. When using third party tools you need to carefully monitor the correctness of their installation, the sequence of actions, etc. And the most important thing is not to interfere with the process, otherwise data loss (which may lead to the need to reinstall the OS) cannot be avoided.
IN Lately on laptops with installed Windows 10 you can often encounter a situation where the entire hard drive is represented by just one local drive C. This causes certain inconvenience, especially if in the future you have to reinstall the operating system, completely formatting the hard drive. In this article you will learn how to split a hard drive into 2 parts in Windows 10 without losing data. Moreover, we will do this using standard operating system tools without installation additional programs.
The process of splitting the system drive C into two local drives
It is worth noting that you can divide drive C into two disks by an amount equal to the free space on it. For example. If you have 200 GB free on your C drive, and the entire disk is 465 GB, then after partitioning, the size of your C drive will remain about 265 GB, and new disk D, which will be obtained by dividing drive C, will be about 200 GB in size.
So let's get started.
First you need to go to " Disk management". To do this, right-click on the “Start” menu and select “ Disk management«.
Go to disk management
The second way to get to " Disk management" - through " ", where you need to select " Administration» -> « Computer management" and on the left in the menu " Disk management«.
Here we find drive C, right-click on it and select “ Compress volume...»

Find and select drive C
A window will open in which you need to select the volume in megabytes that will be cut off from drive C to create a new local drive. This volume will be almost equal to the free space on drive C.

Specify the amount of space to be cut off from drive C
You should not cut off the entire available space from drive C. Leave at least 10 GB of the available space for drive C, otherwise it will be almost completely full after partitioning!
Specify the size and click the “ Compress«.
After this, an area called “Unallocated” will appear in the Disk Management window. Right-click on it and select “ Create a simple volume...«.

Selecting an unmarked area
A window with the creation wizard will open simple volume. Click the button " Further«.

New Volume Wizard in Windows 10
Then there will be a few more dialog boxes, in which nothing needs to be changed. Just press the button " Further«.

Specify the size of the new local disk

Finishing the process of splitting drive C into two disks without losing data in Windows 10

Specify the label of the new local disk

Select a drive letter
As a result, you will have created a new local disk, which was obtained after partitioning drive C. Now you can copy data from drive C to the new disk.
Like this in a simple way within a few minutes you can split your C drive into two drives without losing data in Windows 10 or operating system Windows systems.
The computer hard drive is a means of storing system and user data in particular. Sometimes, it is necessary to divide information into some large sections to avoid confusion. It is recommended to install the system on one partition, and user files, programs, etc. save to others. When purchasing a new PC, most often the hard drive is not divided into local disks (partitions), so you need to carry out this operation yourself. Let's look at how to properly partition a hard drive. For example, we will use Windows 7, which is the most stable among current versions(Windows 8, 10).
Before you begin the process of partitioning your disk, we recommend that you familiarize yourself with the following tips:
- For the OS, allocate at least 50-60 GB free space, otherwise normal operation you won't see the system. Of course, if you have a hard drive of 100-200 GB, then allocating that much space is too troublesome, but for systems starting from the “seven” you need enough memory.
- It is also better to take care of the path for saving files for the browser and torrent client; it is better to set the path for uploading files for them not on the system drive (by default), but on another more capacious partition. You should also understand that desktop content takes up space on the system disk.
- If you have a hard drive up to 1 TB, divide it into 3 partitions, if from 1 TB to 2 TB, divide it into 4 partitions, and more than 4 TB into 5 partitions. This is explained by the fact that when shaking large files to the hard drive, optimal partitioning will allow it to be recorded correctly.
- Don't use all of it available memory on your hard drive. It is necessary to leave some space “in reserve” to restore damaged clusters.
If you follow these tips, you can set up the separation once hard drive and don't worry about it anymore until you decide to expand the memory on your computer.
How to partition a hard drive in Windows 7?
To partition the hard drive, we will use a standard tool in the Windows operating system. It's called "Disk Management". To open this utility, you need to do the following:
Now let's move on to how to partition a hard drive in Windows 7. The instructions are as follows:

How to partition a hard drive in Windows 8, 10
On Windows example 7 we looked at the partitioning process. There will be nothing fundamentally new in the “eight” and “ten”, so you can use this procedure for this system as well. The only exception is that we will slightly adjust the tips to complete the task correctly:
- For system disk leave (add) at least 70-80 GB of information. Starting with “seven”, the system writes information about the current state to the local disk so that you can use system recovery if necessary. In addition, after many updates (including up to 8.1, 10), files are generated large volumes, which are protected by the system;
- Divide the disk into several partitions, do not leave 2 partitions. This will make it more convenient for you to handle files that are recorded on your hard drive, logically structuring them into sections.
How to partition a hard drive in Windows 7, 8, 10 using third-party programs
What to do if you don't trust standard means work with local disks? We suggest using third party application Partition Wizard. This application is free, does not require much space and is stable. Of course, its functionality is far from Acronis Disk Director, but for partitioning a hard drive it will be just right.
So, first, download it and then install it in a convenient location on your computer. When the program is installed, run it and wait while it loads necessary information about your system and hard drive.
An unallocated partition will be designated as "Unallocated". Right-click on it and click "Create".
When you run this command, you will need to provide the following information in the next window:
- Section title;
- Partition type (for example, logical);
- Drive letter;
- File system type;
- Volume.
Please note that in the case of a program that is built into the system - “Disk Management”, these operations are performed in different windows, but here, for convenience, everything happens in one window. For example, we created a new “Test” section with 400 GB on board. After creation, file system looks like this:
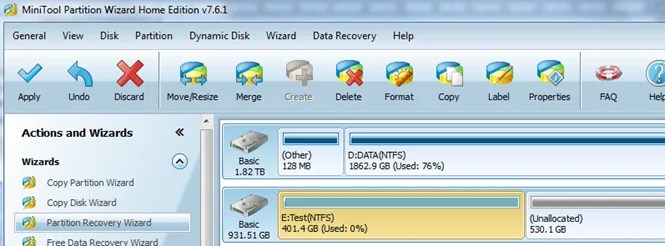
This process can be repeated as many times as you like until you run out of free unallocated space. Please note, it is very important to leave just a little free space so as not to harm the hard drive. To create another new partition, simply repeat the instructions. Don't forget to save your progress using the Apply button.
