Reasons for Windows 7 not starting. Black screen on boot
Why won't Windows 7 start? Loading the operating system may fail for a variety of reasons: due to a hardware failure, due to incorrect installed software, due to viruses, but most often due to problems in Windows itself. To make the description of the process of searching for the source of the failure more clear, we will first analyze the startup sequence of the seven.
Windows 7 Boot Steps
The launch of Windows 7 is conventionally divided into three stages, which are divided into phases.
1) OSLoader
OSLoader- the first stage of booting Windows 7, which begins immediately after executing the BOIS code. At the beginning of this stage, a small group of basic drivers is loaded, necessary for further reading data from hard drive. Further winload.exe, Windows 7 boot loader, proceeds to initialize and start loading the kernel, loads the registry hive into RAM SYSTEM and the next batch of drivers with the launch parameter BOOT_START.
Stage OSLoader lasts 2-3 seconds. By the time the system logo appears on the screen, it is already completed.
2) MainPathBoot
MainPathBoot- the main and longest stage of loading Windows. Consists of several phases. Visually, this stage continues from the appearance of the system logo on the screen and ends with the start of loading the desktop. The duration of this stage can vary - on average, from ten seconds to a couple of minutes.
PreSMSS phase
During this phase it is fully initialized Windows kernel 7, the plug and play hardware manager starts, previously running drivers are initialized BOOT_START and hardware drivers.
Errors that occur during this phase are often associated with problems with the main computer devices or their drivers.
SMSSInit phase
The phase begins when control is transferred to the session manager - SMSS.exe. At this time, the remaining registry hives are initialized and drivers are loaded with the “auto” launch parameter. At the end of the phase, control passes to the file Winlogon.exe- Windows user login program. Visually about the end SMSSInit indicates the appearance of a login prompt on the screen.
Crashes and slowdowns during this phase are often due to delays in loading the video driver or problems with the video subsystem.
WinLogonInit phase
This phase begins at the start Winlogon.exe(welcome screen) and ends with loading the desktop - starting work Windows shell- file Explorer.exe. During its progress, the system reads and executes group policy scripts and starts services (system and third-party). The phase can last quite a long time and be accompanied by high load processor.
Failures at this stage are often caused by services third party applications, including antivirus.
ExplorerInit phase
It begins with the start of the shell and ends with the start of the desktop window manager process. During this phase, desktop icons appear on the screen. At the same time, services are further launched, startup applications start, data caching, etc. All this is accompanied high load on hardware resources - hard drive, memory, processor.
Problems and delays during ExplorerInit often associated with insufficient power or equipment malfunction.
3) PostBoot
Stage PostBoot begins with the appearance of the desktop and ends after loading everything that is registered in autorun. During this period, the bulk of applications launched with Windows begin to work. After the end of the stage, the system goes into inactivity.
Delays and failures at the stage PostBoot are associated with startup programs, sometimes with viral activity.
Failures at various stages of system boot
As already briefly mentioned, problems at different stages of the Windows 7 startup manifest themselves in different ways: some are related to the hardware, others to the drivers, and others to the system registry or other boot-critical files. By understanding what processes occur at each stage of system startup, you can determine the range of possible problems.
Briefly about hardware problems
We will not dwell on hardware problems in detail, since our topic concerns Windows 7, but sometimes it can be very difficult to determine what is broken - a physical device or a system.
- Repeated failure of the same driver at the Windows startup stage may be due to a malfunction of the device controlled by this driver.
- A series of various errors (blue screens of death) that appear on different stages downloads, often due to problems random access memory.
- The absence of an image or artifacts on the screen, while the sounds of the system booting can be heard, may indicate problems with the video card.
- If Windows does not even start loading or suddenly stops - “freezes” in one place - it is possible that the hard drive is failing.
- Sudden shutdowns of the computer while Windows is loading indicate problems with the power supply or motherboard, and sometimes something else.
Corrupt boot files
In the early stages of Windows startup, damage or lack of important files may be manifested by the display of a phrase on the screen "Bootmgr is missing" or other error messages. But it happens that no messages are displayed, and the user simply sees a black screen with or without an arrow cursor.

Operating loader Windows systems 7 and 8, like other boot elements, are inaccessible to the user - they are located in a separate hidden section and cannot be deleted accidentally. However, the user may unknowingly format this partition by booting from external media. Then Windows will not boot.

The screenshot shows the boot hard section disk accessed from the recovery environment.
Another part of the files important for downloading is located on the system disk in the directory and subdirectories C:Windows. The system registry is also located there.
Registry corruption
If the registry is inaccessible or damaged, Windows may not even start loading.

The system itself will inform you about the failure and automatically launch the built-in recovery wizard. It often helps to identify and fix the problem - the registry will be restored from a backup.

But self-healing Windows 7 booting is not always possible. Thus, it does not occur if the recovery wizard cannot find backup copies of missing or damaged data. In these cases, the system needs the user's help.
Windows 7 startup recovery
Recovery Environment
Restoring the boot of Windows 7 is much more convenient than Windows XP, because the seven is equipped with a set of tools Windows Recovery Tools (WRT), which is accessible from the recovery environment. The recovery environment during Windows installation is installed on the hard drive, in separate section, and has its own bootloader. Therefore, it remains operational no matter what happens to the system.
To get to the recovery environment, select from the menu F8(menu additional options launch Windows 7) "Troubleshooting your computer".

To access the recovery options, the system will ask you to enter a password. If you do not have administrator rights or have forgotten your password, the environment Windows recovery 7 will have to be run from the installation disk.
After the window opens in front of you "System Recovery Options"- select the first option from the list: "Startup Recovery". After self-diagnosis, damaged boot files, registry or individual startup parameters will be restored.
This tool helps solve the problem in most cases, and should be used when you don’t know exactly why Windows won’t start.

Two ways to restore the system
If a failure occurs after installing the program, due to viral infection or due to changes in the registry, it will help to restore the seven’s ability to boot "System Restore". But it will only be useful if recovery checkpoints have been saved on the hard drive.

The way this tool works is familiar to many: you select a suitable checkpoint when the system was functioning normally and perform a rollback. Any changes made after the selected date will disappear and you will be able to boot into Windows normally.
If there are no points, but you saved backup copy system on an external drive, this tool will help "System Image Restore". Connect the media with the archive image to your computer and follow the instructions in the recovery wizard.

Manual registry repair
If the above manipulations did not help and Windows is unclear why, but does not start, you can try to manually restore the registry from a backup copy. A copy of the Windows 7 registry is automatically created every 10 days and saved in the directory C:WindowsSystem32configregback. To restore system functionality, you need to copy all 5 files from the above folder to the folder C:WindowsSystem32config, where the current registry files are located. It is better not to delete old files, but to rename them (as a last resort).
- From the list of options, select Command Prompt. Open it and run notepad with the command - you will need it to launch Windows Explorer.

- In the notepad window, go to the menu "File" and select the item from it "Open"

- Go to directory C:WindowsSystem32config. To see everything in this folder, change the file type from. txt on "all files".
- Files Default, Sam, Security, System And Software(without extension) - this is the current registry. Rename them to something - add at least an extension to them .old.

- Open the folder Regback with backup registry files and copy them one by one to the folder config.

- After you have copied everything, restart your computer. If Windows failed to load due to the fault of the registry, the problem will be solved.

The reboot button is at the bottom of the window "Recovery Options".

File recovery
Windows' own protected file recovery tool - utility sfc.exe, can be successfully launched in a recovery environment. Usually it is launched with the parameter /scannow- to automatically search and fix found problems. In the recovery environment you will also have to specify Extra options: location of the offline download directory and offline Windows directory(for a recovery environment, the Windows folder and the drive where it is located are offline directories) These are the options /offbootdir And /offwindir.
The complete command is written as shown in the picture:

IN offbootdir you need to specify the path to the system disk, and in offwindir- path to the Windows folder. Just remember that in the recovery environment, the partition letters may not match those that you see in Explorer when you normally boot Windows. The “correct” letters can be viewed by opening Explorer using a notepad.
If after this Windows 7 still for some reason does not start, you may have to manually restore the boot files and also overwrite the main boot entry(MBR) of the hard drive and boot code of the system partition. They will also help you with this own funds Windows.
To recreate the boot files, open a command prompt and run next command:bcdboot.exe C:Windows. Don't mix up the partition letter.

To rewrite the MBR and VBR (partition boot code), run the following commands: bootrec/fixmbr And bootrec/fixboot.

After that, check the download.
Very often, computer users encounter a problem when the Windows 7 operating system refuses to start. However, many of them do not understand why this can happen. In this case, it would not hurt to know the main and common reasons why this can happen, as well as the errors that occur with this problem and methods for eliminating them.
Error Disk boot failure, insert system disk and press Enter
This is the most common mistake, which appears after starting the computer. As a rule, instead of starting the operating system, the Disk Boot Failure error is displayed. This may indicate that, according to the operating system, the disk from which they wanted to launch it is not the system one. This problem can occur for various reasons, among which are the most common.
It very often happens that a disk is inserted into the drive or a USB drive is connected to the PC, and the BIOS is configured so that it sets this media to boot by default. This leads to the operating system not starting. In this case, you should try disconnecting everything third party drives such as SD memory, flash drives, smartphones, etc. You also need to remove the disc from the drive and then try to start the computer again.
Perhaps this time the operating system will start.
In addition, the problem may occur when the boot order is set incorrectly in the BIOS. In this case, the instructions from the method above will not be able to help. Even if the computer started normally in the morning and stopped in the evening, you need to check this option, since BIOS settings may go astray. This can be affected by a dead battery on the motherboard or power outages, as well as static discharges. When checking the settings, you need to verify that the hard drive is detected by the BIOS.
In addition, if the operating system sees the hard drive, you can resort to system startup recovery tools. This will be discussed a little below. If the system cannot detect the hard drive, if possible, you can try disconnecting the hard drive and reconnecting it. In this case, you should pay attention to the connection of the hard drive to the motherboard.
In addition, such an error may occur for other reasons, including problems with the hard drive itself, the presence of viruses in the system, and much more. Be that as it may, it is recommended to check all the methods described above. If nothing helps, then there is another solution to the problem, which is suitable for almost all cases when the “seven” does not want to start.
Error BOOTMGR is missing
This error can also appear when the operating system of the seventh version refuses to start. At the same time it appears BOOTMGR message is missing on a black screen. This error can appear for various reasons, including the activity of viruses, incorrect actions of the user himself, which led to a change in the boot record of the hard drive, or some other mechanical problems in the hard drive. Options for solving this problem can be searched on the Internet.
Error NTLDR is missing. Press Ctrl + Alt + Del to restart
This error manifests itself in almost the same way as the one described above. At the same time, the methods for eliminating it are slightly different from the previous one. To fix this problem, you can use special instructions that are easy to find on the Internet.
Windows 7 boots but only displays a black screen and mouse cursor
If, after starting the computer, the operating system desktop is not displayed on the screen and there is no “Start” menu, but only a black screen with a mouse cursor, then this problem can be solved quite simply. Very often this problem occurs after removing the virus using antivirus utilities or on your own. As a rule, not all changes that the malware caused were corrected, which led to the appearance of a black screen. This error can be fixed quite simply, as can be found on various forums related to this problem.
Troubleshooting Windows 7 startup errors using integrated utilities
In some cases, when the system refuses to start due to changes in the hardware configuration, incorrect shutdown PC or any other errors, when the PC starts, the system recovery screen will be displayed, with which you can try to resume starting the operating system.
However, if such a screen does not appear, then you can press F8 after the BIOS has loaded, but the operating system has not yet started loading. As a result, a menu will appear on the screen with the item “Troubleshooting PC”, which must be clicked.
After this, a notification will pop up informing you that the download of operating system files has begun. Then you will be prompted to set the language, where you need to specify Russian. Next you need to log in to your account. To do this, it is better to use an administrator account. If a password has not been set, then it can be left blank.
After these manipulations, the operating system recovery window will open, in which you can activate automatic search and eliminating problems that prevent the system from starting normally. To do this, you need to click on a special link.
After identifying all problems, the application will automatically eliminate all errors found that prevented Windows from starting. It happens that the utility does not find any problems.
In this case, you can resort to using the OS recovery function. If the problem with starting the operating system appeared after updating drivers or something else, this action may help. In principle, it is clear how this procedure can quickly resolve the problem associated with updating operating system components.
In general, these are almost all the main problems that can arise when the system refuses to start. If none of the above helps, then you should contact a specialized computer repair company.
Coming across an error like “Operating system not found” while booting your computer can be nerve-wracking. But, if you have 7 installed, then you have nothing special to fear. After all, such loading errors can often be resolved with just a few simple steps.
In many cases, the inability to boot Windows 7 may simply be due to an incorrect boot order in the BIOS. This can happen if you have more than one hard drive installed in your computer. Typically, entering the BIOS occurs a few seconds after turning on the computer by pressing a button Delete or by pressing the special function key. Once you enter the BIOS, make sure your Windows 7 hard drive is in the correct place in the boot queue. If you don't know where to look, read the instructions for your motherboard.
Another possible reason for your computer not detecting Windows during boot is a hardware problem. If the BIOS cannot detect your system drive, then make sure that all cables are connected to it properly. If your hard drive makes strange noises, like clicking and tapping sounds, then it may be broken. Finally, it is possible that your hard drive is experiencing data corruption issues affecting important system data, such as the Master Boot Record (MBR).
If you suspect your drive has failed, it's a good idea to back up important data, scan it for errors from another computer, and even consider purchasing a replacement drive. Trying to fix a boot problem on a damaged drive may result in data loss, so back up your data before you do anything.
The MBR and other important boot data can also be corrupted by attempts to install earlier versions of Windows other than Windows 7 (like Windows XP) or by third-party programs such as viruses. In the case of a virus, even before any “corrective” actions, it is recommended to scan the disk using an antivirus program. Otherwise, attempts to fix a disk with a virus may result in data loss.
Also, the appearance of messages about boot data corruption can be caused by incorrectly setting the active disk partition, which can come from excessive curious user Windows with administrative rights.
Fixing MBR and other Windows 7 boot problems is most quickly accomplished by using a Windows 7 installation DVD. But if you don't have one, then an alternative is to use a Windows 7 system repair disc, which we'll show you how to create below.
If you don't have either an installation DVD or a recovery disc, then do yourself a big favor by creating a recovery disc now to avoid unnecessary headaches in the future.
Fix Master Boot Record (MBR)
Step one: Turn on your computer by booting from either the installation Windows DVD 7, or from the Windows 7 system recovery disc. Please note that to boot from DVD, you may have to change the boot order in the BIOS.
Step two: When booting from your installation disk or recovery disk, you may be asked to select a language. Select it and then continue downloading. If you are using the installation DVD, when prompted below (or similar in another language), select Repair your computer.
Step three: It will take the computer some time to search for installed Windows, after which you will be provided with a list of possible recoverable Windows. Select the appropriate installation and continue. If, by chance, a problem is discovered in one of your Windows installations at this early stage, the system may ask you if you want it to automatically fix it. Here you can decide for yourself - whether to allow the system to correct itself or not? If you do not want automatic correction, then simply select “no” (No).
Step four: Once you reach the system recovery settings screen ( System Recovery Options) as shown below, you will come across a list of choices that can help you in repairing your damaged Windows 7
If you wish, you can first try the Startup Repair option, which often automatically solves many boot problems. However, in this article, we will use the Command Prompt option to solve our problems manually. Therefore, to continue, click on Command Prompt.
Step five: Once at the Command Prompt, type the following command and press Enter:
In case of her successful implementation, you will see a corresponding welcome message like “The operation completed successfully.” This is what you need! Your MBR has been restored!
Even though the above command fixes the MBR (and sometimes that's enough), there may still be an error with the system partition's boot sector and Boot Configuration Data (BCD). This may happen if you tried to install another operating system in addition to Windows 7, such as Windows XP. To write a new boot sector, try the following command:
If your Windows 7 is still not detected when you boot your computer, or you want to include more than one operating system in the system boot list, try the following command to rebuild your BCD:
bootrec.exe /RebuildBcd
The above command will scan all your drives for other operating systems compatible with Windows 7 and will allow you to add them to the system boot list. If this doesn't work, then you may need to backup your old BCD folder and create a new one using the commands below:
bcdedit /export C:\BCD_Backup
c:
cd boot
attrib bcd -s -h -r
ren c:\boot\bcd bcd.old
bootrec /RebuildBcd
Some users simply delete the old one boot folder and try the above steps to solve their downloading problems. But it is not recommended to do this.
How to change active partitions
After deliberately changing the active partition on our system drive during system boot, we encountered a BOOTMGR is missing error, which prevented us from booting Windows. This is a common error that occurs when you start “playing” with partitions on the system disk. And solving it can cause a serious headache if you don’t prepare for it in advance.
To reverse the active partition, use your Windows 7 recovery disc or installation DVD and follow the steps below.
Step one: Follow the above steps (one through four). This should take you to the Windows recovery environment command prompt.
Step two: Type DiskPart and then press Enter.
Step three: Type List Disk and press Enter. This command will list all the drives connected to your computer and assign numbers to them.
Step four: Enter Select Disk x, where x is the number of the disk containing the partition you want to make active. Press Enter.
Step five: Type List Partition and press Enter. This will allow you to see a list of partitions on the selected drive. Determine which section you want to make active.
Step six: Enter Select Partition x, where x is the number of the partition you want to make active. Press Enter.
Step seven: Now just type Active and press Enter. This command will make the section you selected active.
How to create a Windows 7 system repair disc
Windows 7 makes it easy to create your own system recovery disk, if, of course, you already have the operating system installed and running.
Step one: Click on the Start button -> Programs -> Maintenance -> Create a system repair disk.
Step two: Insert a blank CD or DVD into your optical drive.
Step three: Click on the create disk button and let the program do its job.
Just what you need! The program only needs to write 140-160MB of data to disk (depending on the type of operating system), which should only take a few minutes. If you don't have optical drive CD/DVD-R that you could use to create a recovery disk (and for later use), then you can download an ISO image of the Windows 7 system recovery disk and then use it to create a bootable USB flash drive.
How to create a bootable USB flash drive with a Windows 7 system repair disc
Step one: Download the Windows 7 system recovery disk image ().
To download you will need a torrent client, like. Alternatively (if you have a DVD drive) you can use installation disk with Windows 7 or the Windows 7 system recovery disc. In this case, you should skip directly to step seven.
By the way, using the Windows 7 installation disk in the seventh step, you can not only restore the system, but also install Windows 7 from a USB drive, which can be very useful if you are a netbook user.
Step two: Open a command prompt with administrator rights. To do this, click on the Start button -> Programs -> Accessories -> right-click on Command Prompt and select Run as administrator.
Step three: After confirming all UAC prompts, you should be at the command prompt. Make sure your USB flash drive is connected to your computer, then type DiskPart and press Enter.
Step four: Type List Disk and press Enter. Determine which number corresponds to your USB flash drive. In our case, the USB flash drive corresponds to Disk 1. We determined this by the capacity of the flash drive, which we have is 2GB.
Step five: Enter the following commands in order, changing the disk number to your own. Warning - executing the commands below will erase all data on your USB flash drive or drive of your choice.
Select Disk 1
Clean
Create Partition Primary
Select Partition 1
Active
Format FS=NTFS
Step six: Once DiskPart has successfully formatted your USB flash drive (which may take a few minutes), you need to enter the following commands:

Step seven: Now you need to copy the contents of the ISO image (or DVD) you downloaded to your USB flash drive. It's just a couple of folders and a file. To extract files from an ISO image you will need some kind of program, like.
Step eight: Now that the files have been copied, you need to make your USB flash drive bootable. To do this you need to download a small file. This file can also be found in the boot directory of the Windows 7 installation disk. After downloading, place bootsect.exe in the root folder of your USB flash drive.
Step nine: Back at the command prompt, you need to change the current directory to the root directory of the USB flash drive. In our case, the flash drive corresponds to the letter E, so we will use the following commands:
e:
bootsect /nt60 e:
The bootsect command will add compatible boot code to the specified volume. If everything goes well, you will receive a bootable, recovery USB flash drive. However, when using it, do not forget that it must be indicated in the BIOS boot list.
Many computer and laptop users have probably encountered problems loading Windows 7. The operating system simply refused to boot and gave an error. In such cases it is impossible to even enter Safe mode By F8.
The first thing that comes to mind in such situations is reinstalling Windows itself. The procedure is simple and well described in the manuals: Installing Windows 7 and many others.
Reinstallation will solve the problem with loading the system, but you don’t want to lose documents, programs, you don’t want to set everything up again, installing drivers and applications, as well as configuring them can take a lot of time.
Comment: This guide does not cover hardware problems such as problems turning on the laptop itself, problems with the image, and so on.
Fortunately, there is a simpler way to solve the system boot problem. Bootloader corruption is usually the cause of system boot problems. Windows, disruption MBR. To restore the system, you need to restore this same bootloader and MBR. How to do this will be described below.
Restoring Windows to Normal Boot
MBR and bootloader recovery process Windows 7 almost completely identical to that for Windows Vista. This means that the recommendations described below can be safely applied to recovery Windows Vista.
Let's begin. First of all, we need a boot disk or flash drive with the distribution kit Windows 7. How to prepare them is described in detail in the manuals: Installing Windows 7 with USB flash drives on a laptop, netbook or regular PC
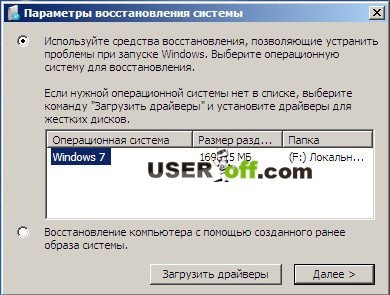
Now you should select the item System Restore at the bottom:

After this, a search will begin for installed copies of Windows on your hard drive:

As a result, the wizard should find the installed Windows 7. Select it and click Further:

The Windows recovery menu should appear:

Let's look at what each point is for:
- Startup recovery- recovery of Windows bootloader and system files
- System Restore- restoring the system from restore points. Restore points are created automatically when important system updates are installed, and can also be created manually by the user
- Restoring a system image- restoring Windows from a disk image
- Windows Memory Diagnostic Tool- checking RAM for errors. Quite a useful thing.
- Command line- command line for manual recovery
The first two points, as well as the last one, are of interest to us. Let's first consider Startup recovery. This is the easiest way to restore normal system booting. Let's launch it. The diagnostics should run:

After some time the problem will (or will not) be fixed:

Let's now look at the second menu item - System Restore. Let's try to restore the system from restore points. To do this we launch System Restore:


Now select the last restore point and click Further:

Click on Ready We agree with the warnings:


Reboot your laptop or computer.
P.S. It is not always possible to solve the problem using the methods described above; therefore, you will have to start analyzing the text of the error message that appears during PC startup and look for alternative options.
Windows 7 won't boot
A message with the text “BOOTMGR is missing” indicates that the Windows 7 operating system boot loader is damaged or missing. To solve this problem, you will need a Windows 7 installation disk or a disk with ERD Commander (32bit or 64bit, corresponding to your OS), which can be found in. In the “Boot device priority” section of the BIOS settings, assign the first boot device CD/DVD drive. Then boot from the Windows installation disc and select the "System Restore" menu item. From the list of installed operating systems (if you have several of them), select the one you need and click the “Next” button. In the “System Recovery Options” window that appears, there are two items - “System startup recovery” and “Command line”, you will need them. The first option will automatically fix the problem with starting the operating system, and if it fails, you will have to turn to the second. At the command prompt, type “bootrec /rebuildbcd”, press “Enter” and agree to make changes to the boot configuration data by alternately pressing the “Y” and “Enter” keys. After that, all that remains is to create a new one boot sector using the console command “Bootrec /FixBoot” and restart the computer.
Compressed Partitions
As a result of erroneous compression of the partition with Windows 7 boot files, the message “BOOTMGR is compressed” may appear. The ntfs.sys file system driver, which is responsible for working with compressed disk partitions, begins to operate much later than the Bootmgr.exe loader. IN in this case You will again have to turn to the help of the Windows 7 installation disk, in the command line of which you need to sequentially run a number of commands:
- expand bootmgr temp
- attrib bootmgr -s -g -h
- del bootmgr
- ren temp bootmgr
- attrib bootmgr -a +s +r +h
- bootrec/fixboot
Windows XP won't boot
The error “NTLDR is missing” indicates that the NTLDR file, which is the Windows XP loader, is damaged or missing. Unlike BOOTMGR in Windows 7, which is stored in a separate hidden partition, the NTLDR file is located on the same drive as the operating system. It happens that inexperienced users mistakenly mistake system files with names unknown to them for malware and without a doubt remove them. This fate often befalls the innocent NTLDR, as well as another critical file for successful loading of the OS - ntdetect.com. To solve the problem, you will need a Windows XP installation disk. At the very beginning of the download process, you must press the “F10” key to get into the recovery console. With its help, you need to go to the Windows installation disk using the command “X:”, where X is the letter of the corresponding optical drive. Then all that remains is to copy two missing file by running the commands:
- litter i386\ntldr C:
- litter i386\ntdetectcom C:
This method is also effective in case of loss of any other system files, copies of which can be found on the Windows 7 and XP installation disks, respectively. The “NTLDR is compressed” error rarely appears because it only affects computers running Windows XP without SP2. It can occur in cases where there are too many files stored in the root of the C: drive. A similar problem with NTLDR boot loader compression is solved in the same way as if it is damaged or deleted - by copying the original file from the Windows XP installation disk.
Boot device not found
Error message appears “No bootable device” and its many variations (“Boot device not found", "Invalid boot device", "Non system disk or disk egor", etc.) indicate that the computer has not even started to start the operating system, since it does not see the boot sector or even the hard drive. To understand where the problem lies - at the software or hardware level, just go to the already familiar “Boot device priority” section of the BIOS settings. If the hard drive is not among the suggested options, then the problem is related to the hardware. The SATA or IDE cable or hard drive power cable may have come loose, or the HDD may have failed. If the computer normally recognizes the hard drive, the reason is software in nature and lies in the master boot record (MBR) - either damaged or missing. Unlike the fix options discussed above, this situation is relevant for both Windows 7 and XP. After booting from the installation disk, run the command in the recovery console: “bootges /fixmbr” (for Windows 7) or “fixmbr” (for Windows XP).
Driver error
Windows critical error messages, which are called “BLUE Screen of Death” because of the background color, are quite common problems in Windows XP, but in Windows 7 they tried to make the system more reliable in this regard. Reason BSoD There may be malfunctioning hardware, such as RAM. Most often, early boot BSOD messages appear after updating device drivers and contain the text “DRIYER_IRQL_NOT_ LESS_OR_EQUAL” along with a file name with the SYS extension. To delete problematic driver via Device Manager, you can try to start Windows in safe mode, since it uses a minimal set of drivers. To do this, press the “F8” key while loading the OS and select “Safe Mode”. If you still get the blue screen of death when booting into safe mode, you need to go back to previous version driver with which there were no problems. This can be done using a restore point, if one was created previously. In Windows 7, to do this, press the “F8” key while the OS is loading and select “Troubleshoot computer problems” in the menu that appears. After this, you will be taken to the exact same “Recovery Options” menu as when using the Windows installation disk. Next is the “System Restore” item, where you can select one of the available rollback points.
Corrupt bootloader file
An error like “Windows could not start because the following file is missing or corrupt: Windows\System32\filename.dll” is specific only to the Windows XP operating system. It may be caused by damage or lack of configuration file loading Boot.ini, which is not used in the new OS version. You can solve the problem using the “bootcfg /rebuild” command in the Windows XP recovery console, which will correct an existing one or create new file Boot.ini. The absence of other files in the system, primarily drivers with the SYS extension, occurs in both Windows 7 and XP. Most effective method To solve the problem - return the file to its place by looking for a copy of it on the Windows installation disk, borrowing it from another computer with the same OS version, or look for the file by typing its name in any Internet search engine. If you don’t have a second PC at hand, then to search, download and copy files you will need a LiveCD with an OS that does not require installation. One of the most convenient options is. The exception is the system registry files System, Software, SAM, Security and Default, which are stored in the C:\windows\system32\config folder. It will not be possible to replace them with copies from another computer, so the only option is to roll back to a restore point. In Windows XP, to do this, you first need to load the operating system with at least standard registry branches, and only after that start the OS regeneration process. To do this, go to the Windows XP recovery console, as described above, and run a number of commands (take the System registry file as an example):
- md tmp
- litter c:\windows\system32\config\system with:\
- windows\tmp\system.bak
- delete c:\windows\system32\config\system
- litter c:\windows\repair\system c:\windows\
- system32\config\system
Diagnostic and repair utilities
Many Windows boot problems can be caused by corrupted hard sector disk (badblocks). It will help to check the hard drive MHDD program, which runs from disk (the image can be downloaded from the link). In the program menu, you need to select the hard drive number from the list and start scanning sectors for errors and correcting them - “Remap | ON". Badblocks ( broken blocks), as a rule, are concentrated at the beginning of the hard drive, so it is worth moving the OS partition away from the problem area. Suitable for this boot disk with the partition editor MiniTool Partition WIZard NOT. (in the program menu, select “Partition 1 Move/ Resize”). BSOD can also be related to RAM. A free application allows you to test RAM modules

There are at least three common mistakes that lead to problems with loading Windows 7. When errors occur, the system displays on the monitor screen short message, which indicates a problem. It is these small guidelines that we will be guided by when solving problems that arise.
Perhaps the most popular error is Disk boot failure, insert system disk and press Enter
It is characterized by the following situation: you turn on the computer, but instead of the usual loading of the Windows 7 operating system, this message is displayed to you. It means that the system has recognized the drive from which it starts as a non-system drive, that is, according to Windows 7, there are no system files necessary to run it on this drive. This can be caused by various reasons. Let's look at the most common ones.

Possible variant. A disc was inserted into the DVD-ROM or a flash drive was connected and your BIOS is configured so that by default it launches one of these media. As a result, the system cannot find the files it needs to run on a flash drive or DVD and reports an error.
Elimination. You should try turning off absolutely everything external drives: phones, memory cards, flash drives and external drives. After this, you should turn on the computer again. Most likely, the system will start correctly this time.
It may be that the recommendations provided above will not help. In this case, you need, firstly, in the BIOS settings to set your default startup device system disk. And secondly, you should make sure whether the BIOS detects your system disk at all. It may be that it is out of order.
If the system correctly displays the system disk, it is within your power to take advantage. We will touch on this a little later, at the end of the article.
If the system does not display your main hard drive, you can try disconnecting it and connecting it back, or into the slot next door, if present.
Other problems can also lead to this error, for example, viruses, etc. In any case, it is best to first check the methods that we have mentioned. Most likely they will work. If not, then feel free to go to the end of the article in which we indicated step-by-step elimination Windows 7 problems using the utility.
Error BOOTMGR is missing

Due to this error, you will also not be able to start Windows 7 correctly - a message on a black screen - BOOTMGR is missing. This problem can also be caused by various reasons, including all kinds of viruses. It can be caused by erroneous actions of an inexperienced user who accidentally changed the boot record of the hard drive. Also, physical problems of the HDD are often the cause of this error.
Elimination. Check whether the hard drive on which the system is installed is working properly. Seek help from the Windows 7 recovery environment, which is discussed below.
Error NTLDR is missing. Press Ctrl + Alt + Del to restart

This problem manifests itself in almost the same way as the previous one. You should also use the Troubleshooting Environment to resolve this issue.
When starting Windows 7, the user sees only a black screen and a mouse pointer
If, when the system starts, the usual desktop with the start menu does not load, and all we can see is the mouse pointer, then everything is not so difficult and in the vast majority of cases it is easy to fix. Very often this error occurs if you, using an antivirus program, got rid of some serious virus that had already caused trouble and these same troubles were not fully corrected by the antivirus program.
Elimination. Restart your computer and as soon as the mouse pointer appears, press Ctrl + Alt + Del. The Task Manager will immediately appear.

In it you need to select the “File” menu in which to create new task(execute). A dialog box will appear, in which you should enter the regedit command and press Enter. This will launch the Windows 7 system registry editor.
We will need to look through the sections in the editor:
HKEY_LOCAL_MACHINE/Software/Microsoft/Windows NT/Current Version/Winlogon/
- HKEY_CURRENT_USER/Software/Microsoft/Windows NT/Current Version/Winlogon/

Now you need to edit the value Shell.
With the first section, make sure that the Shell parameter is set to Explorer.exe, if this is not the case, then install it yourself. In the second case, you need to go to the section and look: if there is a Shell entry in it, then it needs to be removed from there. Now all that remains is to close the registry window and simply restart the computer. Everything should fall into place.
And so, everything that we could not eliminate on our own, we eliminate using standard system utilities
In most cases, if problems arise when starting the operating system, we can see the Windows 7 recovery screen. It is this screen that will help us in restoring the system startup. If the recovery screen does not appear on its own, then the next time the system reboots we can call it up by pressing a key F8. Select "Troubleshoot your computer" from the menu

You will see a message that will contain information that system files are being loaded, you will also be asked to select a language.
Every computer user knows very well how frustrating it is when a program does not work. And how can one not remember that this is happening precisely at the moment when hopes are pinned on the program. For example, you need to show your colleagues the results of your work or urgently transfer funds, but the corresponding application refuses to work. And if suddenly the majority has it as the main and only operating system, then this is the real end of the world, the same one that the Mayans talked about.
With such problems, the main thing is not to panic, but to calmly analyze the operation of the system. Remember which programs were installed and which were uninstalled during the last session. Let's look at everything in order. Let's start with, perhaps, the most “scary” thing - Windows 7 will not start.
There are many reasons for this behavior of the operating system - from trivial errors to application programs to hardware failures. And, of course, we should not forget that this system from Microsoft, although it is head and shoulders above all their previous creations, nevertheless, sometimes behaves unpredictably. If Windows 7 does not start, and after turning on the computer, a white message appears on a black background saying Disc Boot Failure, then it is quite possible that the reason lies in a dead battery that supports the BIOS settings. Immediately after turning on the computer, we often press the Del button until we get to the BIOS screen. We are looking for the line First Boot Device (main boot device). The necessary must be indicated: if the system is on a hard drive, then the corresponding hard drive, etc. If the settings are lost without reason, it makes sense to replace the battery on the motherboard. However, more often a problem like “Windows 7 won’t start” lies in the loose contacts of the interface cable. Sometimes it is enough to move it a little so that the hard drive stops being “seen”. Solution: disconnect and reconnect the cable going to the boot device.
If the download continues and a list of actions appears, then you need to try using the “Load last known good configuration” menu item. You can also select "Safe Mode" as an alternative. If the system boots like this, then the cause of the problem is some program installed during the last session. We delete it in crash protection mode (if it is not in the menu, after the download starts, press the F5 button).
Sometimes Windows 7 loads to the screen Moreover, visible reasons there is no such behavior. Often solved by a banal problem without any recovery.
Problems with system performance may be caused by a faulty RAM or hard drive. To determine them, you can use special programs that work from pre-prepared LiveCD.
But fortunately, similar problems are less common than with applications. For example, users often ask why “Minecraft won’t start. Windows 7 works fine." Minecraft game uses the possibilities of virtual Java machines and OpenGL. Therefore, we set latest version Java and fresh drivers video cards. It is also worth noting that there may be difficulties with launching from a Russian folder (the name must be in English).
Similar messages like “Terraria won’t start” are also common. Windows 7 works like a charm." This game is the twin brother of the above Minecraft. The difference is that it does not use Java, but the package Net Framework. Solution: install this package (you can use a package that includes versions from 2 to 4), install DirectX and Microsoft Visual C++ 2005. Sometimes the Redist folder has everything you need. When running on the new Win 8, problems may arise, since the system requires self-connection Net Framework (via "installing programs - enabling Windows components").
The topic that I want to discuss in this article is very popular and talking about it in detail so that you understand how and what to do is not so simple. But still, I will try to describe possible ways What to do if Windows 7 does not boot on your laptop or computer. We will also find out why this could happen?! The task ahead of us is not an easy one, namely, to correct the current situation, but there is no need to be afraid. Just follow the clear instructions and everything will be great! Some points may be suitable for other operating systems, but I will focus on Windows 7.
Dear reader, if you really want to solve the problem, then I strongly recommend reading the article in full, and then drawing some conclusions. I cannot talk about all the nuances in one paragraph.
Safe Mode and Last Known Good Configuration
This is a must try! Reboot the computer, press the F8 key continuously.
Attention! In Windows 8, entering Safe Mode is a little different, so it's best to follow the link below to find out all the details. In the list that appears, we are interested in the item called “Last Known Good Configuration (advanced).” Select and press Enter.
About how to enter safe mode on different systems:
What to do if the information above did not help you? We repeat the steps described in the previous paragraph, but select “Safe Mode”.
Next, you can make a choice: fix the problem due to which Windows 7 does not boot manually, or try to do it in semi-automatic mode. Usually I do everything manually, for example, if Windows does not boot after installing the drivers, then I delete the drivers and try to boot. I think you understand that manual method requires more knowledge from you, so Windows offers you another option, which I will describe below.
If everything loads, go to the Start menu, Control Panel, System and Security. In the “Support Center” tab, click on the inscription “Restore the computer to a previous state.” See the “Run System Restore” button? Great, then you've come to the right place.

Now click it and follow the instructions.
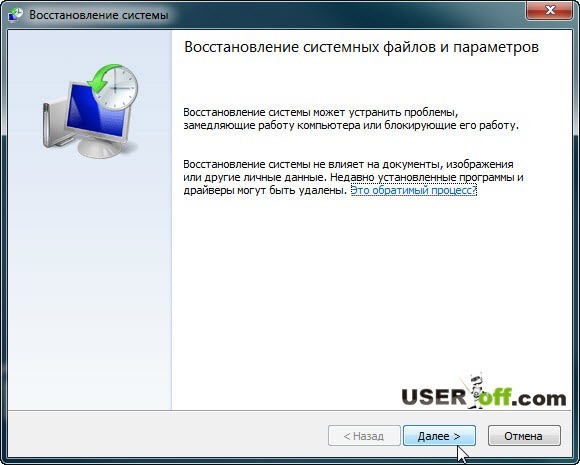
Next, you will need to select a restore point. In my case, I am asked to select a point on the 23rd, and now the calendar shows the 29th. Therefore, you need to click on “Search for affected programs” to find out what actions you will need to take after recovery.
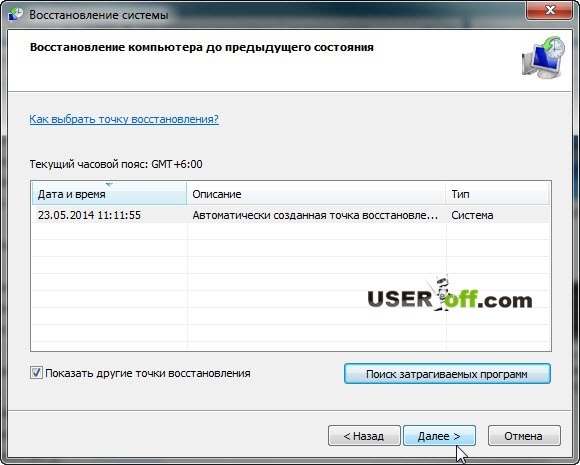

So, you have familiarized yourself with the affected software when restoring the system and now you can close this window. After closing the window, click "Next".
If you were unable to enter safe mode to restore Windows operation, then there is no need to despair. Below we will look at another method.
Note: at the very beginning, when Windows 7 was just coming out, there was one strange glitch that you might have too. When you turn on the computer, the welcome screen follows and a black screen appears. As I remember, it seemed like there was still an arrow, but nothing else was visible. The cure was very simple - go into safe mode and restart the computer as usual. After this, I was able to log into my account without any additional manipulations with Windows.
You may need to reinstall Windows
This option should be considered when you have tried to revive Windows, but all attempts have produced no results.
The very first thing that comes to mind for many, and for me too, is reinstalling Windows 7. But this method, you see, is very long, and if you are a busy person, then access to the computer should be almost constant. Reinstallation is suitable for those who have a lot of free time or do not have time to understand more quick methods, or for those who cannot be helped by any of the methods I have listed below for restoring the Windows operating system.
I will not dwell in detail on installing Windows, since I wrote about this on my blog:
Here brief instructions: since you do not have access to the desktop, go to the BIOS, look for the Boot or Advanced BIOS Features tab, or search for it yourself. Then in it we find the line “1st Boot Device”, set the value to CD-ROM. What have we done? What we did is that now when the computer boots, it will boot from the disk that is installed in your CDRom, and not from the hard drive. After turning it on, when the inscription “Press any key...” appears on a black background, press any button and get into the Windows installation wizard. Then follow the instructions on the screen.
You can read more about how to boot from disk in my article: “”.
I decided to talk about the installation at the very beginning, because if you were going to reinstall Windows, then perhaps this is some kind of sign to implement it))). But as I said at the very beginning, we will now try to bring your Windows back to life without reinstalling it.
System Restore
First of all, you can use the function that is in the installation disk “System Restore”. I will give an example of the Windows 7 system, but if you have a different system, then this is not a reason to think that you cannot do on your system. The names of the buttons may differ, but the principle remains the same.
So, for this procedure we need a Windows installation disk or its image (can be downloaded on the Internet). If you are unable to download the image or do not have a disk, then write to me by email [email protected] or contact your friends who have already installed Windows themselves.
If you don’t have a working disk drive or don’t have one at all, then the article “” will help you create a bootable flash drive.
When you have a Windows distribution, insert it into the drive and restart the computer. If the BIOS is configured for installation, you will see the line:

When it appears, press any key.
If it is not there or Windows boots as usual, then you need to make manipulations in the BIOS. Namely, set loading priorities. Usually the hard drive is set in the BIOS settings, since that is where your Windows is installed.
In order for the computer to start booting from the disk that is in your drive, you need to go into the BIOS and specify CDRom as the first device to boot. I have already talked about this above, if you have not read this point, then it’s time to do so.
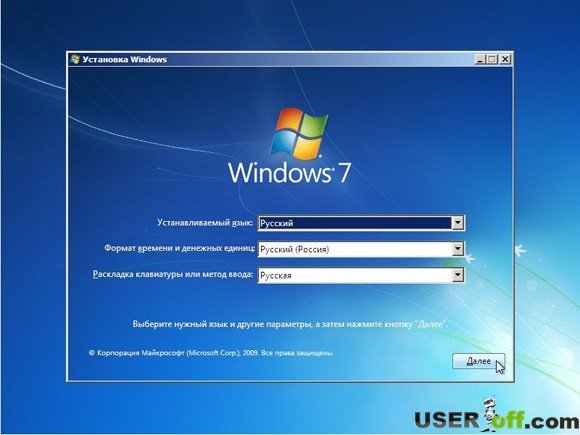
So, you pressed any key, now a window will appear where you click “Next”.
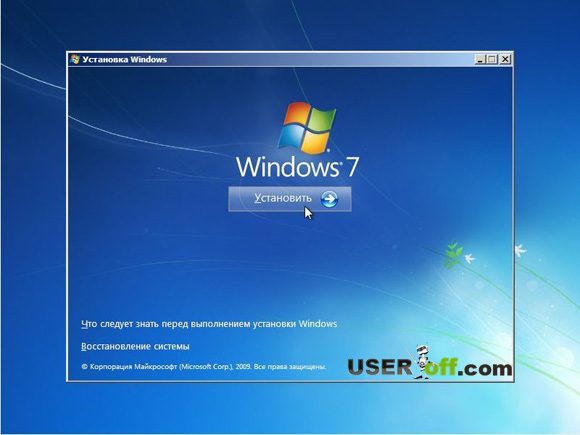
In the next window you need to click “System Restore”.
A search will occur. installed systems. If you have one system installed, then there will be one operating system in the list. Select it and click Next.

Often on at this stage A message may appear asking you to restore your system. If this message will be displayed on your screen, then click “Fix and restart”. After that, try to log into your account.
If the message does not appear, then in the next window you select your system and click “Next”.
After this, a window will appear where you can select system recovery methods.

– automatic problem solving.
System Restore - you can use this method, but provided that this function has been enabled.
Restoring a system image – if you have Windows image recovery.
Command line- by using certain commands you can revive Windows. This method will be discussed further.
Now click “Startup Repair”. Now you need to wait a bit for the utility to try to automatically find the problem and solve it.
System Restore via Command Line
Then enter and press Enter.

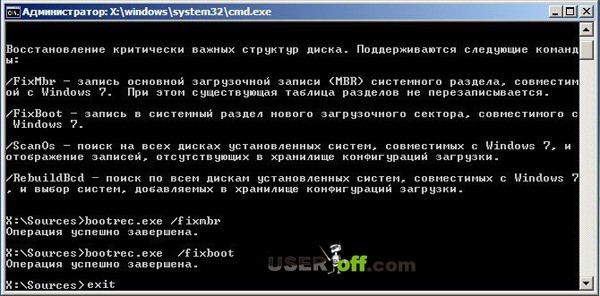
A list of commands that can be used in this utility will appear; now you need to enter: Bootrec.exe /FixMbr and press Enter.

Now enter . exe / , then clicking on Enter. Next, exit the utility by typing exit and pressing Enter. Now you can try to log into your account, since the recovery work is complete.
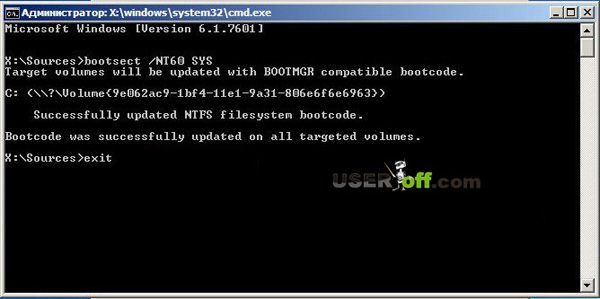
You can also try updating the boot code by entering the command bootsect /NT60 SYS. Then leave as a team Exit.
If the above commands did not help you, then go to the command line and enter Bootrec.exe /RebuildBcd. With this command you will do scanning hard disk to find the systems installed on it.
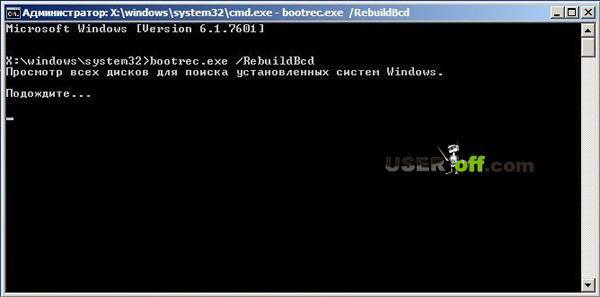
When the scan is finished, a list of installed operating systems on your hard drive will appear. To add it to the download list, click Y And Enter. After successful completion of the operation, enter Exit and press Enter.

So, with command line We've sorted it out for you. In principle, this should help to get your system to boot.
Inactive hard drive partition
This situation does not occur often, but it is still necessary to talk about it, otherwise the article can be said to be truncated. Let me give you an example, after which you will understand what's what.
Let's say you have several Windows operating systems installed on your computer, which are installed on different hard drives. If you assign incorrect attributes to hard drive partitions, you will have problems booting a particular version of Windows.
To check or fix this, you can use the Acronis boot disk Disk Director to change partition attributes. So, download and burn the Acronis Disk Director boot disk and boot from it. How to do it? Insert the disc into the drive, restart the computer, and it will begin booting from the disc in the drive. But before that, check your download priorities. There should be a CDRom, just like when installing Windows. We have already talked about this in this article above.
When the program loads, pay attention to the checkboxes that are on the hard drive partitions.
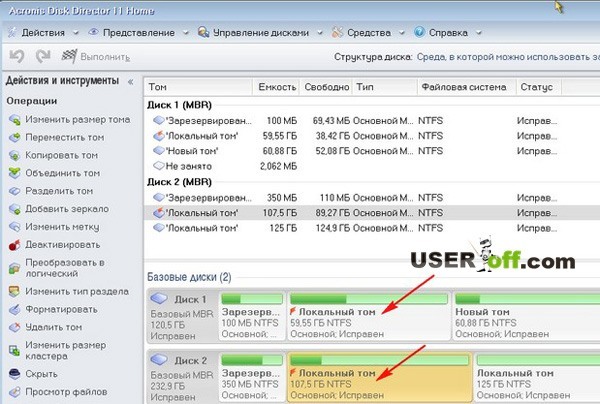
In the image above we see that the checkboxes are on the second partitions of the hard drive. You need to make sure that these checkboxes are on the first sections. We got to practice ;). You need to right-click on each first partition of your hard drive and select “Mark as active.”
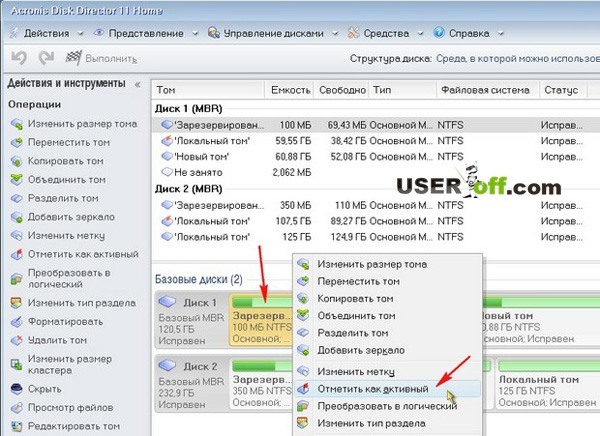
A message should appear where you click “OK”. This is what it looks like after the whole procedure:
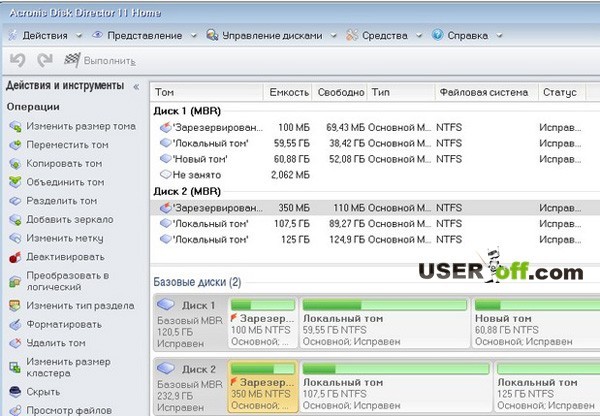
Now all that remains is to click on the “Run” checkbox, wait for the operation to complete and restart the computer. Be sure to remove the disc from the drive.
Hardware problems, BIOS and viruses
HDD. If your system unit, or rather, the hard drive makes suspicious sounds: clicking or tapping, that is, there is a possibility that the hard drive needs to be replaced. To make sure of this, you need to open the cover of the system unit, turn on the computer and listen to work hard disk. Also check the connection of the wires with hard drive. It is possible that the wires have become disconnected and the computer cannot see the hard drive.
If you suspect that the problem is with the hard drive, then you need to copy all important data to another medium. Otherwise, you may lose them completely.
BIOS. Go to the BIOS settings and put the hard drive first so that it starts booting from it. Above we looked at an example where we set up a CDROM; you do the same with a hard drive. Just don’t forget to save the changes in the BIOS by pressing the F10 key.
The second method – you won’t believe it, but it actually works! Just go into the BIOS and, without changing anything there, exit, saving the changes that in fact did not exist (by pressing the F10 button). I personally once fixed my friends’ laptop this way, and when they asked me how I did it, my answer was: “Magic and nothing more 😉.” So give it a try, maybe everything will be much easier than you think.
Viruses. Sometimes viruses prevent Windows from booting. If there are viruses on your computer, you need to scan the entire disk for viruses. Here are articles that will be useful to you: “” and “”.
Of course, if you check your hard drive for viruses, you will need to disconnect it and connect it to another computer, since in your case Windows will not load. Or you can use special boot programs, with which you can check your computer for viruses even if you cannot boot your Windows. Here are a couple of them: and.
Attention! There are cases when, after installing updates, Windows 7 stopped loading! Therefore, you may want to try uninstalling recent updates that were installed before the Windows boot problem occurred.
Important! If you see a specific error on your screen, I recommend using a search in Google or Yandex. You can enter into the search not only the error code, but also the words that are used in it. Thus, you will save your time searching for the problem and its solution.
Important! If the system unit makes squeaks when turned on, then you need to use this squeak to determine the problem. Ask how? Here's an article on this topic: "".
That's all I wanted to say. The article turned out to be long, and I sincerely hope that at least one of the methods I described helped you.
Says a lot of unnecessary things, but there is useful information for you: