After installing linux mint cinnamon. Linux Mint MATE after installation
Linux Mint
is one of the most popular operating systems today Linux.
Developers Linux Mint They release several distributions with different desktop environments: Cinnamon (own development), MATE, Xfce, KDE And LMDE(Rolling release based on Debian, also of our own design).
Xfce it's fast and easy working environment, low consumption system resources. At the same time, it is visually attractive and user-friendly.

This is the desktop Linux Mint 18 "Sarah" Xfce With Welcome screen, which displays various links to help a new user get started with the system.
At the bottom of the monitor, as in most distributions, there is a control panel with applets located on it: menus, application quick launch icons, buttons for open windows and the system tray.
The disadvantage of this environment that new users encounter is the absence of a keyboard layout icon after the first login, because... Even after opening the browser, the user is at a loss as to how to switch from English to his native language, although the system was installed and is displayed in it?
1. Keyboard layout and hotkey assignments
To display a keyboard layout icon, you need to add it to the panel. To do this, click right mouse button on any free space of the panel and in the menu that opens, select:

When the window opens Adding new elements, select Keyboard layouts and press the button Add:

Note. All newly added elements are always displayed in the right corner of the panel. To move them on the panel, right mouse click on the element/icon, select Move, move it to the desired location on the panel and left clicking pins it.

To assign keyboard layout hotkeys, right-click on the icon and select from the menu Keyboard settings:

In the window that opens Keyboard, in the tab Layout turn off Use standard system settings and in the parameter - Change layout options activate the key combination you need:

Now that we have completed the missing element on the panel, it’s time to update the system, because... after the first login, this must be done Necessarily.
2. System update.
In the system tray, on the panel you should see an icon in the form of a shield with a Latin letter i - Update Manager:

Click on the icon and a welcome window will open Update Manager With possible options update policies:

Select/activate the update item that is more acceptable for you And OK.
Perform a system update by pressing the button Install updates and wait for the system update to complete.
Once all updates have been completed, the icon has been installed and keyboard shortcuts have been assigned, you can now work in the system Linux Mint 18 "Sarah" Xfce, as in any other: surf the endless expanses of the Internet and download the necessary files, watch movies, listen to music, print in Libre Office and use a printer, download pictures from the camera and edit them, view your video from a video camera, communicate with family and friends, in general, everything that can be done in a regular operating system.
Note. The further steps proposed in the article are not mandatory; they simply introduce you to the system and its capabilities.
3. Setting up the control panel
Right-click on any free space in the panel and select from the menu that opens - Panel Options:

By default, the control panel is located at the bottom of the monitor, but you can move it to top part. To do this, in the panel settings, uncheck the item Lock panel(top photo), now grab the panel by the left or right edge and drag it up:
The control panel can be positioned not only horizontally, but also on the right or left - vertically, with the same arrangement of applets:

Or choose how Side panel and then the applet Window buttons will display more compactly open windows in the form of icons:

The panel can also be resized:

And also select and activate the options for hiding the panel:

Change appearance panels in a tab Appearance:

Here you can customize the solid color, with a choice of color and transparency of the panel.
Adding applets to a panel
I already described adding a keyboard layout applet at the very beginning of the article. In the same way, other applets from the proposed default list are added. Right click on the panel, select Panel - Add New Items:

Removing applets from the panel
Removing applets from the panel is done as follows:
Right click on the applet and Delete:

4. Desktop customization
Right-click on any free space on your desktop and select from the menu that opens - Desktop customization:

In the window that opens Desktop three tabs: Background, Menu And Badges.

In the tab Background can change background image, click on it from the proposed catalog, or activate the parameter Change background at certain intervals and background pictures desktop will change automatically, after a time set by the user.
Tab Badges is responsible for the appearance of the desktop. In it you can activate the display on the table Home folder, Trash etc. elements, as well as change their size and font size:

Tab Menu serves to configure the menu displayed on the desktop by right-clicking, or by clicking with the middle button (mouse wheel):


5. System settings
Settings systems you can find in Menu by clicking on the icon All settings:


System settings are divided into categories: Personal, Equipment, System And Other. All of them are already set by default, but you can change them at your discretion.
6. Additional programs to install
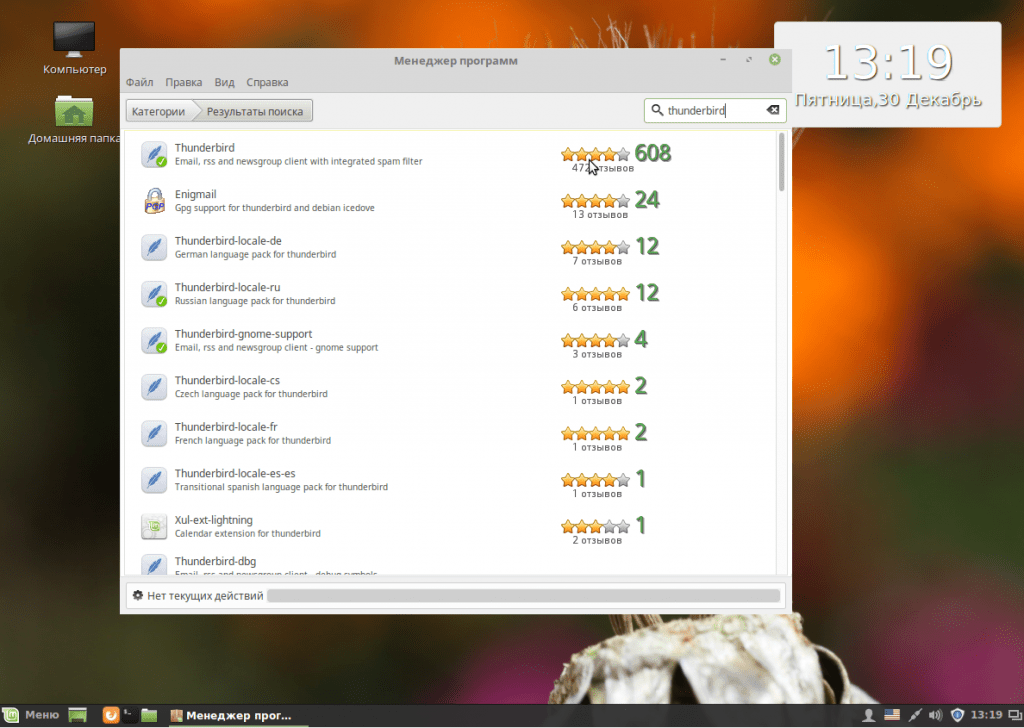
The system already has necessary programs, which the user can find in the menu. If you do not find any special program in the menu, then in the distribution kits Linux you don’t have to look for them on the Internet, first of all open them in the system menu Program Manager, most likely you can find the necessary additional software there:

As you can see in the picture, all programs are divided into categories, which makes it easier to find the one you need. Click on the selected category and view the list of programs offered, or enter the desired name in the search field, click Enter on the keyboard, select the program, click on it and press the button Install:


7. Change window manager
Window Manager- a computer program that controls the placement and determines the appearance of windows in a graphical window system user interface.
IN Linux Mint 18 "Sarah" Xfce By default, several window managers are preinstalled.
Open All Settings - Desktop Settings:

And in the parameter Windows - Window Manager select the one you want to use. The manager will change on the fly:

Suppose a window manager has been selected Compiz. It already has some plugins for managing windows and the desktop (Desktop Cube) activated:

Change settings Compiz can be pressed on the button Set up Compiz:

8. Installation additional programs on the desktop
Let's add some more goodies or frills to the desktop.
The bottom image shows two widgets: Conky and weather widget GisWeather.

And although the additions to both panels have their own weather elements, I think the widget is the most colorful and accurate for displaying the weather in your area GisWeather.
Installing the widget GisWeather
sudo add-apt-repository ppa:noobslab/apps
sudo apt-get update
sudo apt-get install gis-weather
Once the installation is complete, you will find GisWeather in programs Tools or search in the menu.
How to customize the widget and display your area, see.
Installation Manager Conky
Open a terminal (Ctrl+Alt+T), copy and run this sequence of commands:
sudo apt-add-repository -y ppa:teejee2008/ppa
sudo apt-get update
sudo apt-get install conky-manager
After installation you will find Conky Manager in programs Tools or search in the menu.
How to create your own widget Conky, look .
9. Install Skype
Skype - free application, providing text, voice communication and video communication via the Internet between computers (IP-telephony) and mobile devices, optionally using peer-to-peer network technologies, as well as paid services for calls to mobile and landlines.
Program Skype is very popular among Internet users.

Installation Skype
Install Skype
sudo apt install skype
In system 64-bi T, Skype uses a theme Clearlooks instead of the default theme, other themes are also not displayed correctly.
This happens because Skype represents 32-bit application with theme GTK2, where is the engine Murrine in most cases it is not installed.
If you have installed 64-bit system, then fix the theme Skype you can by doing next command in the terminal:
sudo apt install gtk2-engines-murrine:i386 gtk2-engines-pixbuf:i386
Note. If after installation Skype you do not have a tray icon displayed, just install one plugin. To do this, open a terminal (Ctrl+Alt+T), and run the following command:
sudo apt-get install sni-qt:i386
And restart Skype.
10. Install Systemback - restore the system to a previous state
Systemback Very useful application, which allows you to create backups and restore points of your system.

Peculiarities Systemback
System backup
System Restore
System installation
Creating a Live CD
System repair
System update
Installation Systemback
Open a terminal (Ctrl+Alt+T), copy and run the following commands:
sudo add-apt-repository ppa:nemh/systemback
sudo apt-get update
sudo apt-get install systemback
Instructions for use Systemback look .
Conclusion
These are the recommendations that I would like to offer at your discretion after installation Linux Mint 18 "Sarah" Xfce.
System Linux Mint 18 "Sarah" Xfce After installation and all the settings described above, it works stably, smoothly and looks very beautiful.
I have nothing against the Linux Mint logo and dark background, but it is more pleasant to work on the system when the desktop background is set to beautiful image. So first of all, let's change the background. Open Menu -> Options -> Wallpapers:
Then go to the Serena tab and select the picture you like. On the images tab you can upload your own:

2. Theme
Mint 18 also added the Mint-Y theme. It is made in a modern flat style and looks quite beautiful. You can activate it in the settings. To do this, open Menu -> Options -> Themes and select values for all parameters Mint-Y:
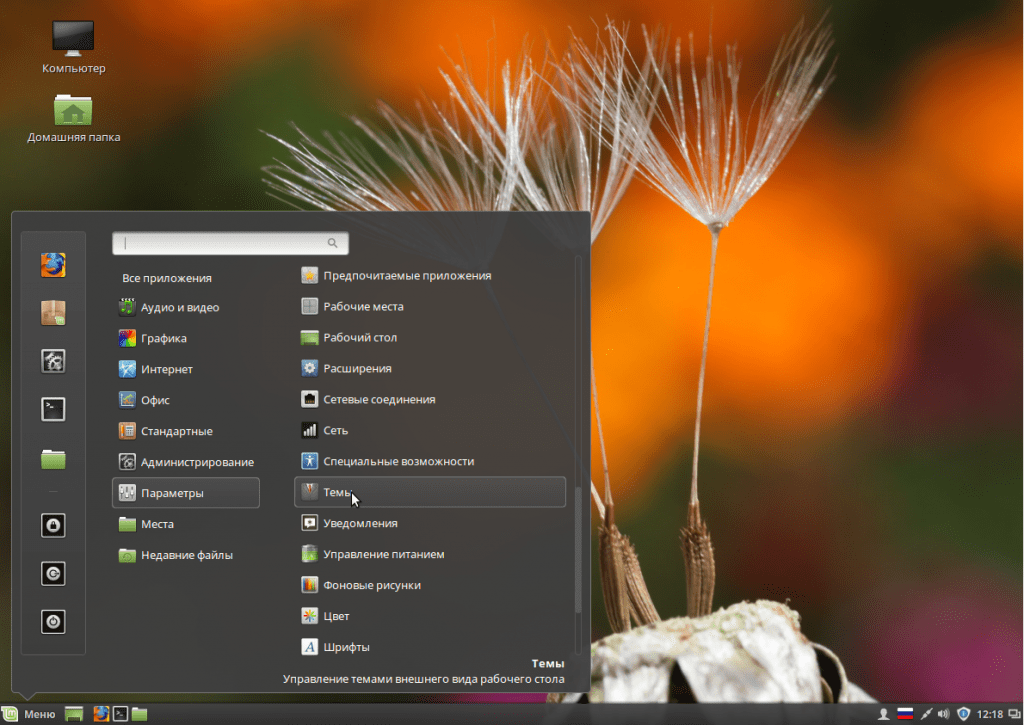
Looks quite nice.

3. Add widgets
Cinnamon supports widgets, which are called desktops here. Return to the main menu of the Settings utility and select Desclets:

Here you can add the desired widget to your desktop using the button Add to desktop:

Or install additional widgets from the network:

4. Update your system
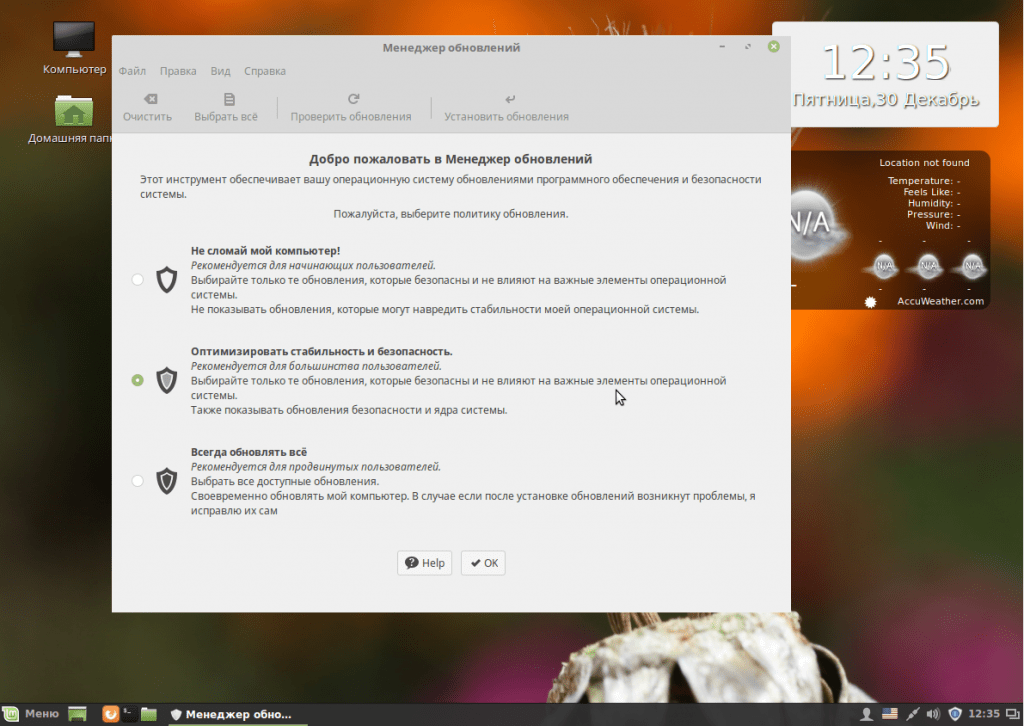
It is important that your system is always in current state. Linux Mint has a special update tool, run it from the main menu:

When you first start, the system will prompt you to choose which updates to install; it is recommended to leave it as is to get the new software:
Then you can choose necessary updates and press Install updates:

Most likely, you will need to do the procedure twice, since you may first need to update the update manager itself.

5. Installing codecs
Previously, codecs were supplied with the distribution and there were no problems with this. But then the developers decided to remove them. But we can install linux mint codecs from official repositories. For this we have an application center:

In the search, type mint-meta-codecs or just codecs, you will immediately see the package found, as well as its rating:

To open the package description window, double-click on it and then click Install for installation.
To install all available codecs, open a terminal and run the command:
sudo apt-get install gstreamer1.0-libav gstreamer1.0-plugins-ugly-amr gstreamer1.0-plugins-ugly libgstreamer-plugins-bad1.0-0 gstreamer1.0-plugins-bad-videoparsers gstreamer1.0-plugins- bad-faad gstreamer1.0-plugins-bad libdvdnav4 libdvdread4
6. Install drivers
The system already contains drivers for many peripheral devices, even if they are closed source, But not all. For example, drivers for a video card must be installed separately. Open the driver manager through the main menu:
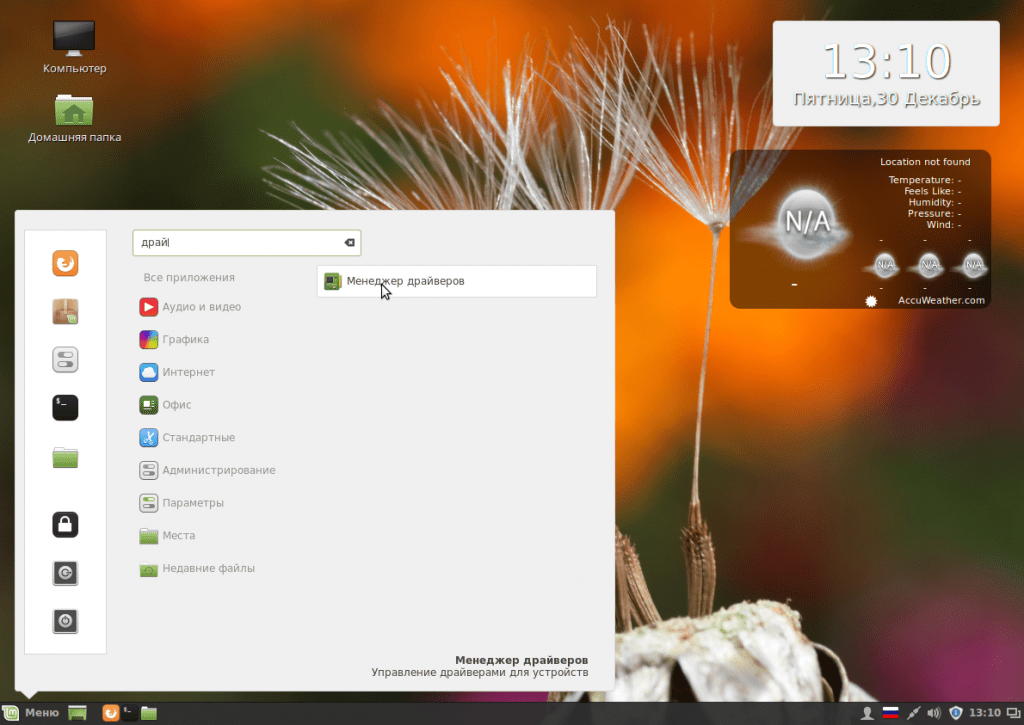
When the program loads, select the drivers you want to install and click Apply changes. After installing the driver, you will need to restart your computer.

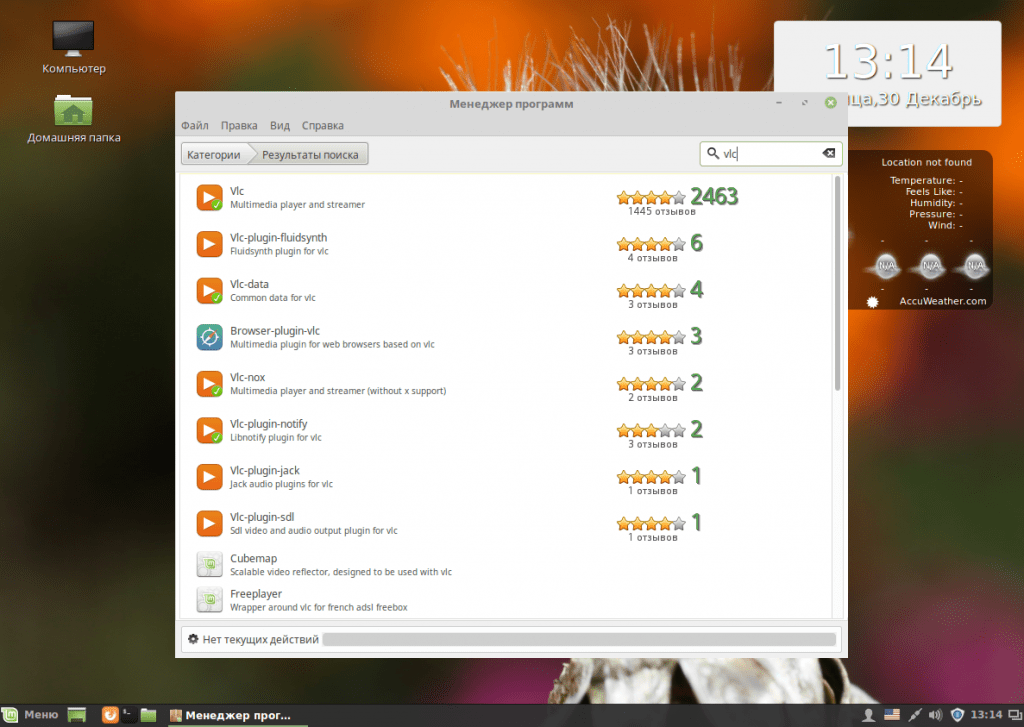
7. Installing programs
Despite the fact that the system already contains many of the programs you need, not everything is there. Everything you need can be installed through the application center. Skype communication program:

VLC media player:
Audio player Clementine:

Graphic editor Inkscape:

Torrent client qBittorrent:

Aria2 Download Manager:

Mail Mozilla client Thunderbird:
Chromium browser:

BleachBit system cleaning program:

You can find and install others popular programs In chapter Favorites:

8. Installing Adobe Flash
Flash technologies are used less and less on websites, and are being replaced by HTML5, but many users still need Flash player. To install it, use the following commands in the terminal:
sudo apt-get install pepperflashplugin-nonfree
$ sudo dpkg-reconfigure pepperflashplugin-nonfree
9. Install Java
Many programs need Java machine for work. You can install it from the PPA repository. First add the repository:
sudo add-apt-repository ppa:webupd8team/java
$ sudo apt-get update
Then install the package:
sudo apt-get install oracle-java8-installer
10. System backup
Linux setup Mint 18 cinnamon should include backup after installation. While the system is still clean, you can create backup copy, so that you can quickly restore it later. To do this, you can use the TimeShift utility. First install it from the PPA:
sudo apt-add-repository -y ppa:teejee2008/ppa
$ sudo apt-get update
$ sudo apt-get install timeshift
Then run the program from the main menu, then set the frequency Reserve copy and create your first copy using the button Create:

Now you can restore the system if necessary.
Everyone good day! Today we will look at what you need to do after successfully installing the MATE desktop environment on your computer. This instruction is not mandatory and only shows the subjective opinion of the author of the article.
Setting up Linux Mint MATE after installation
When you boot your operating system for the first time, you will see a desktop with a welcome screen in front of you. To prevent this screen from popping up every time you boot up, you need to uncheck the box in the lower right corner of this window.

If during the installation process you did not have an Internet connection, then you do not have all elements of the system in Russian. To fix this, you need to install full support for the Russian language. We have already looked at how to get it, so we will not dwell on this in detail. Now we need to configure switching keyboard layouts. Personally, I find it convenient to switch languages using the alt+shift combination, but you can choose the one that is convenient for you. We find on the bottom panel an indicator with the inscription en and right-click on it. In the menu that opens, select “keyboard options”.

Select the “Russian” layout and click on the “parameters” button. Find the line “switch to another layout” and check the box next to the desired combination.

We close the window and now the language switching is configured. In the lower left corner of the screen, the menu button still remains with an English inscription. Let's replace this inscription with the familiar Russian one. To do this, right-click on it and select “settings” in the menu that appears.

Erase the text on the button and enter “Menu” or “Start” (you can write anything there)

Now that we've sorted out the menu, let's move on to the clock settings on the panel. Right-click on them and select “options” in the menu that appears.

In the “general” tab, uncheck all the checkboxes (if you need a date in your watch, then leave this checkbox). You still won’t see the weather and temperature (even if you set the terrain). In the "terrains" tab you can specify locality, in which you live. There is no practical benefit from this.

You shouldn’t even go to the “weather” tab, as this functionality doesn’t work. We've sorted out the clock and it's time to update the system (this needs to be done while the Internet is connected). Go to menu-system-terminal and enter the command sudo apt-get update. This command will update the list of repositories and available versions software. After that, enter the command sudo apt-get dist-upgrade. This command will update your system and download all available updates.

An easier update option is to launch the update manager. Find this icon on your dashboard:
Click on it and the update manager window will appear in front of you.

As you can see, there are few updates, but this is due to the fact that we have not updated the list available updates. To do this, click the "check for updates" button. After this, you need to click on the “install updates” button.
Linux Mint drivers
Most drivers for your computer are already installed when you install the system. To check the available drivers, go to the menu - administration - driver manager.

There are no drivers available for installation on my system, but your list may show an available driver for your video card. Select the one that says "recommended" and install it. After this, restart your computer.
Setting up the Linux Mint desktop
Our desktop currently displays the shortcuts "computer" and " home folder". Let's remove them and add a display of the recycle bin. Go to the menu-options-desktop settings and check the necessary boxes.

Now you need to adjust the screen resolution. We go to the menu-parameters-monitors, set required resolution and update frequency.

Let's optimize the system boot process. To do this, go to the menu-parameters-launched applications.

This displays a list of all the programs that start when your computer starts. Personally, I remove nintUpload, mintWelcome and general access to the desktop.
To prevent your screen from locking after 5 minutes of inactivity, go to the menu-options-screen saver and uncheck the boxes.

All other settings can be found in the “control center”.

Removing unnecessary programs
IN installed system There is a necessary set of software for full operation. But you're used to working in other programs, so let's remove everything unnecessary. Launch the terminal and enter the following commands one by one:
sudo apt-get autoremove hexchat*
this command will delete the chat
sudo apt-get autoremove banshee*
This command will remove the audio player
sudo apt-get autoremove brasero*
this command will remove the disc burning program (personally, I don’t even have a CD-ROM)
sudo apt-get autoremove thunderbird*
this command will remove the application for receiving and sending email
sudo apt-get autoremove simple-scan*
This command will remove the program for scanning documents
sudo apt-get autoremove transmission*
This command will remove the torrent downloader
Installing the necessary programs
We need a normal audio player and that is deadbeef. Go to and download debubuntu package i686 (if you have a 32-bit system) and debubuntu package amd64 (if you have a 64-bit system). Go to the folder where you downloaded the installation file, right-click on it and select “open in gdebi”

Click on the Install Package button and wait for the installation to complete.
To download torrents we need the qbittorrent program. Open a terminal and enter the command
sudo apt-get install qbittorrent
So we looked at what needs to be done after installing Linux Mint. If you have anything to add this article, then write about it in the comments and I will make additions.
This article will describe and illustrate the installation process step by step for novice Linux OS users. initial setup latest version of the distribution Linux Mint 18 (Sarah) based on package base Ubuntu 16.04. The development team announced support for this release until 2021.
Brief list of changes:
1. Desktop environments Cinnamon 3.0 and MATE 1.14.
2. Support for cross-desktop applications - xapps, analog and packages. - a universal, non-distribution method for software distribution.
3. New topic registration - Mint-Y. An excellent theme that is not yet enabled by default. I really like it and, as for me, its dark version does not strain the eyesight at all.
4. Support for HiDPI screens high density pixels or just very high resolution.
5. Changing the utility apt, making it even easier to use, updating many system utilities and versions of pre-installed applications.
To begin installation, insert the disk or USB drive with the distribution kit into the DVD drive. You can download the system from the developer's website. When booting the computer, using the Boot-menu (called by pressing the F8\F10\F12\esc keys, depending on Bios version your PC) select the required drive For loading. The Live CD will start Linux Mint 18 (Sarah). Clicking on the icon on the desktop will launch the installation wizard.


In the screenshots above, the first steps are choosing the installation language, a window with a question about installing proprietary software - codecs and players. The next step is setting up the disk. I have one disk, empty, and I left the default partition. If there are other Linux partitions on the computer, partitions with installed Windows, then the dialogue will contain a proposal to leave the existing file system, install Mint on free space and select options for the bootloader. The next steps are to select the time zone, default keyboard layout, user login and password. This is not the root superuser password; it is not set when installing the system in Mint\Ubuntu. Below we will describe how to set it.
 ,
, 

For now, everything should be extremely simple and clear. The following steps are completely automatic. The installer will copy, install and configure the system with all software. The duration of the process depends on the performance of your PC (for me it takes about 10 minutes on average hardware). At the end, you need to remove the distribution media and reboot.


First launch - login window and appearance of the Cinnamone 3.0 desktop:


The first thing I wanted to do was change the design of my desktop to the highly praised one. Mint-Y. Themes can be changed in “Menu-Options-Themes”. Traditionally, I chose the dark option - it strains my eyesight less:


Sudo apt-get update sudo apt-get upgrade
The first updates the local repository cache - the list of packages available for installation and/or updating, the second updates the system and all applications.

The appearance of the graphical update utility, which has become a little similar to Windows:


The next step is completely optional. In Mint\Ubuntu it is assumed that there is no need for a root password, everything can be done the same way. This is convenient in some places, not so much in others. I prefer to set a password for the superuser:
Su - passwd root
the first command - you log into the system as root in its root folder, the second - change (create) the password for it.

The last thing for today is adding the Russian keyboard layout and changing the switching combination.


Have you ever wanted something better than what's running on your computer now? Whether you use Windows, Mac or Linux, you can see that there are other good systems out there.
What is Linux today?
Linux Mint is one of the most popular and fastest growing operating systems. Today it is full replacement for Windows. The advantages of this “shell” are obvious: it is faster, better, easier to use, while its functionality is expanded and protected. In addition, the OS is completely free to use and distribute.
Moreover, Linux Mint is unique in its appearance, easy theme management, large storage software and functionality out of the box.
The OS has four versions or variants:
- Linux Mint Cinnamon is a native Linux environment with the Gnome desktop. This version is elegant and functional.
- Mate is another flavor of Gnome used as a classic OS.
- XFCE is a minimalist and elegant desktop environment. It is suitable for computers with low resources.
- KDE is one of the most complete desktop environments that has many functionality and good appearance. It's good for modern computers with the latest equipment.

System requirements for installing Linux Mint:
- 512 MB RAM (1 GB recommended for easy use).
- 9 GB disk space(20 GB recommended).
- Resolution 1024×768 (at lower resolutions, press ALT to drag windows with the mouse if they don't fit on the screen).
Wherein:
- 64-bit ISO can be booted from using BIOS or UEFI.
- 32-bit ISO - only with BIOS.
- 64-bit ISO is recommended for all modern computers (almost all devices released in the last 10 years have 64-bit processors).
How to make a boot file?
Go to the Linux Mint download site and select the best option for you. You can choose a download mirror or download a torrent. Depending on the speed of your connection, it may take some time for the download to complete.
To copy an ISO file to a DVD, you will need an image burning program. One of the most popular free options is ImgBurn, although there are many other popular functionalities (Nero, etc.).
Burn a bootable disc. You can also burn the image to a USB drive if you want to install Linux Mint from a flash drive. To do this you will need to download from the official website Linux application Live USB Creator.

Use the downloaded software to create installation media. Select the downloaded ISO as source file. Click the "Record" button to begin the creation process. This may take a few minutes.
Set your computer to boot from a DVD drive or USB. To run Linux Mint, you will need to start booting it from the created media instead hard drive. You can use for this BIOS menu your computer. Make the priority settings so that Linux Mint is installed from a disk or flash drive immediately.
Once your device boots from the media you created, you'll see a short list of options. Select "Launch Linux Mint" to boot the operating system.
This does not install a "shell". Booting the operating system from a DVD or flash drive allows you to test Linux and see its functionality before installing it. You will not be able to change any settings or delete or create files in preview. When running from disk, the shell will run slower than if it were installed.
Once you are familiar with the OS desktop, you can start installing Linux Mint from a flash drive or DVD by double-clicking the “Install Linux Mint” icon located on the desktop. This will launch the installer. Select your language and click Continue.
To use the bundled bootloader, you need to have at least 3.5 GB free space on your hard drive, as well as an active Internet connection. If you are installing Linux on a laptop, make sure it is connected to a power source during installation.
The following menu will allow you to select how much hard drive space you would like to allocate to your operating system Linux system. There are two main options:

- Clean the disk and install Linux Mint. This option will erase all data on the selected drive and install a new OS on it. Any existing OS or the data will be destroyed. Use this option if you want Linux to be the only “shell” on your computer.
- Install without deleting data. This option will allow you to use free space on your hard drive to create separate section to install Linux Mint nearby with Windows or other OS. This option also allows you to select the partition size.
From the drop-down menu, select which drive you want to install the new “shell” on. If you choose the second option, you will be able to use the slider to set the partition size.
Installing Linux Mint requires a minimum of 6GB for its partitions, and swap partitions should be 1.5 times the RAM you have installed.
How does the installation process work?
Once the installation begins, you will be asked to select your time zone and keyboard layout. You can use the "Arrange Keyboard" button if you are unsure of the default settings.
After selecting your input settings, you will be prompted to enter your name and create a user profile. You can change your username as you wish. The machine name is the name that your computer will display to other devices on the network.
You will also need to create a password. This username and password combination will be your administrator account and must subsequently be entered whenever changes are made to the system. Once the installation of Linux Mint is complete, you will be able to create more user profiles.
Wait for the process to complete. After entering your Linux information Mint 18 will start copying files. You can monitor the download progress by looking at the bar at the bottom of the window. Once the files have been copied, the installation will begin and your hardware will be configured.
This process may take some time, especially on older machines. From this moment on, everything happens automatically, so you don’t have to monitor the process.
The bootloader will use additional files during the installation process, so you will need a valid network connection.
Ending the process
Once the installation of Linux Mint is complete, you will be prompted to restart your computer. Click the Restart Now button to boot into the newly installed operating system.

Once the above process is complete, launch Linux Mint Cinnamon and log into your account to go to the desktop. View the welcome screen. It contains links to guides and tips, so take a moment to browse through the resources available. This window will appear every time you start the OS unless you uncheck the box in the bottom right corner.
Customize your desktop
By default, Linux Mint (including the Russian version) will boot with a link to the contents of your computer and your home directory on your desktop. You can add a trash icon to make it look more like Mac computer or Windows. To do this, click the "Menu" button in the lower left corner and select " System Settings" From the left side. Click "Desktop" under Settings and check the icons you want to display.
Software
Linux comes with several basic programs such as Firefox, LibreOffice, GIMP Image Editor and VLC Player. You can also install many other applications, most of them are free. To do this, click the "Menu" button, hover your mouse over "Administration" and select "Program Manager". You will be prompted to enter your administrator password.
Programs are sorted by category, but you can also search for specific services. Keep in mind that most Windows and Mac programs are not available for Linux Mint 18, so you will need to find alternatives that perform the same functions.

Installing Wine and/or VirtualBox Wine will allow you to simulate Windows and, accordingly, install or run programs for this OS. However, sometimes this can be quite difficult - some applications will not be fully accessible.
To avoid this, you can install PlayOnLinux. This is a program that makes it easy Windows installation Software (for example, MS Office 2007, games) with boot disk. The second option for running non-Linux software is installing VirtualBox, which creates virtual partition to start the OS. Basically, you can install and run Windows (or anything else) inside Linux, just like in another window. Then you can install your software on it. You also don't risk breaking Linux Mint.
Install Compiz Fusion
Setting up Linux Mint after installation also includes loading and displaying some of the functionality necessary for the operation and comfortable use of the OS. Open Synaptic Package Manager, type "simple-ccsm" (without quotes), right-click and check required values for installation. These include ccsm, as well as compiz, compiz-plugins, compiz-core, compiz-gnome and compiz-fusion-plugins-extra. Make sure they are all checked (use the search box at the top) and then click Apply.
Set up Compiz
Compiz is a window manager that takes full advantage of your graphics card and adds many effects (like rotating your desktop in 3D). Right-click on your desktop and click "change background" to open the Appearance settings. Go to "Visual Effects" and select "custom". Now click on the settings button to open the Simple CompizConfig Settings Manager and go to the Desktop tab.

Select "Desktop Cube" under Appearance. Use 3-5 columns and one table for the desktop. Go to the Effects tab. Select "Shift Switcher (Cover)" as Alt+Tab window switcher.
Find "Warp": "Cylinder", change the opacity to about 70 and check all the "EXCEPT Blur" boxes if you don't have graphics card, which can process it. If your graphics are relatively old/integrated, don't touch this option.
Do instead simple settings. Hold Ctrl + Alt and click and drag the mouse to display the menu. Open CompizConfig Settings Manager. On the main screen, deselect "Denial" and check "Show Mouse". Click "Rotate Cube" and change the scale to 0.4. Go back to the Effects section ( left menu), check "Bicubic Filter" and "Trail Focus". Try using the Paint Fire and Water effects (just enable them and use the shortcuts from the settings page). Now go to "Cube Reflection and Deformation" (check it if it's not already checked), expand Appearance and click on the top image file. Click "Edit" and replace everything with "`" (without quotes). Same for the bottom image. Go through the top and bottom colors of the cube and change the opacity to 0 for both. Now go back to the main screen and check “Window Previews”. Feel free to try other things too. Everyone has different requirements and different tastes.
Install Emerald/Compiz Window Decorator
Go to Package Manager from the main menu. Enter Emerald in the search box above. Right click on it and mark it to install, then apply. Once it's installed, press Alt + F2 (launch a dialog) and type "emerald -replace" (without quotes). You should notice the change immediately. To ensure that the functionality is loaded every time the system boots, add it to the list in “Startup Applications.” Use the same command.
Set up Emerald/Comfiz
When the installation of Linux Mint is fully completed, the instructions for adapting it to familiar operating systems are especially relevant. You can make the borders of your window exactly the way you want, whether it's like Mac Snow Leopard or Windows 7. For this you need Emerald Theme Manager. If it's not already installed, go back to Synaptic (package manager) and install "emerald/comfiz-theme-manager". Then open it and explore. There are literally thousands of themes and settings to choose from. To use them, just go to gnome-look.org -> beryl and download what you would like to download. Then add them via Theme Manager.
Install Synapse to run programs
Just add ppa: synapse-core/ppa to your software sources, update and search for "Synapse" in the Ubuntu Software Center. Open it from the main menu. You can activate it by pressing Ctrl + Space. Type a program to search for and press Enter.
Install the dock
The Dock is a launcher for applications and windows. You have many different options for this, including Docky, Cairo-Dock, ADeskBar and AWN. To install any of them, just copy from the official website and paste the commands into Terminal. Go back to synaptic and download additional gstreamer plugins, ms core fonts and Flash.