Connecting a laptop to a wifi network. Instructions for connecting Wi-Fi from various devices
Today you can use wireless Internet from completely different devices. This can be not only a laptop and computer, but also a phone, tablet and even a TV. But these devices must support WI-FI technology . Almost all modern laptops have Wi-Fi. This also applies to smartphones and tablets. And on computers, a wireless connection can be created by purchasing a special adapter.
I will tell you about this and much more right now.
So, after we turned on WI-FI already you can try to connect to it. Let's start with the laptop.
1. Connect to WI-FI on a laptop
Any modern laptop has WI-FI. Just turn it on, then find our wireless network and connect to it. Let's get on with it.
Opening:
Start – Control Panel – Network and Internet – Network and Sharing Center shared access- Change adapter settings.
Here we see the icon Wireless network connection. Clicking on it right click select an item Turn on.

A window will appear at the bottom of the screen (where the clock is) with the wireless networks found. We find our WI-FI and connect to it.

Confirm by entering your password.

Now we can open any other browser and try to load sites.
2. Connect to WI-FI on your computer
Co desktop computers a little more complicated. They most often lack technology wireless communication. But this problem is easily solved by purchasing a special board or a small adapter.
This is what I had on my old computer:

By inserting it into standard USB WI-FI port appears on the computer.
On my new PC Network adapter as a fee:

The price is almost the same ($10), and it has a better signal, which has a positive effect on Internet speed.
After installing any of these adapters and installing drivers for it (the disk is included), exactly the same will appear on the computer connection to WI-FI, as in the laptop example. We proceed by analogy with a laptop.
3. Connect to Wi-Fi on your phone and tablet
On your phone, just go to settings, turn on WI-FI and find your network. Here's an example from an iPhone:

On other phones everything is similar, including Android smartphones. It’s the same on tablets too :)))
4. Connection on other devices
On other devices, for example, TVs that support WI-FI or even printers, everything is done the same way: it turns on, the network is found and the connection is made.
I hope you were able to connect to WI-FI.
First you need to understand what it is Wi-Fi is a way to connect to the Internet without a wire. , so before you proceed directly to the connection, you need to make sure that you have all the necessary equipment for this. On the one hand, this is a Wi-Fi router that converts a wired signal into a wireless one, which means that the wire fits into it, but does not come out of it. On the other hand, this is a laptop equipped with a Wi-Fi module. As a rule, everything modern laptops are equipped with a built-in module, therefore special problems does not happen with it, but if for some reason it is not in the laptop or it does not work (and the failure is not related to the software), then you can connect an external Wi-Fi module, which is somewhat reminiscent USB drive and is connected through this connector.
Connection
So, we have a laptop with necessary equipment and a configured router. All you have to do is make a direct connection. First of all, you need to enable the Wi-Fi module on your laptop. This is done very simply, just press the Fn key combination and one of the F1-F12 keys, the one you are looking for is the one with the Wi-Fi icon. After clicking, a message will appear on the screen indicating that the module is enabled.
After this, you should pay attention to the lower right corner of the monitor screen. Near the clock, icons different programs, the Wi-Fi icon appears, it looks like several gray sticks of different heights. Those who remember the first mobile phones have probably seen it, only before it showed the presence of a connection. If this symbol is crossed out with a red cross, then the module is not enabled, which means you need to repeat the keystroke process. If a yellow circle appears on it, this means Wi-Fi is working and, moreover, the module has detected wireless networks.
The next step is choosing a network. To begin, left-click on Wi-Fi icon. A window will appear showing all the networks to which the user can connect. The network signal level is shown by green sticks, the more of them, the more powerful the signal, which means faster and  more stable work Internet. Now you need to select the desired network and click on it. A “connect” button will appear. If the network does not have a password, then the connection window will hang for some time, then it will disappear, icon wireless connection will not have any symbols on top and that means everything is done correctly. Now it’s enough to check the Internet, and to do this you just need to go to any site in the browser.
If the network is under a password, a window will pop up asking you to enter the security key. If it is known, then there are no problems. If not, then there are two possible ways - hacking using special programs or connect via wire and in the Internet connection settings you can find the security key or disable it or change it.
This completes the process of connecting to Wi-Fi. Sometimes a situation arises in which the wireless connection module does not work. There are two possible situations here: the drivers are not installed or it is physically broken. In the first case, it is possible to fix the problem yourself; in the second, you need to contact service center.
Drivers
So, if there are no drivers for Wi-Fi module, then they can be found on the device manufacturer’s website. Large companies post all device drivers for their laptop models on their website. The second way is to find the driver on a disk, which is sometimes found in the box with the laptop. If it is not there, you can go to the “device manager” and find the “ network adapters" All modules are displayed there, both for wireless and wired connection. If the laptop is connected to the Internet via a wire or USB modem, then by double-clicking on the required device and opening the “driver” window, you can update them via the Internet. In most cases, the laptop itself finds the programs it needs on the Internet and installs it. If the problem lies specifically in the software, then in the “device manager” the icon of the module that is not working correctly will be shown Exclamation point. This immediately indicates that you need to take care of updating the drivers or changing them.
Addition
The above method applies to connecting a laptop via a wireless connection with Windows XP or 7 installed on it; for newer systems - Windows 8 or an almost similar process, but with a slight nuance. First, open the network window, it will appear if you click on the Internet icon in the lower right corner of the desktop. Next, you need to drag the slider to the “on” position and select the desired network. Further process completely coincides with the above.
The second way is to go to the “networks” tab. The mouse cursor must be moved to the right top corner desktop, a panel will appear with a “Settings” tab. It has several different icons and among them is Wi-Fi. Further everything follows the already known method.
Sometimes it happens that the network tab is empty. In this case, find “network and internet” in the control panel. Next, you need to click “Network and Sharing Center”, and in it there is a tab “change adapter settings”. There you need to turn on the Wi-Fi module and then the process will be no different from the above.
Wi-Fi settings video
Wireless Internet is gaining more and more popularity and this process can no longer be stopped. To have a demon at home wired Internet, or point Wi-Fi access. I tried to describe the connection process in detail Wi-Fi router with photos and videos.
In fact, there is nothing complicated here, but you will need a little care and, perhaps, the phone number of your Internet provider. The whole process can be divided into three stages: physical connection, setting up a router and setting up a computer or laptop.
Connecting the router to the computer
After you have taken the router out of the box, you need to connect it to your computer. By default, I will mean that you have a regular wired Internet.


Enter the router settings
After turning on the router, it needs time to boot and get itself in order. At this time, the lights on the front panel may light up and go out, wait 1 minute. We need to go to the administrative interface of the router and configure it. This can be done through any browser, for example Internet Explorer, Google Chrome or Opera. To log into the “admin panel” of the router you need to write in the address bar:
192.168.1.1
login: admin
password: admin

A small note: the address 192.168.1.1 is used in most routers. If you receive a “Page not found” or “Page cannot open” error, then try using a different address, for example: 192.168.0.1
If there is an ambush here, then we need to find out correct address, for example from a sticker on back side devices:

If it’s not there, then you need to look at the instructions, which may be on the included disk, or search the Internet from your phone. The same applies to the login (username) and password (password), i.e. not everyone has admin/admin. If the device is used, then maybe someone changed the default settings. In this case it is necessary. To do this, you need to find the “Reset” hole on the router and press the button inside with a match.
Network cable is not connected
Let’s say the login address and login/password are known, but you still can’t log into the admin panel due to a network error. Then you need to check the network card settings in Windows 7/10. Let's go “Start -> Control Panel -> Network and Internet -> Network and Sharing Center”. There on the left we find “Change adapter settings”. Connection "Connect via local network» Should NOT be in the status “Network cable not connected”:

If this is so, then most likely this is the problem, i.e. The cable is not connected, is connected in the wrong place or is faulty.
Also, the status should not be “Disabled”. If this is the case, then right-click on the icon and select “Enable”.
Incorrect TCP/IP settings
If you still can’t log into the admin panel, then right-click on the connection icon and select “Properties”, and there we find “Internet Protocol version 4 (TCP / IPv4)” and double-click on it. In the protocol properties, you need to check that the “Obtain an IP address automatically” and “Obtain DNS server address automatically” checkboxes are checked. Click “OK” twice. Now wait 10 seconds and you can check.

I hope this was sorted out and I was able to log in to the admin panel of the router without any problems.
Quickly setting up a Wi-Fi connection on a router
It's more complicated here, because... All routers are different and the interface may vary greatly. Yes, and Internet settings among providers can also differ dramatically. If you have TP-Link router or another with the possibility quick setup, then you are in luck, everything can end very quickly. Find the “Quick Setup” item in the menu on the left or top and follow the instructions of the wizard:
On the first screen just click “Next”

I have a 3G router, so I'm prompted to select my preferred connection type: 3G or cable. I don't have a 3G modem so I select "WAN only"


If you don't know what to choose, then try auto mode. The router itself will try to determine the type of connection. If he succeeds, the wizard will move on to the next configuration step. But you may need to enter your login and password (in case of PPPoE connection)

or network settings (in case of “Static IP” connection type)

The provider should have given you all this information; look carefully in the contract. If the technician is unable to determine the connection automatically, then he will have to call the provider and ask, or try at random, there seem to be not many options
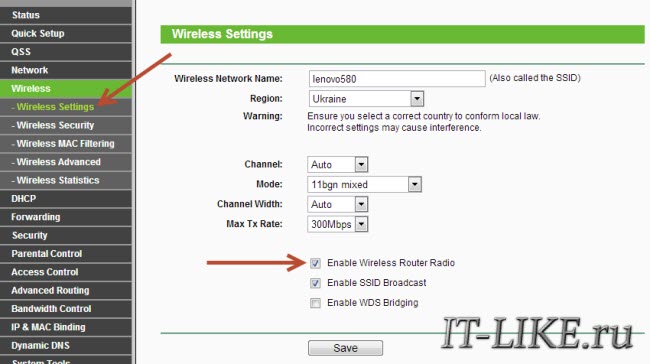
At the next step, the wizard prompts us to enable the Wi-Fi module:

- “Wireless Radio” - this is Wi-Fi, must be in the “Enabled” position
- In field " Wireless Network Name" enter any name of the point on English language
- Parameters: “Channel”, “Mode”, “Channel Width”, “Max Tx Rate” set as in the screenshot or leave it as default.
- , safety. Don't leave Wi-Fi without a password! Not only will everyone around you use your Internet and download the channel, it will be such a huge, huge hole in your security! Virtually anyone will be able to access all of your personal data. Set the switch to WPA/WPA2 and enter a complex password.
A small digression: when everything works, if it turns out that the Internet is too slow or if there are problems, then try selecting “Channel” not “Auto”, but some number from 1 to 13 and saving the settings. You can go through all the numbers to find the right one. The fact is that now there is a lot of wifi equipment around, and each device needs its own channel to work. As a result, devices operating on the same channel interfere with each other.
It’s good if you don’t have the cheapest router and it can operate at a frequency of 5 MHz. In this case, there will be a corresponding option to select a frequency of 2.4 or 5 MHz. At this frequency it works much fewer devices, and therefore the likelihood that someone will interfere decreases significantly.
Manual setting
Well, what if automatic settings it didn’t happen, then you’ll have to go through the points manually. We find a section something like “Network” and there is an item with the word “WAN”:

There should be similar settings items. Here everything is the same as for automatic setup, only we ourselves must select the type of Internet connection and enter the login/password.
- “Secondary Connection” leave “Disabled” or “Dynamic IP”, this is only needed to access internal network provider.
- “Connection Mode” set to “Connect Automatically” so that the router connects to the Internet automatically after each reboot.
If the provider requires you to specify the IP address and DNS server, then this can be done in the Advanced settings, but usually this is not necessary:

But, for example, I have a provider with problematic DNS servers and I register the Google server: 8.8.4.4 , which always works! How does a problematic DNS server manifest itself? This is when not a single site or website, but Skype or torrents work without problems! However, if you install the server on Google, then the internal sites of some providers may not open, for example, such as account replenishment and statistics.
It is here in manual settings, you can specify the connection type - VPN, if you have one. To do this, select “L2TP”, enter the name/password and VPN server address (provided by the provider). If an IP address, mask, gateway and DNS are provided, then select “Static IP” and enter all the data. Don't forget to check the automatic connection box at the bottom.

That’s it, save the settings and look for the “Wireless Settings” menu section:
All settings have been described above. For Wi-Fi to work, the checkbox must be checked. "Enable Wireless Router Radio".
Next point, here we enable encryption, that is, we set up security as already mentioned above:
The router setup is complete! I advise you to save all parameters from the menu "System Tools -> Backup & Restore". Button “Backup” - saves, “Restore” - restores from a saved file. This will be useful in case everything suddenly goes to hell and all settings are lost. You can easily restore them from a file
Oh yes, I almost forgot, change the default password for logging into the admin area. This is done in the section “System tools -> Password”.
How to connect a laptop to WiFi
In Windows 8/10, you need to click on the icon at the bottom of the screen:

A panel will appear on the right where you need to select the desired wireless network. Remember when we gave the name of the network in English? This is where you need to find it. If this is a public institution and you don’t know which network to connect to, then choose any one with a higher signal level. When you hover over a network, a hint appears whether a password is required or not. If, when you hover, you see something like WPA/WPA2, this means that you need a password to connect to the Wi-Fi network.

You can leave the “Connect automatically” checkbox. Next, the system will connect to the router and ask Wi-Fi password, which we installed earlier. If your device supports QSS technology, then you don’t have to enter a password, but simply press the button on the router labeled “QSS”. In this case, the password will be filled in without our participation!

When the system asks about file sharing, I advise you to select “No, do not enable sharing” if you do not know why it is needed:

I made a short video tutorial on how to do this:
In Windows 7, everything is the same, only the icon and the window with found networks look “Semerovsky”

Also find here required connection, click on it and voila.
No Wi-Fi icon or not connecting
First, check whether the wireless module is turned on using the switch on the laptop body. Many Asus models, Toshiba, Sony and Acer have this switch. On some laptops, wifi can be activated using hot buttons, for example “Fn+F2” (look for the antenna icon on the F1-F12 buttons). In any case, the method works through the “Network and Sharing Center”, the same way when we “turned on” network interface to connect to the router via wire.
In more severe cases, please study.
I hope everything worked out for you! Most likely, questions will arise regarding setting up the router, because... The interface and parameter names are different for everyone. To receive an answer in the comments, immediately send a link to a screenshot of the window.
According to my observations, few of those who were able to independently connect wifi router, if there wired Internet, knew how to do it RIGHT. That is, use it to set up a wireless network and integrate it into it different devices. As a result, they subsequently encounter difficulties that could have been solved at the local network design stage.
How to connect a wifi router?
Before you start step by step description regarding connecting a Wi-Fi router, I want to draw your attention to one point.
To create a full-fledged local wireless network, you need to buy a device such as a ROUTER, or also called a ROUTER.
The fact is that there are a lot of devices that are similar in appearance and functionality. for various purposes. For example, out of ignorance it is easy to confuse it with a wired router without WiFi, which also distributes the Internet signal to devices. But only with the help of cables - it does not have an antenna.
Another device similar in design appearance- access point. In general, her tasks are slightly different from ours. Characteristic difference router from the access point is that it has several sockets for network cables. While at the point there is usually only one.
The point of connecting a router is that it is now it, and not your PC, that will connect to the Internet via cable. To do this, all the necessary parameters required to connect to the provider, which were once applied in your desktop computer, will now be registered in the router settings. And all other devices will already receive Internet via wifi from it and according to the rules that will be specified in it.
For clarity, look at the diagram:

In order to connect a router at home and set up a Wi-Fi network, I used a dozen models from absolutely different manufacturers. I can say with confidence that in terms of WiFi configurations router and connection to the provider, the difference between them lies only in the details graphic design admin panel. Therefore, having mastered the principle once on one model, you can apply them to others. Today, as an example, I will illustrate with screenshots from two routers - TrendNet TEW-632BRP and ASUS WL-520GC.

How to connect a router to the Internet via DHCP?
The first setting we'll look at is DHCP setup server.
If previously there was only one computer and it alone received an IP address from the provider, then we can connect many computers and gadgets to the router. This means that it is the router, instead of the computer, that will “communicate” with the provider’s equipment. And already within our home network between these devices, he will himself assign an internal IP address to each computer, laptop, phone, TV and everything else.
Procedure:
- After connecting to the power supply, first of all you need to configure the router to communicate with the computer. To do this, insert the Internet cable into the WAN slot on the device. And we connect the other cable, with two plugs, which most likely came with the device, at one end to the computer’s network card. Where there used to be an internet cable. Others - in any of the LAN1, LAN2, LAN3 or LAN4 slots of the router.

I also want to note that it is better to connect the router to the network through a source uninterruptible power supply. I had an unpleasant experience when good device from Netgear faltered due to a power surge in the network. It simply began broadcasting wifi not at 100, but at 2 meters. Of course, I had to buy a new one.

- Next we take installation disk, included with the router. And we start installing the drivers and software.
- After this, we need to configure the computer to work with the router. Now we have LAN card configured to connect directly to the Internet through the provider. This means that perhaps the control panel contains some data that is important for us to save and use later when working with the router. To do this, go to the settings of the TCP/IP v.4 protocol as shown in the diagram:
For Windows XP: Start > Control Panel > Switch to classic look> Network connections".
In Windows 7: Start > Control Panel > Network and Internet > Network and Sharing Center > Control network connections>Changes adapter settings."
In the screenshot I go to settings " Wireless connection", but you don’t have it yet, and since we connected the computer to the router with a cable, you need to select the “Local Area Connection” item:

If you have something indicated here, then write down this data on a piece of paper. This is especially true for those who have lost their contract for the provision of services and do not know the data for connecting to world wide web. For a certain type of connection, which will be discussed below, this may be useful. After this, here, in the network connection settings on your computer, you need to set the IP, gateway and DNS to automatic. We will already enter these parameters in the wireless router.
- After that, go to the address “http://192.168.1.1”. Typically, configurations with the router occur here, if they did not have to be done at the software installation stage. But look in the instructions for the device to see which way to go to the router’s control panel. Since the default preset IP on different models may vary. Also another popular placement brief instructions— sticker on the bottom of the device. Look there too. If there are no instructions in the instructions, or it is lost, then go to the Control Panel, as I already described above. Only after right-clicking on “Local Area Connection” in the window that appears, click the “Details” button. In the window that opens, look for IPv4 Default Gateway - this is the IP address of the router.

- Now, finally, go to the address indicated there through the browser (http://IP ADDRESS OF YOUR ROUTER). And we find the DHCP Server item in the menu (in Trendnet it is combined with WAN) and set the range of values for possible IP addresses of devices within your local network. For me it was like this: Start IP - 192.168.10.101, End IP 192.168.10.200. And of course, opposite the DHCP Server item there should be an Enabled parameter. Domain Name or Host Name is the name of the future home wifi networks. Let me make a reservation right away that the screenshots below were taken from my devices, which are already working or have been working for several years. Their interface is in English, so it would be difficult for a domestic beginner to figure out what’s what without help - I hope these pictures will help you. Most modern firmware and the software is already in Russified form, so it will be even easier to understand.
This is what it looked like on Trendnet (highlighted in red):

And here it is in ASUS:

Setting up a computer connection to the router via LAN
Now we will set the parameters for our wifi network at home - IP and router mask. For Trendnet this is the same item (see Figure 1, highlighted in green), for Asus - the WAN & LAN section - at the very bottom of the settings page. In the first case I set IP 192.168.10.1, in the second - 192.168.1.1. This is the address within the local network at which we can access the admin panel through a browser. And through which computers will access the Internet. Mask - default, 255.255.255.0
Connecting a WiFi router to the Internet via the WAN port
These were all flowers, now the most interesting part is the setup external connection router to the Internet.
There are several types depending on the provider settings. This happens in the WAN menu.

There are several other options for connecting to the provider’s equipment, but I didn’t come across them. Therefore, I will not talk about them for now.
How to encrypt your WiFi connection
If you did everything correctly and saved all the settings, then all devices that support wifi should now see new network with the name you specified. However, this is the question of how to connect wifi at home, not closed yet. The home wifi network turned out to be open, that is, anyone can use your Internet access for free. In order to ruin everyone and make the wifi network at home accessible only to its owner, you need to protect the wireless network.
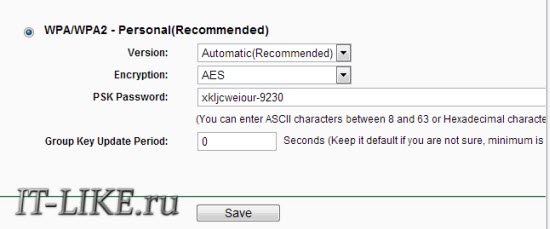
There are several methods, I have used two in my practice: WPE (or Shared Key) and WPA. The latter is more reliable, so I'll consider it. Go to security settings. In Trendnet this is the “Security” menu item, in Asus it is “Wireless > Interface”.
Select WPE or WPA Personal (PSK, TKIP) from the menu and set a password for authorization - from 7 to 64 characters. And we save. I show you how it was for me:


Well, now to access the Internet through your router, you need to enter a password. The final touch remains - so that there are no problems with connecting various devices to the router and with the operation of programs, we will manually set the DNS server. Setting this parameter is located in the same place where you entered the parameters for connecting to the Internet. We activate the function of manually assigning DNS servers and enter the IP from Google there:
- DNS-Primary (or DNS Server 1):8.8.8.8
- DNS-Secondary (or DNS Server 2): 8.8.4.4
You can also specify one of the Yandex servers (for example 77.88.8.8).

As you can see, connecting wifi through a router and making a wifi network at home is quite easy. I hope everything works out for you too!
Now a traditional video for dessert on connecting a router, which will tell you about it even more clearly typical settings for working with the network.
There are several ways to connect to Wi-Fi with mobile phone(on Android and iOS) or from a computer. In the instructions, we will also look at what problems you may encounter and how to solve them. We will also consider the configuration issue in detail. network connection through the interfaces of the router itself and Windows.
How to connect Wi-Fi on your phone
Every modern smartphone It has a Wi-Fi module in its filling. Typically, you can connect your device to Wi-Fi in just a few steps. Use the menu quick access or connect through your phone settings. Learn more about these steps for devices running iOS control and “Android” will be discussed further.
On iPhones
IN modern versions operating system iOS has a quick access menu that can be accessed by swiping up. If your phone automatically connects to your home network, then you can safely turn on Wi-Fi through the lower toolbar. Press the wireless connection indicator until it lights up and becomes active. After will happen automatic connection to a well-known network.
If you are connecting for the first time to your home or public network, you must perform the following steps:

Now you know how to connect Wi-Fi on any iOS device.
Possible problems and solutions
There are situations when a phone or tablet does not connect to Wi-Fi. The first and most common problem is a password-protected access point. You need to enter it in the appropriate field when connecting.

If the point does not have a password, but you cannot connect, take the following steps:
- check the Internet connection to see if the network is accessible from a computer or other device;
- make sure you are close enough to the router;
- make sure that automatic IP address distribution is enabled (DHCP function);
- reboot the router;
- reboot your mobile gadget;
- reset your router.
If other devices connect to your wireless network without problems, this means that the problem is with a specific mobile phone. We recommend taking it to a service center for diagnostics.
On Android devices
Despite the differences between Android and iOS, fundamentally connecting to Wi-Fi follows the same principle. To access quick menu Swipe down on the unlocked screen, and then tap the corresponding Wi-fi icon.

Users can activate Wi-Fi through settings:
- Go to your phone settings.
- In the wireless networks section, click on WLAN (or Wi-Fi).
- Move the slider to the activated state, and among available networks click on the one you want.
- Enter your password if the system prompts you for one.
If you encounter problems, follow the same steps as described in the troubleshooting section for iOS.
If the connection to the router is hidden
When devices are connected to Wi-Fi, a corresponding icon appears at the top. However, in some situations, you may not be able to connect to a wireless network because it is hidden. The user will not find it in the search list. To connect to a hidden wireless point to access, follow the instructions:

If all parameters are entered correctly, the phone will automatically connect to hidden network. Make sure you are within its coverage area.
When DHCP is disabled
When trying to connect to the router, the user may see a persistent “Obtaining an IP address” message. Each device connected to the router receives its own IP address. DHCP (Dynamic Host Configuration Protocol) is responsible for the function of distributing addresses. It may be disabled on some routers, so you must enable this protocol manually.

To activate DHCP, you need to go to the router settings. How to do this is described in detail in the subsequent paragraph “Access via the web interface”. Once you are in the settings, find the DHCP (or equivalent) section, and then select the Settings sub-item. It should enable the Enable inscription. Click "Save" and reboot your device.

DHCP may be disabled due to a problem in the router. Try full reboot. Press the button on the back of the router that says reset, and then hold it down for more than 5 seconds. Your password settings will be lost, but this will allow you to restore DHCP functionality.

Connecting Wi-Fi on a laptop
If you are connecting to a wireless network via a laptop, follow these steps:
WPS technology allows you to connect to the router quickly and easily. Using it, you do not have to enter a password on your computer or laptop. To do this, go to point 3 previous instructions. As soon as the password entry window appears, find the button on the router that says WPS, and then click on it. The laptop will automatically connect to the network.

WPS is often disabled by software. You can activate it in the router's web settings. Go to the WPS section, and then click the “Enable WPS” button. If necessary, you can add a new device through the web interface by clicking the “Add device” button.

Now you know how to connect to Wi-Fi with a password.
Enabling on the case or using a keyboard shortcut
On some Wi-Fi laptops disabled by hardware. It must be turned on before connecting to a wireless network. The first way is to click special button. Some manufacturers place a similar key on the keyboard or on the side of their devices.

You can also connect your laptop to Wi-Fi using key combinations. On many models for Wi-Fi activation There is a button among the functional ones (F1-F12). It should display the appropriate icon. To activate Wi-Fi, you need to press it together with the Fn key.

These are current ways to connect your laptop to Wi-Fi using buttons.