Why is the memory on the local disk decreasing? How to increase disk space from
Dear friends, I once encountered a problem - before my eyes it became disappear free place on drive "C". This was quite a long time ago, but an acquaintance reminded me of this the other day, literally shouting for help. There are few programs installed on the computer, and the free space is literally melting before our eyes. He installed the Windows 7 operating system a few days ago; the sellers assured him upon purchase that the system was licensed. But he already began to doubt this, thinking that he had been given a defective OS.
Ugly picture? It got to the point where he had 2 GB of 58 GB of free meta on disk (C). I deleted everything I could and moved the rest to disk (D). It didn’t help for long, the next day the same picture happened again. They began to deal with him. By old memory I immediately installed the Free Disk Analyzer program on his computer. The program is easy to configure, the interface is in Russian, and it is free. Free Disk Analyzer quickly analyzed all the disks on your computer. And he produced this picture.

Now you need to click on the disk you need and Free Disk Analyzer will show how much space and which folder is taking up space.

It turned out that the “System Volume Information” folder occupied half of the disk space. It is clear that an increase in the volume of the folder also led to a decrease in the volume of disk (C). In general, where did this System Volume Information folder come from and what does it contain?
We all want to take care of protecting our OS; in addition to installing antiviruses, we also set up system recovery. Read more about system recovery (rollback) in my article. When installing some programs and uninstalling them, when installing updates from Microsoft, we create system restore points.
How many of them can be created? But here it all depends on the user settings. By default, when you set new system, you have allocated 3% of disk space for recovery. 3% is not much, so recovery points do not last long. It’s a shame, what if there’s some kind of problem, so I want the restore points to be saved longer. So my unfortunate friend gave as much as 55% to restore the system.
Each restore point captures the state of the system at a specific point in time. All this data remains on the hard drive, thereby filling up a considerable amount of space, and all this information is stored in the System Volume Information folder. Somehow I had to read other people’s very abstruse advice on how to clean out this folder. But I did a simpler thing with a friend’s computer - I entered system restore and deleted all the created restore points.

To do this, you just had to click the “Delete” button. Then I moved the slider, setting the value to 5%.


In the empty line of the window that opens, you can enter any word in Russian or Latin, or a number. Clicked “Create” here too.

Once you have completed creating a manual restore point. I opened the computer.
This article can be successfully applied if you have an operating room Windows system XP, Windows 7.
In this article we will apply to you paid program Acronis Disk Director, but we also have another article, the free program does the same thing in it EASEUS Partition Master Home Edition, in the end you can choose what to work with.
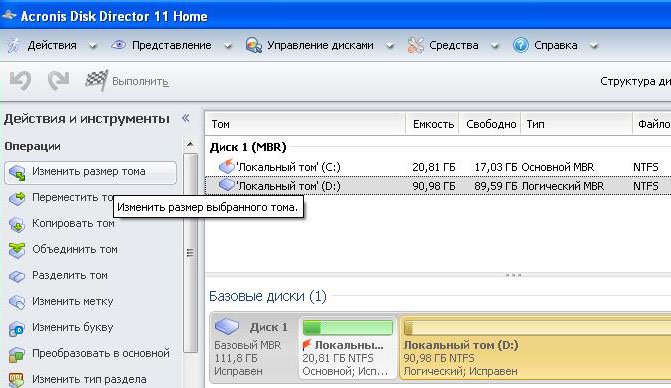
So here we will use Acronis Disk Director. Use this program if you need to divide your hard drive into several partitions or if you need to change the size of a partition. You can also use this program to find and restore deleted partition. There are a lot of articles on our website that describe working with this program, you can find them here. In our case, we split it incorrectly HDD to partitions when installing the operating system.
- Acronis Disk Director can be installed directly into Windows, but many users work from the program's boot disk, so there are fewer errors. Boot disk can be created in Acronis Disk Director itself.
At Windows installation XP drive (C:) on which we have installed operating system, turned out to be only 20.8 GB in size, and the disk (D:) turned out to be large 90.98 GB. Let's correct our mistake and increase the disk capacity (C:) due to the disk (D:), we will make them almost equal, all our files will naturally remain untouched, we will do this using a special Acronis programs Disk Director 11, website http://www.acronis.ru, you can download a free demo version. This program is very serious, if used skillfully it can help, but if used ineptly you will lose all your data, but I think it will do without it.
How to increase space on drive C
- The first thing we will do is reduce the disk partition (D:) and we will create unallocated space
- Second, attach the unallocated space to the drive (C:)
- Friends, if someone is working with the Acronis Disk Director program, after allocating free space from the disk (D:), this very space will disappear into nowhere and the disk (C:) will not increase in size, and the disk (D: ) becomes smaller, then first check the sections you are working with for errors, or two instructions at the end of the article will help you.
In general, for the future, it is better for you to perform the operation on the hard drive partition in the operating system installation program, immediately before installing Windows.
So here is our drive (C:), the full amount 20.8 GB
Disk management

Let's launch our program

Point the mouse at the disk (D:) and click right click mouse once (select it), then resize the volume
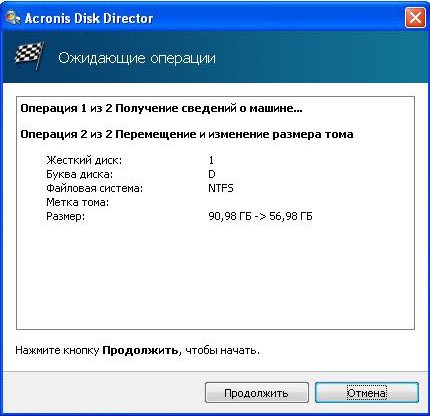
We change the size of the selected volume (D:) downward so that the unallocated space is in front of the volume (D:), set it to 34 GB, then we add the freed volume to the disk (C:) and the two volumes will become approximately the same in size.

Set it to 34 GB and click OK

Our program works in pending operation mode and all changes we make will take effect when you click the Apply pending operations button


Continue
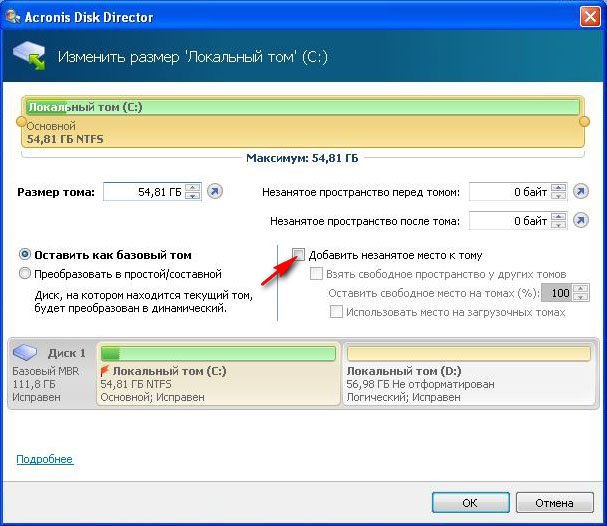
As we see, it appeared free space(Not occupied) with a capacity of 34 GB. Now it’s time to increase the size of the disk (C:), select it and click Resize Volume

Increase the volume size to 54.81 GB or to the maximum and check the box Add unallocated space to volume

In the main program window, click Apply pending operations, a request to reboot appears, continue and reboot

Before starting the operating system, we see the program working.

Windows loads, go to disk management and see the enlarged disk (C:)

Attention: Friends, if someone in the process of working with the Acronis Disk Director program, after allocating free space from the disk (D:), this very space will disappear into nowhere and the disk (C:) will not increase in size, and the disk ( D:) becomes smaller, then two small instructions will help you.
How does this happen. For example, if we take our case, we initially had a disk (C:) with a size of only 20.8 GB and disk (D:) size 90.98 GB.
In Acronis Disk Director, we pinch off 34 GB from the disk (D:), then attach this space to the disk (C:). After this operation, the disk (C:) should have a capacity of 54 GB, and the disk (D:) 56 GB.
In fact, we get the drive (C:) the same as it was 20.8 GB, and the drive (D:) 56 GB. In other words, the detached space from the 34 GB disk (D:) disappears into nothing.
In this case, you once again need to boot into the Acronis Disk Director program and pinch off a small space from the disk (D:), about 1 GB, and attach it to the disk (C:), then click the Apply pending operations button. After reboot, the missing space will be attached to the drive (C:)
Another instruction from our reader:
ATTENTION: maybe my advice will help someone. I also wanted to increase the “C drive”, and was also tormented by the loss of GB. One thing helped: I tore off one more small piece from “drive D” (100 MB) and left them as “not used”. After restarting the computer, I went to “My Computer” -> “Disk Management” and there I already added these 100 MB to “drive C” (function: Extend volume). After which he admired his missing GB.
The first, most natural “devourer” of free space on your hard drive is the Windows operating system. During PC operation, a so-called paging file is used, into which the OS unloads files if there is not enough random access memory. It is not recommended to disable the use of the paging file, but a competent specialist can change its size if necessary.
Another "fruit" Windows operation- creating system restore points. The files needed to restore the operating system after a failure can take up a very large amount of the total disk space and are not always needed by the user. If you save important data to an external hard drive or flash drive, and installers of the programs you need to work are at hand, then you can disable system recovery altogether. If you need recovery points, use them periodically when system failures, then in the settings you can reduce their number, as well as the amount of space for them.
For Windows Vista or Windows 10, the path you need to follow to access the above settings is: “Start” -> “Settings” -> “Control Panel” -> “System” -> “System Protection”.
How to remove “garbage” after running various programs
Of course, the files that create various programs in the process of their work, cannot be called garbage in the full sense of the word, but after receiving desired result They can be cleaned quite painlessly. For example, you should clear your browser cache more often. After uninstalling programs, you should check the location where it was installed and manually delete folders and files that were created and not deleted automatically.
Sometimes computer owners are faced with an unpleasant fact: free space on the hard drive disappears like snow under the hot sun. Feverish removal does not help installed programs- the place is steadily disappearing.
You will need
- scanner program
Instructions
First, clean out the Temp folder where temporary files are stored. These files are created by the operating system during operation to store the intermediate results of various operations. The folder itself is located on the system disk and constantly grows during operation. Press the Win+R keys and enter the %Temp% command in the "Open" line. Will open Temp folder. Use Ctrl+A to select all the files it contains and press Delete key. If a file cannot be deleted, the . Mark the remaining files with the mouse and press Delete again. This operation will free up a lot of hard disk space for you.
Download free program scanner from the developer's website, unpack the archive and run it by double-clicking executable file scanner.exe. Check logical drive, where space is lost. The program will scan it for some time.

The result of the scan will be , on which different colors files and folders located on the scanned disk are indicated. Hover your cursor over the colored area and the folder's name, size, and number of files it contains will appear in the top left corner of the dialog box. If you want to delete unnecessary program, click on the colored area, and then on the “Uninstall programs” icon (top in the right row). The standard Windows Add or Remove Programs window will open. Click the "Uninstall" button under the program name and follow the instructions.

Video on the topic
Sources:
- Download scanner program
Users personal computer During work, you may notice that the free space on drive C is rapidly decreasing. The reasons for this process are different: from completely natural to threatening the performance of the operating system. But most often, spare gigabytes are spent on accumulation various information and system files.

Instructions
The most common reason for reduced disk space is an increased number of installed programs. Some applications can take up a very significant amount of disk space. For example, dictionaries, databases, graphic editor, games. At stable connection everything to the internet antivirus programs constantly automatically update their virus databases data, so the free space is filled invisibly.
If the user is interested in collecting pictures in high resolution, films, music, then they are probably copied precisely to system disk. Firstly, if this data is downloaded from the Internet (from websites, file hosting services, ftp servers), then by default all browsers save the information in the Downloads folder, which is located in the My Documents folder, which means with each new file disk space is shrinking. Secondly, everything that is downloaded from torrents also immediately goes to drive C.
Sometimes there is a need to increase the size of drive C at the expense of another partition. Most likely you need this because there is almost no space on it, but you need to expand it. In this article I will analyze two programs that will help you do this and some instructions.
We will talk specifically about increasing drive C at the expense of another partition, for example, drive D, and they must be on the same hard drive or SSD. If you have Windows 7, 8 or 10, then these instructions will suit you.
How to increase the capacity of C drive using Aomei Partition Assistant
A wonderful program that will allow you to expand section C: hard drive or solid state drive, called Aomei Partition Assistant. This program It does not install various garbage along with it, which some programs are famous for. Also, the program is in Russian with a completely understandable interface. Works on all operating systems starting from Windows 7.
The most important thing to pay attention to: do not correct work with partitions can lead to data loss. If they are important to you, I recommend keeping them in a safe place.
Download and install the program, I think there will be no problems with this. After launch, you will see a nice interface, although it depends on who you are. All your disks and partitions are displayed there.
In our case, as I said, we will increase section C at the expense of section D. Now let's do this.
Right-click on drive D and select "Resize partition".
A window will open where we can use the slider and thereby change the size, or enter it manually. You need to make sure that the unallocated space of the partition after selecting the size is in front of it, as shown in the screenshot. Then click OK.

Now, in the same way, we change section C, only now we increase the size on the right. It will increase due to the free space that we took from drive D. Click OK again.

After the work has been done, at the top of the program, on the left, there is a button "Apply", press it.

Now the computer should be rebooted, usually you need to do two of them. As a result, the size of the C drive will increase.
This is not the only function of the program. With her help we can. Also, you can create a bootable flash drive in the program and resize the partitions there.
How to Enlarge C Drive Using MiniTool Partition Wizard Free
So, there is another good program called MiniTool Partition Wizard Free. It is free, does not install third-party software, but its disadvantage is that it is not in Russian, it may be difficult for some, but thanks to this article you will understand everything.
The program interface is somewhat similar to the previous one. In principle, there are almost no differences from the first option. We will enlarge the system disk in the same way.

First, click on drive D, and then click "Move/Resize Partition" up. Now let's take right size drive D, highlight it on the left and click OK.


That's all, after the operation you can already see the increased size in the explorer system partition. Now you know how to do it.
You can download the program from here.
How to increase the size of the system disk as standard
Standard means using standard Windows tools. You can do this, fortunately, like Windows 7, Windows 8 and Windows 10, there is such a function. But there is this method disadvantage: the data on drive D will be erased, so you will need to first transfer it somewhere. Perhaps you have decided to use this method, then first press the combination Win+R, a window will open in which you need to enter the command:
| diskmgmt.msc |
This will open the tool "Disk Management". There you will see all connected disks and partitions. If present additional sections, they are also called hidden, I don’t recommend touching them.
So, right click on partition D and select "Delete Volume". Subsequently, the data on the disk will be deleted, and free, unpartitioned space will be created to the right of the C drive.

To increase the volume of the system disk, right-click on it and select "Extend volume". Next, the volume expansion wizard will open, where we need to specify the volume by which we will expand the disk. You shouldn't choose too much if you still need section D.

We have enlarged the system disk, now we need to use the unoccupied space that we have left. To do this, click on what is not distributed with the right mouse button and click "Create Simple Volume". The drive will be assigned the letter you selected and will be formatted. That's all.

Now you can return all your important data back to the D drive.
How to increase space on drive C at the expense of drive D or another
The editors of our portal have more than once received questions like how to increase the space on disk c or how to increase the volume of disk c at the expense of d and so on. In today’s article, we will try to answer these questions in as much detail as possible and make some instructions for you, with the help of which everyone can painlessly and without losing data increase the size of the desired local disk.
Why am I running out of disk space?
Operating systems family Microsoft Windows have one unpleasant property: over time, the size they occupy grows and increases, thereby filling up the free space on the disk. Both temporary and system files, which grow depending on the needs of the system. Sooner or later, there comes a time when there is simply not enough space on the system disk and the operating system begins to “glitch” and work slowly. You can clean and remove unnecessary files, but what to do when there is nothing left to delete. In this article we will tell you how to increase the space of the System disk at the expense of other logical volumes.
Two methods to painlessly transfer free space from one drive to another
- Method 1 - if you are using operating system or 8, then you have the option to use standard utility to view and change hard drive partitions.
- Method 2 - otherwise you will have to use programs such as Acronis Disk Director or Partition Magic.
How to increase the size of the system disk with Windows 7 or another OS - Method 1
We need the utility “To launch this utility, right-click on the “Computer” icon and select “Manage.”

In the window that opens, find and launch the Disk Management utility. This component of the operating system allows you to manage all storage devices, be it a hard drive, flash memory or disk.
In order to increase the space on drive C at the expense of local drive D or any other, we need to transfer the available free space from one local drive to the system drive (that is, the one where the Windows 7 or other operating system is installed). Before doing this, check your local disk for free space and calculate how much you would like to transfer.

To free up space, right-click on it and select “Shrink Volume”.

In the next window we will need to specify the size of the space that we want to transfer to another volume. Set it to the “Size of compressed space (MB)” field.

After completing the steps, free space should appear on our hard drive, which we can transfer to the system drive.
In order to add free space to the system disk, right-click on it and context menu select "Extend volume".

After this, a wizard will launch that will help you resize our volume. In the wizard window, you will need to select the volume to expand and the amount of space to add.

Increasing space on drive C using Acronis Disk Director - Method 2
Acronis Disk Director is a very powerful product for working with computer hard drives and local drives. You should read the system messages very carefully so as not to accidentally make a mistake and destroy data.
When entering the program we are greeted intuitively clear interface, in which we can select disks and perform operations with it. To increase the volume size, select the disk and click “Change Volume Size”.

In the window that opens, check the boxes next to “Add unallocated space to a volume” and “Take free space from other volumes.” By clicking on the button next to the percentage window, select how much space you want to take from other drives. Once you have freed up space, change the Volume Size.
After making all the changes, click “Ok” and apply the actions. The system will ask you to reboot and after reboot you will have a disk with a large amount of free space.