Disabling the password when logging into Windows 10. Using the Control Panel
What are the differences between them? When using a local account, you usually plan to work on one computer, without synchronizing settings, installed applications and objects on the desktop. This approach was used back in Windows 7, and it may not require entering a password when logging into Ten.
WITH the advent of Windows 8, the authentication method has changed, and now, along with using a local account, it is now possible to use a Microsoft account when logging in. In this case, all OS settings are synchronized with the server, and you can log into your account from other devices. Authentication using a Microsoft account requires the user to set a password each time they try to log into the OS.
In the material presented, I will share with you tips on how to get rid of this. It is advisable to do this if no one is working on the computer except you, and you do not care about the safety of your confidential information (such as the password stored on your PC). Email, pin and code of a bank card, means of entry into other services). If someone else is working on your computer, it would be wiser to leave the OS login locked.
Method 1 – by changing user account settings
You can remove a password in Windows 10 different ways. One of them is to use the user account settings.
Open the mini command input panel through the “Run” menu by pressing the key combination Win+R(the Win button is a key on the keyboard with the Windows logo on it). On the panel that appears, enter the command netplwiz.
A form opens with settings for work user accounts. Select our active user in the list and uncheck the box that requires entering the username and password.

Click the “Apply” button. A transaction confirmation form appears, where you need to specify the current password for your active Microsoft account.

Enter your login password twice in the appropriate fields and click OK. We check that the checkmark in the field we need has disappeared and reboot to check if our method worked.
Method 2 – Using Registry Editor
One of the main disadvantages this method– this means that your password will be available for viewing in open form in the register, and anyone interested will be able to see it. Besides, this algorithm very reliable and comfortable, so in a progressive approach this method you can rest assured.
We launch the registry editor when using a key sequence Win+R and entering the command regedit. The editor window opens.
Opening a thread HKEY_LOUCAL_MACHINE \Softwares \Microsoft \WindowsNT \Current Version \Win logon.

- Changing the value AutoAdminLogon by double-clicking on this field, as a result of which the value of the parameter should change from 0 to 1.
- Changing the value DefaultDomainName to the domain name or local PC name. You can always see this value on the computer properties form. To call it, click right click mouse in open conductor on the “This PC” object and select “Properties” from the pop-up menu. Here you will find the full name of your PC.
- Change the field value if necessary DefaultUserName to a different name, or simply leave the active user untouched
- Generate String Element DefaultPassword, and in the “Value” field enter the password of your current account.
Now all that remains is to check the effectiveness of the procedure performed by restarting the computer and trying to log into the system.
How to remove password entry when exiting sleep mode?
When leaving sleep-mode a form also appears asking you to provide an account code. We'll remove that too.
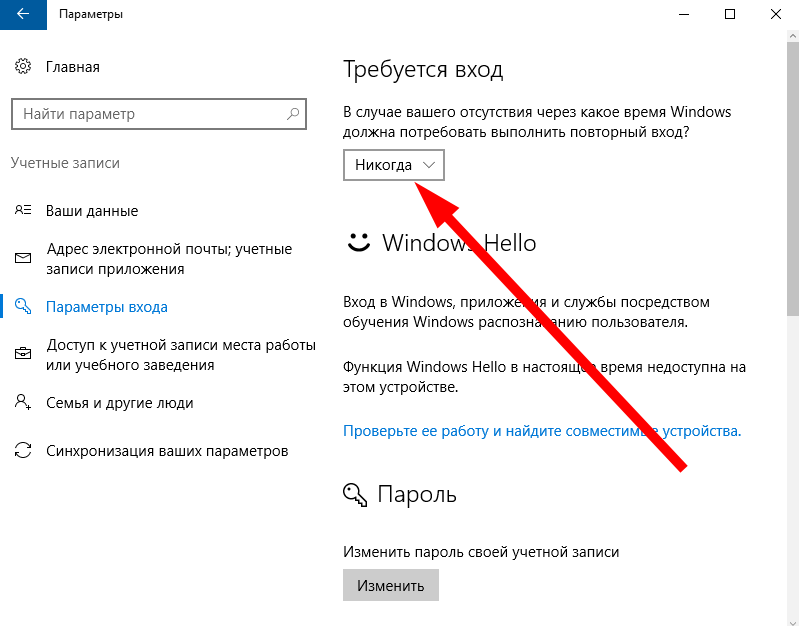
To do this, go to Windows settings by selecting the appropriate item in the Start menu.

On the parameters form, go to the subsection “Accounts” -> “Login Options” and in the first paragraph we change the value of the parameter to “Never”.
Well, that’s all, now you have the right to freely leave the computer for any length of time, and the password request window will not appear.
Method 3 - Reverting to local account authentication upon login
As I already said at the beginning of my article, the authentication method can be changed from local to Microsoft and vice versa. Let's say that you preferred the last option. Then, if you switch to a local account, the need to enter a password every time will disappear by itself. How to return to local method authentication? Go to the menu Windows Settings through start menu"Start".


The first number will ask us to enter the password for the active account. Let's do so.

The next form will ask you to enter your local account username and password. We enter the username arbitrarily, but intentionally leave the password fields blank.

Now everything is ready. We exit the operating system and log in with fresh authentication parameters by clicking on the button on the next window to log out.

Now log in again and make sure that a password is not required.
So we figured out how to remove the administrator password when logging into Top Ten. Some of these methods are safer, others are more convenient and practical. We tested them all and can say with clear confidence that they all work. Choose whatever you like and enjoy the comfort of working in Windows 10.
On latest versions operating system Windows 10 users can use an account password or PIN to sign in. A password prompt appears on the lock screen. By default, users must enter a password every time they restart the operating system or after resuming from sleep mode.
You can configure your computer so that users do not need a user name and password when logging on. To do this, it is enough to specify in advance the user on whose behalf the automatic login into the system.
After these steps, you will not need to enter your password every time you turn on your computer. Login will be performed automatically for the user whose data you entered above. If you need to disable the password for some accounts, you will have to enter data for several accounts separately.
How to disable password when resuming from sleep mode in Windows 10
Users who actively use sleep mode need to disable the password request when exiting sleep mode in the system settings. To do this, just go to Start > Settings > Accounts > Sign-in options, and at point Login required set value Never. After these steps you will not need to perform re-entry after the time you are away from the computer. 
Disabling login authorization using Registry Editor

After a reboot, you will not be prompted for a login password. To revert changes, you must set the AutoAdminLogon parameter to 0 or use a previously created copy of the registry.
You can also use the command line to make the necessary changes to the registry. The user only needs to execute one command. Run command line as administrator and run the command:
Reg add "HKLM\SOFTWARE\Microsoft\Windows NT\CurrentVersion\Winlogon" /v AutoAdminLogon /t REG_SZ /d 1 /f
After executing the command, the password prompt when booting the computer will be disabled. Although the command line is used to make changes to the registry, you should also be careful and create backup copy registry Moreover, the creation process will take literally a few minutes.
There are questions regarding disabling the login password. The Windows 10 operating system requires you to enter a password for your account Microsoft records every time you turn on the computer and log in, which is quite annoying for users. Especially if the password is quite complex and the user cannot enter it from memory.
If you also encounter similar problem, then this article should help you. Now you will learn how to disable the login password in Windows 10.
Step No. 1. Execute the “netplwiz” command.
In order to disable the password when logging into Windows 10, you need to run the “netplwiz” command. This can be done in several ways. For example, you can open the Run window using the Windows key combination + R and enter the command “netplwiz”.
You can also use the search. To do this, open the Start menu and search for “netplwiz”. After this, the system will prompt you to run this command.

Step No. 2. Disable the password when logging into Windows 10.
After executing the “netplwiz” command, a window called “User Accounts” or “User Accounts” should appear on the screen if you have English version Windows 10. In this window, you need to disable the “Require username and password” feature and click on the “Ok” button.

Step No. 3. Confirm that the password is disabled.
After clicking the “Ok” button, the operating system will require confirmation by entering a password. Enter the current password twice and click on the “Ok” button again.

At this point, disabling the login password can be considered complete. Now when you turn on the computer, the system will not require you to enter a password. But, the password will be required when exiting sleep mode. To disable the password when resuming from sleep mode, follow step #4.
Step No. 4. Disable the password when exiting sleep mode.
If you have Windows 10 without updates, then in order to disable the password when exiting sleep mode, you need to right-click on the “Start” button and select “Power Management”.

You can also open the Power Options window by searching in the Start menu. To do this, enter search query"Power supply."

In the power management window, you need to go to the “Require password on wakeup” section. The link to this settings section is in the left side menu. If you do not have the “Request password on wakeup” section, then you may have a “Power button action” section where the same settings are available.


After this, you need to enable the “Do not ask for password” function and save the settings by clicking on the “Save changes” button.

After these simple manipulations, the password when logging into Windows 10 will be completely disabled. Now the operating system will no longer require you to enter a password after turning on or resuming sleep mode.
If you have installed Latest updates for Windows 10, then you will not have the settings described above in the “Power Options” section. In your case, you need to use the "Options" menu. To do this, open “START”, go to “Settings” and find the “Accounts - Sign-in Options” section there. In this section, there will be an option called “Login Required”, you need to set it to “Never”. After this, the system will disable the password when logging into Windows 10.

If you have Windows 10 Professional or Windows 10 Enterprise, you can also use the Editor group policies. To do this, run the command “gpedit.msc” and in the window that appears, go to the section “Computer Configuration - Administrative Templates - System - Power Management - Sleep Settings”. In this section, you need to disable two functions related to the password request when exiting sleep mode (marked in the screenshot below).

Once again, I repeat that the Group Policy Editor (gpedit.msc) is only available for Windows 10 Professional or Windows 10 Enterprise. If you have Windows 10 Home, you can disable the password prompt when resuming from sleep mode only through the Settings menu.
OS login password - reliable protection data on the hard drive from being viewed by strangers. But if computer technology is at the disposal of only its owner, then restricting access is unnecessary. In order to remove the password when logging in Windows system 10, you will need to erase the code word previously written there in the settings of the created entry. But often they remember about removing restrictions when they cannot log into the OS and the user table parameters are unavailable. In this case, they use tricks.
Cancel password entry for a user account
Cancellation is carried out using a special panel. It is called by the WIN+R keys. In the “Open” field, copy the phrase “control userpasswords2” or “netplwiz” (without changing, paste). Confirm the operation by clicking “Ok”. Then do the following:Only the administrator and the user with open access. If the record is of a different type or the PC is part of a domain, the checkbox will not be available.
Cancel password entry when resuming from sleep mode
Restrictions on entering the OS will also be triggered when the PC or laptop exits sleep mode. The recording key must be specified when waking up the equipment each time, which is not entirely convenient. When to leave limited access to enter the OS when turning on the equipment, but remove it during operation, proceed as follows: If entering a code word is still necessary, you can configure the sleep mode itself. Standard settings- 5 minutes if there are no operations in the system. This period can easily be increased to tens of minutes and even several hours. Then you will have to enter the password less often. You can set up sleep mode by right-clicking on a free area of the screen, then selecting “Display Settings”. Here go to “Power and sleep mode”. Select the required time.
Using the Registry - For Advanced Users
If using the previous methods to achieve desired result failed, then to remove the password when logging into Windows 10, all you have to do is use the registry editor. Press the keys simultaneously on the keyboard WIN+R. In line " Open» register "regedit" Further: Important! It is not recommended for novice users to make changes to any registry blocks. Errors can cause the system to crash.
 Disabling the request through the "Power Options" section on awakening
In the Control Panel menu there is a “Power Options” item. You need to enter it, select in the marked scheme “ Settings …" Follow the link in a new window additional settings. Here, in central block windows expand item " Balanced" and in the section " Require password..." choose " No" To restart a computer.

Account settings
If the password is not forgotten or lost, you can simply cancel it. Login to the user's OS is controlled by the recording settings. By changing them, it is easy to remove the password. You need to do the following: This is the easiest and safest way for beginners to remove the password previously assigned to log in to the system. But the method will work if the code word used in the recording is not forgotten by the user. In this case, you will have to resort to one of the methods described above. Users who have not previously changed system settings should not use password removal through the registry. He's not safe. You should use the control panel and registry only in cases where standard method didn't fit. When making changes to the system settings, you need to double-check the recorded data. This will save you from mistakes.
 Typically, during the Windows 10 installation procedure, an account is entered, which subsequently entails the need to enter a password each time you log in to the system.
This causes some inconvenience to the user, and if the code contains a large number of dissimilar signs, then there are also significant unjustified losses of time. Windows 10 has several options to shut down and quickly resume its working state.
For example, each time the computer owner exits the hibernation state, he or she must enter a password. Below is a guide that will help you disable the code request when logging into Windows 10.
Stage 1. Log in to the “User Accounts” menu
The following steps need to be taken:

Stage 2. Disable the display of the window for entering account data and code when logging into the OS
In the main menu “User Accounts”, enter the “Users” tab and here you need to uncheck the “Require user login and code” section. Then click “Ok”.

Stage 3. Confirm to the system the seriousness of your intentions to deactivate the password request
 Performing the steps in the second step will cause a menu to appear on the screen with Windows requirement confirm canceling the code disabling. Algorithm consistent actions as follows:
- In the menu that appears, enter current code to log into Windows 10 in the “Password” field;
- In the next field “Password Confirmation” enter the same code again;
- Next click on “Ok”.
Ready! Performing the actions prescribed in steps 1-3 allowed us to successfully disable the code entry request when Windows startup 10. Now after loading the OS, entering account credentials is not necessary.
However, after hibernation, the system will continue to prompt for a code.
Below are instructions in the form of “4 steps” to solve this problem.
Stage 4. Disable the code entry window when resuming from hibernation mode
To remove the OS login code after hibernation, you need to take the following steps:

All! Now logging into Windows 10 will not require the user to enter a code. Following the steps in all four stages of the instructions allowed us to remove the interfering window at each loading Windows or after the system “wakes up”.
The described method is not the only one. You can also remove the code prompt when logging in from the OS through the registry editor.
Alternative methods to solve the problem
There are two more additional ways, with the help of which you can also effectively get rid of the problem in question.
Remove password using Registry Editor
Additional effective method To remove the annoying request, use the editor Windows registry 10.
To do this, follow the following step-by-step guide:

Getting rid of the user credentials request
If the user uses a local account on the PC, you can remove the request for this data for specific user. To do this, you need to perform several sequential actions:
- Open the command line with Administrator rights;
- Type “net users username”;
- Click “Enter”;
- Quit the command line;
- Ready! The OS will no longer prompt a specific user for a password.
Conclusion
As you can see, the process is quite simple to follow. The computer now quickly launches the operating system desktop. No need to waste precious time by simply skipping the login screen every time you turn on your PC. From now on, the user will not need additional effort to remember and type characters. But now the computer owner will need to take special care to prevent important information people who can unwittingly delete necessary files, for example, children, because to access the user’s desktop now you only need to press the computer’s power button.