The taskbar does not hide when watching a full-screen video. How can I turn off the display of recent documents? How to change the power button value in the Start menu
The taskbar is located at the bottom of the screen. That is why this arrangement is traditional. But modern displays have become much wider, so it became possible not to spare space for additional “bars”, and from time to time users have a question: how to position it on the side, that is, on the left or on the right.
Let us list the reasons why such an organization of workspace can sometimes be considered effective:
- for example, when editing text, it is desirable to see as much of the text as possible on the screen, and for this, the Taskbar located below is a hindrance, as a result there is an irresistible desire to eliminate this interference.
- The same applies to image processing, graphics, photos.
- Likewise, the taskbar located at the bottom of the screen can be distracting when watching a video.
- Also, some computer games require the entire screen from top to bottom.
Taskbar on the side - how to do this?
If the picture is fixed on the wall, and it needs to be moved to another place, then the first step is to unfasten the picture from the wall and remove it. It’s the same with the Taskbar - first make sure whether the Taskbar is pinned or not. If yes, it needs to be unpinned.
How to unpin the taskbar - the first method
Video version of how to position the taskbar on the side:
Let's look at a few other questions regarding the Taskbar.
How to hide the taskbar so that it pops up when you hover over it?
First, unpin the Taskbar. To do this, click right click mouse on the Taskbar, in the menu that appears, uncheck the “Lock the Taskbar” option.
Then for Windows 7:
in the “Taskbar and Start Menu Properties” window, check the box next to “Automatically hide the taskbar” (number 2 in Fig. 2),
then click on the “Apply” button (number 6 in Fig. 2), and then click on “OK” (number 7 in Fig. 2).
For Windows XP the same:
in Fig. 3 in the “Taskbar and Start Menu Properties” window, check the box next to “Automatically hide the taskbar”. First, click on the “Apply” button, and then click on “OK”.
After these simple actions The taskbar will not take up any space on the screen at all, and, if necessary, will automatically pop up when you hover the cursor over it.
How to make icons on the taskbar larger or smaller (Windows 7)?
Here everything depends on the checkbox next to the inscription “Use small icons” (number 3 in Fig. 2). If you check it, then click on the “Apply” button (number 6 in Fig. 2), and then click on “OK” (number 7 in Fig. 2), then there will be small icons in the Taskbar.
If you uncheck the box next to “Use small icons” (number 3 in Fig. 2) and click “Apply” and then “OK”, then the icons on the Taskbar will be enlarged.
How to enlarge the Taskbar?
If you have placed the panel on the left or right of the screen, you will be able to stretch it to the center if there is free space. To do this, move the mouse cursor to the top border of the Taskbar. Move the cursor near this border a little up and down so that the cursor takes the form of a double-headed arrow, at this moment click on left button mouse and drag the border to set right size taskbar.
This option is applicable for both Windows XP and Windows 7.
How to make the taskbar smaller?
You can reduce the taskbar in the same way as described above in the question “how to increase the taskbar”.
P.S. By computer literacy you can also read:
Receive the latest articles on computer literacy directly to your mailbox
.
Already more 3,000 subscribers
The taskbar is usually located at the bottom of the Desktop, however, it can be placed on the side or top of the screen, if it is more convenient for the user. But often a line is moved accidentally due to the careless actions of one or another user. From this article you will learn how to make a toolbar at the bottom of the Desktop if you are not used to using it in other places.
Navigating through properties
To move the socket to the location you need, you need to understand this course of action:
- The location of each element must be specified in its properties. In order to get into them, you need to right-click on the “Start” button.
Important! You can do it differently: right-click on empty space in the taskbar or use the built-in Start search. Ultimately, the window you need will appear on the monitor.
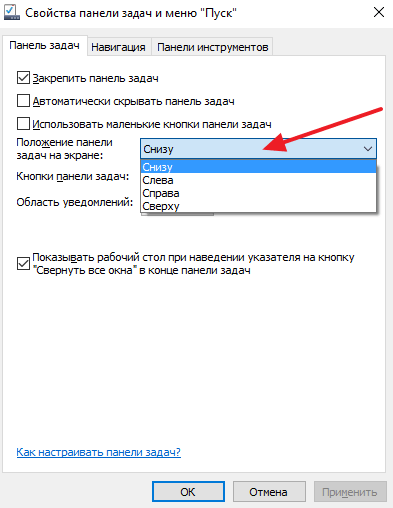
- Next, you will notice in the properties the line “Position” (or “location”). It indicates where the panel with all its components is located (top, bottom, right or left).
- Select “Bottom” and click “Apply”.
- In order to protect yourself in the future and not move the element to an unwanted place, it is better to check the box next to the “Pin” item.
Important! Once you have the control panel down, you will have the option to set it to auto-hide. This way it will disappear when the cursor is not hovering over it.
The information we have prepared in the following articles will be useful to you:
Manual movement
As a rule, the socket changes its location due to careless movements with the computer mouse. If this element was not secured previously, you can easily swipe it to the desired location. This problem is also corrected manually. To do this, follow the given algorithm:
- Right-click on the panel and make sure there is no checkmark next to “Dock.” If there is one, you should remove the mark by clicking on it with the left mouse button. Stripes of dots will appear on both sides of the element.
- Place the cursor on empty space on an element. Press and hold the key.
- Move this element down or in any other direction - you will notice that it “sticks” to the edges of the computer screen.
- After the panel is placed at the bottom of the Desktop, you should right-click on it again and select the “Dock” checkbox - this is necessary in order to prevent its next accidental movement.
Important! Don't know how to hide information on your PC from public view? The answer is simple, read it. The information at this link will also be useful for you.
The described steps are the same for all versions of Windows.
Important! If you use Windows XP, then it should be noted that this system has a very interesting feature - placing a particular folder on the sides or at the top of the Desktop. It could also be thrown into an unwanted place at random. As a result, a panel always appears showing the contents of the directory. This problem is solved in a similar way: the folder is taken and simply pulled out to the desired location on the desktop.
Other problems
So, we figured out how to move the control panel down, but other problems can occur with it. Below are the most common ones:
- The taskbar disappears and appears again. If it keeps disappearing and reappearing, then most likely the user has the auto-hide function activated. It is very easy to disable it in settings or properties.
- The taskbar is very large. Another common problem is its too large size. To solve this problem, you need to unpin this panel, then move the mouse cursor over its edge and drag it towards the desired edge of the screen. If using this method width does not decrease, then you should open the properties and activate the function where it says “Use small buttons”.
Important! If you don’t know how to clean your computer so that it doesn’t slow down, read the information by clicking on the link.
PVC panels are a practical and durable material, and therefore are widely used in decorative wall decoration. They are suitable for any room, and the variety of textures, shapes and colors allows you to make the interior not just cozy, but also very stylish. The fastening technology is quite simple, so wall decoration plastic panels– an excellent option for a novice master.
The range of plastic panels is so large that it is very difficult for an inexperienced buyer to understand. To avoid mistakes, you should familiarize yourself in advance with the characteristics of this material and its varieties. You should only consider certified material, because low-quality panels do not have the required strength and quickly fade.

The main advantages of plastic panels:

The disadvantage of this material is its low impact resistance, so the panels should be handled with care during transportation and installation. Depending on the coating, the panels are divided into matte and glossy, and according to the technology of applying the pattern - into film and printed.

Standard sizes:
- width from 200 to 350 mm;
- length from 2700 to 3000 mm;
- thickness from 8 to 10 mm.

The strength of the material depends not only on the thickness of the walls, but also on the number of stiffeners located inside the panel. To check how durable the material is, you need to press your finger on the surface - if the plastic bends, the panel will not last long.

Besides, You should not buy panels if:

Comparative table of characteristics of PVC panels (for comparison, plastic panels with a flexo printing coating type, 0.25 m wide and 3 m long are taken)
| Indicator/panel | PVC panel TM Decomax | Average Chinese panel | Average European panel |
|---|---|---|---|
| Front surface thickness, mm | 2,5 | 1,5 | 2,0 |
| Number of stiffeners, pcs. | 29 | 20 | 29 |
| Condition of the stiffeners | smooth, without deformation | smooth, there are minor deformations | smooth, without deformation |
| PVC panel weight, kg/sq.m | 2,2 | 1,7 | 2,0 |
| Appearance | The coating is smooth, but with obvious gaps in the stiffening ribs, there are slight deformations | The coating is smooth, without any stiffening ribs. | |
| Raw materials | after slight pressure the panel becomes deformed, which proves the high chalk content | after slight pressing, the panel returns to its original appearance, which indicates a low chalk content |
Preparatory stage

Preliminary calculations
You need to start by calculating the amount of finishing material so that you don’t have to overpay or go to the store for an additional batch. The panels can be mounted both vertically and horizontally, depending on the wishes of the apartment owners. When mounting vertically, the number of panels is calculated as follows: measure the length of the perimeter of the room, subtract the width of the openings and divide by the width of one panel. To the resulting number add 2-3 lamellas in reserve.
For horizontal installation, measure the area of the room minus door and window openings and divide by the area of one panel. Here the margin should be at least 10%, since the consumption of material for trimming increases. Additionally, you need to calculate the number of slats for the sheathing and fasteners. First, the height of the walls is divided by the sheathing pitch, which is usually 0.5 m, and multiplied by the perimeter of the room. The resulting number indicates the length of the slats in linear meters. By measuring the height of the corners and multiplying it by their number, we obtain the total footage of the corner profiles; to this number you need to add the perimeter of window and door openings.
Methods for attaching lamellas

There are three ways to secure the panels to the wall - using glue, self-tapping screws and clamps. The first method is suitable for very even and smooth walls; glue is used special for PVC, universal “Moment-installation” or “liquid nails”.

The use of this method simplifies and reduces the cost of the installation process, since there is no need to attach the sheathing. Disadvantages: it is impossible to replace a damaged panel; during subsequent repairs it is difficult to remove the covering from the wall.


Fastening with self-tapping screws is a reliable and convenient option that does not require a perfectly flat surface. To screw in the screws, you definitely need a screwdriver, otherwise the installation process will take a long time. Disadvantages of this method: a wooden frame is better suited for self-tapping screws, so additional time is spent cutting the timber and treating it with an antiseptic.

The third option is the most optimal. The clamps are conveniently and quickly attached to the sheathing and securely fix the panels to the wall. The lathing is mounted from a metal profile, assembly of the covering is carried out effortlessly. A damaged lamella can be easily replaced with a new one; dismantling the finish also does not take much time.

Tools and necessary materials
During the work process, everything should be at hand, so materials and tools for installation are prepared in advance. You will need:
- fine-toothed hacksaw;
- pencil and tape measure;
- level;
- square;
- plastic panels;
- slats or plastic profile;
- dowel-nails, screws or clamps;
- screwdriver;
- perforator;
- antiseptic composition;
- sealant;
- ceiling plinth.
Preparing the walls
Before covering the walls with panels, you need to clear the old coating, seal every single crack, smooth out noticeable defects and treat the surface with an antifungal agent. Thanks to this, dust will not accumulate under the plastic and mold will not develop, which negatively affects the microclimate in the room. If installation will be carried out on a frame, it is not necessary to additionally level the surface.
Installation of plastic panels

Step 1. Marking the walls
The sheathing should be fastened strictly according to the level, this will help to avoid distortions. In order not to measure out each rail, you should make markings on the walls. The bottom row of the sheathing should be located 1-2 cm above the floor, so mark a point on the wall with a pencil at this height, and then use a level to horizontal line around the entire perimeter. Exactly the same line is drawn under the ceiling or along the edge of the trim if the walls are not sheathed to the full height. Next, measure 40-50 cm upward from the bottom line, place a beacon, and so on until the very top. Strictly parallel lines are drawn through the beacons along the perimeter of the walls. The marking is ready.
The panels must be attached to the sheathing perpendicularly, so the horizontal frame is sheathed vertically, and vice versa. To make markings for vertical sheathing, the first line is drawn in the corner from ceiling to floor using a plumb line. Next, mark the second corner, and then draw the remaining lines in increments of 50 cm.
Step 2. Installation of the sheathing


If wood is used for the sheathing, all slats must be primed with an antiseptic agent in advance. Along the marking lines, holes for dowels are drilled with a hammer drill at a distance of 50 cm, then slats are applied, leveled horizontally and secured to the wall. Where the walls are uneven, wooden wedges are placed under the sheathing. If wiring runs along the wall, it must be hidden under the trim. To do this, take measurements, drill holes in the wall and secure the wires with clamps so that they do not protrude beyond the plane of the sheathing.


Step 3. Attaching the slats
The first lamella is installed in the far corner from the entrance, which is considered the most noticeable.

Take measurements and, if necessary, cut the panel to length with a hacksaw. One edge of the panel is inserted into the side molding, applied to the corner and secured to the sheathing from the back.

The second lamella is inserted into the mounting groove of the first, the joints are pressed tightly and fixed to the frame slats.


To achieve maximum sealing of the joints, the side edges are lightly coated with silicone before insertion. All subsequent elements mounted exactly the same way.


Holes are cut out in the panels for switches and sockets with a sharp knife, and after installation, these areas are covered with plastic boxes. The last lamella most often requires cutting in width, so first try it on the wall, mark the cutting line with a pencil and cut off the excess with a hacksaw.

Step 4. Installing moldings
After installing all the elements, the surface should look monolithic and smooth, without gaps at the seams and around the perimeter. To do this, all corners, joints and connections are covered with special plastic moldings. Their design allows you to carefully insert the edges of the panels on both sides, making the corners look much more attractive.

Finally, decorative molding is installed around the perimeter of the ceiling, and a plastic baseboard is attached around the perimeter of the floor. At this point, finishing the walls with PVC panels is considered complete. With careful use, the panels do not lose their attractiveness for a long time and do not require repairs.
Video - Wall decoration with plastic panels
Often when opening a video file in full screen mode The taskbar remains visible and is not hidden. This covers part of the screen and spoils the entire experience of watching the video. Moreover, the problem may appear when viewing online videos in full screen mode, for example on YouTube, or when launching computer games. In the latter case, part navigation menu becomes inaccessible, which makes it impossible to play normally.
If you are faced with the problem of an unhidden taskbar, then you should take the following steps in succession.
What to do
First, try just restarting your computer, in most cases this is enough. Since the main reason for this behavior is incorrect operation the explorer.exe process, which is responsible for the operation of the Windows interface.
You can also try to restart this process. Why open the “Task Manager” (Ctrl+Shift+Esc) and find the “Processes” tab, sort by the first column and find the process in this list explorer.exe, after which we click the “End process” button and confirm our intentions. In Windows 10, you need to go to the “Details” tab in the task manager, where you can remove the task from the explorer.exe process.
The system interface (taskbar, start button, etc.) will disappear, but don’t worry, in the Task Manager we can now click File -> New task(Run). In the window that opens, enter explorer and click OK. You just rebooted everything Windows interface without restarting the computer.

If this does not help and the taskbar is still located on top of the video, then you can try the following. Right-click on the taskbar and uncheck “Pin taskbar”.

Now we change its size (width) by pulling the edge up and down. Increase the size of the “Taskbar”, and then return it to its original state and secure it again by checking the appropriate box.
You can also use the option to automatically hide the taskbar. To do this, right-click on the panel and click “Properties”. In Windows 10, click "Options". In the properties window that opens, enable the “Automatically disable taskbar” option, then click OK to save the changes. In Windows 10, this option is added with the label “in desktop mode”. In this mode, the taskbar will be hidden all the time unless the mouse cursor is hovering over it.

In Windows 7 it may be useful solution disable preview desktop using Aero Peek. This parameter is set in the taskbar properties window. It may also help to simply change the theme.
If you were unable to get rid of the problem either by restarting the Explorer process or by using additional options and changing the theme, then most likely the system files and operating system on your computer are damaged. But before this cardinal decision integrity can be checked system files SFC utility, which can be launched from command line Thus:
sfc /scannow
System files will be checked and restored, but may be prompted during the process. installation disk with Windows.
The taskbar plays the role of the main panel in the operating room Windows system. Displayed here running programs, clock and start button.
By default, this panel is located at the bottom of the desktop. But, because software error or user inattention, the taskbar may move to a different position. For example, on the top of the desktop or to the side. For most users, this non-typical panel arrangement is not convenient. Therefore, they wonder how to lower the taskbar to the bottom of the desktop.
Lower the taskbar to the bottom of the desktop using the mouse
Perhaps the easiest way to lower the taskbar to the bottom of the desktop is to use the mouse. In order to use this method, you must first check whether the Taskbar is pinned or not. To do this, right-click on the taskbar and look at the item “ Pin Taskbar" If there is a check mark next to it, it means that the Taskbar is docked. To unpin it, click on the “Pin Taskbar” menu item and uncheck it.
Once the Taskbar is undocked, you can move it down to the bottom of the desktop using the mouse. To do this, just left-click on empty space on the Taskbar and without releasing the mouse button, move the Taskbar to the bottom of the desktop.
After the panel drops to its usual place at the bottom of the screen, it needs to be secured. To do this, right-click and select the “Pin taskbar” menu item.
Lowering the taskbar using settings
You can also lower the taskbar to the bottom of the desktop using the settings. To do this, right-click on the Taskbar and select “Properties” from the menu that opens.

This will open a window with settings for the taskbar and Start button. Here, on the “Taskbar” tab, you can select the location where the Taskbar should be located. In order to lower the Taskbar to the bottom of the desktop, select the “bottom” option and save the settings using the “Ok” button.
Please note that in order to change the location of the Taskbar using Settings, it is not necessary to unlock it.
Solving other problems with the Taskbar
In addition to the above, other problems occur with the Taskbar. We will look at the most common of them below.
- The taskbar disappears and appears. If your Taskbar keeps disappearing and appearing, then most likely you have the “Automatically hide the Taskbar” feature enabled. You can disable this feature in the taskbar settings. To do this, right-click on the taskbar, select “Properties” and on the “Taskbar” tab, disable the “Automatically hide the taskbar” function.
- The taskbar is too big. Another problem with the Taskbar is that it's too large size. In order to solve this problem, you need to unpin the Taskbar, move the mouse cursor over the edge of the Taskbar and drag it towards the edge of the screen. If you cannot reduce the width of the Taskbar using this method, then open its properties and activate the function “Use small buttons on the taskbar.