Tricolor satellite antenna direction. Technical parameters of the tricolor TV antenna system
Tricolor TV, like modern satellite television, can be set up without the help of a specialist, saving a decent amount of money. The work front is very labor-intensive, but not difficult if you know the sequence of actions. Below we will describe in detail how to set up Tricolor TV.
What will you need at work?
Before answering main question How to set up a satellite dish, you will need to prepare the following working tools:
- spanners different sizes;
- perforator;
- screwdrivers of different sizes;
- elements for fastening;
- insulating tape;
- working level;
- drawing pencil or pen.
Selecting an antenna installation location
Setting up the Tricolor TV antenna begins with the choice of its future installation. The main factor that you should rely on when choosing is the free access of the device towards the satellite, that is, the signal source. In other words, if you visually draw a straight line between the satellite and the antenna, you should not find an obstacle on it in the form of trees and structures on roofs or buildings. This will be the first step towards how to set up the Tricolor satellite dish yourself.
Please note that the closer the dish is installed in relation to your TV, the better signal quality you can be guaranteed. In addition, this way you can set up the plate much easier and faster.
Places unfavorable for installing an antenna:
- glazed loggias;
- areas that may be subject to precipitation in the form of snow or rain;
- roofs with a gable, hipped or asymmetrical roof;
- places near the spillway.
Assembling the Tricolor TV antenna and installing its main elements
Contrary to popular belief, assembling and setting up an antenna and dish is not that difficult. For this you need to follow established algorithm actions and rely on the proposed scheme.
- The massive bracket, which is included in the Tricolor package, should be securely fixed to the wall. The installation features and the choice of fastening tools will depend on the wall (load-bearing or solid).
- When fixing the bracket, keep in mind that the converter located in the holder must be installed downwards. This way, you will protect your Tricolor plate from precipitation.
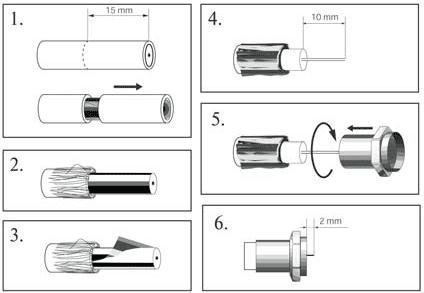
- Securely connect the cable and the converter to each other using the F-connector. To do this, you will need to free the cable from the top insulation by no more than 10 mm. Then, wrap the cable tightly with braided shielding and foil. The inner insulating layer also needs to be removed by 10 mm and the connector must be tightened as much as possible.
- Prepare stitches and insulating tape in advance to install the cable in the arc of the converter holder.
- Sealing is a necessary procedure that must extend over the entire length of the cable. In some cases, you may need silicone sealant.
- Next, fix the antenna to the bracket. Install it so that you can rotate it at any time different directions.
- At the last stage of assembly, you will again need electrical tape and zip ties, since in addition to the antenna, the cable must also be fixed on the bracket. If you secure the cable with a small margin, this will subsequently make it easier for you to install and repair the device, if necessary.
If you are still wondering how to set up a Tricolor TV antenna without the help of a specialist, then keep in mind that you have already overcome the first and most difficult stage. And as you can see, it wasn't that difficult to do. In addition, the procedure for assembling the antenna is universal and does not depend on what you are using and what image format will be displayed on the screen, in particular, the Ultra HD format.
Installation of a television connector
Based on the presented diagram, act progressively:
- for fear of damaging the shielding braid, remove 15 mm from the top insulation of the cable;
- the shielding braid, and then the foil, must be located along the entire length of the cable;
- also remove the cable from 10 mm of the inner insulation layer;
- Screw in the connector as much as possible and use wire cutters to disconnect the conductor, which should not extend beyond the edges by no more than 3 mm.
Video, transmitted to TV by using installed plate The tricolor will directly depend on the quality of the work you carry out. Therefore, carefully follow the order of the instructions and put maximum effort into the process. Setting up Tricolor TV requires progressive action.
Adjusting the Tricolor TV antenna
The more accurately the antenna is adjusted from a geographic point of view, the better the channels will be shown on Tricolor TV. The peculiarity of these manipulations also depends on two factors: elevation and azimuth. Both quantities are measured in degrees.
The difficulty is that for each individual settlement and region the indicators can vary significantly. For example, for Bryansk the elevation angle will be 29 degrees, and the azimuth will be 178 degrees. Take this feature into account when adjusting the antenna.
If for one reason or another your channels have disappeared, then perhaps the cause of the failure is the incorrect adjustment of the dish.
You can determine the azimuth yourself if you know how to use a compass and determine its exact indicators.
Rely on the advice provided by the provider satellite television with high quality images Ultra format HD, connect the cable from the converter to the signal receiver. This will be very easy to do, since the installation of the television connector has already been completed. After that, connect the receiver to the TV and check the presence of a signal and its quality.
Setting up the Tricolor TV signal
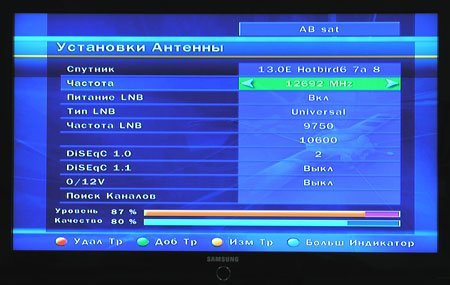
In order to set up free channels Tricolor TV and their signal, you will need to go to the “Antenna Settings” menu. Next, move the antenna cursor in the plane to such an extent until you receive a signal that satisfies you.
There should be no interference, ripples or small dots, in addition, the sound should be of high quality and perfect.
Please note that if during operation you have lost channels, then as one of the options for troubleshooting, you can go to the above-mentioned menu.
The next step is to open the “Received Signal Level” tab.
- Pick up the receiver's remote control and press the "MENU" button.
- Use the arrow buttons, find the “Settings” tab, then confirm the command by clicking “OK”.
- For further installation, a password must be entered. At the first stage, the provider provides for the introduction of four zeros. You can change it yourself later.
- Next, get to the “ System settings" and confirm the command again by clicking "OK".
- Enter the “Antenna Settings” menu and confirm the request.
After you select the antenna installation mode and channel list, determine the satellite that matches your region: Eutelsat 36A or Eutelsat 36B. Find two scales in the antenna installation menu tab that characterize the signal level and its transmission to the satellite. If both of them are filled to the 70% mark, it means that all your work was carried out correctly and the channels on Tricolor TV will be shown in high quality.

In the event that the indicators are below the desired level, it makes sense to turn to the cable connection. Perhaps he is transmitting weak signal to a satellite that simply does not pick it up.
Do not forget that your plate is still outdoors, and it cannot be ruled out that it may be affected by weather conditions. Thunderstorm, lightning, heavy rain or any other precipitation may affect signal strength. But it will return to normal once the weather conditions improve.
Video instructions for setting up
The video clearly presents all stages of assembly and installation of the Tricolor TV antenna. A visual demonstration allows you to more easily imagine what the work process will look like.
Now you know how to set up Tricolor TV yourself, how to assemble the antenna, how to check the signal level and what to do if channels are lost. This will allow you to save money that could have been spent on the services of an adjuster.
In contact with
Satellite television is available in almost every home today. In Russia on this moment Tricolor TV is considered the most popular and reliable satellite television provider. The principle of operation of such television is to transmit data via an Earth satellite from the transmitting center to the receiving device to the consumer. Data transmission is of high quality. Ensures picture and sound quality correct installation and equipment setup. You can call a service specialist for installation and adjustment, but you can install and adjust the system yourself.
The plate is the fundamental element satellite system. It is a metal structure of a parabolic shape, concave inward. This form was not chosen by chance. Signals arriving from the satellite, reaching the dish, are concentrated at one central point - in a circular convector, which allows receiving high level communications. From the convector, information travels along the cable route to the receiver, where it is converted and displayed on the TV screen.
Now knowing the principle of signal transmission, it becomes clear that the satellite antenna should be installed according to the following rules:
- We select an available trajectory from the dish to the satellite. To do this, mentally draw a line from the antenna in the direction of the transmitting device. There should be no trees, buildings, structures, or structures along the path of the trajectory line that could block the path or distort the signal. Remember! The satellite signal cannot pass through walls.
- We fix the antenna at a high altitude point. The roof of the house, the open side of the balcony room, will help it become. It is not recommended to mount the plate on the inner wall of a loggia or balcony. This will degrade the transmission of digital messages and cause interference.
- The best direction for the plate is south.
- We avoid places on the building where snow or moisture accumulates. These can be spillways, slopes and eaves of the roof of the house.
- We mount the antenna near the TV. This will make the setup process easier.
Simple installation rules satellite dish Tricolor TV will help you avoid the first mistakes in setting up your television yourself.
We begin the installation of a satellite dish
Having chosen a location, we proceed to install the structure itself. The external structure of Tricolor TV consists of several parts:
- bracket;
- antenna mirror;
- coaxial cable;
- convector
The bracket is attached to the wall or roof with anchor bolts to enhance stability. Any wind vibrations of an insecurely fastened bracket will lead to deformation of the entire structure and a decrease in image quality.
Attention! There is no need to fully tighten the bolts until the work is completed, as... You may have to change the inclination and position of the structure during setup.After installing the mount, we attach the plate mirror itself, the convector.
We install the convector on the holder with the connector in the lower position so that moisture does not get on it.
Stages of connecting cable and convector:
- We strip the outer insulating material on the cable at a distance of approximately 15 mm from the ends of the cable, and the inner one – 10 mm. Be careful not to damage the shielding braid.
- We bend the shielding braid together with the foil into opposite direction from the ends and screw it to the F-connector until it stops.
- Do not cut off the end of the core behind the 2 mm connector.
- We secure the cable wire to the holder with insulating tape or zip ties.
- We seal the connector to prevent moisture from entering it using sealant or insulating tape.
That's it for external setup work satellite broadcast Tricolor TV is finished, you need to connect the cable to the receiver and adjust the operation of the receiver itself.
Subtleties of installing the receiver
Installing the receiver to the TV is carried out in one of two ways:
- Using a high frequency (HF) antenna cable.
- Using a low frequency (LF) cable with connector.
The RF is connected to the TV socket intended for the antenna and to the “RF Out” socket on the receiver. When you plug the receiver into a power outlet, the screen television device The word “BOOT” and the TV channel number should be displayed. Turning on the channel search, we get the phrase “No signal,” indicating that the receiver is working correctly.
Algorithm for attaching LF to satellite receiver the same as HF. The only thing is that after the “BOOT” message appears, press the “A/V” key on the remote control and wait for the “No Signal” message to appear. If the inscription appears, then everything was done correctly. Other information that appears on the screen of the television device indicates that the equipment is assembled incorrectly.
To ensure that the image is of high quality
Before the signal search stage, you need to carry out several actions in the satellite television settings themselves:
- On the receiver's remote control, press the "Menu" button.
- In the “Installation” column, click “OK”.
- Enter "0000".
- In the pop-up window, click “OK”.
- Select “Antenna installation” and click “OK”.
In the “Antenna installation” column we find two scales “Signal quality” and “Signal strength”, showing the level of the received information flow. The optimal transmission rate should be at least 70%.
Reasons low level signal may be due to incorrect equipment assembly or inaccurate antenna position. If the cable is connected correctly, then you need to adjust the value of the incoming signal by changing the position of the plate itself.
We begin to move the antenna 1-2 mm, stopping each step for a few seconds so as not to miss the signal. The mirror of the Tricolor TV dish should be directed as high as possible.

We continue to rotate the Tricolor TV plate until desired value filling the scales on the TV screen. Filling one scale indicates that the device is not communicating with a satellite. Therefore, we continue the search. After filling the scales to the desired value, the image will appear on the monitor. When the setup is complete, tighten the bracket mounting bolts until they stop.
Setting up the Tricolor TV device yourself does not take much time and does not require any special skills or abilities. In general, it will take no more than 3 hours to put satellite television into use. The final stage Settings include registering the satellite receiver itself.
We call and register
Registration of the receiver occurs through the department technical support By the specified number V subscription agreement. Before dialing, have the following information ready:
- FULL NAME. subscriber or passport data;
- device installation address;
- receiver details.
Remember! Registration of the receiver can be done through the Tricolor TV website
A technical support specialist will check the correctness of the data and confirm it. During the working week, the inscription “DRE Coded Channel” may appear on the television screen. After the specified period, the broadcast of “Tricolor TV” will begin.
Setting up the Tricolor TV satellite is completed independently. You can enjoy watching your favorite channels in high quality images and excellent sound design. Satellite television "Tricolor TV" gives consumers big choice channels in high speed mode.
It’s not at all necessary to call a specialist to set up a regular satellite dish. IN in this case you can save money. We will tell you how to independently configure the Tricolor TV antenna to a satellite. With these tips, you can do everything right. It's only a little more complicated than connecting a monitor to a computer.
By the way, you can ask the seller to assemble the antenna and bring it home assembled. This will save some time, but even self-assembly this process won't complicate it. All you need to do at home is drill holes for the bracket (the plate is attached to it), and then follow the recommendations and actions in the instructions. The instructions themselves must be included with the purchase, so check the kit for its availability.
Tools and devices for tuning the "Tricolor TV" antenna
You will need the tools that are available in any home: strong electrical tape (where would you be without it), various screwdrivers (you may only need one screwdriver of a certain type), a hammer drill or drill, pliers, a knife, wrenches 8-13.
It is possible that you may need some additional tools (ladder, stepladder, special drills for a hammer drill, clips for securing the cable, etc.), because installation conditions always differ for different houses. Some have used it and even manage to improve the original design of the bracket and weld additional ribs to it.
The standard purchase package includes the antenna itself, a bracket, a receiver (set-top box), and a converter. Sometimes sellers have promotions and the package may include various bonuses, but this is rare.

Self-tuning of the "Tricolor TV" antenna in theory
The procedure itself looks like this (very generally): one person sits at home and looks at the TV screen, the other tries to point the antenna at the satellite and catch the signal. Using the remote control, you adjust the signal until the picture on the TV becomes clear.
It is worth noting that for different settlements, independent tuning of the Tricolor TV antenna to the satellite will be carried out slightly differently. For example, when setting up an antenna in Samara, you should point it in the direction where the sun is at 12:30. Then it needs to be slightly adjusted depending on how the picture on the TV screen changes. As soon as the adjuster sees that the picture has become clear, he gives a signal to the one who installs the antenna on the roof, and he, in turn, fixes it on the bracket in the desired position. That is, in the position in which the antenna catches the signal.

It is not difficult to catch the signal, because the Eutelsat 4 satellite (it is with its help that Tricolor TV broadcasts) covers a huge part of Russia and gives a strong signal.
Instructions for self-tuning the Tricolor TV antenna to a satellite
As stated above, Tricolor TV operates EUTELSATW4, which is located at 36 degrees east longitude. The installation is carried out in several stages, each of which we will describe sequentially below.
Determining the location for installing the antenna
The main criterion for such a place is free review in the direction from which the signal will come. There may be leaves and trees behind the antenna, it doesn’t matter, but the front side of the antenna should be clear. Depending on the city, the visual line connecting the satellite and the antenna is raised from the horizon 27-30 degrees upward. If this visual line abuts any structure (a house, for example), then you should look for another place.
Experts recommend installing the antenna on the roof of the house, on the outside of the balcony, but not on the inside (because of the glass). Also, you cannot install the antenna on sloping roofs, because it will collect snow in winter, and this is an additional load for which the antenna is not designed.

If the store has not yet assembled the antenna for you, then you should assemble it yourself strictly in the order specified in the instructions. At the place you have chosen, we attach the bracket. Depending on the conditions (wall material, etc.), we select the correct fastening elements: drills, anchor bolts, screws, etc. It is important to take into account the possibility of precipitation, in particular snow. The antenna must be installed in a place so that snow cannot get on the converter.
Connecting the F connector

Next, we connect the cable to the converter using a special F-connector (it is included in the kit). Then we use zip ties or simple electrical tape to secure the cable to the envelope holder and be sure to seal the f-connector. The same electrical tape is ideal for sealing. Just wrap the joint in several layers. It is advisable to use silicone sealant in addition, but if you don’t have it, then it’s okay. Some users find another way: they use a regular plastic soda bottle. The bottom is cut off, the joint is placed in it, then both ends are wrapped with electrical tape. The technique, although primitive, works. Although ideally it should be silicone sealant and electrical tape.
The F-connector itself is easy to install: you expose the cable, insert it into the connector, and fix it. Everyone has dealt with a regular cable that connects to the TV. It's the same here. The photo below shows examples.


Now we place the plate itself on the bracket. To begin with, you don’t need to screw it tightly, but it shouldn’t dangle from the wind either. Tighten the adjusting nuts, but not too tightly, because you have to turn the plate left and right and up and down to find the ideal point.
Setting up the Tricolor TV satellite dish
First, sets the antenna rotation angle and azimuth. So far, approximately. Depending on the city, you need to display it differently. For example, the azimuth in Tolyatti is 197.49 degrees, the elevation angle is 27.884 degrees (you need to orient yourself to the south). A compass or city map will help with this.
The antenna must be installed so that it corresponds to an elevation angle of 26.6 degrees. This means that the plate itself should be tilted 3-4 degrees down. Then connect the cable that comes from the converter to the set-top box. It needs to be inserted into the LNB IN socket (the leftmost one in the picture below).

TV connection
The same F-connector is used here, so there should be no problems. Now we connect the TV to the receiver. Everything must be done in the order specified in the instructions. That is, first we connect the cable to the TV (we use the RF OUT socket on the receiver and the only socket for the antenna on the TV), turn off the TV. If the receiver is turned on for the first time, then it may be disabled LNB power supply. In some cases this is exactly the case. Power turns on when prompted start menu. When turned on, the search is activated and must be checked by simply pressing the EXIT button.
Setting up the receiver on TV
- Antenna - 1;
- Frequency - 12226;
- EutelsatW4-EutelsatSesat satellite;
- FEC - 3/4;
- Polarization - left;
- Flow rate 27500.
There will be two indicators on the TV screen. The lower one shows the signal level, the upper one shows the quality. The person on the roof must move the antenna mirror slightly horizontally to find the position that will give the maximum signal strength (lower indicator). Then the plate should be moved up and down to search best quality signal (upper indicator). This is how the search is carried out desired point and setting up the Tricolor TV antenna for satellite. Once the point is found, the plate must be finally and firmly fixed in the desired position.

The influence of weather on tuning and searching for a signal
The signal level depends greatly on weather conditions. If there is rain or fog or cloudiness, then it is unlikely that you will be able to adjust the Tricolor TV antenna yourself. It is simply impossible to catch a strong signal level. This must be done on a clear day under ideal weather conditions.
Once all the described actions have been completed, you can search for channels. The instructions for the receiver will definitely tell you how to do this. But this is understandable even intuitively. Here we will not describe the process of searching for channels, but note that first we need to find only an information channel. In theory, only this should be accessible to the user after installing the antenna. Access to others after registering on the Tricolor TV website and activating the card.
Subtleties for self-installation and configuration of the "Tricolor TV" antenna

There are some unspoken rules and subtleties that you need to know about:
- We look at the neighbors. Nearby standing houses neighbors almost always have plates. To begin with, we install our antenna in approximately the same way.
- If it was not possible to catch the satellite within the first 20 minutes, then it is better to look for another place for installation.
- When setting up the receiver, it is better to have a small monitor (TV) nearby so that you can immediately see how the picture changes when the antenna moves. Most often, people, trying to tune the Tricolor TV antenna to a satellite on their own, shout at each other or talk on the phone.
- It is better not to change your PIN unless absolutely necessary. If you change the code and then forget it, there is no way to restore it. Although it is possible to re-flash the receiver, it is difficult and not accessible to everyone.
- Once all channels have been found, you need to finally tighten the antenna to the maximum.
- If suddenly the antenna tunes to another satellite (and this may happen), then there is no need to save the found channels. You will have to again configure the Tricolor TV satellite antenna yourself, rotating it horizontally and vertically in order to search best point signal.
- The bolts must be tightened carefully. Often, when tightening bolts, users lose the position and have to do everything again.
- You need to register on the Tricolor TV website after setup, and not before. First, set up the antenna, and as soon as the info channel is displayed clearly, you can register on the company’s website. After receiving the smart card, all channels will become available after some time.
That's all. We can assume that you have configured the Tricolor TV antenna yourself. There is nothing complicated in the process itself, and any person who knows how to use a drill/hammer and knows how to connect the simplest F-cable to the receiver and converter can handle this. No specialized knowledge is required, so you don’t need to call a specialist if you don’t want to spend extra money.
Of course, this process is not described in as much detail as possible. It is likely that some difficulties may arise during installation that cannot be foreseen when writing the article.
Which satellite should you tune the Tricolor TV antenna to?
For residents of the European part of Russia and the Urals, the antenna must be tuned to satellites Eutelsat 36B & Express AMU1 36.0°E. For residents of the Siberian District and part of the Far Eastern District, the antenna must be tuned to the satellite Express AT1 56.0°E. In the Ural District, which borders the irradiation zones, the antenna can be tuned to any of these satellites.
What to do when Tricolor TV channels do not work!
On April 2, 2018, all channels in the MPEG-2 standard were disabled. To watch the operator's channels, you must exchange MPEG-2 equipment for MPEG-4 equipment at the operator's dealers. Why do paid channels stop working on older models of MPEG-4 receivers? This is a question for satellite operator Tricolor TV in St. Petersburg!1. If all your Tricolor TV channels have stopped working, do not rush to set up the dish and re-register the channels, the operator may have channel maintenance!
2. If the operator does not have preventive maintenance and the satellite is in place, and the packages have been paid for, and the receiver displays “No signal,” then you need to check the connection to the antenna, setting the dish to the satellite, the converter, and then the receiver itself.
3. Sometimes it is useful to reset the receiver to factory settings (then turn it off from the network and turn it on again) and re-register the channels.
4. Snow stuck to the converter can completely block satellite signal!
5. When the receiver displays “Scrambled channels”, “Error...” and something like that, but the info channel is working.
In this case, you need to check the availability of payment via Personal Area subscriber
Try resetting the receiver to factory settings (then turn it off from the network and turn it on again) and re-register the channels, then you need to leave the receiver turned on on the encrypted Russian channel and wait for the keys to arrive. If the channels do not open, then you need to contact Tricolor TV managers, and if they do not help, check the receiver for latest firmware or malfunction.
6. If you didn't update on time software receiver from the satellite, when the operator suggested doing this, then all or some TV channels may stop working. In this case, the receiver must be updated forcibly via a USB connector using a flash drive. All software firmware can be found on the website of the GS receiver manufacturer.
How to set up the Tricolor TV antenna for Eutelsat 36B & Express AMU1 36.0°E satellites yourself
Coordinates to which the satellite dish is adjusted:1. Azimuth.
2. Elevation angle.
What is the difficulty of setting up an antenna?
Very narrow beam of the antenna pattern, only a few degrees. Moreover, the larger the antenna size, the narrower the beam. Setting up an antenna for a satellite Express AT1 56.0°E is performed in the same way as setting up the Eutelsat 36B & Express AMU1 36.0°E satellites, only you need to enter the coordinates of the Express AT1 56.0°E satellite into the program.
Setup process
1. Setting up the Tricolor TV antenna for a satellite is quite simple! At the initial stage, information is needed about telecommunications satellites, the coordinates of their location, the features of satellite television and satellite equipment. You can get information about this and much more on our website, in the article: "Satellite television".
2. Before installing and configuring the antenna, you must determine the direction to the satellite:
A). Using a compass (it must be taken into account that its readings may be influenced by metal objects located nearby), the sun, GPS navigator or nearby dishes, approximately 0.6 m in size, determine the azimuth to the Eutelsat 36B & Express AMU1 satellites 36.0°E, (36 degrees East longitude). Be sure to check that the direction to the satellite is clear of high-rise buildings, trees, etc.
b). In order to accurately determine the location of the satellite, you can use the program " Satellite Antenna Alignment", which can be downloaded from http://www.al-soft.com/saa/satinfo-ru.shtml
The “Satellite Antenna Alignment” program will help you calculate the azimuth and elevation angle required for installing and configuring a satellite dish to any available satellite at the selected geographic receiving point. Using the program, you can calculate angles for all geostationary telecommunication satellites located on the “arc” at once.
The program remembers geographical coordinates places for which the calculation was made. Subsequently, you can use these coordinates, because they are stored in program memory.
First, when working with the “Satellite Antenna Alignment” program, you must enter the geographic coordinates of the installation location in the “Coordinates of the antenna installation location” section.
Legend: "N - northern latitude", "S - southern latitude", "E - eastern longitude" and "W - western longitude". After entering the coordinates, on the left side of the table you will receive the calculated azimuth and elevation angles (elevation angle) of the antenna for all satellites at once. Azimuth is the direction to the satellite (in degrees), defined as the angle between the north and satellite directions. Elevation angle is a direction defined as the angle (in degrees) between the direction of the satellite and the plane of the earth at the receiving point. A negative elevation angle means that the satellite is below the horizon and is not available for reception. Thus, at the location where the antenna is installed, it is theoretically possible to determine all the satellites from which signals can be received. Based on azimuth and elevation, you can quickly determine on the ground the direction to the satellite and the possibility of receiving a signal at the selected point.
If you do not have a tool for determining the geographic direction, you can use the determination of satellite coordinates by the sun.
The program allows you to calculate the azimuth to the sun. To do this, you need to specify the geographic coordinates of the area in the program. Estimated height above sea level - 0 meters.
The calculation is made for certain date. The calculation results are presented on the left side of the table. Using the table, we determine the azimuth and elevation angle for the sun at a given point in time.
Procedure: first we determine the azimuth to the selected satellite, and then we calculate the azimuth of the sun on the day the antenna is installed. Next, in the table, we find the azimuth of the sun that is close in value to the azimuth to the satellite and determine the time (and date) when the sun will be in this direction. At the calculated moment in time, we turn the antenna directly towards the sun, because At this time, the azimuths of the sun and the satellite coincide. The elevation (elevation) angles of the satellite and the sun may not coincide. If they coincide, then reception from the satellite at a given time will be unstable, or not possible at all, because powerful electromagnetic radiation the sun will be “blown out” by the signal from the satellite. This phenomenon is called solar interference, it occurs in spring and autumn for several days.
When calculating, the time zone must be taken into account (for Moscow +3 hours to Greenwich).
If the country switches to summer time, then 1 hour must be added to the resulting azimuth calculations!
The program displays the direction to the satellite with a red line; the red line is not drawn if the satellite is beyond the horizon and is not available for reception this place. The yellow sector indicates daylight hours; the diagram also shows the sides of the horizon.


Also, using this program, you can calculate the angle between an obstacle in the path of a satellite antenna and the plane of the conventional horizon where the antenna is located. By indicating the height of the obstacle and the distance to it, you can determine this angle. If it is greater than the elevation angle of the satellite you have selected, then reception from the satellite at this installation location is impossible.

Another one useful feature programs: when the “Transponders” tab is activated, the program downloads from the Internet all active transponders of the selected satellite.
The program saves all data in the file format of your choice.
To determine the location of the Eutelsat 36B & Express AMU1 36.0°E satellites, enter the coordinates of your locality into the program (data can be obtained from Yandex) and you will determine their azimuth and elevation angle. According to calculations of the Satellite Antenna Alignment program, the exact parameters of the satellites in Nizhny Novgorod are: azimuth - 189.592 degrees east longitude, elevation angle - 25.516 degrees.
3. Next, assemble the antenna according to the instructions, attach the converter to it and install the antenna on the bracket, which should be fixed vertically to the Earth on a flat surface. Connect the antenna to the receiver using a TV cable with a characteristic impedance of 75 Ohms, with the receiver unplugged from the network.
4. Turn on the receiver, you will see the message “no signal” on the TV screen. In order for the setup indicator to appear on the TV screen, press the buttons on the remote control in sequence: menu, setup, manual search. The setting indicator has two scales: “signal quality” and “signal level”. The setting must be carried out on the “signal quality” scale. It should be taken into account that the signal level is affected by the length of the cable from the receiver to the converter. If the cable length is long, it is necessary to use special satellite amplifiers (the signal level differs by different models receivers).
Next, we configure the antenna itself. Moving the antenna plane along the elevation angle with an interval of 3-4 degrees from the position in which the antenna plane is directed perpendicular to the ground plane to a position of approximately 80 degrees to the ground plane in both directions, rotate the antenna in azimuth on the bracket in a sector of approximately 20 degrees from the specified to the direction satellite (see point 2). The operations must be carried out sequentially: first the elevation angle changes, then the antenna rotates. You need to rotate the antenna slowly so as not to miss the direction to the satellite; the working reception sector (directional pattern) of the dish is only 2-2.5 degrees. When an image appears on the TV screen, you need to set the maximum signal level in the circles of the signal level indicator by moving the antenna in azimuth and elevation, and finally tighten the antenna mounting nuts tightly.
5. Enjoy your viewing!