On which disk to put the paging file. Speed up PC performance, swap file, increase size
What's happened Virtual memory? Virtual memory is a combination of RAM memory and temporary hard drive storage. RAM is the memory physically installed on the motherboard and temporary storage is hidden file on your hard drive pagefile.sys, which is the swap file.
If there is not enough RAM memory, and when the entire volume is full, data from RAM is placed in the paging file. The larger the amount of RAM, the faster programs run, since reading data from memory is much faster than with hard drive. By Windows default stores the page file in boot partition drive C, where the operating system is installed
Windows 7 automatically sets the initial minimum page file size to the amount of RAM installed plus 300 megabytes (MB), and the maximum page file size to three times the amount of RAM on the computer. If warnings appear when using these recommended values, you will need to manually resize the page file.
Settings
To adjust the paging file size, do the following.
Opening Control Panel - System. Let's move on Extra options systems. In the tab Additionally find the section Performance and press the button Options.
In the tab select Additionally. Finding the section Virtual memory and press the button Change.

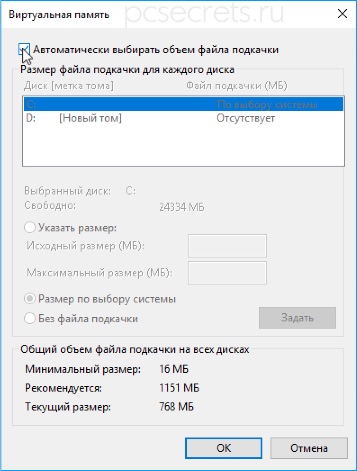
The figure shows that " Automatically select paging file size". Uncheck the box, select drive C, set Specify size and register Original And Maximum The sizes are the same, in my case it is 6108 MB. Click Set And OK

Note Typically, a reboot is not required after increasing the size. However, if you reduce the page file size, you must restart your computer for the changes to take effect. Microsoft recommends don't turn off And do not delete swap file.
Transferring the paging file to another hard drive
To improve system performance, the page file should be moved to another partition on another hard drive.
What does moving the paging file to another hard drive do?
- The operating system processes multiple I/O requests faster. When the page file is located on the boot partition, Windows routes disk read and disk write requests to both system folder, and to the swap file. Once the page file is moved to another partition, the contention between write and read requests is reduced.
- The page file is not broken into pieces (if the page file is located on the main hard drive, then it can be broken into pieces as it grows to increase its size virtual memory)
- One-piece ( Defragmented) a swap file means faster access to virtual memory and increases the chances of writing a crash memory file without significant errors
Disadvantages of moving the paging file to another hard drive.
After removing the swap file from the boot Windows partition cannot create a crash file ( Memory.dmp) to record debugging information in case of fatal error kernel mode. The Memory.dmp file is necessary to debug the error that has occurred
To move the swap file to another HDD, in my case it's a disk D (Archive), we do the following:

When the system asks you to reboot, click OK and restart the computer

After the reboot, check the location of the swap file. Open the settings window Virtual memory. If everything is done correctly, it should look like in the picture.

Any user is familiar with the concept of physical memory on a computer; it can be built-in or removable hard disk on which processed data is written. Modern hard disks reliable and durable, but they have one significant drawback– low read/write speed. Therefore, in addition to physical memory, all computers are equipped with a kind of intermediary between the physical disk and the processor - RAM or otherwise RAM, which has much more high speed than any HDD or SSD drive.
What is a paging file and what is it for?
However, RAM also has its drawbacks, the most significant of which today is its relatively small volume. But in addition to the processes of the system itself, the processes of all custom applications, often very demanding on hardware resources. And when the user runs programs, the total amount of memory he requires may exceed the amount of RAM available on board. In this case, there is a sharp drop in performance up to freezing. individual programs or even the system crashing into BSOD.
To reduce the risk of such an unpleasant scenario developing, the developers created a special file in which the system resets data that does not fit into RAM, and then, when part of the RAM is free, returns it back. It is called the page file; in Windows 7/10 it is also often called virtual memory or page file. To explain in detail the principles of its operation, it would be necessary to read an entire lecture, but we will limit ourselves to this brief explanation: the main task paging file - provisioning best performance operation of the system and programs in conditions increased load to RAM.
How to enable the paging file and what its size should be
So, what is a paging file and why is it needed, we hope you understand more or less, now it’s time to move on to more complex and interesting topic, namely its configuration. In truth, the page file in Windows does not need much configuration except in some special cases. The operating system itself creates it and determines its size based on the physical and software parameters of the computer. By default, this file is located in the root of drive C, system name pagefile.sys and, like many system objects, the modification of which is undesirable without special need, is hidden. So if you want to see it, uncheck “Hide protected system files” in the folder options.

If the swap file is in the root system disk, most likely, you have it turned on. To make sure of this completely, open with the command systempropertiesperformance"Performance Options".

Next, switch to the “Advanced” tab and find the “Virtual Memory” block, where the current size of the paging file will be indicated. If suddenly it turns out to be disabled (size 0), we strongly advise you to enable it. Click the “Change” button in the performance settings window, check the “Automatically select paging file size” checkbox in the next window, turn on the “By system selection” radio button and save the settings.

It’s so easy to put a swap file on Windows 7/10, but this applies to the default settings. You can set your own page file size by turning off automatic selection volume and activating the “Specify size” radio button. Despite the more than sufficient experience of IT specialists, there is no clear opinion about the optimal size of the paging file. Traditionally it is believed that its volume should be at least equal to the amount of RAM, but this is very approximate, if only for the reason that the swap is dynamic and can increase on demand operating system.
So, how much to set the paging file in Windows 7/10 if we're talking about about him manual setting? This depends primarily on the amount of RAM; the system capacity does not matter in this case fundamental role. Taking into account the individuality of a PC, we suggest using the following method to calculate the size of virtual memory. Running on PC as possible more programs, browser tabs, etc., open Task Manager, go to the Performance tab and note down the amount of RAM used.

Multiply the resulting number by 2 and subtract from the result real volume random access memory. The final value will be equal to the recommended page file size.
In general, the less RAM on a PC, the larger the swap should be. So if you are still in doubt about how to properly configure the paging file, use the data in this table, proposed by experienced system administrators:
It should be understood, however, that the figures given here are also averages. There are examples when a paging file is needed even if the PC has 16 or more GB of RAM (this is a requirement of some programs). Also, if you have a habit of leaving a lot of programs running in the background, it is recommended to increase the page file size by 20-30 percent of the above values. On the other hand, if your computer has enough memory, you don’t run “heavy” programs, don’t notice a decrease in performance, and there’s no need to increase it. Three gigabytes of the paging file for 4/8 GB of RAM should be enough to work without “brakes”; an excessive increase will not only not speed up the system, but rather, on the contrary, will slow it down, since Windows will have to access more often not RAM, but to the slower swap file.
In what cases is it necessary to increase the file size?
Let’s assume that we have sorted out the question of what size of the paging file to set; now we will briefly consider the cases when it needs to be increased. In short, because there are only two main reasons - a noticeable decrease in performance at startup large number programs and the error “The computer does not have enough memory” appears.

It also happens that a program or game requires a swap file when starting certain size. How to increase the paging file in Windows 7/10 was theoretically discussed above, in practice it looks like this.

Let's assume that the amount of virtual memory is set according to the system's choice and we need to increase it. Using the systempropertiesperformance command, go to the performance parameters, click change virtual memory, uncheck automatic detection paging file size by the system and indicate your own size. You don’t have to bother with the initial and maximum sizes, set them in both fields same values, click “Set”, save the settings and restart the computer. It's that easy to change file size Windows swap.
Using a swap file on an SSD
The use of FP on SSD drives should be mentioned separately. There is an opinion that a paging file is not needed on solid-state drives, since, firstly, they are already fast enough, and secondly, repeated data writing shortens the life of the disk. Both of these statements are incorrect. Whatever they are fast SSDs, they are still significantly inferior in terms of bandwidth RAM and, if the latter is insufficient at a certain moment, the user will immediately experience a decrease in system performance.
In addition, the volume of data written to the FP on the SSD is not so large as to exhaust the resources of the memory cells (this will take many years). Moreover, the performance characteristics of SSDs and the basic models of using the paging file fit together perfectly, so if your computer has two disks and one of them is an SSD, then it is recommended to place the paging file on it, as it is the fastest! In addition, do not forget that disabling the FP will make it impossible to diagnose critical errors in the system (creating an emergency memory dump).
So, is a page file necessary on an SSD? We can say with a greater degree of confidence that yes, even if the system did not enable it during installation. The exception is PCs with very large volume RAM (16 GB and above), but even here everything is not always so simple. As for extending the life of an SSD by disabling/transferring the FP, there is some truth here, since the practice of using solid state drives clearly showed that their service life directly depends on the load placed on them.
However, there is no need to worry about this. If the PC has sufficient RAM, the page file on the SSD will be used minimally, and there are many other and more significant factors that affect the life of the SDD, including defragmentation, hibernation, TRIM, indexing and other functions.
Well, we hope we have figured out the question of why a paging file is needed. Of course, there are still many subtleties in its use. For example, there are such issues as transferring FP from the system HDD to the user HDD, partitioning, automatic cleaning, usage special utilities for configuration, but this is a topic for a separate article.
Almost all the materials on , which I have come across on the Internet, mention such an object of the Windows operating system as the paging file (virtual memory). It is assumed that optimization of the paging file should affect the speed of the operating system and the computer as a whole. But is this really so and does it exist? optimal file swaps? Let's find out...
Why do you need a swap file?
I’ll explain in a nutshell what this file is and what it is needed for.
Every computer has RAM, which processes data most quickly. But almost always there is not enough RAM to solve current problems, and to eliminate this deficiency a special file was created, which, as is understandable, is called a paging file.
The page file is located on the hard drive and is a system file.

The page file is usually hidden from the user, like most other system files.

During work Windows computer places data in this file that does not fit in RAM. In the future, this data can again be placed in RAM and again uploaded to the paging file.
Do I need to move the swap file?
By default, the paging file is created on the system drive, that is, usually on the C drive on which Windows is installed. I have already repeatedly come across a recommendation to move the paging file to another (non-system) partition, which seems to improve performance.
But is it? Let's figure it out.
Microsoft itself, in one of its articles, recommends moving the paging file to another partition: “ You can increase system performance and also free up space on the boot partition by moving this file to an alternative section».
However, it is not specified which section. Therefore, many, relying on this information, they simply recommend moving the paging file, for example, to drive D. It is believed that moving the paging file to a non-system partition will reduce it, which is the constant companion of all files in, and this, in turn, should increase the performance of the operating system.
As for fragmentation, I agree - when moving the swap file from system partition its fragmentation should decrease, but in this situation such an event will be of little use, or rather, there will be even more harm.
The fact is that the absence of a paging file on the system disk will not allow the system to create memory dumps.
A memory dump is a snapshot of RAM that can be extremely useful in identifying the causes of failures. That is, analyzing a memory dump quite often allows us to identify the reason that caused the computer to reboot or freeze.

Perhaps for most users this is not a particularly popular function, but if emergency situations arise, analyzing a memory dump is practically the only opportunity to get to the bottom of the problem at home.
As I already mentioned, fragmentation of the page file on a non-system drive will indeed be less pronounced. However, this will have virtually no effect on the speed of working with the file and you will not feel any performance gain.
But this still does not mean that moving the swap file is pointless.
When is moving the swap file justified?
If you have two connected to your computer hard drives, then it makes sense to move the swap file to one of the partitions specifically second hard disk.

Wherein optimal solution will create two paging files - one on the system disk, and the second on one of the partitions of the second hard drive.
The first swap file will allow you to create memory dumps for analyzing emergency situations. A second swap file will speed up Windows operation with it, since it will be physically located on another device.
You can find recommendations calling for creating separate section for the page file to minimize its fragmentation while the system is running. As I said earlier, defragmentation does not play a key role in the speed of the system with the page file. Therefore, you don’t have to create a separate partition for it, but simply place the file on one of existing sections second hard drive.
Now let's talk about how to do this.
How to transfer the swap file
In the Control Panel, go to the “System” section:


Let's find the "Performance" subsection:

And on the “Advanced” tab, turn to the “Virtual Memory” subsection:

Uncheck the box that automatically adjusts the size of the paging file, and in the list of available drives, select the one to which you want to transfer it.
And here a completely logical question arises - how to determine the required volume of this file?
Optimal paging file size
Unfortunately, it is impossible to say unambiguously which optimal size the swap file needs to be installed. It all depends on many factors, primarily on the amount of RAM installed on the computer. And of course, it depends on what purposes the computer is used for, that is, what programs are launched on it and what tasks are solved using the computer.
I can only say that the more RAM installed on the computer, the less the paging file will be used by the system.
But this statement is not always true, since there are very resource-intensive programs for which even 64GB of RAM will not be enough.
For this reason, the optimal paging file for each computer will be different. But you can follow Microsoft's advice when setting up the page file.
According to information from the Microsoft website, Windows is based on the following principle: "Windows installs original size paging file equal to the amount of RAM on your computer, and the maximum paging file size corresponds to triple the amount of RAM".
To operate Windows operating systems, a paging file is used, which is a kind of virtual memory of the computer, which is an extension of its physical RAM. This swap file ensures the functionality computer programs in cases where there is not enough physical RAM memory.
Windows, by default, detects paging file settings automatically. But sometimes manually changing the paging file can help the user optimize the system. In some cases, it is advisable to completely disable the page file. In some situations, it is best to do nothing and let the system continue to automatically determine the size of the paging file. Below we will figure out how to configure the paging file according to the particular use of the computer, as well as its characteristics.
How to increase or decrease the paging file in Windows 7/8/10
Before we talk about what file size is optimal for different scenarios, we want to explain how you can change this size or disable the use of operating system virtual memory.To configure the paging file settings, go to “System Properties” (“ My computer» right click - « Properties"), and then select "System protection" from the list that appears.

You can do this faster by pressing “ Win+R" and then entering the command sysdm.cpl (suitable for Windows 7/8/10).

Open the "" tab in the dialog box Additionally", then click on the button " Options", located in the section " Performance" and then select the " tab again Additionally" After this, you should go to the section “ Virtual memory" and press the key " Change».

Here you can configure the necessary virtual memory parameters:

- Increase or decrease the paging file;
- Disable virtual memory.
How to properly configure the paging file?
In some articles devoted to Windows optimization, there are recommendations regarding disabling the page file if the RAM size is 8 or 6 gigabytes. They also recommend using automatic selection of the paging file size. These tips are based on the following. If the paging file is disabled, the computer will not use its hard drive as additional memory. This will increase the speed of the operating system (the computer's RAM is many times faster). By manually specifying the exact size of the paging file (it is recommended that the initial and maximum sizes be the same), we will free up disk space and be able to save the operating system from having to adjust the size of this file.Note: when using SSD It is advisable to install the maximum possible amount of RAM on the disk, and completely disable the paging file, which will increase the life of the solid-state disk.
We believe that when regulating the paging file, you should primarily focus not on the size of RAM, but on the peculiarities of using the computer, otherwise there is a high probability that a message about insufficient memory will appear.
If on your computer device If you have 8 gigabytes of RAM installed, and you use your computer mainly for browsing various sites and also playing a few games, disabling the page file is most likely the right solution (although there is a possibility that you will see an insufficient memory message).
If you use your computer to edit photos using professional programs, work with three-dimensional or vector graphics, designing rocket engines and houses, and also using virtual machines, eight gigabytes of RAM will not be enough for you, so during your work you will definitely need a swap file. Moreover, by disabling the paging file, you risk unexpectedly losing documents you have not saved, as well as files if a memory shortage occurs.
 If you cannot determine how much RAM you need and what the optimal page file size should be, we recommend following these steps:
On the Internet you can find recommendations that differ from the option proposed above. You must decide for yourself which of these recommendations you will follow.
Selecting the paging file size
The question about the size of the paging file is quite often found on various technical resources, but there are no clear recommendations on this matter. I come across advice to set the swap file to 1.5-2 times the size installed memory, and turn it off completely. Both are absolutely meaningless from a practical point of view. Therefore, today we will talk about what a paging file is (also known as a swap file, also known as a page file) and how to correctly select and configure its size.
To understand why a page file is needed, you should first understand how memory works in Windows. So let's start with theory.
Virtual memory
As a rule, when talking about memory, we mean RAM modules physically installed on the computer, or physical memory. The amount of available physical memory is strictly limited and depends on the capabilities of the hardware, the bitness of the operating system and licensing conditions. In order to get around these restrictions, Windows operating systems use a resource such as virtual memory.
operating room Windows system It works not with physical, but with virtual memory. Technically, virtual memory consists of physical memory (RAM) and special page file(s) combined into a single virtual address space. For each running process it allocates its own address space in virtual memory, separate from other processes, in which it runs and manages. To access memory, pointers to addresses in the virtual address space are used, while the process itself is not aware of where exactly its data is stored - in RAM or in a file, this is decided by the operating system.
The maximum possible amount of available virtual memory depends on the bitness of the operating system. So on a 32-bit system, a process can address no more than 4 gigabytes (2 32) of memory. For a 64-bit process, the theoretical limit is 16 exabytes (2 64), and practically modern 64-bit versions of Windows support up to 16 terabytes of address space.
Note. Some 32-bit Windows versions Server uses PAE technology, which allows you to address up to 64GB of memory. You can find out more about PAE.
Unlike physical memory, virtual memory has much more flexible limitations. This allows a large number of processes to run simultaneously that would otherwise not fit in physical memory. Thus, the main task of the virtual memory mechanism is to expand available memory computer.
Memory management goes something like this.
The virtual address space is divided into equal-sized blocks called pages. Hence the name, by the way. page file - page file. Physical memory is also divided into sections called page frames, which are used to store pages.
Each process is allocated a “chunk” of address space in virtual memory at startup. Accordingly, at each moment of time, pages from the virtual address space of each process are in memory. Pages that are in physical memory and are immediately accessible are called valid pages, and pages that are this moment are inaccessible, for example those located on disk - invalid (invalid pages).
When a process accesses a memory page that is marked as invalid, a page fault occurs. When an interrupt occurs, the virtual memory manager finds the requested page and loads it into a free page frame in physical memory. Actually this process is called paging.
When there is a shortage of physical memory, the memory manager selects frames that can be freed and transfers their contents to disk, to the paging file. The transfer principle is as follows: when a process has used all the frames allocated to it, then with each page fault in this process, the system removes one of its pages from physical memory. Page selection is carried out according to the principle of first in, first out (first in, first out, FIFO), i.e. The page that has been in memory the longest is transferred to the paging file.
Each process has its own working set - a set of pages located in physical memory. The working set determines the size of physical memory allocated to the process and has a minimum and maximum size. At startup, the process is assigned a minimum working set size, i.e. minimal amount pages that are guaranteed to be in RAM. Given enough free physical memory, a process can grow its working set to a size equal to the maximum working set. When memory pressure begins, the virtual memory manager begins to trim the working set of all processes to the minimum, deleting extra pages from physical memory.
After reducing a process's working set to a minimum, the memory manager monitors the page faults generated by each process. At large quantities interrupts, the dispatcher can increase the size of the process's working set; if not, it continues to reduce the working set until an interrupt occurs. The appearance of an interrupt indicates that the minimum memory size required by the process to operate has been reached. This achieves a balance between physical memory consumption and performance.
In fact, this is a very rough description of how virtual memory works, but for common understanding it will be quite enough. Therefore, let's stop with theory and move on to practice.
Current paging file settings
You can view the current file size in the System Properties snap-in. To do this you need to click Win+R and run the command sysdm.cpl. Then go to the “Advanced” tab, in the “Performance” field, click on the “Settings” button and in the window that opens, go to the “Advanced” tab.
The total size of the paging file on all disks is indicated here, and by clicking the “Change” button you can go to its settings.
By default, automatic paging file size management is enabled. This means that the operating system creates one page file pagefile.sys in the root of the system disk and sets its size automatically based on its needs.

Memory dump
To understand what guides the system when choosing the size of the paging file, let's go back to theory and turn to the concept of a memory dump. The fact is that in addition to expanding physical memory, the paging file has one more purpose - it is used to create emergency memory dumps during system failures. This happens as follows.
During boot, the operating system creates a map of the sectors occupied on the disk by the paging file and stores it in memory. If the system fails, the integrity of this card, disk driver and management structure disk driver. If their integrity is not compromised, then the system kernel calls special I/O functions designed to save a memory image after a system failure and writes data from memory to disk, to the paging file, using the saved sector map.
The next time the system boots, the session manager ( Session Manager Subsystem Service, SMSS) initializes the page file and checks for the presence of a dump header in it. If there is a header, then the data is copied from the swap file to the file crash dump and a corresponding entry is made in the system log.
Accordingly, when automatic control With the paging file, the system focuses on the settings for creating a crash memory dump, choosing the file size in accordance with the type of dump:
Complete memory dump - the dump records the entire contents of RAM at the time of the failure, so the size of the paging file should be equal to the size of physical memory + 1MB (for the header). This type is selected by default when the amount of physical memory is less than 4GB;
Kernel memory dump - only the memory allocated for the OS kernel, device drivers and applications running in kernel mode is recorded in the dump. A core dump takes up much less space than a full dump, and is usually sufficient to determine the cause of the failure. This dump type is selected by default for systems with 4GB or more RAM. Minimum size The paging file should be approximately 1/3 of the physical memory;
Small memory dump is a mini-dump that contains the minimum necessary data: a stop code and a description of the error, a list of loaded drivers and information about the processes running at the time of the failure. This dump requires a swap file of at least 2MB;
Automatic memory dump - new type dump that appeared in Windows 8\Server 2012 and newer. In fact, this is the same core dump, the only difference is that it allows the system to dynamically manage the size of the page file, choosing the most optimal size.
Memory dump settings are located in the advanced system properties, in the Boot and Recovery section (Startup and Recovery). Here you can choose one of four dump types or completely disable its creation.

Even knowing the dump settings and the amount of physical memory, it is not possible to say exactly what size the paging file will be created by the system. Therefore, I decided to experiment a little, for which I took 2 systems as experimental ones - client Windows 8.1 (x64) and server Windows Server 2012 R2 and tested how the page file size depends on the amount of physical memory and dump settings. Here's what happened:
As you can see, the file size directly depends not only on the amount of RAM and dump settings, but also on the type of operating system. Also, disabling dump does not mean complete absence swap file.
It's also worth remembering that these are initial values. If there is insufficient virtual memory during operation, the system can increase the paging file up to maximum value, which at automatic configuration is 3 volumes of physical memory.
Determining the required paging file size
Although the size of the paging file can be controlled through the memory dump settings, this is not the most direct way. It is much better to adjust the file size manually. It remains only to find out what size can be considered sufficient.
There is no clear answer to this question. The only way to more or less accurately set the size of the paging file - this is to collect in this specific system data on memory consumption and paging file usage, find out what maximum amount of memory can be occupied by services\applications and how much the paging file is actually used. Based on the data obtained, you should select the file size.
You can quickly estimate the current virtual memory consumption in Task manager, in the Performance section. The Committed field shows the ratio of used virtual memory to its total amount. In my example, the computer has 64GB of RAM and a swap file of the same size. The current amount of virtual memory is 128GB, 65GB is occupied. Of these, 62.4 GB are for RAM and 2.6 GB for the swap file.

You can also use performance counters to collect information. Meters provide more information, and also allow you to collect statistics for certain time, which will allow you to more accurately determine the system's virtual memory needs. We will need the following performance counters:
Memory, Committed Bytes— this counter shows how many bytes in virtual memory are occupied by current processes. When the Committed Bytes value exceeds the amount of physical memory, the system begins to actively use the page file;
Memory, Available Bytes— the amount of free physical memory on the computer. This parameter shows the load on RAM, and the less physical memory remains, the more active system uses the swap file.
Memory, Commit Limit— a value equal to the sum of the amount of RAM and the current size of the paging file. In other words, it is the maximum amount of virtual memory that can be allocated to all processes without increasing the size of the paging file.
Memory, %Committed Bytes In Use— shows the percentage of virtual memory usage. Represents the relation Committed Bytes \Commit Limit.
Paging File, %Usage— percentage of paging file usage, current value.
Paging File, %Usage Peak— paging file usage percentage, peak value.
For a deeper analysis of memory consumption, you can additionally use the following counters:
Memory, Page Fault\sec— the number of page faults (interrupts) per second when accessing memory pages. Let me remind you that a page fault occurs when accessing a memory page that has been paged out to disk.
Memory, Pages\sec— shows how many pages per second were read/written within the page fault. Simply put, this counter shows the intensity of data exchange between RAM and the page file. Represents the sum of counters Pages Input\sec And Pages Outpit\sec.
Process, Working Set- shows current physical memory usage active processes. The Total value displays the total volume for all processes, but you can display data separately for each specific process. This counter is not directly related to the page file, but can help in diagnosing performance problems.

As you can see in the example, the 64 GB swap file is actually used by only 2-3%. That is for normal operation in abundance A 4GB swap file is enough. And this despite the fact that the server is very heavily loaded; for a less loaded computer the numbers will be even lower.
It is also worth mentioning the selection of the paging file size for computers running the Hyper-V role. The fact is that due to the nature of the architecture, the hypervisor does not use the swap file for virtual machines even if there is insufficient physical memory. On Hyper-V servers, the page file is needed solely for the purposes of the host system, which uses only a small part of the RAM (usually no more than 2-4GB). Therefore, creating a paging file based on the total amount of physical memory in this case is absolutely pointless.
Settings
Having determined the required size, we proceed directly to the setup. To change the size of the paging file, open the virtual memory properties and disable automatic size selection. Then in the “Drive” field, select the logical drive on which the file will be located, select the “Custom size” option, indicate the initial and maximum size of the paging file and click “Set”. After configuration, a system reboot may be required for the changes to take effect.
There are some restrictions on the page file:
The maximum file size can be no more than 16TB for a 64-bit system and no more than 4GB for a 32-bit system;
You can create up to 16 swap files, but each must be located on a separate volume ( logical drive);
To be able to create a crash memory dump, it is necessary that the paging file (at least one) be located on the system disk.

To automate the setup process, you can use this PowerShell script(substituting your values):
# Disable automatic management for pagefile
$ComputerSystem = Get-WmiObject -Class Win32_ComputerSystem -EnableAllPrivileges
if ($ComputerSystem.AutomaticManagedPagefile) (
$ComputerSystem.AutomaticManagedPagefile = $false
$ComputerSystem.Put()
}
# Set manual size for pagefile
$PageFile = Get-WmiObject -Class Win32_PageFileSetting -EnableAllPrivileges
$PageFile.InitialSize = 4096
$PageFile.MaximumSize = 8192
$PageFile.Put()
Conclusion
In conclusion, some practical advice, which can help with setup.
When setting up manually, you must specify the initial and maximum file size. In this case, the system creates a file starting size, increasing it if necessary until it reaches the maximum. As the size increases, the paging file may become fragmented, which will affect its performance. To combat fragmentation, you can initially set the initial and maximum sizes to be the same. Then the system will immediately allocate all the necessary space for the file, and the static file size will eliminate possible fragmentation in the future.
To increase system performance, the paging file can be moved to another partition. Let me clarify that you should only transfer a file to a partition located on another physical disk. Placing the swap file on additional section using the same drive will not improve performance. In practice, it makes sense to move the swap file to a separate SSD drive; this can give a noticeable performance boost.
Another theoretical 🙂 way to increase the speed of working with the swap file is to place it on a separate partition, specially allocated only for it, for which set the cluster size to 64Kb (instead of the default 4Kb). When working with large files (such as the page file), a larger cluster size can improve performance file system. The larger the cluster size, the larger the data is read/written in blocks; therefore, for the same amount of data with a cluster size of 64Kb, 16 times fewer read/write operations will be required than for 4Kb.
In some places there are tips to completely disable the page file. Indeed, in some cases this can provide some performance gains, although personally I don’t see much benefit in this. As you can see with the help of performance counters, if there is free physical memory, the OS uses the paging file to a minimum, so the increase will be minor. If, with the paging file disabled, physical memory runs out during operation, then the application ,
consuming memory will be stopped, which can lead to malfunction and data loss .
Additionally, if there is no page file, Windows will not be able to save a memory dump in the event of a crash.
And one last thing. Manipulating the paging file does not have much impact on the performance of the system as a whole. I repeat, if there is enough physical memory, the paging file is used to a minimum. If the system is constantly low on memory and actively uses the page file, then first of all you should think about expanding the physical memory.