The local network asks for a password. How to open access to a computer over a network
Hello, dear friends! Today's topic will be for those who use computer local networks. When trying to connect to any PC from the group, you must constantly enter a special code - the network password. There are situations when this data is forgotten. For such a case, I’m here - our article will tell you how to find out the network password on the most popular operating systems today - Windows 7 and 10.
Where can I manage passwords?
For example, you need to set up shared access to a printer on a network, and the operating system asks for an access code. How to find out the network password of your computer, where can you find it?
To access all passwords on a PC running Windows 7 and 10, you need to:
- Call the “Run” application using the Win + R button combination;
- We write the command netplwiz;
- The “User Accounts” window will open;
- Go to the "Advanced" tab;
- Click Manage Passwords to access all passwords stored on this computer.
Here you can delete or change data, add an account.
If you have Windows XP, the command for “Run” will be different - controluserpasswords2.
How to watch?
I’ll tell you how to find out the network password for a home group (the code itself), using Windows 10 as an example:
- In the “Control Panel” we set the viewing mode by categories;
- Go to the “Network and Internet” section;
- Go to the “Home Group”;
- In its settings, look for the item “Show or print homegroup password”;

- We rewrite the necessary data on a piece of paper or remember it.
While I was writing, I realized that users often have problems viewing code. If you also can’t find out the local network password using my instructions, write in the comments!
Possible problem
It happens that the code is not installed, but the system still requires it. Or a message pops up that the network password is incorrect, although it is definitely correct. What to do in this case (using the example of the “seven”):
- To launch the local group policy editor, open “Run” and enter gpedit.msc;
- Now, one by one, go to sections from the following list: “Computer Configuration” – “Windows Configuration” – “Security Settings” – “Local Policies” – “Security Settings” – “Network Security: LAN Manager Authentication Level”;
- Check the box “Send LM and NTML...”.
This method of solving the problem does not work on all versions of Windows 7!
How to remove the code prompt?
Watch video instructions on the topic of this section here:
If you have only a few devices in your HomeGroup and you are confident that it is secure, you can remove the code entry. I’ll tell you now how to disable the network password request on Windows 7/10:
- Go to the “Control Panel”;
- Set the viewing mode to “Large icons”;
- Go to the “Network and Sharing Center...” section;
- In the additional parameters (section on the left) look for “General (current profile)”;
- We look for “Sharing public folders” and check the box next to “Enable sharing...”;
- Select the line “Sharing with password protection”;
- Check the box “Disable password protected sharing”;
- Save the changes with the appropriate button.

Here I also looked at the reviews, it turns out that it doesn’t help everyone. If you also have a problem, write to us and we’ll think about what can be done.
How not to save?
You can prevent the operating system from saving codes. I don’t know in what situation this might be useful, but there is such an instruction (using Windows 7 as an example):
- In the “Control Panel”, go to the “Administration” section;
- Open "Local Security Policy";

- Click "Security Options", go to the "Local Policies" tab, and then to "Security Options";
- In the list on the right, find the line “Network access: do not allow storing passwords...”, right-click and go to “Properties”;

- After completing the operations, save the changes with the OK button.
This is such a complex topic. On the “ten” it is much easier to find out the network password than on the “seven”. Windows 7 has many versions, and what works on one may not work on another. But you always have a WiFiGid team that will try to resolve any issue. Thank you for your trust!
HomeGroup is a feature that first appeared in Windows 7 and is designed to share folders, libraries, and devices across small networks. In this case, we mean a home network. However, to use the network's capabilities, it must be configured. Only after creating a personal group will users from different PCs have access to the printer, scanner and the contents of local disks.
How to create a HomeGroup on Windows 10 PC?
Before you start creating a homegroup in Windows 10, you should make sure that all computers are connected to the Internet and have at least version 7 of Windows installed. Further instructions will be as follows:
- Right-click on the “Start” button and select “Control Panel”.
- A new window will open. Select “Network and Internet”. Click "Home Group".


- A new window will appear. In it, click on the link “Change additional sharing settings...”.
- Check the “Enable network discovery” and “Enable file and printer sharing” checkboxes.

- Now you need to expand the “All Networks” branch and check the “Enable sharing so that network users can read and write files in shared folders.” After clicking “Disable sharing with password protection” (if you want to set a password, then it’s worth checking the first box) so that the user of another PC can see the folders without entering the secret code. Click “Save changes”.

- Return to the “Home Group” section and click “Create a Home Group”.

- We specify the folders that users will have access to over the local network. Click “Next”.

- A window with a password will appear on the first PC; it is needed to connect all other computers for the first time.
This completes the creation of a homegroup. To connect your PC to a homegroup, do the following:
- Go to “Control Panel”, select “Network and Internet”, “Home Group”, “Join”.

- Next, open the folders for access, click “Next”, enter the password and “Done”.
If there are difficulties connecting the PC or the group object is inaccessible, you should perform the following steps. Go to the “Windows” folder, then “ServiceProfiles”, “LocalService”, “AppData” (provided hidden folders are displayed), “Roaming”, “PeerNetworking” and delete the “idstore.sst” file.

Then you need to reboot the system and create a new group.
Finding out the homegroup password in Windows 10
The standard way to view the homegroup password in Windows 10 is as follows:
- Go to “Control Panel” and select “Networks and Internet”.
- Select "Home Group". The group settings will appear." Select “Show or print homegroup password.”

- Let's look at the password. We can print it out.

The password is entered once if you did not set access to the group using a secret code.
Watch the video on how to create a home group:
As a rule, this question arises after you tried to log into another PC over the network, but received a login/password request. The situation can be resolved simply and quickly; the main thing is to learn a few basic commands.
Where does Windows store network passwords?
You can manage passwords in this OS using the “netplwiz” command. To run it, go to the Start menu and enter “Run” in the search bar, or press R+Win-key. The described method is relevant for Windows 7; in Windows XP you should use the “control userpasswords2” command. When the corresponding window with accounts opens, go to the “Advanced” menu and select the “Management” sub-item. This tab is intended for any manipulations with passwords, user accounts, security settings and other actions. Naturally, all operations must be carried out from an account with administrator rights. This way you can easily change any password to a more suitable one. The physical storage of network passwords is the %systemroot%\system32\config directory.
Request for a non-existent password
It often happens that computers controlled by different versions of Windows are difficult to network or connect to them from the outside. For example, Win 7 may ask Windows XP for a network password that was not assigned at all (or will not accept an existing passcode). How to fix this problem? The following conditions must be met on all machines: users must be allowed access over the network by assigning each a non-empty password; The login pass for authorization is the same on the “client” machine and on the server. If the connection is still not established, go to “Computer Configuration” (Win + R, enter gpedit.msc) -> select “Windows Configuration”, then “Security Settings”, inside the item “Local Policies”, again “Security Settings”, sub-item “Network security: Lan Manager check”, include the line “Send LM and NTLM”. Also check that the following settings are correct:
- in the “Control Panel”, item “All items” -> “Network and Sharing Center”, sub-item “Advanced settings”, disable “Password protected access”;
- the default network model for Win 7 should be “Workgroup” (default);
- The guest account is enabled, and in the local policy it is removed from the “Denied access to a PC from the network” item.
If you found out/changed the password and did everything as indicated in the article, but still did not gain access to the machine over the network, you need to study in detail the settings of local access policies on each specific computer.
Entering the network password: where can I get it? Method of detection and shutdown.
Quite often (especially in small offices with local networks installed) you can observe a situation where all machines connected to the local network seem to be working normally, but when accessing a specific terminal you are required to enter a network password. Where can I get it? The system administrator, according to most users. No matter how it is! What if the administrator didn’t set any passwords on the system at all? What to do then? Not only ordinary users, but even some novice system administrators know the answers to these questions. But there is nothing particularly complicated here.
Entering the Windows 7 network password: why is this necessary?
Of course, no one argues that in offices, if there is a sufficiently large number of computers connected to the local network, the use of access passwords, both at the direct input level and at the remote access level, is justified.

But often, even if all terminals have the Windows 7 operating system installed, they seem to “see” each other on the network, but when, for example, an attempt is made to send a document for printing using a network printer, nothing happens even with the correct settings, because a network password is required. Where can I get it? The network administrator is not aware. In fact, there is a solution to this problem, and it is quite simple.
How to find out the network password? View data
The password data itself is hidden from the eyes of a user of any level (whether he is a private user or an administrator, the system still does not allow him to see the hidden data).
However, there is a way out. If we take into account that all folders, including registration data, are invisible, you just need to enable the display mode of such objects in the same “Explorer”. But even in this case, finding the folder with passwords will be quite difficult.

In fact, everything is much simpler, and you don’t need to waste effort on entering the network password. Where can I get it and find the parameter we are interested in? Elementary! You just need to use the command rundll32.exe keymgr.dll, KRShowKeyMgr in the command line running as administrator.
How do I disable or change network passwords?
In the initial version, call the “Run” section from the standard “Start” menu or using the Win + R combination.

Then, in the console itself, we enter the command Controluserpasswords2 and press the enter key. In the menu that appears, uncheck the password requirement for selected accounts (does not work on Windows 10!).
The same actions can be performed from the “Control Panel”, where you need to go to the section of the Network and Sharing Center, and in the current (general) profile, check the box for using password-protected sharing.
Security Policy Settings
In the most optimal scenario, when you need to enter a network password (where to get it, what to enter, enable or disable a service), you can use another fairly effective tool - editing group policies with setting access permissions to certain system functions at the administrator level or local user.

To access, use the gpedit.msc command, and in the editor itself - the computer configuration section, where you need to find the “LAN Manager” network security check directory and activate the LM and NTLM sending parameters in it.
Bottom line
Actually, that’s all. If there is a problem with the network password, you should simply disable its use. If necessary, you can install a new combination on Windows 7 and below. But this will have to be done on all machines synchronized over the network, and provided that the seventh modification of the system is installed on all of them.
It goes without saying that in the Group Policy Editor settings you can change and apply some additional settings that may be related to a specific group or class of users working on the same terminal.
Quickly enter a Windows 7 network password
Entering a network password does not act as a mandatory means of protecting your computer. But its use will provide you with network security. In order to open access to your personal network, an attacker only needs to know your username.
How to enter the network password?
If you try to connect via the network from a computer running Windows 7, the system will ask you to enter the network password. The Windows 7 operating system will allow input if a number of the following conditions are met:
- Classic configuration of the network access model;
- Authorization under the same credentials;
- The client computer is authorized in the system under an account that does not exist on the server computer.
Today, when the development of technology does not stand still, using a flash card to transfer data is not relevant and an outdated method. Today, transferring information from one computer to another is as easy as downloading information from the Internet.
Wired and wireless networks allow us to widely use all the possibilities of data exchange between computers. But the use of such opportunities requires, in turn, certain knowledge. Currently, computers are often sold with the Windows 7 operating system pre-installed, but the ability to connect is mainly through Windows XP.
At the initial setup stage, it is recommended to use a passwordless connection scheme. Setting up the connection is quite simple - no specific, special knowledge is required. If you need to create a home network, change the settings in the control panel. You just need to sequentially go to the following directories:
- First, go to the “Network and Internet” position;
- Find the folder “Choose HomeGroup Settings”;
- Finally, select “Enable Password Protected Sharing” or “Disable Password Protected Sharing.”
Then, configure the workgroup for all computers. If Windows 7 is installed on all computers, this setting will be carried out automatically. If you have a Windows XP computer on your network, you will be denied access.
In Windows XP, shared folders contain symbolic names, and in order to create a shared folder, you will have to perform a number of other actions. This can be done by clicking “Share this folder” in the folder properties in the “Access” menu.
But this fact does not mean that you will be able to use the connection at a high quality level. In this situation, you should not bother yourself with special wisdom. You just need to remove certain “barriers”, which are set out in instructions specifically designed for this.
To carry out the correct operation, it will be enough to create a shared folder in the direct directory of the disk with the installed software. After this, all connection problems will disappear! And you can enter the network password in Windows 7.
How to remove the network password request?
If you want to remove the network password request, you just need to do the following:
- Open the “Start” menu;
- In the “Run” line, enter “Controluserpasswords2” and click “Ok”;
- Select the desired account and uncheck the “Require username and password” checkbox.
Windows 7 allows you to disable the network password by changing the computer security group policy. However, it is necessary to understand that there may be negative consequences from such actions. Performing these operations can significantly reduce the security level of your computer.
How to reset or change a password for a network resource
When connecting to closed (password-protected) network resources, you are asked for a login and password. In order not to constantly enter a password, the user checks the “Remember credentials” checkbox. To delete these passwords (for example, when changing users) you need to go to:

Start → Control Panel → User Accounts → Account Administration
You can also get here through “Start → Run”, enter the text “control userpasswords2” and click OK.

Note: “Start → Run” can be called with the hot keys System + R (where System is the button with the windows logo).

Any password can be “Changed” or “Deleted from storage”.

“Change” password is sometimes required to change a user account.
For example: previously a manager used the computer, and he had the rights to change documents in the “Managers” folder of resource N, and now an accountant sat down at the computer who does not have the right to use documents in the “Managers” folder, but must have full access to the “Accounting” folder » resource N.
If you “Remove” passwords from storage, then the next time you try to access this resource, you will be prompted for your login and password again.
If you need to prevent the computer from remembering passwords, then you need to go to:
Start → Control Panel → Administrative Tools → Local Security Policy → Local Policies → Security Options → Network Access: Don't allow storage of passwords or credentials for network authentication → Properties → Disable/Enable


Microsoft's solution for resetting passwords.
1. Log in to the system administrator. 2. Click Start → Run (System + R), enter regedit or regedt32, click “OK”. 3. In the editor, select the HKEY_USERS branch, but do not enter it. 4. In the editor menu, select File → Load Hive. 5. A file selection dialog box will open. You need to select Ntuser.dat in the root of the problematic user’s profile (Documents and Settings\User\NTUSER.DAT). After selecting the file, you will need to give the NAME of the loaded registry branch. 6. In the registry editor, go to the address HKEY_USERS\NAME\User. 7. Remove the keys. 8. Select the HKEY_USERS\NAME branch and click File → Unload Hive.
9. Exit the registry editor.
Passwords saved in windows network connections
Passwords saved in network connections windowsadminsrtfmMarch 3rd, 2010 Files with passwords saved in network connections are located in the following paths: windows XPC:\Document and Setting\All Users\Application Data\Microsoft\Network\Connections\Pbk\rasphone.pbk
C:\Users\All Users\Microsoft\Network\Connections\Pbk\rasphone.pbk
C:\Users\All Users\Application Data\Microsoft\Network\Connections\Pbk\rasphone.pbk
------------------
There is also a utility called Dialupass, which will show all the passwords on Dialup without any problems!
adminsrtfm.livejournal.com
One of the effective security measures when using a network connection is a network password. It should not be too short and simple, since it provides protection against hacking both for wired networks and when establishing a wireless connection such as Wi-Fi.
Instructions
You will need
- To find out your forgotten password, you will need the free Asterisk Key program. The Asterisk Key utility is simple and easy to use, specially designed to recover passwords hidden by asterisks.
Instructions
- Zone.net, computer information portal
In every article on setting up a router, or in instructions on changing passwords, I advise you to write down somewhere the password that you set for your home Wi-Fi. Or set a password that you definitely won’t forget, but at the same time, it should be strong enough. As you understand, few people do this, to be honest, I don’t write anything down either :) And the password is such a thing that if you forget it, it’s very difficult to remember, you’ll try a bunch of options and nothing will work. And here you just need to connect a new device to your Wi-Fi. In this article I will tell you what to do in such cases. How to remember a forgotten password for a Wi-Fi network, where to look it up in the settings of your computer or the router itself. I will try to write in detail about all the nuances, possible problems and not miss anything.
How can you find out your forgotten Wi-Fi password:
- View the password in the computer settings if you have already connected (or are connected) to a network for which we need to find out the password.
- View the password in the Wi-Fi router settings.
- Reset the router, configure it again and set a new password.
We'll start with the simplest thing, which is, of course, the computer. If you have a laptop (or PC with adapter), which has already been connected to your Wi-Fi, or is currently connected, then most likely we will be able to look in the settings for the password that we have successfully forgotten.
Looking for a forgotten Wi-Fi password on a computer: Windows 7, 8, 10
Many people ask where to find this password on a computer? In Windows 7, Windows 8 and Windows 10 this is not difficult to do, but XP has its own problems. Let's look at newer versions of Windows first. On seven and eight everything is almost the same.
Attention! Your computer from which you want to remember the network key must be connected to this network. If he connected to it before, that’s fine too. If you do not have such a computer, then go straight to the section where we will look at the password in the router settings.
And one moment: if you don’t want to mess around with the settings, you can try to do everything with the WirelessKeyView program, which I wrote about a little lower.
Go to Network and Sharing Center.
Seva choose Wireless Network Management.

You'll see a list of all the networks you've previously connected to. Find the network you need to remember the password for, right-click on it and select Properties.

In the new window, go to the tab Safety, put a tick next to the item Show entered characters and in the field Network Security Key look at our password.

Let's take a quick look at the possible problems you may encounter.
What should I do if there is no “Manage wireless networks” item, or if the password is not displayed after checking the box?
These are very popular problems. There may most likely be no management of wireless networks due to the fact that you do not have Wi-Fi configured on your computer at all (in this case, you definitely won’t be able to view the password this way).Or, I read somewhere that this could be due to the home version of Windows. What to do if there is no "Wireless Network Management"? You can view the password through the router, read about it below, or try doing this:

You will succeed under one condition: you must be connected to the network from which you want to view the password.
If, after checking the “Display entered characters” checkbox, the password does not appear, then try looking at it in the router settings. Or, try from another computer, if possible.
How to find Wi-Fi password in Windows XP? We use the WirelessKeyView program
As I wrote above, XP is a little more complicated. In principle, you can see everything there too, but not as easily as on Windows 7. Therefore, I advise you not to go into this jungle, but to use the free WirelessKeyView program. Which, by the way, works just as well in newer versions of Windows. What does the little program WirelessKeyView do? It displays all the networks to which the computer on which you launched it previously connected. And of course, it displays the saved passwords for these networks.
Everything is very simple. Download the program from the official website http://www.nirsoft.net/utils/wireless_key.html. Open the archive and run the file "WirelessKeyView.exe". The program will open, look for your network there (by name), and in the field Key (Ascii) look at the password for it. It looks like this:

Agree, everything is very simple and clear. Even on Windows 7 and 8, you don’t have to bother with finding the password in the settings. Very good program, thanks to its developers. The only thing is that your antivirus can swear at it. Probably because of its slightly spy purpose.
Where is the Wi-Fi password in the router settings?
Another proven method. If you can set a password in the router settings, you can view it there. And even if it doesn’t work out, you can set a new password. If you were unable to view the key in the computer settings, there is no computer connected via Wi-Fi, and the WirelessKeyView program also failed, then all that remains is the router itself. Well, or reset the settings, but this is a last resort.
Another good thing about this method is that you can even access the settings from your phone or tablet. Provided they are already connected. You just can’t see the password on a mobile device, at least I don’t know how to do it. Although, perhaps there are already some programs for Android (but you will most likely need Root rights there).
I think it’s best to separately show how to view the password on a router from a specific manufacturer. Let's look at the most popular companies.
We look at the key to the Wi-Fi network on Tp-Link
We will start, as usual, with Tp-Link routers. We need to go into settings. Connect to the router via cable or Wi-Fi (which is very unlikely, because you don’t know the password :)). Open the address in the browser 192.168.1.1 (possibly 192.168.0.1) and specify the username and password. The default is admin and admin.
To view the installed key, go to the tab Wireless- Wireless Security. In field Wireless Password a password will be provided.

Remembering the password on Asus routers
Everything is about the same. Let's go to the settings, if you don't know how, then. The address used is the same - 192.168.1.1.
In the settings, right on the main screen there is an item State of the system, the password is indicated there. Just place your cursor in the field "WPA-PSK key". Like this:

By the way, it may still be useful to you.
Finding out a forgotten password on D-Link
I already wrote how to do this in the article: . But I couldn’t help but write about it here, because D-Link is very popular. So we do the same, and go to the tab WiFi - Security Settings. In field "PSK encryption key" you will see the password itself.

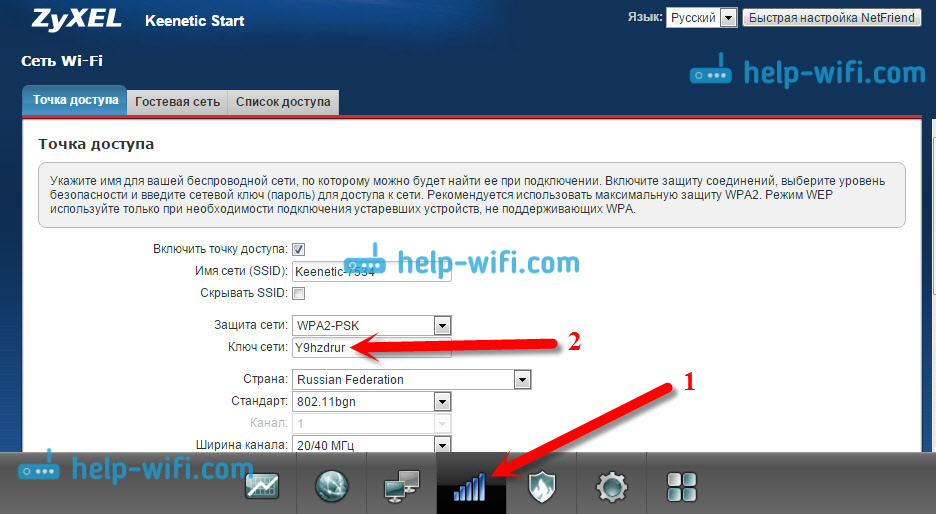
We look at the password for ZyXEL
Go to the settings of your ZyXEL Keenetic router, I wrote how to do this. Go to the tab Wi-Fi network(below) and in the field "Network key" you will see the password itself, which is currently set and which you have forgotten.
If you forgot your password on your Tenda router
This means it’s exactly the same on Tenda routers, go to the tab Wireless settings - Wireless Security and in the field "Key" look at the password.

On a Linksys router
Let's take a look at Linksys devices. We do everything according to the scheme: , go to the tab Wireless network - Wireless Security. In field "Passphrase" the password for the Wi-Fi network is specified.

That's all, as you can see, nothing complicated.
What to do if nothing helps?
I think that there is only one way left, this is to reset all the settings and passwords of your router and configure everything again. You can configure it according to the instructions that you will find on our website in the “Setting up a router” section.
I tried to collect on this page all the possible ways in which you can recover a forgotten Wi-Fi password. If something didn’t work out for you, or some points from the article are not very clear, then write about it in the comments, we’ll figure it out. And of course, I will be grateful for new and useful information on this topic.
How to find out the password for your Wi-Fi? Surely, many people asked this question because they forgot the password for their network. On the one hand, if a computer or smartphone has already connected to the network, remembered the password and now connects again automatically, there is nothing wrong with that, but on the other hand, you often have to connect new devices and, unfortunately, you can’t do without a password. In order to find out the password for your Wi-Fi, there are several ways that even an amateur can easily use.
Content:
Advice: Before contacting your provider, try to find out the password yourself by following the instructions below.

Where can I see my Wi-Fi password? What options?
First you need to find out if you have devices that are currently connected to the desired Wi-Fi network. Based on this, you need to use one of the options proposed below.
How to find out the password for an already connected Wi-Fi
If your device is connected to the network, then two methods will help you:
- Find the password in the router settings;
- Find the password using the Windows operating system.
You can easily find out the password using a router; any router has its own special IP address. Often it is printed on a tag that is glued to the back of the router. The instructions for the router should also contain a password to enter the router settings. First you need to connect to the router in one of two ways - via a Wi-Fi network or via a regular network cable. After this, enter the IP address into the address bar of any browser. Next, you need to confirm your (i.e., administrator) login and password from the router settings page. They are also usually listed directly on the router. Additionally, they are almost always set to admin and admin by default. Then the router settings page (admin panel) will open.

The admin panel looks different for different router models, but in general, you need to go to the wireless connection protection section, where you will find your Wi-Fi password.
 The password for the router settings page, which is set by default in the router, is usually written on the back of its case. However, if you changed it (the password) yourself, you might have forgotten it. In this case, you will have to reset all settings. To do this, use the “Reset” button.
It is located on the back of the router, near the cable connectors. To prevent accidental pressing of it, the button is pressed inside the case. Access to it is only through a narrow hole through which, for example, a needle or paper clip can fit. After pressing the reset button, eventually the router automatically returns to factory settings. The password for the router will also take its initial form (written on its case). The only negative is that you will have to re-adjust/configure all the router settings.
Find out your Wi-Fi password in Windows
If your device has previously connected to a Wi-Fi network, you can use the operating system functionality to find out the passwords for them. To do this, use the following instructions:
- Find the Network Status icon on the taskbar.
- Click on it with the left (1) or right (2) mouse button.
Option one:
- Hover your mouse over the name of the desired network and right-click on it. A context menu will open, which consists of three components.
- Use the "Properties" command. After this, a new window will open - “Wireless Network Properties”.
- On the “Security” tab you will find a line with encrypted characters. This set of characters is your password. To see the characters, check the “Display entered characters” checkbox.
Option two:
- Select the "Control Center..." icon.
- In the left command column, select Manage Wireless Networks. This will take you to the list of available networks.
- From the list that opens, select the network you are interested in and quickly double-click on it with the left mouse button. The Wireless Network Properties window will open.
- Next, we perform everything as in the first case.
Recovered your password? Don't forget to take a look and enjoy it for free!
Programs that help you find out your Wi-Fi password
There are a large number of common programs for finding and decrypting Wi-Fi passwords, but few of them are actually useful. One of these is the program "". It is worth noting that this program does not “steal” the password from any Wi-Fi network, but finds in a computer or laptop data about the networks to which the device was once connected.
There are also programs for hacking Wi-Fi networks. One of these is “”.
The router's IP address is usually written on the router itself. It also contains instructions or can be obtained from your provider. And if you reset all settings, then the IP address of your router model can be found even on the Internet.

Or, alternatively, you can find out your router's IP through your mobile phone or tablet by going to the settings of your wi-fi connection (as shown in the screenshot above).
How to find out the password without connecting to a computer or router
You can usually get the standard password from your provider. You can also find out the password using your smartphone. However, this requires Root rights.
There are also many special devices that search for enabled Wi-Fi networks in a certain range, and then automatically select a password for it, and you will find it out. One of such devices is. In addition to it, many analogues are produced, however, it is possible that the use of such devices is illegal.
No matter how trivial it may be, you can find out the password by asking it from a person who knows it, for example the owner of a wi-fi point.
As you can see, there are many ways to find out the forgotten password for your Wi-Fi network. It's easier to do this through a computer or laptop. If you are lucky and one of your devices is connected to the network, you can recover your password in just a few clicks. This can also be done quite easily using a router. You may not be able to do this yourself, but there is no such case that it is impossible to find out the password. However, you should still not forget your passwords, as this entails unnecessary inconvenience, loss of time and problems.
There’s a lot of writing, but I think I can handle it, LET’S GO....
I will use some quotes from my previous answers FOR DOMAIN ARCHITECTURE.
FOR PEER-TO-PEER NETWORK ARCHITECTURE (WORK GROUPS)
Let's simulate the situation
Your PC name=MYPC
Accounts
Friend account Pertor=Petrov, which belongs to the Guests working group.
Friend account Sidorov=Sidorov, which belongs to the Guests working group.
[U]PS You ask why Guests - the fewer rights the person you trust has, the more valuable your information;)
Open folders
Petrovich for Petrov read-only
Sidor for Sidorov for reading and writing
For_all for everyone who has read and write access to MYPC, with no more than 1 user per folder.
We have set the task - we begin to solve it.
First of all, let's create users and disable those we don't need.
To do this, right-click on the “My Computer” icon and select “Manage” (mouse settings for right-handers).
The Computer Management dialog box opens. Let's move on to Computer Management - Utilities - Local users and groups - Users. A list of users will appear.
I recommend disabling the "HelpAssistant" and "SUPPORT_..." accounts; in 99% of cases they are never used. Disabling is very simple - double-click on the user, a window opens and check the “Deactivate account” checkbox.
To ensure that all users are prompted for a password when logging into MYPC, disable the Guest account.
Now let's create users. Right-click below the list of users and select "New user...". The “New User” window will open. Enter the following
User: Petrov
Full Name: Petrov Petr Petrovich
Description: My best friend
Password: [access password]
Confirmation: [confirm password]
"Require a password change at next login" - empty
"Prohibit the user from changing the password" - set
“Password does not expire” - set
"Deactivate account" - empty
Note Place the checkboxes at your discretion, but this is how I usually put them. The Full Name and Description fields are optional.
Click "Create". The window closes and the user appears. BUT by default the OS creates accounts with “Users” rights, but we need “Guests”.
To do this, click on “Petrov” 2 times, go to the “Group Membership” tab, select “Users” and click “Delete”.
1) Click “Add” - “Advanced” - “Search” - the list of groups will be displayed, click “Guests” and OK.
2) Click “Add” and in the “Enter names of selected objects” field enter “MYPC\Guests” (for English OS “MYPC\Guests”). According to the user Petrov everything is OK;)
For Sidorov we carry out a similar procedure. ;)
With a pure soul, close the “Computer Management” window
Now we set up access rights to MYPC
Now I’ll start repeating myself, but if I don’t do this there will be a small gap.
Start-Settings-Control Panel-Administrative Tools-Local Security Policy
In the Local Security Policies dialog box
Security Settings-Local Policies-User Rights Assignment
We pay attention to 2 parameters:
1) Denial of access to a computer from the network
2) Access your computer from the network
These 2 parameters are strongly interrelated, therefore, when specifying values in them, it is necessary that the parameters do not intersect, but even if they intersect, then “Denial of access to the computer from the network” has a higher priority.
Denial of access to a computer from the network
Click on this inscription 2 times and enter the settings.
If the list of refusals contains the entry Everyone, then no one will have access to your PC on the network (there are exceptions, but I won’t go into details).
If the Guest entry is present, then unauthorized users will not gain access.
Here you can explicitly specify users and workgroups that are denied access.
Let's clear all previous entries.
And add the following:
"MYPC\Administrators"
"MYPC\Users"
"MYPC\Power Users"
etc. and so on. except for guests.
Accessing a computer from the network
This list contains the names of users and workgroups that are allowed access to your PC.
For our example
Let’s pay attention to one more parameter “Reject local login” and enter “MYPC\Guests” there. For what?! - So that users with guest rights cannot log into the OS from your PC (I already explained this in PS).
Comment It will be very cool if you put “MYPC\All” - it’s strange that there haven’t been any viruses with such a trick yet or I haven’t encountered them;) You can check it, but not on your PC!!!
Since we are in the “Local Security Settings”, let’s check one more parameter at the same time.
Security Settings - Local Policies - Security Settings and a looooong list will appear, as Google says. Just kidding, not that big :)
Let's pay attention to the "Network access: sharing model and security for local accounts" parameter and set "Regular - local users authenticate themselves as themselves."
After correctly performed operations, double-check the changes made and to be completely sure that the parameters are accepted, reboot the PC (although not necessary).
Once you have access to your PC, you need to restrict access to shared folders.
To do this, the first step is to disable “Use simple file sharing”. To do this, go to "Explorer" - "Tools" - "Folder Properties..."
The Folder Properties dialog box opens. Go to the "View" tab. In the "advanced options" list: find the line "Use simple file sharing" and uncheck the box. Don't forget about "OK".
Find the Petrovich folder on your local hard drive, right-click on it and select “Sharing and Security.” A new dialog box will open. Go to the "Access" tab - check the "Share this folder" checkbox - click the "Permissions" button - delete "All" - click the "Add" button - enter "MYPC\Petrov" - click 2 OK.
Note If the partition is NTFS, there will be a “Security” tab in the folder properties - here we will simply add the user “MYPC\Petrov” and from the list we will assign him certain rights at our discretion.
OK, we're done with Petrov.
Similarly for Sidorov, but do not forget that he must have read and edit rights to his Sidor folder. This applies to the “Access” and “Security” tabs.
Find the For_all folder on your local hard drive, right-click on it and select “Sharing and Security.” A new dialog box will open. Go to the “Access” tab and check the “Share this folder” checkbox. We put a dot “no more” in the right field the number 10 will be indicated - we reduce it to 1. Click the “Permissions” button and allow changes for everyone. Now OK. Don't forget about the "Security" tab if the section NTFS
Computer networks have become very closely integrated into the life of modern people. He encounters them constantly and everywhere. At work, at home, with friends. Thanks to computer networks, it has become much more convenient to exchange data. Almost always there is a need to combine two computers located in the same room via a network connection. But starting with Windows 7, the process of accessing network resources has changed slightly. Now it is not enough to simply configure the network configuration and add computers to the same workgroup or domain. You also need to disable the network password prompt. You will learn how to do this in this article.
Prompt for network password in Windows 7
Where is entering a network password disabled in Windows 7?
If, when trying to access network resources, you are prompted to enter a network password, then in this case you need to do the following.
This procedure must be carried out on a computer, when you log in via the network to which you will be prompted for a network password.
Go to and select “Network and Sharing Center”.

Network and Sharing Center
At the top left click on " Change advanced sharing options«.

Setting up network access
In the window that opens, expand the sub-item “ All networks" and at the very bottom in the section " Password protected sharing"Put the switch in position " Disable password protected sharing«.

Disabling password protected access

Additional sharing settings in Windows 7
Also, to avoid problems with network access, check that in all subparagraphs “ Private" And " Guestbook"The switches were in the " Enable network discovery" And " Enable file and printer sharing«.
A fairly common question among those who use local computer networks is disabling the entry of network credentials when trying to connect to any computer on the network. This applies to and younger. There is no such thing on Windows XP.
In this article we will tell you how to remove this prompt for entering network credentials, so that you can log in to other computers on the network without any problems.
Where is the prompt for network credentials disabled?
This is done through the control panel. , find the “Network and Sharing Center” icon there and click on it.
Network and Sharing Center
In the window that opens, select “Change advanced sharing settings” at the top left.
Setting up network access
Here we open the “All networks” sub-item and at the very bottom in the “Password protected sharing” section we disable it by moving the switch to the appropriate position.

Disable password prompting over the network
It is worth noting that in this way you can disable the prompt for entering network credentials not only in Windows 10, but also in Windows 7 and Windows 8.1.
Conclusion
As you can see, getting rid of entering network credentials is not so difficult. In any case, it is much easier than looking for these same credentials in the form of a login and password or trying to guess them.
The best way to thank the author of the article is to repost it on your page