Linux on a flash drive: installation and other tips for using Linux on USB drives. Installing Ubuntu on a computer via a USB flash drive
A full-fledged operating system on a small external media is very convenient. You can run the system on almost any computer, and also have all your files and data always at hand, and you no longer need to keep it on the main drive a large number of systems
It is for these reasons that many computer users are interested in how to install Linux on a flash drive, whether it is possible, and if possible, then how to implement everything correctly. In this article we will try to answer such questions. We will also analyze in detail the installation process on a flash drive for one of the most popular distributions - Ubuntu.
Despite all the advantages of using operating system from a flash drive, many say that this is not necessary. And for good reason, because such intensive use of a flash drive can simply destroy it.
Non-volatile flash memory has one significant drawback- This limited quantity overwriting one cell with data. There are no restrictions on the number of data reads, and the write limit is very significant - tens of millions of times. For using flash drives for their intended purpose, this is not critical, since the recording frequency is not very high and the flash drive lasts a long time.
But when you install the system on a flash drive, the kernel, the file system, programs constantly save their temporary files, constantly work with data and write something to the disk, the situation is further complicated by file system journaling, since it logs data about any changes to files, which further increases the number of rewrites of flash drive blocks.
You can say that there are SSDs made using the same technology that are used in computers. But everything is not entirely true, SSDs are designed for such a load, because they have a rewrite limit of several billion, as well as the ability to hot-swappable already failed blocks with backup ones.
Therefore, when you agree to install an operating system on a flash drive, you must understand that the flash drive will work much less than it could. But it's not all bad, you can perform some optimizations that will force the system to write less information to disk. If you agree with the risk, then next we will look at how to install Linux on a flash drive.
Installing Linux on a USB flash drive
operating room Linux system allows the user to do everything he needs, and if you want Linux on a flash drive, then that’s possible too. We don't even have to resort to any special tools.
We will consider the entire process using Ubuntu as an example, and everything will be done using the official installer. We will not be interested in simply writing an image to disk or working from random access memory. In the end, we will get a full-fledged operating system on a flash drive.
First, do everything as usual, select the language, software and update settings. The differences begin at the disk marking stage. Here you need to choose manual option, because automatic marking does not allow us to do what we need.
There will be one note here, you need to ensure that the system is not loaded from the flash drive on which you are going to install it, otherwise you will not be able to install ubuntu on the flash drive. That is, in addition to the installer, another clean flash drive must be connected to the system. If everything was done correctly, then in addition to the main disk /dev/sda, the /dev/sdb flash drive will appear in the layout window:
For a flash drive, its size, disk label will be indicated, and most likely there will be only one partition on it. This partition must be deleted to gain free space.

The first partition must be created with the FAT32 file system and precisely the first one so that Windows can work with it. For example, if you have a 16 GB flash drive, then 5-4 GB can be allocated for data. The mount point for this partition is /home:


The second section applies to system files, here we need at least eight gigabytes. It’s better to use Btrfs as a file system, since we don’t need journaled ext4, and btrfs has compression and optimization for ssd. Specify / as the mount point:

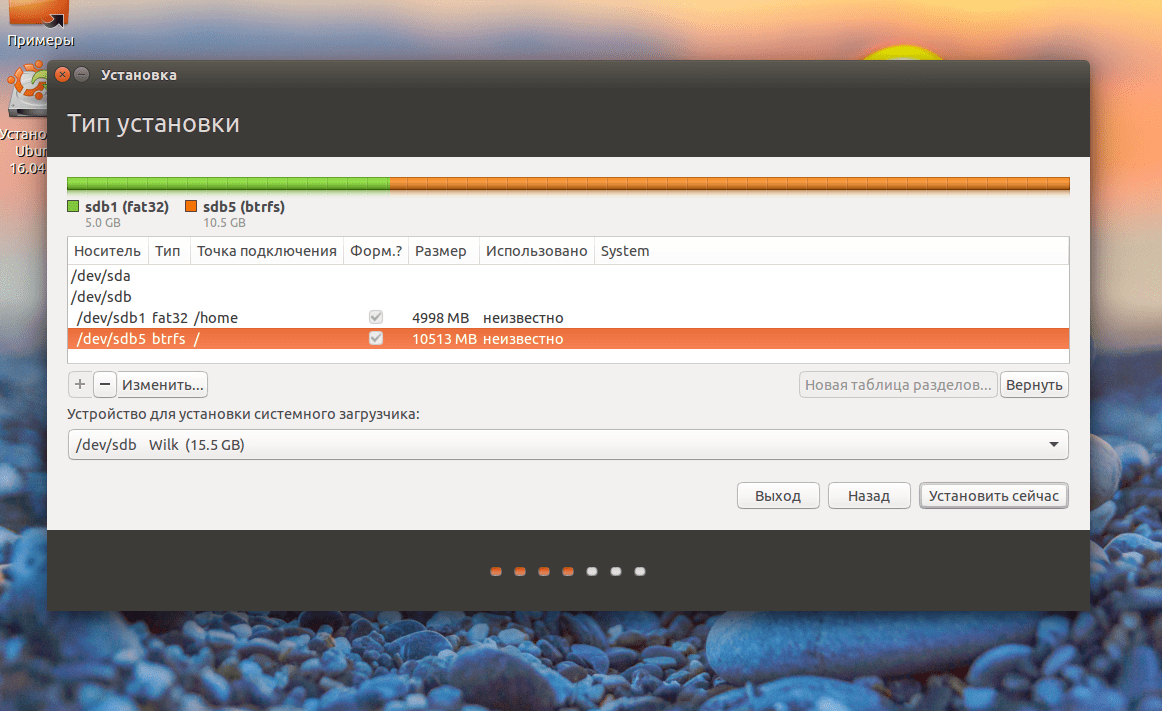
The last action at this step of the wizard is to specify the device for the bootloader, this should be the same flash drive on which you are installing the system.
Optimizing Ubuntu for working on a flash drive
Installing Ubuntu to a flash drive is complete, but now we just have to make it work in such a way as to write data to the disk as little as possible. All this must be done in an already installed system.
Most of the settings will be carried out in the /etc/fstab file, first we will enable compression of all files and optimization for ssd in btrfs, which is used as the root. We used the /dev/sdb2 partition for the root, since we used /dev/sdb1 for /home:
/dev/sdb1 / btrfs errors=remount-ro,noatime,nodiratime,compress=lzo,ssd,commit=60 0 1
Perhaps your disks in fstab will be named by UUID, then you will have to find the entry that indicates the mount point / and the btfs file system, and therefore change it. Let's look at the options:
- errors=remount-ro- remount read-only during errors;
- noatime- do not update file access time;
- nodiratime- do not update folder access times;
- compress=lzo- use lzo compression, this is the fastest zlib algorithm gives a higher compression ratio but takes longer;
- commit=60- by default, the file system writes all information about file changes every 30 seconds to disk, but using this parameter you can specify your own value, but not more than 300;
- ssd- a set of optimizations for solid-state drives.
Some folders in which temporary system files are most often written can be moved to RAM; to do this, add the following lines to the end of the /etc/fstab file:
tmpfs /tmp tmpfs rw,size=100m 0 0
tmpfs /run tmpfs rw 0 0
tmpfs /var/lock tmpfs rw 0 0
tmpfs /var/log tmpfs rw,size=10m 0 0
The kernel does not immediately write data to disk, but caches it in memory, and writes it when the disk is not loaded or it can no longer be stored in memory. To configure settings for flushing data to disk, use the files /proc/sys/vm/. The settings below reduce the number of entries by increasing RAM consumption.
Maximum time between data writes to disk:
sudo sysctl -w vm.laptop_mode=120
$ sudo sysctl -w vm.dirty_writeback_centisecs=12000
$ sudo sysctl -w vm.dirty_expire_centisecs=12000
Maximum amount of cache memory in percentage:
sudo sysctl -w vm.dirty_ratio=10
Write data to disk when only % of memory is free:
sudo sysctl -w vm.dirty_background_ratio=1
After these settings, the installation of ubuntu on the flash drive is completed, the system is more or less ready for use on the flash drive and will not harm it that much. But still, do not forget to backup important data from time to time, because everything can break at the most inopportune moment.
Ubuntu occupies an honorable third place in the world of operating systems, and, probably, every experienced PC user has ever thought about experiencing new user experiences from using it. Below we will show you how to install Ubuntu on your computer using a USB flash drive.
What you will need:
- USB flash drive with 4 to 9 GB of memory on board. During the installation process, the flash drive will be formatted - make sure that there is no important files. Create backup copy just in case;
- a computer with an operating system already installed. Microsoft Windows, Mac OS or OS Linux;
- a backup copy of the “native system”, in case there is important data on it.
Case 1. Starting point - Windows 10,8.1, 7, Vista or XP
Installing Linux Live USB Creator
Step 1. Download Linux program Live USB Creator. It is distributed free of charge and is available from the official website of the developer.

Step 2.

Step 3. Reading useful information and click “Next”.

Step 4. We indicate the path where the program will be located after installation - “Install”. The installation starts.

Step 5. After the loading line has reached its end, click on the “Next” button.

Step 6. Close the installation program by clicking on the “Finish” button.

Downloading an Ubuntu Disk Image (ISO) File
An ISO file is essentially your OS. Distinctive feature The Ubuntu operating system is its openness. You can download it absolutely free from the official website.

Creating an installation USB flash drive
Step 1. Open the Linux Live USB Creator program.
Step 2. Insert an empty flash drive into the USB connector of the PC.
Step 3.

Step 4. In the “CHOOSE A SOURCE” column, click on the first icon of the disk image and indicate the path to the ISO file.

Step 5. We leave the next two columns unchanged - STEP 3 and STEP 4, respectively.
Step 6. The program will check the volume available memory on the drive and will give you the result.

Step 7 In the “STEP 5” column, left-click on the lightning icon. The program will begin creating a bootable USB flash drive. The process can take from a few minutes to 15 depending on the power of the PC.

Once the download is complete, the program will notify you that it has been successfully completed. If you Windows user skip the following sections until “Part 2: Installing the OS.”
Case 2. Starting point - Mac OS
Step 1.

Step 2. Open the terminal. Combination Ctrl keys+ space will open a search using the “Spotlight” system, type “Terminal” in the input column and click on the corresponding icon.

Step 3. In the window that opens, enter the following text:

The installation flash drive has been created! If you're on a Mac, skip the next part.
Case 3. Starting point - OS Linux
Step 1.

Step 2. Insert the flash drive into the PC.
Step 3. Open the terminal using the key combination Ctrl+Alt+F1-F12 or through the “Dash” application menu.
Step 4. In the window that opens, enter the following text:

Ready! The computer wrote the installation data onto a USB flash drive.
Part 2. Installing the OS
Step 1. Opening BIOS menu. To do this, during system boot, press the key on the keyboard that corresponds to your brand. We list several such keys in the table below.
Step 2.

Step 3. Press Enter - the system reboots and starts
Step 4.

Step 5.

Step 6.

Step 7

Step 8 Select your time zone and click “Continue”.

Step 9

Step 10 We create account Ubuntu and click on the familiar button in the lower left corner of the window.

Step 11 A window with a loading line will appear. Wait until it reaches the end and click on the “Restart Now” button.

The system will switch on, after which all you have to do is log in and start working in the new environment. Congratulations! You have successfully installed Ubuntu on your computer.
Read the detailed step by step instructions in a new article -
Video - Installing Ubuntu from a USB flash drive
Linux can be useful to you for many reasons. For example, your old computer can't update to new ones Windows versions or macOS, or you need Linux-specific applications, or you're just curious to try something new. Or maybe you just bought new computer without an operating system and want to save money by choosing free Linux.
Installing Linux is easy. Of course, there are distributions like Arch, which are quite difficult to install for a beginner. But most modern distributions are very easy to install. Perhaps even simpler and faster than Windows.
Before installing Linux on your main computer, make a copy of your important data. When working with partitions on your hard drive, you may accidentally erase something important. Of course, if you follow the instructions and carefully read what you are doing, then nothing unexpected will happen. But it’s not superfluous in any case.
You can install Linux on computers running Windows control and macOS or to blank HDD. You can choose Linux as your main system or use it in parallel with your old system.
1. Download Linux distribution
First of all, you need to choose a Linux distribution. The DistroWatch.com rating will help you decide.
Then you need to download the selected distribution. This is easy to do: open the website of the desired distribution, find the downloads section and select the one that suits the bit capacity of your processor.
Usually, Linux distributions The official websites offer two ways to download. The first method is a normal download. The second is via P2P using a torrent client. The second method is naturally faster. So choose it if you want to save time.

When the distribution is in ISO format downloaded, you need to burn it to a CD or a regular USB flash drive.
You can burn to CD standard means system: “Burn Disk Image” in Windows or “Disk Utility” in macOS. Just click on the downloaded image right click mouse and select the appropriate item in the menu.

For ISO recording on a flash drive you will need special utilities. For Windows is better select Rufus, and for macOS - UNetbootin. These programs have a very simple interface, it is quite difficult to get confused in them.
3. Prepare the disk partition
This step should be followed if you want to keep the system installed on you and use Linux at the same time as it. If you decide to switch your computer completely to Linux or are installing the OS on an empty hard drive, skip this paragraph.
Windows

Open Windows Disk Management. Select the drive or partition from which you plan to carve out some space to install Linux. For most distributions, 10 GB is more than enough. But if you plan to install a lot of apps, get more. Right-click on the partition and select Shrink Volume. Enter the size and click OK.
The process can take quite a long time, so be patient.
When Disk Management finishes resizing the partitions, there will be empty unallocated space on the disk, marked in black. We will install Linux there.
Later, if you don’t need Linux, you can delete the partitions with it and give the free space back to Windows using the same “Disk Management Tools”.
macOS

You can allocate space for installing Linux using " Disk Utility» macOS. Select your drive and click on the “+” icon to create a partition for Linux. Creating a new partition may take some time.
4. Prepare the bootloader
Windows
This item applies only to new computers running before installed Windows 10, 8.1 or 8. These computers use a UEFI bootloader, which will not allow you to boot into anything other than Windows.
To fix this, go to BIOS settings your computer and disable the option Secure Boot. Then reboot. Done, you can now download and install other systems next to your Windows.
macOS
Unlike most computers, Macs require a pair additional actions in order to install Linux on dual boot with macOS.
First of all, disable SIP. Restart your Mac and press Cmd + R. The Recovery menu. Select “Terminal” in it and enter csrutil disable .
Restart your Mac again. SIP is disabled.
Manual
Suitable if you want to set the sizes for your sections yourself or, for example, create separate section for your files. To do this, select “Other option” and click “Continue”.

Linux will display what partitions you have on your computer. You can delete them, format them, or, conversely, leave the sections with the information you want to save intact.
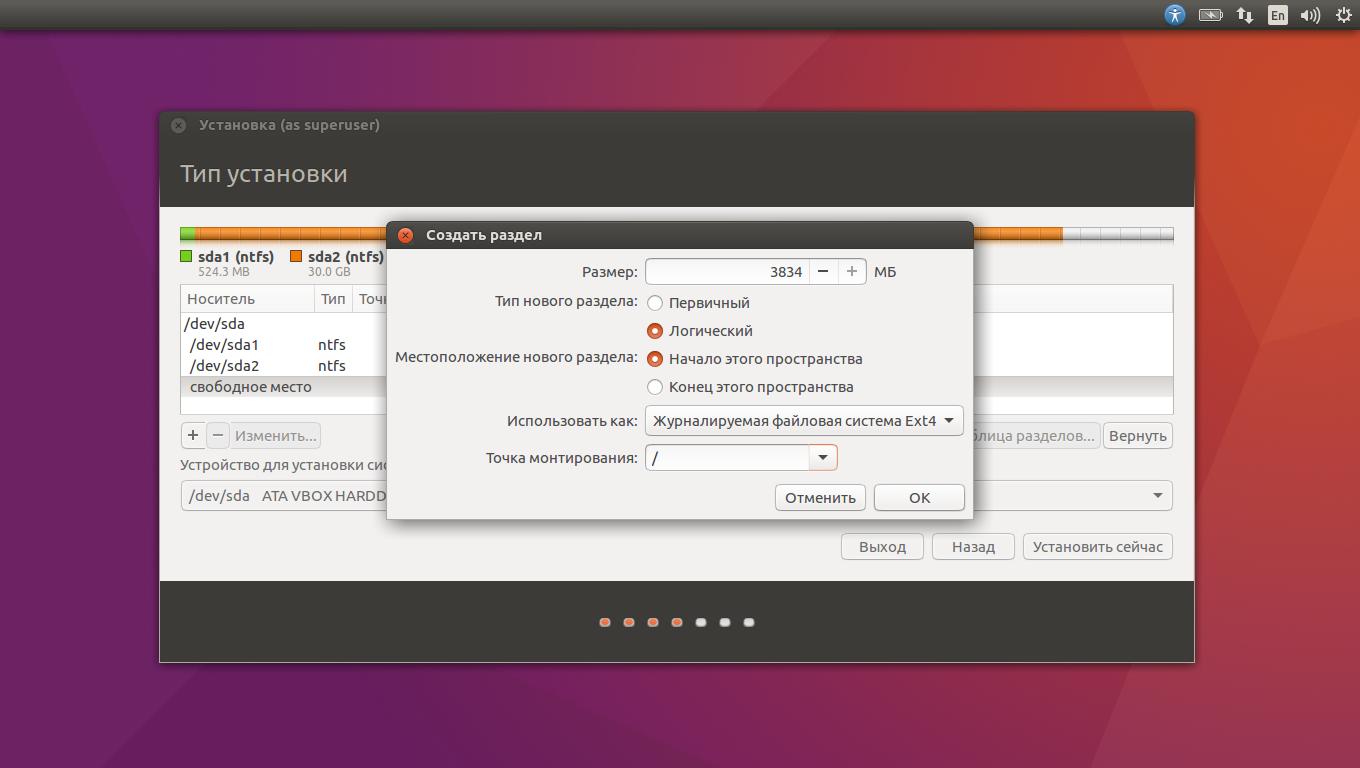
To install Linux instead of your system, select a partition with installed system and delete it with the “–” button. Then create new partitions in the free space.

- Root partition for system Linux files. Select file system Ext4 and mount point /.
- A swap partition, or swap partition, is useful if you do not have enough RAM, but have a fast SSD drive. In the list of file systems, select "Swap Partition".
- Home partition where your files will be stored. Select the Ext4 file system and the /home mount point.
Click Continue and confirm the changes. The installer will erase the partitions you selected and create new ones in the free space.
How to install Linux next to your current system
Install Linux is nearby with your system there are two ways.
Auto

Most Linux installers will immediately detect the systems you have installed. If you haven't created a separate disk space for Linux, you can try selecting the "Install next to Windows" option. The installer will create the required sections, and you don't have to do anything manually.
Manual
If you want to determine for yourself how much space to allocate to the system, and followed the instructions in step 3, click “Other option” and click “Continue”. You will see your disk partitions and empty place, which we have prepared for Linux. Create a root partition there (mount point /) as described above. A home partition is not necessary in this case: you will be able to copy and modify files on your main system.
Click Continue. The installer will leave your files in place. It will simply create new partitions on the free space. You will be able to choose which system you want to boot at startup.
8. Complete the Linux installation


You will then be asked to introduce yourself. Enter your name and create a password. Don't forget your password, as you will constantly need it to perform tasks on behalf of everyone. If you wish, you can encrypt your home folder.
Then just wait. When the installation is complete, you will be prompted to pull out installation disk and reboot. Don't forget to disable BIOS loading With external drives, if you turned it on.
What to do after installation
When you reboot and your Linux desktop appears in front of you, you can do everything you can do in Windows and macOS: surf the Internet, edit documents and listen to music. Don’t forget to update and look at the “App Store” (or its equivalent, depending on the distribution) to additionally install the applications you need.
Try Linux and you will see that in Everyday life it is no more complicated than Windows or macOS.
Apparently, you decided to install Ubuntu on your computer and for some reason, for example due to the lack of empty discs or a drive for reading disks, you want to use bootable USB flash drive. Ok, I'll help you. This manual will cover the following steps in order: creating installation flash drive Ubuntu Linux, installing boot from USB flash drive in Computer BIOS or laptop, the process of installing an operating system on a computer as a second or primary OS.
This step by step guide suitable for everyone current versions Ubuntu, namely 12.04 and 12.10, 13.04 and 13.10. I think we can finish with the introductory part and proceed directly to the process itself.
How to make a USB flash drive for installing Ubuntu
I assume you already have ISO image with the version of Ubuntu Linux OS you need. If this is not the case, then you can download it for free from Ubuntu.com or Ubuntu.ru. One way or another, we will need it.
Run the program (example given for latest version 1.0, released on October 17, 2013 and available at the above link) and follow these simple steps:
- Select required USB drive (note that all other data on it will be deleted).
- Check the box Auto format it with FBinst.
- Check the box Linux ISO/Other Grub4dos compatible ISO and specify the path to the image Ubuntu disk.
- A dialog box will appear asking you what to name this item in the boot menu. Write something, say Ubuntu 13.04.
- Click the "Go" button, confirm that you are aware that all data from USB storage will be deleted and wait until the process of creating a bootable USB flash drive is completed.

We're done with this. The next step is to go into the computer's BIOS and set it to boot from the newly created distribution. After the settings have been saved and the computer has restarted, you can proceed directly to installing Ubuntu.
Step-by-step installation of Ubuntu on a computer as a second or main operating system
In fact, installing Ubuntu on a computer (I’m not talking about its subsequent configuration, installing drivers, etc.) is one of the most simple tasks. Immediately after booting from the flash drive, you will see a prompt to select a language and:
- Launch Ubuntu without installing it on your computer;
- Install Ubuntu.

Select “Install Ubuntu”
We choose the second option, not forgetting to first select Russian (or some other language, if it is more convenient for you).

The next window will be called "Preparing to install Ubuntu". It will ask you to make sure that your computer has enough free space on the hard drive and, in addition, connected to the Internet. In many cases, if you don't use Wi-Fi at home router and use the services of a provider with an L2TP, PPTP or PPPoE connection, the Internet will be disabled at this stage. It's OK. It is needed in order to install all Ubuntu updates and additions from the Internet at the initial stage. But this can be done later. Also at the bottom you will see the option “Install this third-party software" It has to do with codecs for MP3 playback and is best noted. The reason why this point is made separately is that the license for this codec is not completely “Free”, and Ubuntu uses only free software.
The next step will require you to select an Ubuntu installation option:
- Next to Windows (in this case, when you turn on the computer, a menu will be shown in which you can choose whether you are going to work in Windows or Linux).
- Replace the existing OS with Ubuntu.
- Another option (represents independent markup hard drive, for advanced users).

For the purposes of this tutorial, I'm choosing the most commonly used option - installing a second Ubuntu operating system, leaving Windows 7.
The next window will display the partitions of your hard drive. By moving the separator between them, you can specify how much space you allocate to the Ubuntu partition. It is also possible to partition the disk yourself using the advanced partition editor. However, if you are a novice user, I do not recommend contacting it (I told a couple of friends that it was nothing complicated, they ended up without Windows, although the goal was different).

When you click “Install Now”, you will be shown a warning that new disk partitions will now be created, and old ones will be resized, and this may take a long time (Depends on how busy the disk is, as well as its fragmentation). Click Continue.
Through some (different, for different computers, but usually not for long) you will be asked to select the regional settings for Ubuntu - time zone and keyboard layout.
We assume a situation where Windows is installed on the user's computer. And immediate advice: keep this system, at least for the first time. Linux and, above all, Ubuntu presented in this article, are of course user-oriented, but in some cases they are strikingly different from Windows.
First you need to know that you and your equipment can handle the system. This is where Ubuntu's first big advantage comes in: you can try it with complete peace of mind. new system without harming already installed Windows. Linux on a USB drive Users can download the system for free from the manufacturer's website (ubuntu.com/download/desktop).
Attention! Both 32-bit and 64-bit versions are available. If you have 4 GB of RAM or more, take the 64-bit version. One way or another, this version is more modern, since it even copes with modern firmware UEFI, which will be an advantage if you need to install Ubuntu in parallel with your existing Windows.
The file from Ubuntu will be downloaded to your computer in ISO format, after which you can burn it to a USB drive using free program, For example, Universal USB Installer(goo.gl/dXQ9yw). The size of the flash drive must be at least 2 GB. Configure the Universal USB Installer as follows: for “Step 1” select “Ubuntu”, for “Step 2” go to the “Browse” button ISO file with Ubuntu that you want to burn to a USB drive, select it and click on “Open”.

For “Step 3” you need to select a USB drive from the drop-down menu. Clicking “Create” starts the recording process. Please note that this action will permanently delete all data previously saved on the flash drive. Therefore, at this moment you will see a warning that you need to close by clicking on the “Yes” button. After about 3-5 minutes, the USB drive is ready for use.
Starting the system in Live CD mode
Ubuntu runs from a USB stick or our premium DVD without affecting Windows. To boot from a flash drive, you need to change the startup order of your computer. This is done in the BIOS/UEFI menu, usually called up with the “Del”, “F2” or “F12” keys, in special cases The correct key will be prompted by messages at startup; some laptops have a special button above the keyboard for this.

In the BIOS/UEFI, look for menu items such as “Boot” or “Startup” and place external media in front of the built-in SSD or hard drive. When exiting the BIOS/UEFI, the changes should be confirmed, and then reboot the computer with the connected flash drive or DVD installed.
If everything worked out for you, Ubuntu should start instead of Windows. When choosing from boot menu“Try Ubuntu without installing” option will start the system in Live CD mode. Please note that this will make the system much slower than a normal installation.
First of all, this concerns slow USB connections 2.0. Using a USB 3.0 connector would solve this problem.
Hardware Compliance Check
The benefit of using a USB stick or DVD is that you'll know right away whether your hardware can handle Ubuntu. Whether the screen resolution is supported, whether the Bluetooth keyboard is recognized and whether it connects to the Internet via Wi-Fi.
If such testing is not important to you for now, you can run Ubuntu in a virtual machine to evaluate the system first. For this purpose, we recommend VirtualBox (virtualbox.org) on Windows because it is very easy to set up. In the program, click on “Create”, in the “Name” line enter “Ubuntu 16.04” and accept all the Wizard’s suggestions with a few clicks on “Next”.

After Ubuntu appears on the main VirtualBox screen, click on the “Media” section, and in it, click on the empty line under “Controller: IDE”. Click on the small disk icon on the right side, and then select "Select image" optical disk» Locate the Ubuntu ISO file.
Using the "Launch" button you can download virtual machine and begin setting up and testing the system.
Alternatives to the Ubuntu system
 > Linux Mint
along with Ubuntu, it is one of the most popular distribution kits among beginners. Technically, Mint uses Ubuntu, or rather Debian, as its base, and offers different desktop interfaces in Cinnamon and MATE versions. For two years now, Mint has been focusing on stability.
> Linux Mint
along with Ubuntu, it is one of the most popular distribution kits among beginners. Technically, Mint uses Ubuntu, or rather Debian, as its base, and offers different desktop interfaces in Cinnamon and MATE versions. For two years now, Mint has been focusing on stability.
 > openSUSE- another popular distribution aimed at stability and comfort. Easy to use configuration tools in software package YAST (Yet Another Setup Tool) - distinctive feature systems. hours in pavilion 8, where demonstration implantation will take place.
 > Debian - technical basis many distributions, including Ubuntu and Mint, with over 20 years of experience. This system is intended primarily for experienced users. The main idea is to use free software, which often means reduced comfort.
Photo: manufacturing company