Linux Mint 18.3 Russian version official. Installing Linux Mint next to Windows
Linux Mint is one of the most popular. Linux Mint is optimal for beginners, convenient, beautiful and contains everything you need. This guide takes a detailed look at the Linux Mint installation process. We discuss how to install Linux Mint on a blank disk, how to create partitions, and also how to install Linux Mint next to Windows.
This guide can also be used to install other Linux distributions, since the installation of most Linux distributions is similar.
Linux Mint comes in three editions, which differ in their desktop environment:
- Linux Mint Cinnamon
- Linux Mint MATE
- Linux Mint Xfce
Installation of all editions is performed the same way. In this guide we tell you how to install Linux Mint Cinnamon. If you have never used Linux before, you can start with Linux Mint Cinnamon.
Yes it is. This distro is currently ranked #1 on Distrowatch. Of course, Manjaro has been rapidly catching up lately, but in past years Mint was confidently in the lead. Moreover, even Debian, of which it is a descendant, could not catch up with it.
It is worth saying that Mint is a kind of grandson of the famous Debian. It is based on Ubuntu, which in turn is based on Debian. Many Linux distributions can boast of a similar pedigree, but only Mint and Ubuntu were able to gain popularity greater than that of their ancestor.
Ubuntu once overtook Debian in popularity. Now Mint has overtaken Ubuntu in popularity.
However, how do all these distributions differ from each other? I will not draw parallels with Debian, but let me compare Linux Mint and Ubuntu.
Differences between Linux Mint and Ubuntu
These distributions are very similar, but they also have their differences. Among them are:
- Linux Mint has the necessary software and media codecs right out of the box
- Linux Mint has a more Windows-like (and therefore more beginner-friendly) interface
- Ubuntu is developed by a huge company, while Mint is developed by a small team
- Many tools and packages available natively in Mint are not available in Ubuntu (need to be installed)
- Mint is ready to work almost immediately after installation - Ubuntu needs to be completed
- Mint uses its own graphical environment - Cinnamon. In Ubuntu - Unity. (And from version 17.10 - Gnome)
That's not all, there are other differences. However, they are petty, and there is no point in talking about them here yet.
Installing Linux Mint is quite easy
The installation here is not much different from. However, there may be some nuances here too. Before proceeding directly with the installation, you need to familiarize yourself with the system requirements.
System requirements:
- CPU: x86 or x64 architecture processor with a frequency of at least 1.3GHz
- RAM: 512MB for Cinnamon, xfce4 and mate. 2GB for KDE
- HDD: 9GB free space
- Video card: the one for which there is a driver
- Rest: CD/DVD-ROM drive or USB port
This is what the system requirements for Linux Mint look like. These are the minimum ones, there are also recommended ones, but I don’t see the point of considering them, because the difference in performance will still be felt weakly (Mint is fast).
Preparing for installation
Before moving on to the installation itself, we need to decide on the editor's choice. There are as many as 4 pieces available to choose from, and this is very good:
- Cinnamon: default, moderately beautiful, lightweight design, developed by the Mint authors themselves
- MATE: a fork of Gnome 2 that also has high performance
- Xfce: probably one of the fastest graphical shells
- KDE: a more beautiful, but at the same time more demanding shell
Installing Linux Mint is quite simple. You download the distribution image (a file with the .iso extension), write it to a flash drive or disk, and boot from the flash drive (disk) into the Live system. Inside the Live system, run the installer and follow the installer's instructions. Installation is relatively quick.
The most important step at the installation stage is disk partitioning or selecting a disk (disk partition) on which the system will be installed. If you are installing the system next to Windows, then you need to be careful not to accidentally format an existing disk partition (if there is one) on which important data is located. Below we walk you through the disk partitioning process step by step, so don't worry.
Also, we must not forget about the processor architecture. Here the 32nd version is available for older machines (While many other distributions have only one version left - 64x), use it or not - see for yourself. I recommend doing this only if you have a very old and antediluvian processor.
Now we need to get an image of this Linux distribution. For this we go to the official website of Linux Mint. The download page is available in the main menu, but in order to save you time, I put a link to it, and not to the main page (a significant time saver, I know).
Scrolling down, we can see a block with all the necessary links. Click on the one you want and then move on to the next page.
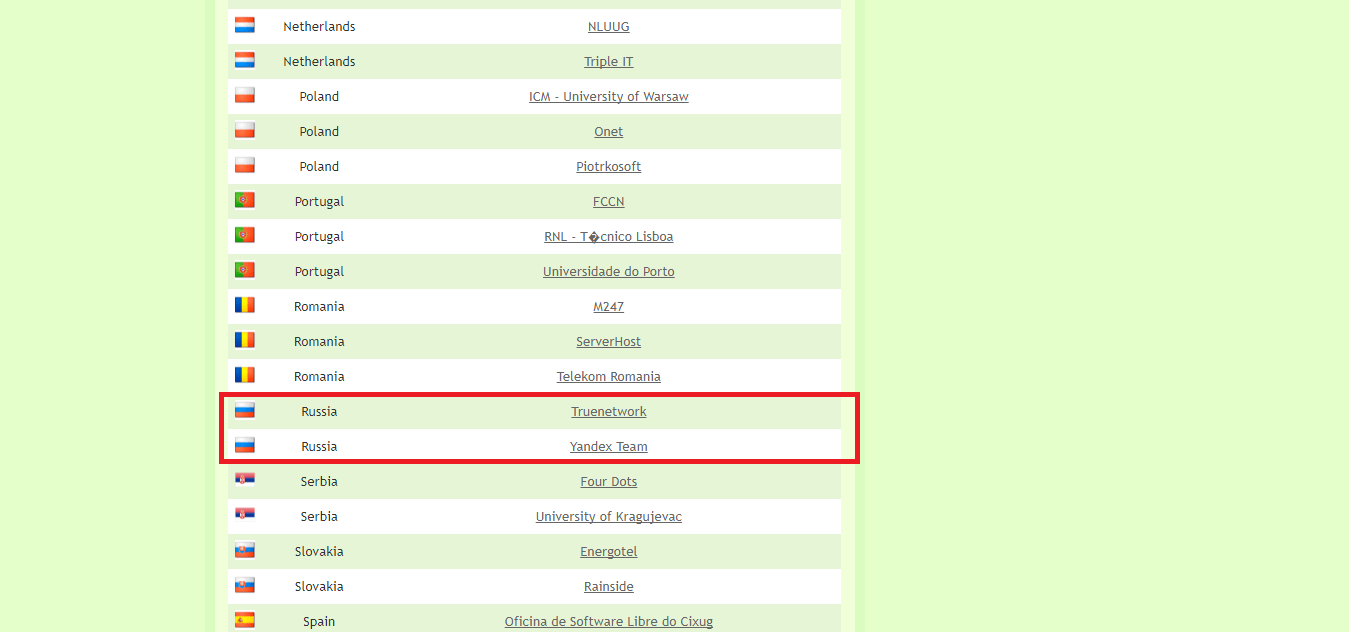
As you might have guessed, this page will contain links to mirrors. If you are from Russia, then it is best for you to use domestic mirrors, because the download speed, otherwise, will be significantly lower. Accordingly, if you, for example, are from Ukraine, then it is better for you to use mirrors from your own, or the country closest to you.
When you click on the appropriate version, a new page will open on which you can select the server closest to you to download or use a torrent file to download.
Recording an image on a CD/USB drive
- If you have Windows, use Rufus
- If you have Linux/Mac - Etcher
Installing Linux Mint next to Windows
If you already have Windows installed on your computer and you want to install Linux Mint next to it, then it is advisable to first allocate space on the disk that will be used for Linux Mint. This can be done using standard Windows tools. If you are not installing Linux Mint next to Windows, then proceed to the next step.
Before proceeding with the steps below, as well as further installation of Linux, it is highly recommended that you back up your important data. It is advisable to make a copy on removable media.
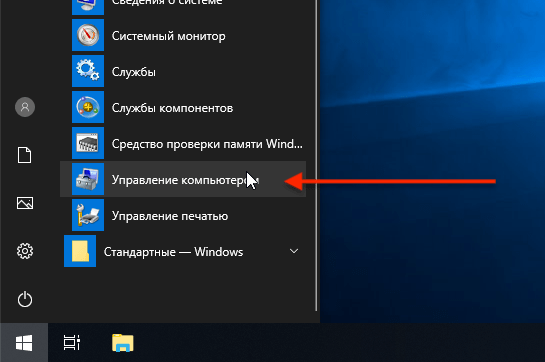
Let's look at how to allocate disk space in Windows for a future installation of Linux Mint. Via the menu Start find the utility Computer management.
A utility for setting up your computer will open. Select the item on the left in the list Disk management . A table will appear with a list of disk partitions. In the screenshot below (example for Windows 10) you can see that the main partition is a disk C. From this we will cut off the space that we will need to install Linux. Click on the disk C and right click on it. From the pop-up menu, select Shrink Volume

In the window that opens, you need to enter the field Size of compressible space enter the size you want to cut from the disk. For Linux, it is advisable to allocate a minimum of 40-50Gb (although less is possible, depending on how you plan to use the system). I cut off only 20Gb, since this is a test system. Enter the desired size in the field and press the button Compress.

The result will be the following markup. We see that an unallocated (empty) area of ~20Gb has appeared on the disk. We will use this area to install Linux Mint.

Now you need to boot from the flash drive (disk) you created. To do this, you need to set the BIOS/UEFI settings of your computer to boot from external media. To do this, you need to restart your computer and open the BIOS. On different computers, you can access the BIOS in different ways.
On modern computers that use the UEFI, to enter BIOS/UEFI you need to hold down a special key when turning on the computer. The key may be different for different manufacturers. Usually this: F2, Del, F10, Esc, F11 or F3.
On older computers that use a classic BIOS (legacy BIOS), to enter the BIOS you need to press a special key when the computer boots at the very beginning, when the motherboard logo appears. The key may be different for different motherboards. Usually this is one of the keys: Del, F1, F2, F8, F10 or some other, or even a key combination.
Example of BIOS setup for booting from a USB flash drive:

Save the BIOS settings and reboot the computer. Don't forget to connect the flash drive to your computer first.
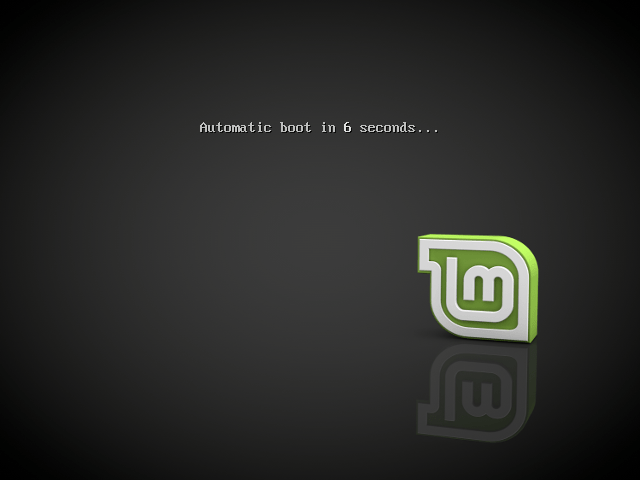
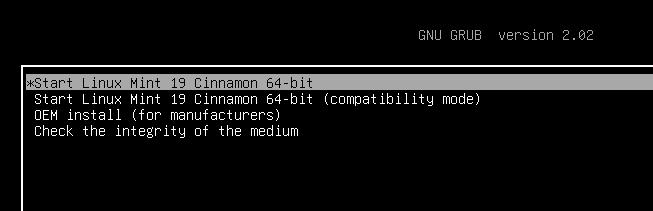
The boot menu will appear. You need to select the first item - Start Linux Mint to start loading the Live system.

In some cases, the boot menu may look like this:
Starting the installation Linux Mint
When the Live system boots, the desktop will appear in front of you. To start the installation, double click on the icon Install Linux Mint located in the upper left corner of the desktop.

The installer will launch. The installer will require you to complete several steps.
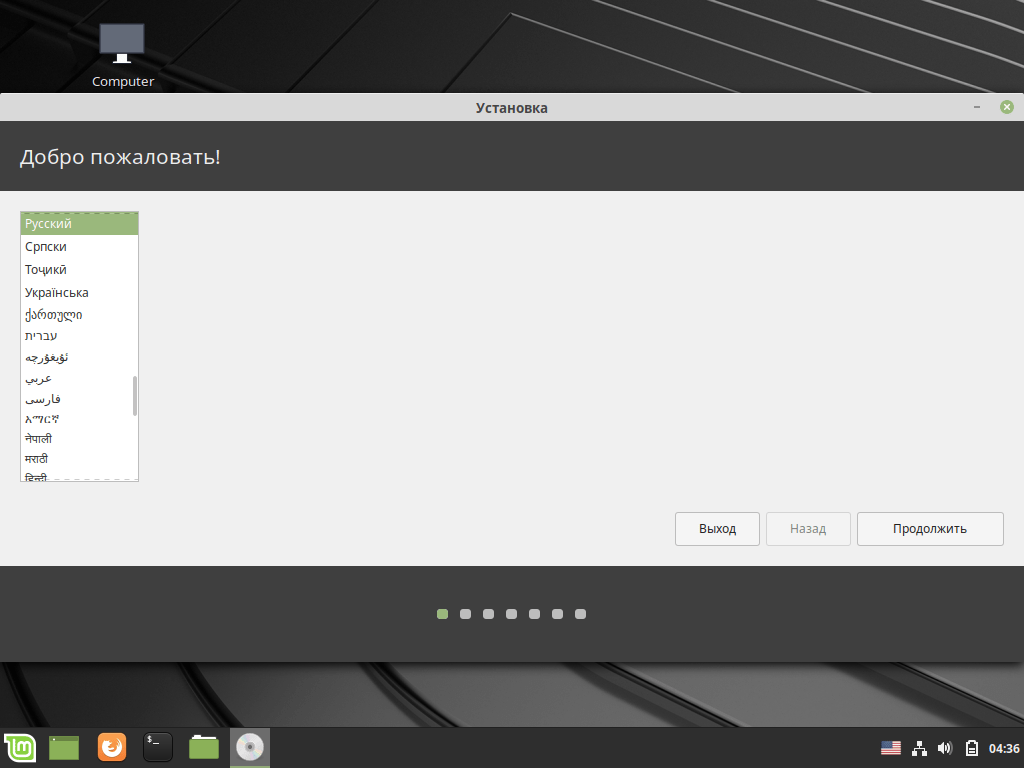
Language selection Linux Mint
Select the language of the future system from the list and click the button Continue.
Selecting a keyboard layout Linux Mint
Select your keyboard layout.

Installing additional components Linux Mint
At this step, you are asked to check a box so that video card drivers, WiFi, Flash support, MP3 and some other components are automatically installed during installation. I recommend installing them, so check the box and click Continue .

Disk selection and disk partitioning
Selecting a disk and partitioning the disk is the most important installation step, which usually causes difficulties for beginners. At this step, you need to choose which disk or disk partition to install Linux Mint on. And also, if required, partition the disk yourself, that is, create the necessary disk partitions on which the system will be installed.
A few words about disk partitions for Linux Mind
Before we move on to disk partitioning, just a few words about why Linux needs any partitions at all.
Any disk can be divided into several partitions. Partitions can be of different sizes, have different file systems and different purposes. For example, when Windows and Linux are used on the same computer, different partitions are created for them on the disk.
If you already have Windows installed, then you already have several partitions created on the disk, or in the simplest case there may be only one partition. But usually this is at least three partitions: an EFI partition, a recovery partition of about 500Mb in size, and a partition that is allocated for the disk C.
Any Linux system (not just Linux Mint) has a certain directory structure. Linux can be installed not on one disk partition, but on several. In this case, each partition is used for specific purposes (for a specific system directory).
For example, a user can create the following partitions:
| EFI | EFI partition. This section must be created for computers running in UEFI mode. If you already have Windows installed on your computer (working in UEFI mode), then the EFI partition should already exist and you do not need to create it. |
| / | Root partition. This is the main partition, which contains all the system directories, except those located on other partitions. |
| /home | Home section. This is the section where user data is located. Exactly at /home section the user creates his personal files. If we draw a distant analogy with Windows, then /home a section is something like a directory Users (Users) on Windows. Each Linux user has his own personal directory in the /home directory, for example, /home/vasya in it he creates his files. |
| swap | Swap partition. Used by the system if there is not enough RAM. Previously, it was usually always created, but now, instead of a swap partition, a swap file is more often used, so we will not create it. |
| /boot | Boot section. This section houses the GRUB boot loader, which boots the system, and other components that are required to start the system. This section is usually used for more, let's say, advanced installations. When you plan to configure RAID, full disk encryption, and so on. |
For the simplest Linux installation, it is enough to create one root partition “/” (not counting the EFI partition).
But sometimes it is useful to create more /home chapter. If you are creating /home section, then in this case the user data will be placed on a separate section. And if, for example, you need to reinstall the system, then during the reinstallation you will be able to use the existing /home section with your data (but do not format it), and your data will remain intact (if you are not sure what you are doing, then create a backup copy anyway).
Below, when manually partitioning the disk, we will create partitions: root “/”, /home and for computers running in UEFI mode, also an EFI partition, if it has not yet been created.
- Installing the system on a “clean” disk (automatic creation of partitions). This option is worth choosing if you are dedicating a separate disk for Linux Mint and do not plan to create partitions yourself. In this case, the installer usually creates only one root partition and one EFI partition (for UEFI mode).
- The Linux Mint installer will detect that you already have Windows installed and will offer to create disk partitions automatically.
- Independent disk partitioning (creating partitions), as well as disk partitioning when installing Linux Mint next to Windows. In this case, the user himself creates the desired sections.
Installation on a blank disk (full disk formatting)
This is the simplest case - for Linux Mint you allocate a separate disk, which will be automatically formatted, and on which the installer will automatically create the required partitions. For this installation option, select Erase disk and install Linux Mint and press the button Install now.

The following warning will appear. From this warning you can see that 2 partitions will be created on the disk: an ESP (EFI) partition and one root partition.

For systems with a classic BIOS, the ESP (EFI) partition is not created, that is, only the root partition will be created.
If you already have Windows installed, the installer will detect this and offer you to install Linux Mint next to Windows. In this case, the installer will automatically shrink the partition on which Windows is installed and create a root partition for Linux. Let's look at how to do this. Select an item Install Linux Mint next to Windows Boot Manager.

The following window will appear. In it you must indicate how much space you plan to cut off from the partition on which Windows is installed in order to use this space for Linux. To do this, move the separator left or right with the mouse. In my case, on a test system for Linux Mint, I allocate 15.1Gb. When everything is ready, press the button Install now.

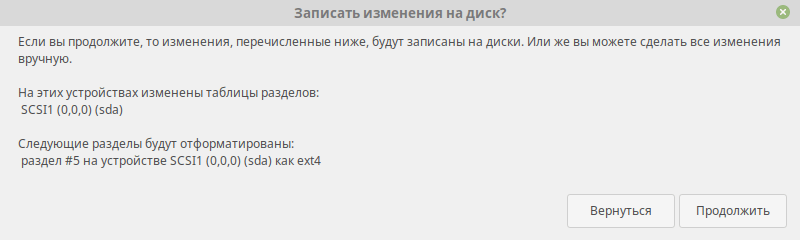
The following warning will appear. Think again whether you did everything correctly and whether you backed up your data. If yes, then click Continue.

Another warning will appear. It shows that the installer will create one root partition and format it with the ext4 file system. Click Continue.
Self-partitioning of the disk (creating partitions)
Now let's look at how to create disk partitions ourselves. To do this, select the item Another option and click Continue.

A utility for creating disk partitions will open. It presents a table with disks and disk partitions.
If you have a blank disk with no partitions, you will see the following window. Your drive is indicated as /dev/sda, it is presented in the list of sections. If you have several disks connected to your computer, they will also be displayed in the list and will have the names /dev/sdb, /dev/sdc, and so on.

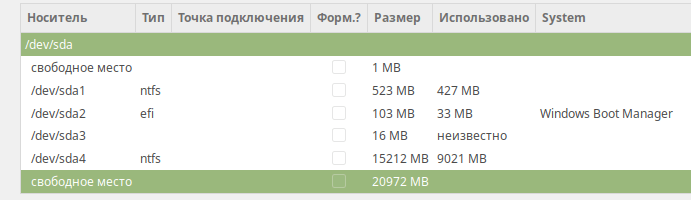
If you install Linux next to Windows, the list of partitions will look something like this. At the bottom of the list we see free place. This is the location we have allocated for installing Linux. You will also notice that an EFI partition has already been created (it is signed as Windows Boot Manager).
If you have a completely empty disk, you must first create a partition table on it. Click the Create Partition Table button. The partition table may already exist on the disk, in which case there is no need to create it. A warning will appear. Click Continue.
We will create three sections:
- EFI partition. It only needs to be created for computers running in UEFI mode. This partition is formatted in the FAT32 file system. It is recommended to specify the EFI partition volume as 512Mb.
- Root "/". It is recommended to allocate at least 30-50Gb for the root partition. File system EXT4.
- /home chapter. For /home partition, you can use the rest of the remaining disk space. File system EXT4.
Let's create an EFI partition (if it doesn't exist).
This step needs to be completed only if you are using UEFI mode and if you have not already created an EFI partition. In the table, click on the line that says free space and click the button with the plus symbol “+”. A window with the settings of the new section will open. Specify the following settings:
- Size. Specify the partition size in megabytes - 512Mb.
- New partition type: Primary.
- Use as: EFI system partition.

If suddenly, during the process of creating partitions, a line of free space of 1Mb in size appears above or below any partition in the table, do not pay much attention to it. This is due to the alignment of partitions on the disk.
Now the partition table will look something like this (this is only if you previously had an empty disk):

Let's create a root partition "/"
Again, click on the free space line in the table and press the “+” button. Specify the settings:
- Size. Specify the partition size in megabytes. A minimum of 30-50Gb is recommended. I specified only 10Gb, since I am installing a test system.
- Location of the new section: The beginning of this space.
- Mount point: /

Let's create /home chapter.
Click on the free space line and press “+”. Specify the settings:
- Size. Since under /home section we plan to use all the remaining free space, then we leave the size that is already specified.
- New partition type: Primary. If you have a disk with an MBR partition table, then it is better to select Logical.
- Location of the new section: The beginning of this space.
- Use as: Ext4 journaled file system.
- Mount point: /home

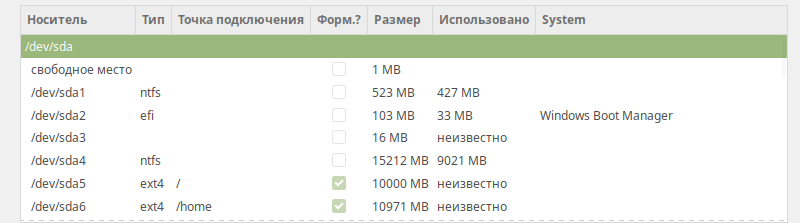
As a result, my list of sections looks like this.
List of sections
Or like this if you install next to Windows.
Also note that there is a drop-down list at the bottom of the window. This is the selection of the drive on which the GRUB boot loader will be installed. To install the bootloader, you specify not a disk partition, but the entire disk. In my case, the bootloader is installed on the /dev/sda drive, on which I install the system, and which is set as bootable in the BIOS.
Review the list of sections carefully again. If you need to change something, you can delete the sections and create them again. In fact, at this step no partitions are physically created on the disk; you are only specifying the settings for now. If everything is ready and you are sure that you did everything correctly, then press the button Install now.
A warning will appear indicating a list of partitions that will be created. Click the Continue button

Selecting the Linux Mint time zone
A window will open asking you to select your time zone. Select your time zone.

At this step, you need to specify the details of the user who will be created in the system and on whose behalf you will work, and also specify the computer name.

You need to fill in the following fields:
- Your name - enter your name in a free format.
- Your computer name- The computer name (hostname) is used to identify a computer on the network. You can specify something like mylaptop or vasyapc. I pointed pingvinushost.
- Username- The username under which you will work in the system. I recommend specifying a not very long name. You can simply enter your name, for example, vaysa, petya. I pointed pingvinus.
- Password and repeat password- You must specify a password that will be used to log into the system and perform administrative tasks. Be sure to remember or write it down.
Select the item below Login automatically, if only you plan to use the computer and do not want to enter a password to log in. But I recommend choosing the item Require password to login. You can also set the option Encrypt my home folder. For beginners and most users, this is not necessary. When all the settings are specified, press the button Continue .
Installation process
Now the installation process will finally begin. It may take several minutes. You don't need to do anything, just wait for it to complete.

Installation completed
When the installation is complete, a warning will appear. Press the button Reboot, to restart your computer.

Another warning will appear. Disconnect (remove) the flash drive or disk from the computer and press the Enter key.
After installing Linux Mint
If everything goes well, you will be prompted to enter your user password. Enter the password you provided during installation and press Enter. 
The Linux Mint desktop will appear and the welcome window will open Welcome to Linux Mint.
To prevent this window from appearing every time you boot, uncheck the box in the lower right corner of this window. 

Switching the default keyboard layout is done using the combination Shift+Alt.
If you are trying to install Linux Mint next to Windows, then by default you will boot into Linux. To boot Windows, you need to select the following item from the Grub boot loader menu when booting your computer: Windows Boot Manager 4.2 / 5 ( 5 votes)
In this article, we will look at the installation process of Linux Mint. It is a community-developed Linux distribution based on Ubuntu. But there is also an edition based on Debian (LMDE).
The main goal is to provide the user with a "modern, elegant and user-friendly operating system that is both powerful and easy to use." Linux Mint provides full support for a variety of media formats, includes some proprietary programs, and comes bundled with a rich set of open source applications.
The founder of the project is Clement Lefebvre; the development team and the user community are also actively involved in the development.
Preparing for installation
Step 1. Download the image
You can download the distribution kit on the official website. Select the edition that suits you and download it. In this tutorial I will use Linux Mint Cinnamon
Step 2. Burn the image
Now we need to create a boot device. I recommend that you use a USB flash drive as such a device. You can make such a flash drive in Linux using the program, or use the command dd:
$sudo dd if=~/linuxmint-18.3-cinnamon-64bit.iso of=/dev/sdX1
Where " sdX" is your flash drive, and " 1 " is the first section on it.
To create a bootable USB flash drive for Windows OS, I recommend using the Rufus program.
Step 3. BIOS setup
I will not go into detail at this stage, since there are plenty of instructions on the Internet (for example,). Just restart your PC. Enter the BIOS menu and place your flash drive first in the list.
Linux Mint 18.3 installation process
Step 4: Download
Below are the screenshots when booting from BIOS and UEFI. In both cases, select the first option.
Step 5: Run the installer
After loading the desktop, look for the “ Install Linux Mint" and click on it 2 times.
Step 6. Welcome and system language
After launching the installer, in the right menu you will need to select the language that will be used during installation and subsequently in the system itself. To go to the next step, click " Continue»
Step 7. Install additional software
Here you are asked to install various additional software, such as drivers, Flash, and other programs. Some software is proprietary. Bet at your own discretion. Personally, I usually refuse and then put in my hands only what I need.
Step 8. Partitioning the hard drive
Here you have to choose the installation method. But I will be breaking the disk with my hands, so I chose " Another variant».
A window for setting up partitions will appear in front of you. First, we have to create a new partition table if we install Linux completely (If you install it next to Windows, then skip this step). To create a blank table, click " New partition table...».
You will be notified that all partitions on your hard drive will be destroyed. If you agree, then click " Continue».
To create a new section, click on " + " in the lower left corner.
If you are installing Linux on computers with UEFI, then you need to create an ESP partition. How to set it up is shown in the screenshot below.
You can also create a swap partition. It is done in the same way as the others, but in the paragraph “ Use as» specify « swap partition" It is needed for hibernation, and is also used when there is not enough RAM. You can specify whatever size you want. Previously, 2 GB was enough for me. Now I'm using a swap file, if you're interested, I'll write an article about it. So, decide for yourself whether to use a swap partition or not. I went straight to creating the root partition. The system itself will be installed on it.
You can also create a home partition, then if you reinstall the OS, all data on it will be saved. If you still decide to make it, then I recommend allocating the most memory for it, since this is where all your personal information will be stored.
This is what my disk partitioning scheme looks like (I remind you that an ESP(efi) partition is created only when installing the OS in UEFI mode).
If you still do not create a swap partition, you will be notified about this and will be offered to go back and repartition the disk. If you are sure that you do not need it, then just click “ Continue».
You will now be shown all the changes you have made. If you are satisfied with everything, then click “ Continue».
If you install the system in UEFI mode, and the computer has other operating systems installed in BIOS compatibility mode, the installer will warn you about this. If you continue, you will lose the ability to run OSes installed in BIOS compatibility mode. If you have other OSes, then you should stop the installation and deal with the problem. If there are no other operating systems, then feel free to click “ Continue».
Step 9: Finding a Location
Step 10: Keyboard Layout
Now you need to select the keyboard layout you need from the list. You can leave what is specified according to the standard. Or you can try to determine it by clicking on the " Define keyboard layout».
Step 11: Create a user
In this window you need to indicate your full name and the name that will be used for the user (you can specify the same thing), computer name (you can specify whichever you want). You also need to set a password for your user. Be sure to remember it! If you do not want to enter a password after each system boot, then click “”. If you use a password, you can install encryption on your home folder. Do this at your own discretion.
Step 14. Login
After reboot, if you did not select the " Login automatically", you will need to enter a password.
Video with the installation process:
conclusions
In this article, we examined in detail the installation process of the Linux Mint 18.3 distribution. After installation is complete, if required, you can customize the system for yourself. If you have any questions, ask in the comments!
Linux Mint 17.3 is one of the most famous distributions of the Linux operating system, second only to Ubuntu in popularity. Although, as you know, Mint was based on Ubuntu, but due to its development, a branch based on Debian with the corresponding repositories also appeared. Linux Mint 17.3, like its previous versions, is available for download in two versions: X86 and X64 in the Mate and Cinnamon graphical environment.
Russian version of Linux Mint 17.3 official website.
Also, if you decide to download and install this system, we offer a step-by-step installation manual. For clarity, we will install the Linux Mint 17.3 Cinnamon 32-bit system on a VMware Player virtual machine.
After the virtual machine starts and the image autoruns, select “Start Linux Mint”

After the installation window appears, select the desired system language (if you need the Russian version of Linux Mint, then select “Russian”) and click “Continue”.

Next, you need to make sure that you have enough space on your hard drive and preferably have Internet access. The system requires a minimum of 8.4 GB for installation, and Internet access is needed to download additional packages (language and updates). However, additional installation is possible after installation.

The next stage is the most difficult for beginners - partitioning the hard drive into appropriate sections. Linux does not have the familiar “C” or “D” drives. First of all, let's choose the breakdown option. We need “Another option” and click “Continue”. You can, of course, use the first item “Erase the disk and install Linux Mint”, but in this case the partitions will be combined into one and if you reinstall the system, you may lose all the data. Although this option is presented in the documentation on the official website.

The next step is to create a new partition table. Find the corresponding button and click on it.

As you can see, the hard drive has already become visible and it’s time to create the first partition. To do this, click the bear on the “Free space” item and at the bottom click on the “Add section” button (the “+” icon).

The first partition we will create is the swap partition. As in Windows, the size of the page file depends on the amount of RAM on the computer. I would like to say that if you have 8GB or more RAM, then you can refuse it altogether.
With 4 GB, it is optimal to set 1-2 GB. For personal use, there is a machine with just four gigabytes on board and 1024 MB SWAP is enough for it. In our case, 1024 MB was selected for the virtual machine and in the “Use as” section, select “Swap partition”, sometimes in distributions it is called “SWAP” and click “OK”

Now we see that a swap partition has appeared on the indicator (displayed in yellow) and there is still some free space, in our case 31.2 GB. Let's continue further. Select “Free space” again and click on the plus sign.

In the familiar window, we set the size for the partition where the files of the system itself will be stored. For a workstation, 20-30 GB is enough. In our case, this is 12 GB (note that the choice is indicated in megabytes, which means you need to multiply by 1000). In the “Use as” item, set “Journaled file system ext4”, and the mount point to “/” and click “OK”.

And the last section we will create is home. When choosing a size, leave the value as it was. This is in order to use all the remaining space on your hard drive. Select the mount point “/home” and click “OK”.

The main sections have been created and all that remains is to select “Install now”, then confirm by clicking on “Continue”.


The next step is to select your keyboard layout. In the left column we find the desired language, and in the right column its variant. This will be the second layout after the English one, if you need more, then after installation you can select another one.

And the last thing you need to enter is user information:

your name – enter the name
Your computer name – will be entered automatically
Enter your username – account name (English characters and lowercase only)
Set a password – everything is simple here
Next 2 points – select login (with or without password)
Encrypt my home folder – only if you are a CIA agent (you don’t have to bet)
And click “Continue”.
That's it, now you can sit back and wait for the operating system installation to complete. This usually takes 20-25 minutes. It all depends on the power of the PC and the speed of the Internet, since the remaining packages and libraries will still be downloaded.
And one more thing: when you go to the official website using the link (at the beginning of the article), you can download Mint with other desktop environments: KDE and Xfce.
You can also watch the installation process of Linux Mint 17.3 in the video below and clearly see that there is no difficulty in this matter:
Instead of a conclusion
Many users, for various reasons, are disappointed in the Windows OS and are thinking about an alternative. On OS X you need an appropriate PC from Apple, but anyone can try Linux, moreover, no installation is required for simple familiarization. Another advantage is that the system is ready for use after installation and, of course, the absence of viruses (there are some, but not as many as on Windows). The disadvantages include problems with specific software (Adobe and the like), although there are many alternatives:
Adobe Photoshop– Gimp, Krita
Adobe Premiere– Kdenlive, Lightworks or OpenShot
3D Max– Blender
Adobe Audition– Audacity
Microsoft Office– LibreOffice, WPS Office
There are many arguments for and against, but it is worth noting that in the world a large number of private and government organizations have switched to the Linux system (NSA, FBI, NASA, etc.). What can we say: everyone who has a smartphone or tablet is already a user of this system, because Android is based on the Linux kernel.
Also, I would like to note that installing earlier or newer versions of Linux Mint systems is performed in the same way. If you need to download the Russian version of Linux Mint 18
At the moment, the current version is Linux Mint 18.3, codenamed “Sylvia”, which was released on November 27, 2017. The most popular and downloaded version is the 64 version with the Cinnamon desktop environment. There are also versions with the working environment Mate, Xfce, KDE, both 32 and 64 bit.
They differ in their graphical shell. KDE is considered the most voracious, although it is the most advanced and beautiful, it is not suitable for weak computers. If you decide to install this distribution on a weak computer, then it is better to install the Xfce version, it is not demanding on processor and video card resources. Let's look at the most downloaded version, Cinnamon.
I don’t think anyone will have any questions regarding the installation of this distribution; the installation is quite simple and easy, and also quick, you can watch the installation process. Linux Mint is primarily suitable for those who have decided to switch from Windows to something new. Although some recommendations also apply to Ubuntu, from personal experience I will say Linux Mint is more suitable for these purposes.
When starting, we see a guest window in which you need to enter the username and password of the user that you specified when installing the operating system.

The welcome screen window appears, with the help of which you can familiarize yourself with the documentation, new features of Linux Mint, and also configure the drivers. Although the drivers are installed by default, the only additional configuration required is the video driver.

In the tray near the clock we see an icon that looks like a shield; when you click on it, the update manager starts, which will offer to update the system and its components, I recommend doing this right away. The programs are constantly being refined and improved, and updates are constantly being released.
 Linux Mint - Update Manager
 We see that the update manager offers to install updates for certain programs and modules.
 Linux Mint - Computer
 As I said above, Linux Mint has a more similar look and feel to the Winodws operating system. We can see this right away on the desktop; there is an icon for “Computer” and “Home Folder”. There is also a “Menu” button at the bottom of the screen, an analogue of the “Start” button in Windows and a quick launch bar. The Quick Launch toolbar is easily customized to suit users' needs.
When we click on “Computer” we see the usual placement of storage devices, and on the side there is a link to folders. What I will say is very convenient and familiar, especially for beginners. Linux Mint - Menu
When you click on “Menu,” you see a menu of all installed programs; for convenience, they are divided into categories. Even if you compare it with Linux Ubuntu, the programs here are placed more conveniently.
The head of the development team, Clement Lefebvre, approved the release of images to a wider audience on July 2, 2017. Interestingly, the release of the new version of Mint coincided with updates to the main desktop environments Cinnamon and MATE, as well as alternatives KDE and Xfce.
Clement Lefebvre commented on the release:
Linux Mint 18.2 is a version with long-term technical support until 2021. The distribution comes with updated software and includes improvements and new features that make your desktop even more convenient to use.
Linux Mint 18.2 comes with the latest versions of Cinnamon 3.4, MATE 1.18, KDE Plasma 5.8 LTS and Xfce 4.12 desktop shells. The distribution is based on the Ubuntu 16.04 LTS codebase and the Linux 4.8 kernel. LightDM is used as an authorization manager for Cinnamon. Software Sources, Update Manager and XApps have received numerous improvements.
Now that work on Linux Mint 18.2 (Sonya) is complete, development of the next major version of Linux Mint 18.3 begins. Clement Lefebvre invites developers to think about new interesting features and projects that they would like to implement in the upcoming release.
In the update manager, select the “Check for updates” button to start checking the new version of mintupdate and mint-upgrade-info. If updates are available for these packages, install them.
Start the system update by selecting Edit > Update to "Linux Mint 18.2 Sonya".
Follow the instructions on the screen.
After the system update is complete, restart your computer.
Additional Information:
- Although Linux Mint 18.2 has a new kernel, this update does not change the kernel on your behalf. This decision must be made by the user.
- The same goes for choosing a graphics manager or choosing software. Brasero will not be uninstalled and MDM will not be switched to LightDM on your behalf. You can apply these changes yourself, but this is not required.
- It is recommended to disable the screensaver before updating. If the screensaver activates during the update and you are unable to log in, switch to the console using CTRL + ALT + F1 , log in and enter killall cinnamon-screensaver(or killall mate-screensaver in MATE). Use CTRL + ALT + F7 or CTRL + ALT + F8 to return to the session.
How to switch from MDM to LightDM
First install LightDM by typing the following commands in a terminal:
Apt install slick-greeter lightdm-settings
When asked to choose a default display manager, select LightDM.
Then remove MDM and reboot by entering the following commands into the terminal:
apt remove mdm