Registry context menu. Editing the context menu
Cleaning the context menu can be done manually through the registry, but this task is not trivial, since the entries are scattered in different places. In addition, it is not always easy to identify the appropriate registry key. For example, drivers are registered using the abbreviation “igfx”. The registry entries are scattered along the “HKEY_CLASSES_ROOT” branch in the “shell” or “shellex” folders, which contains a folder called “ContextMenuHandlers”, which also includes individual parameters.
Shortening the context menu through the registry utility
Manual processing of context menu lines will take a lot of time. It is much easier to use the ShellExView program. Using regedit, you should only change system options.
To detect items from third-party programs in ShellExView, sort the results by the “Company” parameter and find “Context Menu” in the “Type” column.
The free ShellExView utility will create a single list of all these registry lines. Even on a relatively new system, their number can exceed 250. To avoid getting lost in them, after starting the program, the entries should first be sorted. Things will go smoothly if you click on the “type” line at the top of the window. This way you will immediately see all possible registry entries related, for example, to the “Context Menu”. But be careful: along with them, the utility will display lines from Shell, which it is better not to touch.
You can also sort by the “Company” parameter. In this case, the results will be arranged in alphabetical order - records created by the system and designated as “Microsoft” can be easily distinguished from the rest. Here, for example, you can select the corresponding “igfxDTCM Module” and disable it by clicking on the red dot at the top of the menu bar. After this, the entry for the (virtually useless) Intel driver graphics options will disappear from the context menu. However, for the system to apply these settings, you must first log out and then log in again. Alternatively, you can use the Task Manager to disable “explorer.exe” and then call this service again.
Changing system context menu items

Most of the lines in the context menu are created by the system itself. Among them there are also options that are not used by anyone, which, however, you would not want to accidentally activate by mistakenly pressing them. You can't simply get rid of them using the ShellExView program - you will have to manually modify the registry.
A good example is the Send to option that Windows shows every time the user clicks on a file or folder. Don't forget that some sending options do not meet today's needs: the default is generally set to "Fax Recipient".
To remove this item from the menu, in Regedit, navigate to “HKEY_CLASSES_ROOT | AllFilesystemObjects | shellex | ContextMenuHandlers | SendTo". In the right window, double-click the “Default” option and before the long sequence of characters in curly braces, put a modest minus sign “–” to disable it. As always, you need to log out of Windows and log in again.
Right-click menus are called contextual menus because their contents depend on context—in other words, on what program you're in and what you clicked on. File utilities, many free programs and other applications, to make them more convenient to use, often add their own commands and entire sections to the context menus. This is done, in particular, by the archivers WinZip and WinRar, as well as the email clients Outlook Express and The Bat!, which add commands for packing and sending by email as attachments to the context menus of files.
Unfortunately, the more such programs are installed, the longer the context menus, the more cluttered they are, and the more difficult it is to find the right command. The situation is further aggravated by the fact that many programs, especially free ones, have the problem that the context menu commands they created remain even after the programs themselves are uninstalled.
However, some utilities provide convenient ways to configure and delete context menu commands. This is the best and most reliable way to restore order. But if there is no such function in the program (or if you managed to remove it), the composition of the menu can be changed using the Windows system registry.
However, before you go into the registry (which is not always safe), we will consider several of the most common programs that provide not only the creation of context menu commands, but also the ability to safely delete them.
WinZip Archives
The popular archiver utility WinZip adds several commands to file context menus (such as Add to Zip) or highlights them in the WinZip submenu. To configure these commands, start WinZip in "classic" mode (not Wizard mode) and select Options > Configuration. In version 8.1 and later, go to the System tab under Explorer Enhancements. In order not to rummage around too long to find the right command, in these versions you can disable the Display context menu items in a submenu mode - and then the archiving commands will be placed in the main menu, as in previous versions of WinZip.
To change individual commands, select or disable the appropriate items in the Context menu commands section. By disabling the Display icons on context menus mode, you can leave the commands in the menu, but remove the icons.
Finally, to completely eliminate WinZip commands from the context menu, disable Use shell extension (in versions 7 and 8) or Enable Explorer enhancements. However, keep in mind that you will lose the ability to extract content from the archive by right-clicking it, and you will not be able to expand the archive by dragging files onto its icon.
Configuring context menu commands created by the popular WinZip archiver
Music Winamp
The free Winamp media player adds three commands to the folder menu: Play in Winamp, Enqueue in Winamp, and Add to Winamp's Bookmark list. To remove them, Open Winamp and select Options > Preferences (Tools > Preferences) or right-click in the program window or on its panel and select the same command from its own context menu. An image of the hierarchical menu structure will appear on the left side of the window. Under General Preferences ( General settings) select the File types branch - in earlier versions it is called Setup - and disable the Show Winamp in folder context menus in Windows Explorer mode (Show Winamp in folder context menus in Windows Explorer) or, in earlier versions versions, Directory context menus and click the Close button.
Explorer context menus
In Windows 2000 and XP Pro, you can use the Group Policy tool to remove specific commands from the My Computer context menu and folders. Let's say we want to remove the Manage command from the My Computer context menu, which launches the Computer Management administration tool. To do this, select Start > Run, enter gpedit.msc and press Enter. A window will open, the left panel of which will display a hierarchical tree of commands. Go to Local Computer Policy\User Configuration\Administrative Templates\Windows Components\Windows Explorer, double-click Hides the Manage item on the Windows Explorer context menu, select Enable mode (Enabled) and click OK.
This utility can also be launched by clicking Start > Programs > Administrative Tools > Computer Management (Start > Programs > Administrative Tools > Computer Management) and selecting Start > Run, entering compmgmt.msc and clicking OK.
To remove the entire folder context menu in Windows 2000, go to the Windows Explorer icon in the left pane and double-click Remove Windows Explorer's default context menu. In Windows XP you need to select the element of the same name, activate the Enable mode and click on the OK button.The next time you right-click on a folder located on the desktop or on an icon in Explorer, nothing will happen - however, the context menus of other objects such as toolbars will still work.To undo these changes, simply return to the described dialog box, select Not configured, and click OK.
In Windows 9x, to edit the context menu for a specific file type, open the My Computer window and select View > Folder Options. The Folder Options dialog box opens. If you go to the File Types tab, select the file of the desired type and click on the Edit button, another window will open - Edit File Type. This window has several useful functions, in particular you can change its icon or description. But the main thing is that at the bottom of the window are those of the context menu commands that can be changed, and a number of buttons for this: Remove, Set Default, as well as Edit and New.

Configuring Windows 9x Explorer context menus
As you can see, context menu commands can not only be deleted, but also created. True, for this it is necessary to be aware of certain agreements adopted when drawing up such teams. You can, of course, read smart books on this topic. However, for educational purposes, you can use a free program with a set of ready-made contextual commands. It's called Send To Toys and is located at http://www.gabrieleponti.com/software. Many of them, such as passing the file name and path to the clipboard, are useful in their own right - but even more so as a visual aid for composing your own context menu commands.
Many people love the Windows operating system, and many of us grew up using it. But some casual PC users - or those who have just recently switched to Windows - often get confused when looking for information about some of the simple things that control Microsoft's operating system. One such graphical element is called the "Windows context menu", or "right-click menu".
Today we'll tell you not only about this integral element of the Windows experience, but also about a third-party application that allows you to add custom elements to the context menu.
So what is the Windows context menu?
In simple terms, it is a pop-up menu that appears when you right-click in any navigation area of the screen (hence the name “right-click menu”). The context menu can be accessed in folders, the taskbar, web browsers, and other GUI areas. The context menu is not exclusive to Windows, so you may have seen it on other operating systems, including Mac OS X or Linux.
Speaking about the appearance of the Windows context menu, it looks almost the same everywhere - only the elements inside it differ. For example, the screenshot below shows the context menu that opens when you right-click on the desktop to, say, customize the desktop background image in the Personalization window.
Typically, the context menu contains elements such as “View”, “Sort”, “Copy”, “Paste”, “Rename”, “Properties”, etc. Some of the menu items are context based. In other words, in one area of the operating system the context menu may contain some items, and in another – different ones. For example, the menu that pops up when you right-click on the taskbar will contain completely different items compared to the menu you see in the screenshot below.

Here's another simple example of the context menu that appears when you right-click on a folder:

Now that you know what the context menu is in Windows and how it works, let's look at a convenient and free application that makes it easy to customize the menu.
A portable application that allows you to add custom items to the "right-click menu" in Windows 7, Windows 8 and Windows 8.1, it was developed by Sergey Tkachenko (WinAero) - a well-known developer who is the author of many useful tools, including. The application is very convenient in the sense that the entire process of adding items to the context menu requires a few clicks from the user.
To get started, launch the application. The Context Menu Tuner interface consists of two different panels - the left one contains a list of supported commands, and the right one consists of Windows Explorer areas. To add a command, you need to select one of them in the left panel, and then, after selecting your preferred element in the right panel, you need to click on the “Add” button. As you might guess, the “Delete” button is responsible for deleting added commands.
Additional features of the application allow you to add separators before and after certain menu items. In addition, there are a couple of additional options.

Another interesting feature of the app is its ability to add custom commands for specific file types. Once you open the “Select File Type” window, which you can access by clicking on the “Add -> Add to Specified File Type” button in the main application window, you will see an impressive number of supported file extensions. The list is very long, so to quickly find a specific file type, use the search bar.

The screenshot below shows my context menu, which I modified using Context Menu Tuner:

That's all. Now you know what the Windows context menu is and a simple solution to edit it.
Have a great day!
Absolutely all computer users encounter the concept of a context menu, regardless of the type of operating system used or its developer. Such an element is available in all currently known operating systems. But let's take a look at what the Windows context menu is, what types there are, and how to use it. We take Windows as a basis only for the simple reason that most users in the post-Soviet space work with these operating systems. And first, a few words about the term itself.
What is a context menu in general understanding?
Actually, the name of the menu itself comes from the English context. As for a simplified understanding, the context menu of Windows 10 or any other operating system can be interpreted as some additional element of the system’s graphical interface, which contains certain quick access commands to some basic or additional functions.
So to speak, in the context of selecting an object for which an additional menu is used, different commands will be available (this will be discussed separately).
Menu types
Actually, the operating system itself has several types of main and additional menus. For example, the main menu is accessible by clicking the Start button. Installed programs usually have their own element in the form of a top panel, which displays sections of basic operations, etc. Naturally, all such menus differ from each other both in appearance and purpose. But it is the context menu that is universal in its own way and, in a sense, even connects applications with the operating system without the use of additional tools. Forgot how to perform some action? It's OK! This menu will tell you what and how you can do, especially since many menus of this type can open additional lists.
Context menu items
As already mentioned, the contents of the menu can differ quite significantly for different objects. It all depends on the type of object selected and the actions that are supposed to be performed. Everyone knows that in Explorer, through such a menu, when you select a file or folder, you can specify copying, moving, deleting, opening, and performing a lot of other operations, not counting the use of hot keys or their combinations.

On the “Desktop”, when you click on an empty area of the screen, you can quickly call up screen settings or create shortcuts. But to carry out such actions, following the standard methodology, will take much more time. In general, it is believed that the context menu is a unique invention. Despite the fact that almost all the points it contains are duplicated by the operating system itself and some installed programs, its use often reduces the time it takes to access certain actions and functions.
Differences between menus for different objects
Now let's look at the most important question regarding how menus of this type differ when selecting a specific object. It goes without saying that it will not be possible to describe all types, so we will focus on the most basic ones.
We've sorted things out a bit with files and folders. It can be added that antiviruses, archivers and some other programs build their own commands into such menus, so in addition to a set of standard actions, you can use their additional capabilities.

If you are using the menu for a disk or partition, you can already access system tools here. Programs have their own elements of this type, but the context menu for almost all active applications, if the upper left corner of the program window on the header is used as the selected object, the items are the same: closing, moving, minimizing and maximizing the active window, resizing, etc. It is clear that the content of each context menu for applications depends on the specific use of the program. Thus, in web browsers, among the items there are commands related specifically to actions with tabs or settings.

When you use the menu for panels, you can customize them, go to additional options, add or remove elements, etc. As already mentioned, it is simply physically impossible to describe the contents of all types of menus that open, so let’s move on.
How to open an additional menu: several basic methods
Now a few words about how to call or open the context menu. Everyone knows that in Windows, RMB is used for this (click on This action is set in the default settings, although some use button reassignment, after which this control is called with the left button. In general, the mouse context menu, depending on the type used manipulator, can be configured as you like. For example, for the same gaming mice, which have a lot of additional buttons, accompanying software is usually installed, which allows you to manage all their parameters and configure the buttons for a specific action, including calling additional menu.
Few people know that in Windows you can use not only RMB. For example, for laptops it is very important to use the combination Shift + F10. The right button on the touchpad is also used for this. On some non-standard keyboards for stationary computer terminals you can find a special Menu key, which is usually located to the right of the Win button.
How to add additional items to the menu?
Finally, let's look at how to add additional items or commands to the context menu. You can, of course, use Windows tools, but to do this you will have to delve into the registry, and this is very inconvenient.

The easiest way is to use the small Context Menu Tuner program, the interface of which consists of only two panels with sets of commands and areas of Windows Explorer.

There are only two buttons for adding or removing elements, so there should be no difficulties in using them.
Practical advantages of use
As for the advantages, a lot has already been said about them. This concerns not only the fact that the correct call of some actions can simply be forgotten. The versatility of such menus lies precisely in speeding up access to some standard and non-standard functions or actions, which would normally take much longer to call. And so - RMB and all the necessary commands are at hand!
Instead of a total
I would like to hope that after reading the above material, many have figured out what this element of the operating system is. As for its use, there should be no questions at all, since in some situations you simply cannot do without it. And practice shows that one hundred percent of one hundred users always use the context menu, regardless of the actions performed.
We are already familiar with the concept of a context menu. It's time to deepen our knowledge about it and consider the topic - How to remove or add commands to the Windows context menu.
Windows functionality allows the user to edit the context menu to suit their taste.
Editing the context menu (a set of “Explorer” or “action” menu commands) is possible in one of two ways:
- Through program parameters;
- Through the Windows registry;
- Using additionally installed applications.
Let's see how it's done:
Installed programs themselves often have (by default) the function of integration into a set of context menu (CM) commands. Then such a parameter is present in their settings on the main tabs, or maybe on such as “Integration”, “Download” or “Add”, etc. For example, for the VinRAR archiver it is enough to uncheck the box in the settings:

It is clear that in this way you can either add (install) or remove (remove) command(s) from the list. The same applies to other applications.
Working with the registry
When working with the Windows Registry, you need to be very careful. To get into the registry, you need to search in the Start menu by typing “regedit” and run the found executable file “regedit.exe”:

Making a copy
Before editing the Registry of any version of Windows (including Windows 7), do not forget to create a backup copy of it to be on the safe side. To do this, in the editor, on the “File” tab, select the “Export” command. Select “Entire registry” at the bottom of the dialog that opens. By assigning a name and specifying the location - “Save”:

If something irreparable happens (especially for an inexperienced person), you can return the registry to its previous state using the “File” / “Restore” command, specifying the previously created backup file.
Cleaning up the directory set
The registry itself looks like a tree-like block diagram (on the left), each of the branches of which has its own parameters (on the right). The “shell”, “Shellex ContextMenuHandlers” and “Folder\shell” branches of the “HKEY_CLASSES_ROOT\ Directory” directory are responsible for the context menu of folders. Having examined these branches in more detail, you can make sure that the “shell” folder contains the upper part of the context set, and “Shellex ContextMenuHandlers” - the lower part. The folder “Folder\shell” repeats the previous one.
Removal of program elements from the set is carried out in each of the branches. Right-click to select the delete element and call the “Delete” command:

Now for the files
The same procedure is used here, but in different branches. Since the “*/shellexContextMenuHandlers” and “*/shell” branches in the “HKEY_CLASSES_ROOT” registry section are responsible for the set of Context Menu commands for files:

The removal procedure is completely similar. Just don’t forget to delete unnecessary things in both branches.
We use third-party applications
It is much easier (and safer for a beginner) to remove or add an item to the context menu of any version of Windows (including Windows 7) using additional utilities.
After installation and launch, in the program window (in the “Type” column), you can see all programs from the Windows context menu (type = Context Menu).
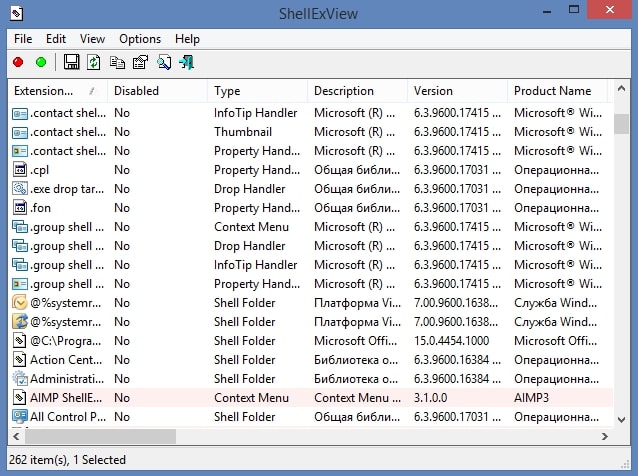
Remove unnecessary items by selecting and clicking the red circle:
An interesting and useful utility with a self-explanatory name (available in a free version) Ccleaner. It has many beneficial properties. Website - http://ccleaner.org.ua/. In our case, it clears the registry of unused entries, paths to programs, shortcuts, etc.:

To clear the Context Menu, go to “Tools” and find “Context Menu” in the “Startup” tabs. A list of applications added to the set and their status will be displayed here (enabled: yes/no):

To delete - while on a line, use the right mouse to call up the “Delete” command. Since repeated return (inclusion in the list) is possible only when reinstalling or reconfiguring the application, it is recommended to select the “Disable” option. - Then it can be easily returned (“Enable”).
Add with FileMenu Tools
It's very easy to add a new item to the context menu using the FileMenu Tools program.
It offers the user three tabs:
- Left - management of suggested elements;
- Medium - to configure the “Send” function;
- Right - disables commands entered by third-party programs from the list:

You need to add a new element using the “Add Command” command. To specify its parameters, the lower right part of the window is used - “Properties”. For example, to add the line “Open in Firefox” to the menu list (opening HTM and HTML files):
You need to enter the name in “Menu Text”, and extension options in “Extensions”:

In “Program Properties” the route to the executable file of the Firefox.exe application is specified:

The added item is saved by clicking the green element at the top of the window (left):
This article helped you understand the various ways to edit the context menu. Now you know how to add and remove elements from it not only using Windows, but also using other programs.