chmod command - Usage examples. chmod Command - Usage Examples Do Files Have Level 777 Permissions Required?
Good health, dear blog readers! We would all like everyone or a folder located on the hosting server and belonging to the site to be protected as much as possible from unauthorized access.
This protection is ensured due to the fact that 90% of hosters use Unix-like operating systems, in which it is possible to regulate access rights to all files and directories. The server of my hosting provider, on which several of my projects are located, is no exception.
By the way, be sure to take an interest by following the link provided. But let's continue. The rules established in Unix differ from the rules of work familiar to many in the Windows operating system, where protection in this aspect is not so strong, which sometimes leads to disastrous consequences in the form of virus infection of the system.
CHMOD for users and access rights to files and folders (directories)
In systems managed by Unix, the situation is different and there is an opportunity to seriously complicate life for bad guys who will try to take advantage of the results of your painstaking work over a long period. Namely, correctly configure CHMOD access rights. Our task is to give the minimum possible rights to access files and folders, which nevertheless will not interfere with the correct operation of the site.
Agree, it’s a sin not to take advantage of the opportunity to seriously strengthen. Of course, in this case, editing some files will take a little more time, but here you have to choose: either optimizing system security, or... Below I will try to systematize the information on CHMOD (access rights), because there are several nuances that are necessary webmaster knows. So, let's begin.
Access rights vary for different user groups. When a connection is attempted, the server determines which group to assign a particular user to. All users are divided into three categories:
- "user" - file owner
- "group" - one of the members of the group to which the owner belongs
- “world” - “rest of the world”, that is, all other users
If you connect to the server using and log in using your username and password, you will be identified as "user"(u) if anyone else connects via FTP it will be detected as "group"(g), if the user uses a browser, then he falls under the category "world"(o).
Now about CMOD access rights to files and directories. In essence, they are slightly different, although the designations are the same. File permissions:
- r (read) - the right to read file data
- w (wright) - the right to change content (you can only edit the content - write, but cannot delete)
- x (eXutive) - the right to execute the file
Access rights to folders (directories):
- r - the right to read the folder (you can get the contents of the directory, that is, the list of files included in it)
- w - the right to change the contents (permission to create and delete objects in the directory; if you have the right to write files, then you can even delete objects that do not belong to you)
- x - access right to a particular directory (the peculiarity here is that even if you have all the necessary rights to a file that is located “deep” in the directories, but do not have access rights to at least one subdirectory on the path to this object, then you won't be able to access it)
The hyphen “-” indicates the absence of any rights. All these rights are assigned by the administrator, who gains this opportunity by entering a password. If we can set the maximum possible restrictions on CHMOD access rights to certain resource files, then we can practically eliminate the danger of virus programs carrying out their “dirty deeds.”
For clarity, let's consider an example when the owner of the file u has all possible rights: read, write and execute. Users assigned to category g (group) have read and write only, all others (w) have only read rights. Then the CHMOD entry will look like this: “rwx rw- r- -”.
Access rights to files and folders in digital terms: CHMOD (777, 755, 444)
But more often, webmasters in their practical activities have to assign certain access rights in digital terms:
- r (read) - 4
- w (record) - 2
- x (performance) - 1
- - (no rights) - 0
Now let's look at the above example again to assign access rights "rwx rw- r- -". To display the rights of each user, the addition of his rights is used (r read + w write + x execute). Thus, part of the entry for the file owner u (user) - “rwx” will turn into 7 (4+2+1). For a member of the group g (group) - “rw-” in 6 (4+2+0) and for other users o (world) - “r- -” in 4 (4+0+0). As a summary, here is a summary table with the values of CHMOD access rights, expressed in both letters and numbers:

Now I will present another table that reflects the total CHMOD rights for all user groups in numerical format:

These are the main combinations that are most often used in the work of a webmaster. The rest are formed by analogy. If you are the site or blog administrator, but are working with the project without connecting via the FTP protocol, you also belong to the “Other users” group. In this case, when working with a site in this mode, you need to take into account the last digit in the CHMOD value.
Typically, on the server where the files of your WordPress blog are located, the folders have access rights of 755, and the files that are part of them are set to 644. This is true when the resource is built using HTML files, but in modern conditions they are widely used to build a website CMS (content management systems), which includes WordPress. And here there may be objects that need to be written to by the “world” user group. There may be folders in which content is downloaded, including images.
Therefore, the assignment of CHMOD rights to certain files must be differentiated. If you log into site management via FTP, you can perform any actions, however, in many cases we work with our project through, and in this case problems may arise if the rights are too high, and, conversely, if access rights to one or another file (folder) are underestimated, then the security threat increases. Therefore, based on the above, we can determine some recommendations for the practical use of CHMOD for a WordPress blog:
777 - for folders in which files are constantly being written and erased (for the caching folder)
755 - in relation to folders in which files are constantly written but not deleted
666 - for files where you need to add an entry from time to time (for example, a .htaccess file)
644 - for files that are read-only (.php, .html, etc.)
How to configure CHMOD permissions using FileZilla FTP manager
If you need to make some changes when working with a resource, but because editing is prohibited, this cannot be done, you need to connect to the hosting server via FTP and change the access rights to 777. However, after making changes to the file, it is recommended to set the previous CHMOD again .
Now let's learn more about how to perform this operation using . To do this, open the program and connect via FTP to the hosting server. On the left side "Remote server" First, we mark the files whose attributes will be edited:

And from the context menu caused by pressing the right mouse button, select "File Permissions". After this a dialog box will appear "Change file attributes":

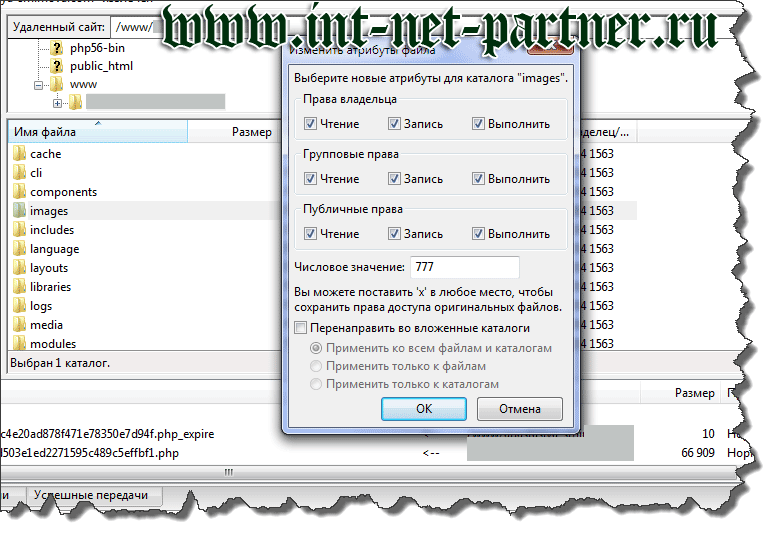
Here we assign the necessary CHMOD values for the selected (or selected) files. But this is only if you selected a file or group of files. If you want to set or change CHMOD values for a directory (folder), when you select “Change file attributes”, an analog window will appear, somewhat different from the one located above, namely:

You see, additional settings have appeared here. If you check the box next to the line "Redirect to subdirectories", this means that the specified access rights will be applied to directories (folders) or files nested in this directory. When the box below is checked, the group of settings located will become active and you will also need to select how the settings should be applied: to all files and directories, only to attached files, or only to directories.
Many novice Linux OS users often get confused when assigning access rights using the command chmod.
In this advice, accessible and visual, I will give examples of using the chmod command . Just use these examples in your work, substituting the necessary files or directories.
chmod command is a convenient tool for increasing the security of the operating system and allows you to assign access rights to files or directories.
If you are running the system using (or granted) extended superuser privileges as root, you will be able tochange the access rights of any file and directory belonging to any user of the system.
If you are a standard user, you will only be able to assign or change permissions on directories and files that you create.
Assign access rights to files or directories using the command chmod can be done in two ways - using symbolic and absolute modes.
Examples of using the chmod command in character mode:
(The initial value of file permissions is rwxrwxrwx - full access for everyone)
To revoke permission to execute a file for all users and groups:
$ chmod a-x file(rw-rw-rw-)
To cancel writing to a file by a group and other users:
$ chmod go-w file(rw-r--r--)
Permission to execute a file by owner:
$ chmod u+x file(rwxr--r--)
Granting the group the same permissions as the file owner:
$ chmod g=u file(rwxrwxr--)
Cancel reading and writing to a file by group users and other users:
$ chmod go-rw file(rwx--x---)
Examples of using the chmod command in absolute mode:
Permission to read, write, execute file file by all users and groups (full control):
$ chmod 777 file(rwxrwxrwx)
Set read and write permissions for owner, group, and other users:
$ chmod 666 file(rw-rw-rw-)
Setting full file access for the owner and read-only for the group and other users:
$ chmod 744 file(rwxr--r--)
Setting full access to the file for the file owner and denying access to the group and other users:
$ chmod 700 file(rwx------)
Setting read and write permissions for the file owner and read only for the group and others:
$ chmod 644 file(rw-r--r--)
Setting read and write permissions for the file owner and his group and denying access to others:
$ chmod 640 file(rw-r-----)
Setting file access with read permission for all users and groups:
$ chmod 444 file(r--r--r--)
File permissions for read, write, execute by owner and read, execute by group and others:
$ chmod 755 file(rwxr-xr-x)
Allowing read and execute access to a file for a user and others and denying access to a group:
$ chmod 505 file(r-x---r-x)
If you want to assign permissions to all files in the current directory, simply put an * (asterisk) after the permissions you assign:
$ chmod 755 *
As a result of executing this command, the owner will have full rights (read, modify, execute) to all files in the current directory, while the group and other users will have only read and execute rights.
If you want your actions to propagate recursively (including all subdirectories), use the -R option:
$ chmod -R 777 *
The result of running the above command will be to recursively "traverse" all subdirectories of the current directory and assign full access to all users and groups.
This article covers just a few examples of using the command. chmod. If you want to know more about the team's work chmod And access rights on Linux, pay attention to .
Glad to see you again or for the first time, subscribers and guests of the blog website! While studying website development, you will definitely come across an important question: how to set access rights to 777 on a document? Why do this and how, we will talk to you today.
Meaning of numbers and powers
Not only do I not recommend putting rights 777 on all documents, but I warn you against this action! Otherwise, don’t be surprised if your website or blog is hacked later, but there are also directories where you need to change attributes and expand access.

If you set such rights to a folder or file, the system will understand that anyone can adjust the contents of this object, and even a novice programmer will not have any difficulty making changes to the operation of your site.
The digits of the code indicating rights are responsible for the following:
- 7 – full powers;
- 6 – read and write;
- 5 - reading and execution;
- 4 – read only;
- 2 – recording only;
- 1 – execution only;
- 0 – do nothing.
The first digit of the code characterizes access to the document for the resource owner, the second for the group, and the third for other users.

Incorrect permissions for folders can block the operation of the site, the display of images, and the functionality of active plugins and themes.
Setting permissions manually
Changing file permissions takes literally a few seconds. You need to go to the hosting panel and find the object to change rights.

Press " Attributes» or similar icon and make edits.

Save your changes. That's all!
Adjustments via FileZilla
If you use this program to move files from a local server to hosting or to save, you can change the rights with its help or thanks to the Total Commander program. The method for both utilities is the same.
To do this, you will need to install, find the required material and right-click on it with your computer mouse.

The very bottom line in the drop-down functions will be useful to you. Select this phrase by clicking on it.
Indicate the authority in the numbers you want to enter and click " OK ».
That's all, you are offered two quick and effective ways. One of them is carried out standardly, and the second solves the problem through the program filezilla or total commander. Which method do you prefer?
Share your experiences and successes in blogging in the comments, subscribe to my site!
See you again!
P/S
Best regards, Alexander Sergienko
The mechanism for distributing rights in operating systems, developed back in the 70s of the last century, turned out to be so successful that it is still used in UNIX systems, that is, for more than forty years.
Permissions 777 - what is it?
The basic principle of the method of distributing access includes the existence of mandatory attributes, such as the names of system users, as well as their groups. It is almost obvious that in Linux each user can have only one name, which must be unique within this system. Using a nickname, the user logs into the system, that is, undergoes authorization. In addition, the operating system contains a finite number of user groups. Each of them can be part of one or more groups. Superuser - root - can edit properties, create and delete groups. Members of different groups have different rights to operate in the system. For example, an administrator has more rights than a guest.
The inode (which every file has) contains the owner's login and the name of the user group that has rights to the file.
When a file is created, its owner becomes the user on whose behalf the process is running. The group of the newly created file is also determined using the group identifier of the current process. During further work, all these values can be changed using console commands, which will be discussed further.
How to change permissions
The chmod command can change the user access mode of a file. Only its owner or superuser is allowed to change these rights in any way. In Unix systems, the code is usually specified as a number in octal form, or using special mnemonic signs (letters). Using each method has its advantages and disadvantages. So, with the help of digital indication of access rights, the system administrator will be able to quickly configure the desired type of access, and with the help of mnemonic codes, he will be able to do this more precisely - for example, add or remove the write right, or deny the read right.
The first argument of the chmod console command is a specification of user permissions, and this is a mnemonic notation, or an octal number. The second and next arguments are the names of the files to which we are trying to change access rights. When setting rights in the form of three numbers, the first digit determines the rights for the owner, the 2nd for the group, and the third for all other users.
Access rights mnemonics
Access to files in the rights system has the following variations:
- r - access to read the file;
- w - the right to edit data (but not delete);
- x - the ability to launch a file for execution.
The following system of rights applies to directories:
- r - the user can read any files in the directory;
- w - with these rights you can create and delete files in a folder, even if some of them in the directory belong to another user;
- x - indicates the right to enter the directory. If you have w rights to a subfolder but do not have rights to a folder at a higher level, then you will not be able to get through to your folder.
A total of 8 different combinations are possible, which are shown in the figure below.
Using the table below, you can understand how to implement complex permission assignments, as well as how to set 777 permissions using the chmod mnemonic specification.

How to set permissions to 777 via SSH
Here are some examples of using the chmod command:
- chmod 711 file_name.txt.
Using this file distribution scenario will result in the owner having full rights to the file, and all other user groups will only be able to execute it.
When using code 775, we will provide the owner and his entire group with a full list of rights. Other users will not be able to make changes to the file. It must be said that to specify a file only by its own name, it must be in the directory where this file is located. Otherwise, you can move to this directory with the command cd directory_name/subdirectory_name or use the following structure:
- chmod 775 /var/bin/file_name.txt.
To recursively change the permissions of all files in a directory and all subfolders, you need to add the -R switch to the chmod command. The resulting command will look like this:
- chmod -R 711 file_name.
As a result, how to set access rights to 777 for a file or directory will not be a problem - you just need to log in to your web server via SSH and run the command:
- chmod 777 filename.

How to set access rights to 777 in the server control panel
You can also implement a similar procedure through the visual interface of the FileZilla FTP client or the WinSCP SFTP client. To do this, you will need to authorize on your server in one of these programs, select your file or folder in the visual interface, then right-click and check the boxes next to the required rights.

Sometimes, in case of urgent need, you may not have access to the Windows client, so you can change access rights through the web server control panel. To do this, using the file manager of your control panel, select the necessary files and click on the Change Permissions button. Next, you will also need to check all the boxes, and now the question of how to set 777 access rights to a folder will no longer be difficult for you.