What program can you test your hard drive? Checking the hard drive for functionality
Hard disk (HDD) is the most important element of a computer on which all the necessary information, programs and user files are stored. Like any other component, over time the hard drive wears out and its normal operation, failures begin to occur. Along with physical wear and tear, which leads to the appearance of so-called bad sectors (bad blocks), logical errors associated with the file system, indexes and the main file table often occur.
For the time being, you may not experience any problems at work. hard drive, but this does not guarantee that one fine day the hard drive will not die for long. Therefore, it is important to check periodically (once or twice a year) HDD for errors and bad sectors that require correction. Regular monitoring will allow you to track the condition of the media and respond in a timely manner to changes in its condition. Of course, you should not neglect such a proven method of protecting information as backup. The most valuable data must be duplicated on a backup storage device.
Symptoms of a failing hard drive
In most cases, HDDs operate smoothly for several years without requiring special attention. However, in case improper use (physical impact, lack of proper cooling) the resource of the storage medium is significantly reduced. In rare situations, there may be a manufacturing defect or sudden failure.
In case of failures in work hard disk may indicate that it is taking too long to load operating system, random disappearance of files and folders, slow application launch. Obvious symptoms of a hard drive losing its functionality are slowdowns in programs and long periods of copying files. If the computer constantly hangs, and nothing but restarting helps, then in the process of identifying the causes, checking the hard drive should be the first point.
Using standard Windows 7/10 tools
You can test the media standard means Windows. The easiest way is to select the desired hard drive in Explorer, right-click on it and go to the “Service” tab.
Next, click the “Run scan” button and set the scan parameters in the window that opens. If both checkboxes are checked, Windows will automatically fix everything during diagnostics. system errors and restore bad sectors.

The results of the audit can be found in the report.

Command line
You can also audit your hard drive using the utility chkdsk called from the command line. In fact, such a check will not differ much from the above option.
So, let's launch command line by selecting the desired Start menu item. Then enter the command in the window: chkdsk G: /f /r
- G – name of the hard drive being tested (select the drive you will check);
- f – error checking and correction;
- r – detection and recovery of bad sectors.

All information about errors and bad sectors found will be displayed as the diagnostics are carried out.

Third-party programs for checking your hard drive
There are many programs and utilities for finding bad sectors and fixing HDD errors. We will list only the most famous ones.
Victoria
Perhaps the most popular verification tool hard drives. The program can be launched as in Windows environment, and in DOS mode from a bootable flash drive.
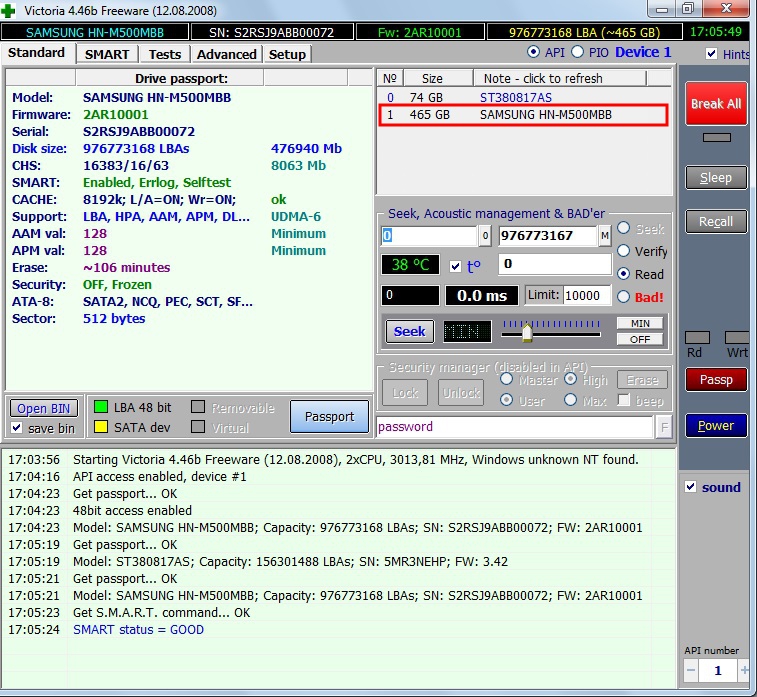
The interface provides five tabs: Standard, SMART, Tests, Advanced and Setup. First of all, go to the section Standard, where in the list of devices we select the hard drive we are interested in. The Drive passport area will display basic information about the HDD.
Next, select the tab SMART and press the “Get SMART” button. SMART (Self-Monitoring, Analisys and Reporting Technology) is a hard drive self-monitoring technology. Those. The hard drive monitors its operation during operation, recording information on a set of parameters that allows one to assess the condition of the media. It is this service information that we are trying to obtain.
After clicking “Get SMART”, either the inscription GOOD on a green background or the inscription BAD! will appear to the right of the button. on red. The second option will indicate that the media is in unsatisfactory condition and will most likely have to be replaced. For more detailed study SMART statistics, pay attention to the list of parameters on the left. Here we are primarily interested in the attribute 5 Reallocated sector count, indicating the number of sectors remapped. If there are too many of them, then the disk has begun to “crumble,” that is, its surface is rapidly degrading and it is urgent to make a copy of all data. In this case, there is no point in restoring the hard drive.

Chapter Tests makes it possible to check the hard drive for bad sectors, and also try to “cure” or reassign unreadable blocks. For simple testing hard drive, set the switch to Ignore and start the test with the Start button. Sector health is assessed by measuring response time. The smaller it is, the better. Each response time range has its own color code. The slowest blocks are marked in green, orange and red. Sectors that could not be read at all are marked in blue. If there are a large number of “slow” and unreadable blocks, the hard drive should be replaced.

The Victoria program allows you to restore bad sectors, but we will not consider all the nuances of the procedure. Moreover, “treatment” often contributes only to a slight extension of the service life of the storage medium. To reassign bad blocks, perform a check with the mode enabled Remap. If the restoration was successful, do not rush to rejoice. Re-diagnostics the disk after certain period operation. The appearance of new bad blocks will indicate that the degradation of the hard drive is irreversible, and it’s time to find a replacement.
HDDScan
This is another handy program for identifying problems with hard drives. After launching the application, select the drive that needs to be checked in the Select Drive list.

Below we click on the “S.M.A.R.T.” button and get acquainted with the provided report.

Now let's diagnose the disk surface. Click on the round button to the right of the drop-down list of media and select Surface Tests in the menu that opens.


Click on Add button Test, thereby adding the test to the list and starting its execution.
You can receive information about the progress of testing in Graph, Map, and Report modes. All blocks are also distributed into groups with corresponding color markings depending on access time.


At the end, a final report is generated.

Perhaps this is all we wanted to tell you about the methods of checking a computer’s hard drive for functionality. We hope the information provided will be useful to you and help you save important data.
Many PC users hardly think about checking the status of their HDD. Checking the hard drive is, first of all, necessary for early detection of errors in it.
If you manage to identify hard drive problems in advance, you can save all important information, stored on it until its final failure.
In this material we will describe specific examples verification procedure HDD status, and we will also tell you what to do in a situation if your hard drive is faulty.
How to check the status of your hard drive
You can check the status of your hard drive using various utilities that read the status of your hard drive from its self-diagnosis system SMART. SMART technology is now installed on every hard drive produced. SMART technology was developed back in 1992 and is still being improved to this day. The main task SMART is logging the hard drive aging process. That is, information such as the number of HDD starts, the number of spindle rotations and many others is collected. More SMART watches for errors"screw", both software and mechanical and, to the extent possible corrects them. During the monitoring process, SMART performs various short and long tests to identify those same faults. In this material we will look at such programs that can read information from SMART:
- Ashampoo HDD Control 3;
- Defraggler;
- HDDlife;
- Victoria.
Each program on the list, in addition to reading SMART readings, offers a number of functions and tests that, to one degree or another, extend the life of the hard drive. But the most interesting is the program Victoria. The Victoria program, in addition to determining the HDD state, can also produce REMAP of bad sectors. That is, she can hide bad sectors by replacing them with spare ones, if available. Essentially, the REMAP procedure can completely restore the hard drive. It is also worth noting the possibility of fixing the hard drive thanks to the console application “ chkdsk». Console program"chkdsk" can fix file system errors, allowing you to avoid reinstalling Windows.
Ashampoo HDD Control 3
First we will look at the program Ashampoo HDD Control 3. Let's run this utility on a computer under Windows control 10.
The Ashampoo HDD Control 3 window displays the message “ ✓ OK", as well as the inscription " This hard drive has no problems" This information means that the hard drive in question is in perfect order. If when opening the program you see the message “ Error", as well as the inscription " This hard drive has a problem", this means that it has bad sectors or is overheating. To view complete information about the health of the “screw” taken from the smart, you need to click on the footnote “” located in the central block.

In addition to viewing information from the smart device, Ashampoo HDD Control 3 can launch self test S.M.A.R.T. And surface inspection test. You can test these tests in the "" block.

By performing these tests, you can also identify problems with the HDD. In addition to taking readings from smart devices and tests, Ashampoo HDD Control 3 can:
- Perform defragmentation;
- Clean the system of debris;
- Find and delete duplicate files;
- Securely erase files from the HDD, without the possibility of recovery.
The presence of such functionality of Ashampoo HDD Control 3 in monitoring the health of the screw and additional functions puts utility first.
Defraggler
Utility Defraggler primarily intended for defragmentation, but besides this she can read SMART readings. The utility is free and any user can download it from the website www.piriform.com. After launching the utility, you need to go to the “ State».

In the window you can see that the utility displays a message about the status of the screw, like “ GOOD" - this means that he is completely fine. If you see the message " Error" in status, this will mean that the hard drive has bad sectors and it’s time to change it. The utility is quite simple and is suitable primarily for novice PC users who want to monitor the health of the HDD and defragment it. I would also like to note that the utility supports all current operating systems, from Windows XP to Windows 10.
How to check your hard drive using HDDlife
Utility HDDlife It has a nice interface and immediately provides the information we need, which is responsible for the serviceability and breakdown of the screw.

From the image above you can see that in the health block there is " OK!", which means that everything is fine with the HDD. To view smart details, you just need to click on the link “ click to view S.M.A.R.T. attributes».

If you see a message in the health block " DANGER!", this means that your HDD will soon become unusable.

In this case, you need to replace the old hard drive with a new one. The HDDlife utility is, first of all, suitable for novice PC users, since its simplicity will make it easy to monitor the health of the “screw”. Except standard utility the developer is still releasing HDDlife for Notebooks, which is designed for laptops. The laptop version has the same functionality as standard version, but can also carry out HDD noise level control. It is also worth noting that the program supports all current operating systems, from Windows XP to Windows 10.
Victoria
Program Victoria is being developed in a version for DOS and by Windows. For our example, we will use the Windows version of Victoria, which can be downloaded from http://hdd-911.com. Victoria is currently available in version 4.47. By launching the Victoria utility, we will be taken to such a window.

Victoria does not have a beautiful interface, as in previous utilities and is written in such old languages as Delphi And Assembler.
In the first tab of the quiz " Standard"is all information about installed hard drives to the computer.
Second tab " SMART» needed for smart reading. To display smart results, you must click the Get SMART button, after which the results will be displayed.

In the hard drive in question, Victoria discovered 1212 bad sectors. This number of BAD sectors is critical, so in this case it is necessary to full backup all data from the HDD. To repair a hard drive using the REMAP test in Victoria, you need to go to the “ Tests" and select the mode " Remap" After these steps, you can begin the procedure of reassigning bad sectors to backup ones with the Start button.

The REMAP test in Victoria can take a very long time. The test time depends on the number of BAD sectors. This test of the Victoria utility does not always help, since there may not be any spare sectors left in the screw.
Please note that using Victoria tests, you can damage the serviceability of the HDD and the information on it.
How to check if a disk is healthy using “chkdsk”
It may happen that by checking the S.M.A.R.T. values. Using the utilities described above, you did not find any problems, but the system still behaves unstable. Instability may manifest itself blue screens death, freezes in programs. This behavior of the operating room Windows systems caused by file system errors. In this case, the console command “ chkdsk" By running the "chkdsk" command, you can fully restore functionality Windows OS. For this example, we will take a computer with the new Windows 10 operating system. First of all, we will open the console in Windows 10 as an administrator. This can be easily done by right-clicking on the “ Start» and selecting the item we need.

In the running console, execute the following command CHKDSK F: /F /R After checking using command application“chkdsk” will display the result of the check in the console.

Now let's look at the command " CHKDSK F: /F /R» more details. Immediately after the command “chkdsk” comes the letter “ F" - this letter local disk , where we correct errors. Keys " /F" And " /R» fix errors in the file system, and fix bad sectors. These keys are almost always used, unlike the others. You can view the remaining keys with the command chkdsk /?

It is also worth noting that in Windows 10 the capabilities of the chkdsk application have been significantly expanded thanks to new keys.
How to check your hard drive's health using DST
Abbreviation DST deciphered Disk Self Test, that is self test disk. Manufacturers specifically integrate this method into the HDD, so that later, using special software, they can perform DST self-diagnosis, which will identify problems. By testing the “screw” using DST you can get information about possible hard drive failure. It is especially convenient to use DST on servers and computers of enterprises, where reliable storage of information plays an important role. Now let's look at using DST using HP laptops as an example. For new HP laptops with support UEFI BIOS There is a special diagnostic menu " Startup Menu" Starts this menu by using combination of power key and key ESC.

To run system tests, press the F2 button.

In the window that appears, DST is called Hard Disk Test. After selecting it, a self-test will start.

Other manufacturers also have a DST method, only the launch on a PC from other manufacturers differs from that discussed above.
Checking your hard drive in Linux
For example, let's take a computer based on the Ubuntu 16.04 operating system. To do this, let's launch a terminal in Ubuntu. In the terminal, type the following command: sudo apt-get install smartmontools This command should install console utility Smartmontools.

Now that the Smartmontools utility is installed, you can use the command sudo smartctl -a /dev/sda which will display all the information of the smart hard drive in the console.

If you don't like working in console mode, you can install a graphical utility Gnome-disk-utility. In it you can see everything you need about the HDD and its condition.

Let's sum it up
In the article reviewed, we described how you can monitor the status of the HDD, as well as how to fix its sectors and file system, if possible. From the material it becomes clear that monitoring the status of hard drives is very important, as it allows anticipate HDD failure.
If you have discovered that your hard drive is problematic, then do not put off replacing it until later. The problematic “screw” can fail at any moment, and you will lose all the information stored on the computer.
We hope our material will be useful to our readers and will completely help solve the problem of checking a hard drive.
Video on the topic
Good day!
How many things could be corrected if we knew in advance what awaits us...
And if in life it is almost impossible to predict some events, then in the case of hard drive- some of the problems can still be predicted and foreseen!
For this there are special utilities, which can find out and analyze the SMART* readings of the drive (show them to you, if necessary), and based on this data, assess the health of your drive, simultaneously calculating how many years it can still serve.
The information is extremely useful, and similar utilities can monitor your disk online, and as soon as the first signs appear unstable work- notify you immediately. Accordingly, you will have time to make a backup in time and take action (although backups should always be done, even when everything is fine ☺).
And so, in this article I will consider several methods (and several utilities) for analyzing the status of HDDs and SSDs.
*Note:
S.M.A.R.T. (Self-Monitoring, Analysis and Reporting Technology) - a special technology for assessing the condition of a hard drive with an integrated hardware self-diagnosis/self-monitoring system. The main task is to determine the likelihood of device failure, preventing data loss.
Perhaps this is one of the most popular questions asked by all users who are encountering problems with their hard drive for the first time (or who are thinking about the safety of storing their data). Everyone is interested in the time it takes for the disk to work until it completely stops. Let's try to predict...
Therefore, in the first part of the article, I decided to show a couple of utilities that can receive all the readings from the disk and analyze them independently, and give you only the finished result (in the second part of the article, I will provide utilities for viewing SMART readings for independent analysis).
Method No. 1 - using Hard Disk Sentinel
One of best utilities for monitoring the status of computer disks (both hard drives (HDD) and “newfangled” SSDs). What is most captivating about the program is that it will independently analyze all the data received about the state of the disk and show you the finished result (very convenient for novice users).
In order not to be unfounded, I will immediately show the main window of the program, which appears after the first launch (the disk analysis will be done immediately automatically). The health and performance of the disk is assessed as 100% (ideally, this is how it should be), the time that the disk will still work in normal mode estimated by the program at approximately 1000 days (~3 years).
What's wrong with the Hard version of the disc? Disk Sentinel
In addition, the program allows you to monitor the temperature: both current, average and maximum during the day, week, month. If the temperature goes beyond the “normal” limits, the program will warn you about this (which is also very convenient).

Hard Disk Sentinel also allows you to view SMART readings (however, to evaluate them, you need to have a good understanding of disks), get full information about the hard drive (model, serial number, manufacturer, etc.), see what the hard drive is loaded with (i.e., get performance information).
In general, in my humble opinion, Hard Disk Sentinel is one of the best utilities for monitoring the status of disks in the system. It is worth adding that there are several versions of the programs: professional and standard (for the professional version with extended functionality, there is a portable version of the program that does not require installation (for example, it can even be run from a flash drive)).
Hard Disk Sentinel works in all popular Windows(7, 8, 10 - 32|64 bits), supports the Russian language in full.
Method number 2 - using HDDlife
This program is similar to the first one; it also clearly shows the current state of the disk: its health and performance (in percentage terms), its temperature, the amount of time worked (in months). At the top of the window, based on all this data, HDDlife shows a summary of your disk, for example, in my case, “ALL RIGHT” (which means that everything is fine with the disk).
By the way, the program can work online, monitoring the state of your disk, and if something goes wrong (when the first signs of problems appear) it will immediately notify you about it.

As an example, the screenshot below shows an SSD disk has received a warning: its condition is still within acceptable limits, but reliability and performance are below average. In this case, you should not trust the disk with any important data, and if possible, you should prepare to replace it.

By the way, in the main window of the program, next to the amount of disk time worked, there is a link "Disk settings" (allows you to change some necessary parameters). By opening it, you can control the balance between noise/performance (very useful with drives that make a lot of noise), and adjust power consumption settings (relevant for laptops that quickly run out of battery).

Addition: HDDlife works on both PCs and laptops. Supports HDD and SSD drives. In stock portable versions programs that do not require installation. You can configure the program to run alongside your Windows. HDDlife works on Windows: XP, 7, 8, 10 (32|64 bits).
How to view SMART readings
If previous utilities independently assessed the disk status, based on SMART data, then the utilities below will give you more freedom and data for independent analysis. In the reports you will be able to find a fairly large set of parameters, on the basis of which it will be possible to roughly assess the condition of the disk and make a forecast for its further operation.
Method No. 1 - using CrystalDiskInfo
СrystalDiskInfo
Excellent free utility to view status and readings SMART hard disk (including SSD disks are supported). What’s so attractive about the utility is that it provides you with complete information about the temperature, technical condition of the disk, its characteristics, etc., and some of the data comes with notes (i.e., the utility is relevant for experienced users who themselves know “what-is- what" and for beginners who need a hint).
For example, if there is something wrong with the temperature, you will see a red indicator on it, i.e. СrystalDiskInfo will inform you about this.

The main window of the program can be roughly divided into 4 zones (see screenshot above):
- "1" - all your physical disks installed in your computer (laptop) are listed here. Next to each one is shown its temperature, technical condition, and the number of sections on it (for example, “C: D: E: F:”);
- "2" - the current temperature of the disk and its technical condition are shown here (the program performs an analysis based on all data received from the disk);
- "3" - disk data: serial number, manufacturer, interface, rotation speed, etc.;
- "4" - SMART readings. By the way, what’s so attractive about the program is that you don’t have to know what this or that parameter means - if something is wrong with any item, the program will mark it in yellow or red and notify you about it.
As an example to the above, I will give a screenshot that shows two disks: on the left - with which everything is fine, on the right - with which there are problems with reassigned sectors (technical condition - alarm!).

As a reference (about reassigned sectors):
when the hard drive detects, for example, a write error, it transfers the data to a specially designated spare area (and this sector will be considered “reassigned”). Therefore, on modern hard drives you cannot see bad blocks - they are hidden in reassigned sectors. This process is called remapping, and the reassigned sector is remap.
The higher the value of reassigned sectors, the worse the condition of the disk surface. Field "raw value" contains the total number of remapped sectors.
By the way, for many disk manufacturers, even one reassigned sector is already a warranty case!
To utility CrystalDiskInfo monitored the status of your hard drive online - in the "Service" menu, check two boxes: "Agent launch" and "Autostart"(see screenshot below).

Then you will see the temperature program icon next to the clock in the tray. In general, you can now be more confident about the condition of the disk ☺...
Method number 2 - using Victoria
Victoria- one of the most famous programs for working with hard drives. The main purpose of the program is to assess the technical condition of the drive and replace damaged sectors with spare working ones.
The utility is free and allows you to work both under Windows and under DOS (which in many cases shows much more accurate data about the state of the disk).
Of the minuses: working with Victoria is quite difficult, but at least, I highly do not recommend pressing buttons in it at random (you can easily destroy all the data on the disk). I have one fairly large article on my blog that explains in detail how to check a disk using Victoria (including finding out the SMART readings - example in the screenshot below (in which Victoria pointed to possible problem with temperature)).
Instructions for working with Victoria:
SMART Tab || Victoria utility
I'll call it a day, good luck to everyone!
Additions on the topic are welcome ☺
– the most unreliable component modern computer. Usually, modern models They last up to 3 years, after which they have to be replaced. The worst thing about this situation is that it is very difficult to predict exactly when the hard drive will fail. Because of this, inexperienced users often lose important data. In this material we will talk about how to check a hard drive for serviceability and correctly assess its condition.
Serviceability check based on data from “S.M.A.R.T.”
If you want to check your hard drive for serviceability, then the first thing you need to do is install the program. This free program collects all available information about the drive and, based on it, gives an assessment of it. technical condition. If the drive is fully operational, then its “technical condition” will be indicated as “Good”. If there are any problems with it, then you will receive an “Alarm” rating, but in cases where the HDD is on the verge of death, the program gives a “Bad” rating.
also in CrystalDiskInfo program you can see the initial data of the “S.M.A.R.T.” system (the program uses them to assess those conditions). To figure out what a particular parameter means, you can use . There is a table with detailed description all parameters of the “S.M.A.R.T.” system. In addition, in the CrystalDiskInfo program you can see the number of starts, the number of hours worked, the exact model name and even the serial number of the drive.
Checking the health of the hard drive under load
If the S.M.A.R.T. system does not show any problems, then the hard drive can be checked for serviceability by creating a large load. To do this, simply try to write a large number of small files (a couple of megabytes in size) to the drive. For example, you can try to copy to it big folder with photos.
- If the disk is good, then the copying process should proceed without any incidents. In this case, the copying speed should be more or less stable throughout the entire copying process (with the exception of a slight drop in speed immediately after the start of copying).
- If the hard drive is faulty, the copy speed will fluctuate greatly (from normal to very slow). In some cases, the copying process may freeze or be interrupted. Some files may not be copied, and the system will report errors. In particularly advanced cases, a cracking or grinding sound may be heard, and the drive may turn off ().
If the file writing test went well, then try testing how data reading works. To do this, try copying data from the disk you are testing.
Checking for errors in HD Tune
The next step is to check the health of the hard drive using specialized programs. Such programs allow you to check your hard drive for errors and identify existing problems, even if they do not appear in the normal use. Let's start checking with free program(or her paid version HD Tune Pro).
To check your hard drive for errors, run the HD Tune program, go to the tab and click on the “Start” button.

After this, the HD Tune program will begin checking the hard drive for serviceability. During the verification, you will be able to observe this process. Normal areas of the hard drive will be marked in green, and damaged areas in red.

On a fully functional hard drive, there should be no damaged (red) blocks at all; the entire surface should be marked green.
Checking for errors using Victoria 3.5
To get the most accurate check, you need to use the program, you can download it as an iso file, for example, (here is version 3.5, which is best suited for checking outside the operating system). The downloaded iso file must be written to a CD (or flash drive) and the computer booted from it. After booting your computer from this CD, you will need to select one of the versions of the Victoria program. For desktop computers you need to select the version “Victoria for Desktop”, and for laptops, respectively, “Victoria for Notebook”. Other options in this menu launch the operating system DOS system and Volkov Commander.

To start checking the entire surface of the hard drive, press the F4 key. After this, a menu with settings should appear. Here you need to select “Ignore Bad Blocks” and "Linear Reading". It should be noted that you need to use the Victoria program very carefully, since using some of its functions can delete data on the drive. For example, this can happen when you enable the options “Write (erase)”, “Write from file”, and also “BB = Erase 256 sect”.
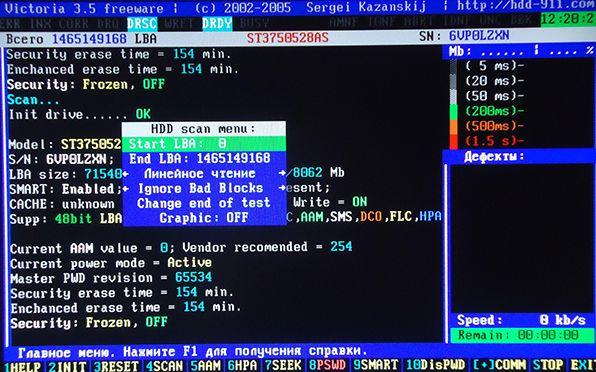
To start scanning, press the F4 key again. After this, all you have to do is wait until the verification is completed. At the end, if the hard drive is fully functional, you should see a screen like this.

If the hard drive has any problem areas, orange and red blocks will appear on the scanning screen. The more such blocks, the worse the condition of the HDD surface. If the number of red blocks is large, this means that the hard drive is faulty and it is time to replace it. Detailed information You can see the problems found on the right side of the screen, in the “Defects” window.
Error checking in Victoria 4.46
If you do not want to burn an iso image and boot from a disk from a computer, then you can use the Victoria 4.46 program, which runs from the Windows operating system. You can download this version of the program, for example, .
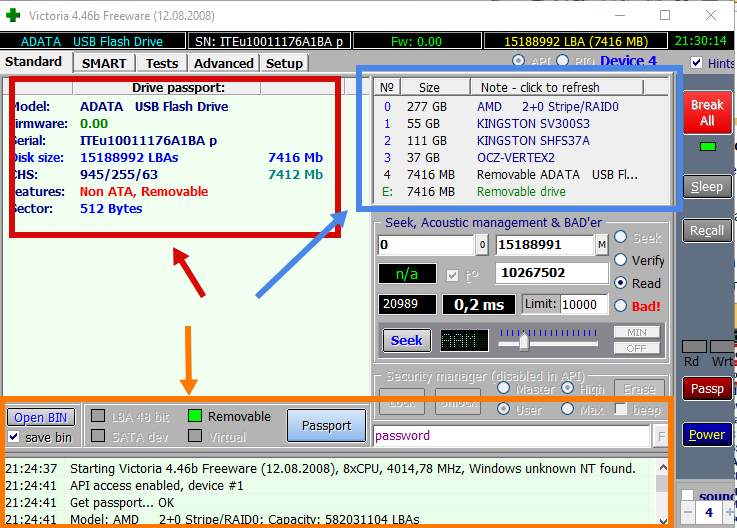
After downloading, you will receive an archive that will need to be unpacked into any folder. To run the Victoria 4.46 program, open the folder with the contents of the archive and run the program vcr446f.exe. After launch, you will see the main Victoria window, it will look something like the picture below.
You should start studying the program from the “Standard” tab. Here on the right side of the screen there is a list of hard drives that Victoria was able to identify, information about the currently selected drive is displayed at the top left (if you wish, you can select another), and at the bottom there is a log of events, errors and other information.
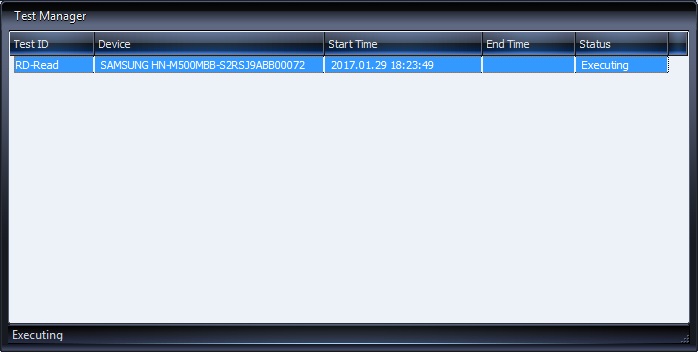
To check your hard drive for errors, you need to open the “Tests” tab. Here you must first click on the “ Passp” button (to get information about the drive), and then on the “ Start” button (to start the check).

After this, you just need to wait until the program finishes checking your hard drive.

During the scanning process, the Victoria program will find faulty and problematic drive blocks, the number of which will be displayed in the column on the right, as well as at the bottom of the screen.
Results of checking the health of the hard drive
A fully functional hard drive should pass all the tests described above without any problems. CrystalDiskInfo should be rated Good, manual read and write tests should pass without difficulty, and HD Tune and Victoria should not detect any problems. If everything is exactly like this for you, then most likely your hard drive is fully functional and will work for a long time.
But, of course, there are no guarantees here and cannot be. That's why the only way To reliably protect your data is backup. The most important data (personal photos, videos, documents) should always be stored on multiple drives.
Friends, hello everyone! In this article we will continue diagnosing the technical condition of the computer’s hard drive. Therefore, the agenda will include the question of how to check hard drive for serviceability and bad sectors.
As you remember, we already did this using the standard capabilities of the Windows operating system. But now everything will be different. Let's just say let's approach this task more professionally.
So, my dears, now it’s time to get acquainted with a very popular utility called Victoria. It is this that will help us diagnose the computer’s hard drive with very high accuracy.
At this step, you should download the installation archive with the program and unpack it on your computer. Then run the file named vcr447.exe with permissions:

After this, in fact, the main application window will appear in front of us. In order to better understand the basic principles of operation, the author suggests watching a short introductory video:
So, let's carry out the above actions on our experimental disk. To do this, select it on the “Standard” tab:

Now the passport data of the hard drive will open:

As you can see in the picture above, here we can find out the exact disk model (Model), firmware version (Firmware) and serial number, full size (Disk size), acoustic noise level during operation (APM val) and much more.
In the next step, go to the “SMART” tab and select the “Get SMART” item. After this, in the main window of Victoria, a completely incomprehensible list will open at first glance:

Let's take a closer look at what's what here. Look, SMART function, this is the internal self-diagnosis system of the hard drive. This firmware is built into all modern hard drive models without exception.
It monitors vital parameters, analyzes them and determines general state disk. As you can see in the picture above, in our case it is “GOOD”. This means you can breathe out calmly, because everything is fine.
Now a little about how this state is calculated. In fact, everything is very simple. Each parameter from the table has a current value (Val) and a threshold value (Tresh):

So, if the current value is equal to the threshold or is even less than it, then trouble has already arrived. You need to seriously think about saving information to backup media, so as not to shed crocodile tears later.
Also worth mentioning is the column Raw, which displays the current “raw” value. The lower this number, the better. It is on the basis of the data in this column that the Val value is formed.
Now let's look at the most significant parameters from the general list SMART systems. They are highlighted in pink by the program itself:

If the Raw value this parameter will constantly increase, then the hard drive begins to crumble. The fact is that the replacement of defective areas with working ones is carried out from the reserve area, which also has its own permissible limit. Let's go further down the list:

- Current pending sectors (No. 197): indicates the number of candidate sectors that will soon cease to be read;
- Reallocation Event Count (No. 196): shows the total number of operations to replace bad sectors with working ones;
- Offline scan UNC sectors (No. 198): displays the real number of bad sectors of the hard drive at a given time;
- UltraDMA CRC Errors (No. 199): indicates errors that occur when transmitting data via the hard drive cable. It may also indicate a loose connector on the drive itself.
So, we have considered the points of primary importance. Now let's look at other, no less interesting and informative positions. For example, this one:

- Power-on time (No. 9): the total number of hours that the tested hard drive has worked. A Raw value close to 20,000 will be quite critical in this case

- Seek Error Rate (No. 7): error rate when positioning the magnetic head unit. With an increasing Raw value, there may be problems with the mechanical part or there has been severe overheating
For owners of wearable laptops, it would be useful to pay attention to the values of the G-Sensor Shock Counter attribute:

This is nothing more than a shock sensor. Again, the higher the Raw parameter, the worse it was for the hard drive. Although for some manufacturers this sensor can be very sensitive and respond to even minor shocks.
Well, friends, now let's get to the fun part. Now we will check our hard drive for serviceability and the presence of bad blocks. But before this process, there is an important recommendation to follow.
In order for the Victoria program not to show false bad sectors, before starting the scan you should definitely disable all third party programs, which can access the disk in the background. Here is a sample list of them:
After that, feel free to go to the “Test” tab:

Here we need to check the “Remap” option and then click the “Start” button. After this, a long process of scanning the surface of the hard drive will begin. And the enabled function Remap will be in automatic mode re-record bad sectors to healthy ones.
Now pay attention to the sector status indicator. Starting with the green color (reading delay 120 ms), problematic blocks already begin. Those marked with a blue “Err” mark are not readable at all. That is, they are not working:

In conclusion, it should be said that those who are very curious should not experiment with the “Erase” parameter, since this will lead to complete removal data:

You also need to understand that such tests place a very heavy load on the hard drive, so it is recommended to ensure good cooling. For example, you can open the side cover of a personal computer case.
And with this, the story about how to check a hard drive for serviceability and bad sectors has come to its logical conclusion. If you have any questions, ask them in the comments to the article. And for dessert you can watch a cool cartoon.