Which format is best for a hard drive. Formatting your hard drive
Formatting hard drive is the process of creating a logical layout of a data storage area located on a magnetic medium and necessary for further filling with information and working with it. Usually formatting is carried out before starting work with the HDD, for complete destruction information or to repair damage caused by a virus.
Types of hard drive formatting
Low-level formatting is HDD markup on physical level, which usually remains unchanged throughout the entire existence of the carrier. It is carried out at the manufacturer's factory and cannot be done at home. Programs that claim to allow low-level formatting are usually, at best, only able to overwrite control information.
Partitioning is necessary to create a layout into logical drives, which will allow you to store information in a more organized way. For example, the only HDD laptop, you can divide two disks, one of which can be allocated for the operating system, the other for storing files. This will allow you to reinstall the OS without erasing information stored on the non-system partition. Partitioning non-system disks can be done from under Windows.
High-level formatting is divided into full and quick. Fast only involves clearing file system tables, which are kind of directories for storing files. Full formatting (verification), in addition to destroying information in tables, also includes searching for broken blocks and replacing them with working ones. There are several formatting options.
Formatting the HDD during Windows installation
To start the installation operating system, you should set the settings in the BIOS so that the first device from which the computer starts booting is installation disk. In order to enter the BIOS, you should restart the operating system and press several times Delete key after the computer starts up again.
In the window that appears, go to the Boot section and specify there, as the device from which the computer will first boot, the disk drive where you insert the installation disk.
After setting the necessary boot parameters, insert the installation disk into the drive, save the changes to the BIOS and restart the computer. Typically the F10 key is used for this. If you have done everything correctly, the operating system installation and recovery window will appear in front of you.

Press Enter to begin installation, click Windows. After this, the text will appear in front of you license agreement, press F8 to continue further work.

After this, you will need to delete all the partitions into which the hard drive was divided in order to create a single partition on the HDD with an unallocated area. To do this, select each of the available sections one by one and press the L key.

After you delete all the partitions on your hard drive, only the single inscription “Unallocated area” will remain in the list.

Press Enter and you will be presented with options for file systems into which you can format the hard drive. Select Format partition in NTFS.

After a few minutes, formatting the hard drive will be completed. This method is good primarily because it allows you to format the system disk, while programs running under Windows do not allow you to do this. If you are going to format a HDD where there is not a running operating system, but some files, then it will be much more convenient to use another method.
Formatting a hard drive using the built-in Windows program
Open My Computer and click right click on the required disk, select "Format" in the pop-up menu.

In the window that appears, you can specify the necessary formatting parameters. Quick formatting It takes much less time compared to a complete one, but it occurs without completely erasing information, which allows, if necessary, to restore part of the information using special programs.

After you set the necessary parameters and click Start, a window will appear warning you that all data on the disk will be destroyed. Click the OK button and wait for the formatting completion message.

Using the command line to format the HDD
One of the simplest ways to hard formatting disk is usage special team on the command line. Click Start -> Run or press the Win+R key combination. A small window will appear in front of you where you should enter a name cmd programs and press Enter.
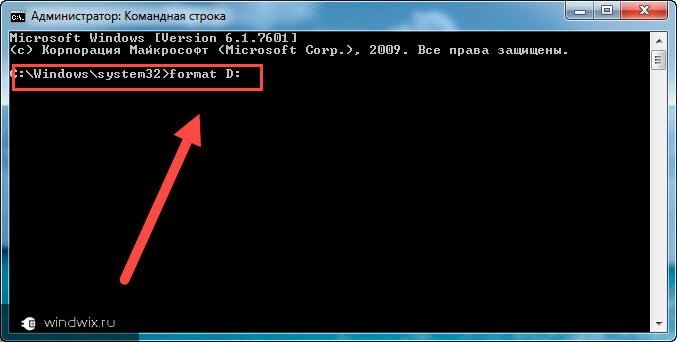
In the black window that appears, type the command format and the drive letter followed by a colon, for example, format d:, and press Enter. A question will appear with the warning “Attention, all data on the fixed drive d: will be destroyed!” and the question “Start formatting?” Press Y and Enter to continue. The formatting will begin.
Formatting using the built-in Disk Management program
The Windows operating system has a special built-in program that allows you to perform various operations with disks and their partitions. The program is located at Control Panel -> Administrative Tools -> Computer Management -> Disk Management.

Right-click on the required drive and select Format. In the window that appears, you can specify the formatting method (quick or full) and file system type.
Using the Partition magic utility to format the HDD
One of the most convenient and functional programs for working with disks and logical partitions is the Partition magic utility. The program can be used even if the built-in Windows software failed to complete the task.

In order to format a disk using Partition magic, you need to create boot disk, insert it into the drive and after restarting the computer, working in the program itself, perform all the necessary operations - formatting, as well as deleting or creating a new partition.

Quite often, users have problems with formatting. Especially if you need to do it with the system hard drive ( usually, but not always, this is C). In this case usual ways won't work.
If the hard drive ( or its section) without system files, then use the formatting method in the system itself.
In my instructions, I will show you how to format a hard drive with a system (there, where is windows installed) and without. I'll start with the simplest thing.
Formatting a non-system hard drive or partition
These methods are practically no different from. It can only be produced on those hard drives, which do not have system files ( usually D or E).
No need to worry about formatting the system drive. There is no way to do it this way. You will see a warning that the action is not possible.
Open my computer ( conductor). In it, select the disk, open the context menu and select formatting.
In the window that appears, leave everything as it is ( can be removed quick way, but then you will have to wait a very long time).

The process will take a long time ( depends on volume). You may think that nothing is happening and the computer is just frozen. But in most cases this is not the case.
The same can be done in the disk management window. Use this method if for some reason the first one did not work.
Go to Start >> All Programs >> Administrative Tools >> Computer Management.

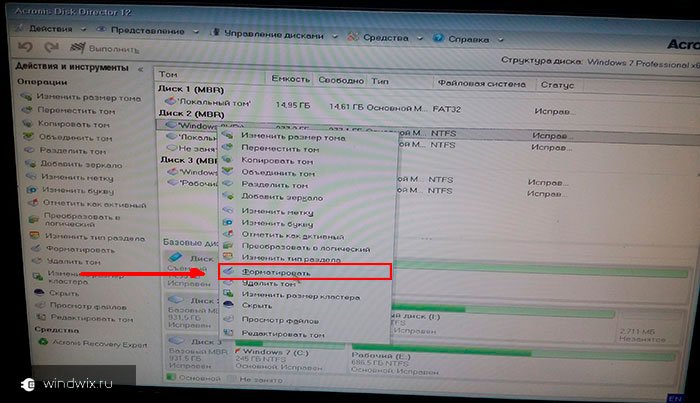
In the window that appears, select your hard drive and context menu“Format” as in the image below.

There is 1 more method on the command line. Administrator rights are required.
Go to Start menu >> Run ( or Win+R) to open the progress bar. Then go to the command line.

Enter the command there:
Explanation: E is the hard drive letter. NTFS- file system. Q- quick formatting.

Formatting the system disk
When you try to format your system hard drive using the above methods, you will see the error shown below.

Why does this happen? It's simple. Windows cannot format itself. This will cause the system to malfunction and the error provides protection against this.
In addition, even if Windows was installed on another hard drive, then system files, necessary to run the OS can be stored locally. In this case, the BIOS check will begin with it ( C).
It turns out that this is only necessary for future installations new system. Otherwise, you will simply make the computer unusable. Before this you need to prepare a little.
You will need another media with the operating system you plan to install. This method works on any version. I'll demonstrate it on Windows 8.
Set it in advance. First you need to find out its letter. It may be different from "C:" so check this in advance. Now I’ll show you how to do this right during installation.
Press the key combination Shift+F10. This key combination also works on other versions of operating systems.

A command prompt window should appear. In it, enter the command notepad, which will open a notepad. From there you can further view the necessary information.

The Notepad program will open. In it, go to File >> Open or press CTRL+O.

Explorer will open. Go to the “This PC” tab and look at the drive letter you want to format. In my case D. It is designated as local.

Now go back to the command line and enter the command:
Where /FS:NTFS- file system. D:— drive letter. /q- quick formatting.

You can also use the utility directly during the installation process and not use the command line.
Select the language, click on the install button and in the window where you need to select the partition to install, you need to select formatting. See how it looks in the image.

It can also be done using any ( almost) LiveCD. This is the media from which the system boots instead of booting from the hard drive. You can format it directly in Explorer, similar to methods with non-system hard drives. This is possible because most of the data is in random access memory and this does not prevent the computer from starting.
There are also many programs, but they are paid and their use will be unnecessary for such tasks. This information should be sufficient.
If something was not clear to you, then watch this video. It clearly depicts all the actions with detailed comments and you will have no questions left.
Were you able to format your hard drive?
When installing the operating system, as well as when changing files or redistributing space between partitions, it is necessary to format the hard drive. It's pretty frequent operation performed by PC users. If you haven’t done anything like this before, then let’s look at the theoretical part of the question.
What is the formatting process?
Marking areas for storing information, in which some of it is deleted, is called formatting. It creates a system for accessing stored information.
Typically done for:
- changing one file system to another;
- deleting files from your hard drive.
On this moment exists a large number of various file systems. They are used on various equipment, including not only computers, but also mobile devices. To work in latest versions Windows uses the NTFS file system.
Video: How to format a hard drive
Why format your hard drive?
Formatting is performed to delete files from the hard drive, as well as to change one file system to another.
In most cases they resort to it:
- before installing a new operating system;
- to create an installation Windows image, for example, on a flash drive;
- due to the need to clear the disk of files if they are not needed.
Formatting with Windows tools
Despite the large number of various programs for working with hard drive operating room Windows system has its own set of utilities.
Let's look at the process of formatting disks using Windows:
- select the disk that needs to be formatted;
- press the right mouse button;
- select Format;
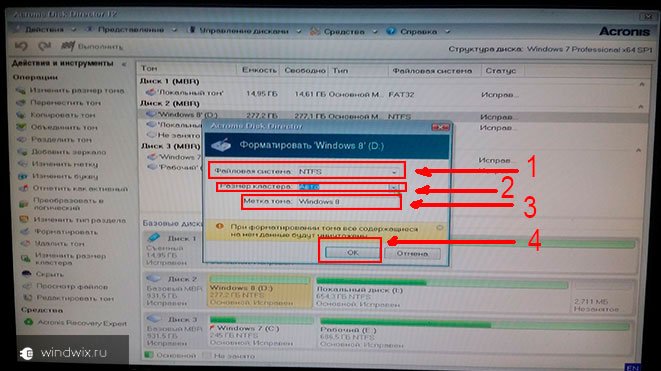
- in the window that appears, select file system, cluster size, and formatting method;
- It is recommended to set NTFS as a file system, and leave the cluster size at the default – 4096;
- After setting the necessary parameters, click Start.

Windows also includes more full service for working with hard drives.
To open this menu, do the following:
- right-click on My Computer;
- select Management;
- open Disk Management;
- V this menu the user can perform various operations on the hard drive, including formatting.

Formatting via the command line
Execute this operation you can also use command line:
- Press the key combination Win+R;
- enter cmd and press Enter;
- in the command line we write the command format y:, where y is the letter of your drive, maybe, for example, c or d;
- the system will ask you to confirm the operation by pressing the Y key;
- after confirmation, the system will begin the formatting process;
- When finished, this message will appear


Formatting HDD in BIOS
If you need to format from the BIOS hard section disk, you'll have to tinker a little. Unfortunately, the BIOS does not have tools for formatting the hard drive, so you should use third party programs to perform these operations.
One of the most common is Acronis Disk Director. To work with it, you need to create bootable media in the operating system with the files of this program. But before you start creating bootable media Another option worth considering is formatting using Windows installer. This decision is a simpler option compared to the Acronis program Disk Director.

For this method All you need is a disk or flash drive with a recorded operating system installation package.
To format, you must perform the following steps:

Attention! The drive partition letters may not match. To more accurately determine the required disk, use the wmic logicaldisk get deviceid, volumename, size, description command.
Creating a bootable USB flash drive for Acronis Disk Director
To create a bootable flash drive you will need:

Algorithm of actions:
- insert the flash drive;
- install and open the program;
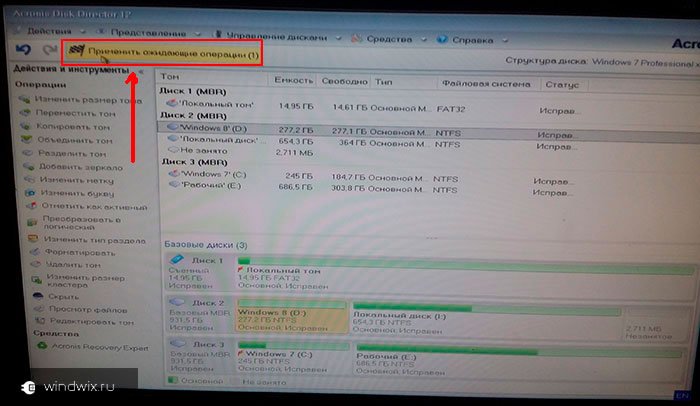
- in the application, open the Tools section and select Acronis Bootable Media Builder;
- click next;
- select boot type Windows media PE;
- in the next menu you should mark the necessary components for recording to a flash drive;
- After selection, you must select the media on which to record and click Next. The flash drive should be formatted in FAT 32 format using the Windows utility;
- you can also create an image for later burning to a flash device or disk using the Ultra ISO program.
Working with a bootable USB flash drive Acronis Disk Director
To load a flash drive you need:

How to format an external hard drive to NTFS
The most convenient formatting method is to do everything using standard utilities operating system. This solution does not require installation additional programs and creating additional boot disks.
If you do not have an operating system installed, then in this case you should use special programs, such as Acronis.
Steps describing how to format a hard drive as ntfs:

Utilities
In addition to the standard Windows programs There are various utilities used for the same purpose.
The most common options include the following:

What is the best program to format drives in ntfs?
Each program has its own characteristics, but the main direction for all utilities remains the same - working with disks, including creating partitions, forming into other file systems, etc. Therefore, the choice of program is purely personal question each user, which depends on his preferences.

Problems and solutions when formatting
How to quickly format a disk without losing data?
Unfortunately this is not possible. All stored information will be deleted. Only part of the data can be recovered.
Which drive is better: external or external?
Formatting external drives is performed in the same way as for a regular hard drive. At this process All information will be deleted, including windows, after execution the disk will be like new without windows.

Unable to format hard drive
If you did everything according to the instructions, but did not achieve results, do not sound the alarm. This doesn't always mean something bad.
- format command - cannot be used for system disk, if she is in his environment;
- if the operating system is located in another partition of the HDD, it cannot be deleted;
- settings antivirus program access to different partitions of the hard drive may be denied;
- various applications and viruses can block access.
If you have removed the factors described above, but still cannot format your hard drive, you will have to resort to special programs. The most popular tool is HDDscan, which is easy to install and free.

Algorithm of actions:
- download the utility;
- open and install;
- run as administrator;
- click on the icon in the form of a sphere located in the center of the interface;
- select Surface tests;
- check the box next to Erase;
- go to the Add test tab;
- click on Scan;
- in the lower right corner, write down the error data;
- set the EraseWAITs option to ON and select Scan again;
- repeat until the error is cleared.
You can also use Acronis Disk Director. If you can't format portable hard disk, using this program, most likely the hard drive has partially failed. And the entire procedure can sometimes be performed only from bootable media, that is, not in the operating system.
How to force format a flash drive?
To format flash drives you can use the program HP USB Disk Storage Format Tool
- provide the necessary set of functions;
- They have a fairly simple interface that will be easy for novice users to work with.
Greetings to all readers of my blog, Denis Trishkin here.
When using a computer for a long time, sooner or later the need arises Windows reinstallation. This can be done in several ways. The correct one is the one before which you need to format the hard drive. In this article I will tell you exactly how this happens, and also introduce you to the main concepts.
So what is formatting? Even at school, this process was presented as a division into sectors and tracks, with the loss of all information previously recorded on the storage medium. In the realities of today's technological world, formatting is the process of marking up an electronic storage medium, regardless of its shape and structure, be it an optical or hard disk, memory card, flash drive.
To put it simply, the process is the erasure of all existing files in the specified area. At the same time, when new ones appear, they are already placed on top in a seamless manner. Because of this, access to them will be easier in the future, and, consequently, the speed of processing requests will decrease. OS and individual programs will work faster.
File system types( ^)
Before moving directly to familiarization with the process itself, it is important to introduce you to such a concept as file system and its types. So, it is a table that indicates the order of storing, recording and naming information on media. In other words, it is responsible for all processes related to transferring and reading data.
There are several most famous and used types:

Formatting process( ^)
We immediately need to clarify that we are talking about formatting before Windows installation. Therefore, we will talk about working with hard drives, and not with other data storage devices.
Formatting methods before installing a new system( ^)
There are only a few ways to format before installing a new Windows:
using built-in capabilities;
command line (use the same tool);
programs third party developer(most often this is Acronis Disk Director);
use another computer.
Step-by-step instructions for formatting with built-in capabilities( ^)
It should be noted right away that I will talk about Windows 7, 8, 10, because previous versions Microsoft has stopped supporting it. So, when, during the installation of a new operating system, you reach the disk selection point, you need to:

The built-in tool allows you to format the disk only in a quick way.
However, it does not provide additional functions. That is why many specialists use special formatting programs that work even without an installed operating system. The above is considered the most convenient Acronis Disk Director. This application is paid, although there is the possibility of temporary use.
Formatting using Acronis Disk Director( ^)
To use the application you need:
1 Download the program image file using a torrent tracker.
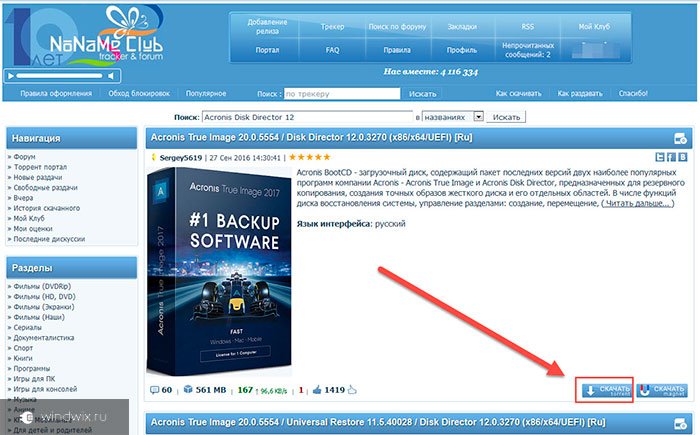
increase
2 Write the downloaded image to a USB flash drive

increase
3 Using the BIOS, check that the system boots first from the flash drive, press the F10 button and agree.
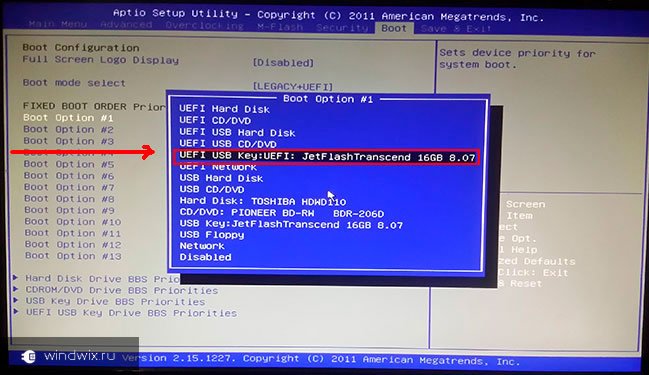
increase

increase
4 After rebooting, confirm working from the flash drive.
5 A black screen appears where you need to select full version Acronis Disk Director.

increase
6 On the pop-up window, mark “manual” mode.
7 After this, select the section and click on the item in the left menu.
increase
increase
9 After this, the program sends us to the initial partition selection window. This is necessary to enter additional changes. But since we are only formatting the disk on which Windows will later be installed, we click on the checkbox.
increase
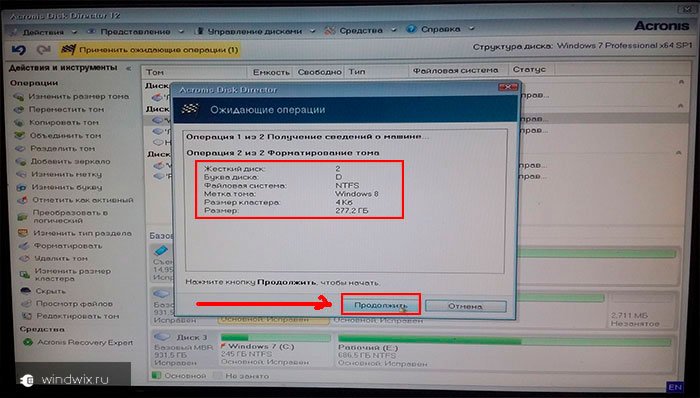
increase
10 We are waiting for the process to complete. After this, you can exit the program and continue installing the OS. In this case, there is no longer any need to format the disk with the built-in program.

increase
Formatting via the command line( ^)
Almost no one uses this method, since the methods described above are sufficient for most. But sometimes there are still situations when he remains the only one.
To call the command line, before copying a new one Windows versions to your computer, when the first installation window appears, press the key combination “ Shift+F10" After this, a black window will appear. It contains the command “ format" along with the letter of the partition that needs to be formatted (this could be C, D, E and others). After this you need to confirm the action: “ Yes" Or write " No» if you made a mistake with the letter of the section or simply changed your mind.
The situation can be resolved using third party computer. An infected hard drive is connected to it and standard system cleared. To do this, after booting the system in the section " My computer“You need to select the damaged partition, right-click on it, and then select the appropriate menu. Specify the file system, cluster size, and volume label.

increase
After hard formatting The disk is installed on the original computer and Windows is installed. Sometimes during this, the system requires you to re-divide the partition into sectors and tracks. Don't worry - this is normal.
Formatting the hard drive before installing Windows - important step. If you don't do it, a new version will work with errors and most likely not for long.
I hope this article will clarify for you the main issues that are associated with the formatting procedure. Subscribe, recommend me to your friends and along with you become computer literate.
Good day!
In some cases, it is necessary to perform low-level formatting of the hard drive (for example, to “treat” bad sectors HDD, or for complete removal all the information from the drive, for example, you are selling a computer and do not want anyone to dig into your data).
Sometimes, such a procedure works “miracles” and helps bring a disk (or, for example, a flash drive, etc.) back to life. In this article I want to look at some issues that every user who has had to deal with a similar issue faces. So…
1) What utility is needed for low level formatting HDD
Despite the fact that there are quite a lot of utilities of this kind, including specialized utilities from the disk manufacturer, I recommend using one of the best of its kind - .
HDD LLF Low Level Format Tool
Main program window
This program easily and simply performs low-level formatting of HDD drives and Flash cards. What’s captivating is that even completely novice users can use it. The program is paid, but there is also a free version with limited functionality: maximum speed work 50 MB/s.
Note: For example, for one of my “test” hard drives of 500 GB, it took about 2 hours to carry out low-level formatting (this is in the free version of the program). Moreover, the speed sometimes dropped significantly less than 50 MB/s.
Main features:
- supports work with SATA interfaces, IDE, SCSI, USB, Firewire;
- supports drives from: Hitachi, Seagate, Maxtor, Samsung, Western Digital and etc.
- supports formatting Flash cards when using a card reader.
When formatting, the data on the drive will be completely destroyed! The utility supports working with drives connected via USB and Firewire (i.e., you can format and bring back to life even ordinary USB flash drives).
Low-level formatting will delete the MBR and partition table (no program will help you recover data, be careful!).
2) When to perform low-level formatting, what will help
Most often, such formatting is carried out for the following reasons:
- The most common reason- get rid of and treat the disk from bad blocks (bad and unreadable), which significantly impair the performance of the hard drive. Low-level formatting allows you to “instruct” the hard drive so that it can discard bad sectors (bad blocks), replacing their work with backup ones. This significantly improves the performance of the disk (SATA, IDE) and increases the life of such a device.
- When you want to get rid of viruses, malware that cannot be removed by other methods (such, unfortunately, do occur);
- When they sell a computer (laptop) and don’t want the new owner to rummage through their data;
- In some cases, this must be done when you Linux systems“transfer” to Windows;
- When a flash drive (for example) is not visible in any other program, and it is impossible to write files to it (and indeed, to format it using Windows);
- When connects new drive and etc.
3) An example of low-level formatting of a flash drive under Windows
A few important notes:
- The hard drive is formatted in the same way as the flash drive shown in the example.
- By the way, the flash drive is the most common one, made in China. Reason for formatting: it is no longer recognized and displayed on my computer. Nevertheless, HDD utility The LLF Low Level Format Tool saw it and decided to try to save it.
- Low-level formatting can be done both under Windows and Dos. Many novice users make one mistake, its essence is simple: you cannot format the disk from which you booted! Those. if you have one hard drive and Windows is installed on it (like most) - then to start formatting this disk, you need to boot from another medium, for example from (or a computer and format from it).
Now let's move on to the process itself. I will assume that you have already downloaded and installed the HDD LLF Low Level Format Tool utility.
1. When you launch the utility, you will see a window with a welcome message and the price of the program. Free version differs in speed, so if you don’t have much big disk and there are not very many of them - then it is quite enough for work and free option- just click the “Continue” button for free» (continue for free).
First launch of HDD LLF Low Level Format Tool
2. Next you will see in the list all the drives connected and found by the utility. Please note that there will no longer be the usual “C:\” drives, etc. Here you need to focus on the device model and drive size.
For further formatting, select from the list required device and click the Continue button (as in the screenshot below).
Selecting a drive
3. Next, a window with information about the drives should appear in front of you. Here you can find out the S.M.A.R.T. readings, find out more detailed information about the device (Device details), and format - LOW-LEVE FORMAT tab. That's what we choose.
To start formatting, click the Format This Device button.
Note. If you check the box next to Perform quick wipe, “normal” formatting will be performed instead of low-level formatting.
Low-Level Format (format the device).
4. Then a standard warning will appear stating that all data will be deleted, check the drive again, perhaps the necessary data remains on it. If everything is done backups documents from it - you can safely proceed...
5. The formatting process itself should begin. At this time, you cannot remove the flash drive (or disconnect the disk), write to it (or rather, try to write), and generally do not run any resource-intensive applications on the computer; it is better to leave it alone until the operation is completed. When it is completed, the green bar will reach the end and turn yellow. After this, you can close the utility.
By the way, the operation time depends on your version of the utility (paid / free), as well as on the state of the drive itself. If there are a lot of errors on the disk, sectors are not readable, then the formatting speed will be low and you will have to wait quite a long time...
Formatting process...
Formatting complete
By the way, the easiest way to format high level- just go to “my computer" and right-click on to the desired disk(if it is visible, of course). In particular, my flash drive became visible after the “operation” was performed...
Next, all that remains is to select the file system ( for example NTFS, since it supports files larger than 4 GB), write the disk name ( volume label: Flash drive, see screenshot below) and start formatting.
After the operation has been completed, you can start using the drive in normal mode, so to speak, “from scratch”...
That's all for me, Good Luck :)