Which slots to install RAM. Installing RAM - how to add and install RAM correctly
“How to install (add) RAM to a computer”
Sooner or later the moment comes when random access memory becomes small. The needs grow, but the memory remains in place, then the game does not start, then the system slows down, or some program has no room to fully develop.
No problem, you can add RAM to your computer. Now let's look at how to add RAM.
First of all, you need to make sure that there are free memory slots.
To do this, remove the housing cover and take a look.
The photo shows that there are 4 memory slots, only one of which is occupied. There are still plenty of excellent places.
The next thing to determine is the type already installed memory.
Total for desktop computers There are 3 main types of RAM. Let's list: DDR, DDR2, DDR3. In turn, these types of memory are divided by speed.
So, let's look at what specific memory you have. This should be written on the memory line itself. In my case it is Hynix PC2-6400 2Gb, i.e. in simple language 2Gb DDR2-800.

It follows from this that I can only add memory of this type (DDR2-800), but the volume can be different, usually 1, 2 or 4Gb. The added volume directly depends on the characteristics of the motherboard. This can be found in the documentation for it. In any case, in order not to miss, you can safely add the same line that is already installed (if you have a volume of no more than 4GB).
The main thing is that the memory type and frequency must match, but the company may be different (although the same ones are preferable).
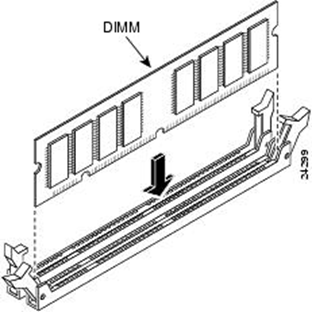
To install new line RAM must be disabled system unit from the network, move the latches on the memory slots to the sides and, turning the memory correctly, insert it all the way into the connector. The latches should close.

I repeat once again: make sure that the cut on the memory line coincides with the protrusion on the motherboard slot.

That's all, the process itself is not complicated, but the main thing is preparation and knowledge.
What to do if not free space for RAM?
Then you need to again look at what memory is installed and how much there is. For example, there are two 512MB slots, i.e. together 1GB. In this case, it would be advisable to install 2 1GB sticks or one 2GB stick instead. Do not forget that it is advisable to know what the maximum allowable volume per connector is.
Operation speed personal computer directly depends on the correct selection and installation of all its components. Correct selection and installation of RAM memory modules is the most important guarantee successful work your PC.
In the previous article we looked at . In this article we will look at the issues of selecting RAM and its proper arrangement in the motherboard connectors.
Basic recommendations applicable to all types and types of memory:
– it is best to install DIMM modules with the same memory capacity;
– the modules must match the operating frequency (Mhz), if you install modules with different frequencies work, then in the end they will all work at the frequency of the slowest memory;
– for installed RAM cards, it is advisable to combine timings and memory latencies (delays);
– it is better to select modules from one manufacturer and one model.
Some enthusiasts try to buy modules from the same batch, but this, it seems to me, is already a perversion!
These tips are not strictly followed; situations vary. If memory modules differ from each other in manufacturer, volume and operating frequency, this does not mean at all that they will not work. In this case, there are no special memory layout secrets - just installing them is enough.
There are also no special features when installing already outdated types of memory such as SDRAM (there is one rule - the more, the better).
But in modern computers, motherboards support special operating memory modes. It is in these modes that the operating speed RAM memory will be the most effective. Therefore, to achieve best performance you should take into account the operating modes of DIMMs and their correct installation. Let's look at the most common RAM operating modes today.
RAM operating modes
SINGLE CHANELL MODE
Single Mode (single channel or asymmetric mode) – this mode is implemented when only one memory module is installed in the system or all DIMMs differ from each other in memory capacity, operating frequency or manufacturer. It doesn’t matter in which slots or what memory to install. All memory will run at the speed of the slowest memory installed.
If there is only one module, then it can be installed in any memory slot:
Two or three different memory modules can also be installed in any configuration:
This mode is more of a necessity when you already have RAM, and the first place is to increase the amount of memory and save money, and not to achieve best performance PC. If you are just buying a computer, of course, it is better to avoid such a memory installation.
DUAL CHANELL MODE
Dual Mode (two-channel or symmetrical mode) – the same amount of RAM is installed in each DIMM channel. Modules are selected according to operating frequency. On motherboards, the DIMM sockets for each channel are different colors. Next to them is written the name of the connector, and sometimes the channel number. The purpose of the connectors and their location along the channels must be indicated in the motherboard manual. The total memory volume is equal to the total volume of all installed modules. Each channel is served by its own memory controller. System performance increases by 5-10%.
Dual Mode can be implemented using two, three or four DIMMs.
If two identical RAM memory modules are used, they should be connected to the same connectors (the same color) from different channels. For example, install one module in the slot 0 channel A, and the second - into the connector 0 channel B:
That is, to enable the mode Dual Channel(interleaved mode) should be done the necessary conditions:
– the same configuration of DIMM modules is installed on each memory channel;
– memory is inserted into symmetrical channel connectors ( Slot 0 or Slot 1) .
Three memory modules are installed in a similar way - the total memory volumes in each channel are equal to each other (memory in the channel A equal in volume in the channel B):
And for four modules the same condition is satisfied. There are two parallel dual modes at work here:
TRIPLE CHANELL MODE
(three-channel mode) – the same amount of RAM is installed in each of the three DIMM channels. Modules are selected according to speed and volume. On motherboards that support three-channel memory mode, 6 memory connectors are usually installed (two for each channel). Sometimes there are motherboards with four connectors - two connectors make up one channel, the other two are connected to the second and third channels, respectively.
With six or three sockets, installation is as simple as with dual-channel mode. If four memory slots are installed, three of which can work in , the memory should be installed in these slots.
(flexible mode ) – allows you to increase the performance of RAM when installing two modules of different sizes, but identical in operating frequency. As in dual-channel mode, memory cards are installed in the same connectors of different channels. For example, if there are two memory sticks with a capacity of 512Mb and 1Gb, then one of them should be installed in the slot 0 channel A, and the second - into the slot 0 channel B:
In this case, the 512 MB module will work in dual mode with the 512 MB memory capacity of the second module, and the remaining 512 MB of the 1 GB module will work in single-channel mode.
That’s basically all the recommendations for combining RAM. Of course, there may be more layout options, it all depends on the amount of RAM, the motherboard model and your financial capabilities. Motherboards with support also appeared on sale four-channel mode memory work - this will give you maximum performance computer!
- one of the main components of any computer. The amount of RAM greatly affects the overall performance of the computer. If there is not enough memory for current tasks, the computer will run slowly. In this material we will talk about how to add RAM to a computer and solve this problem.
Step No. 1. Determine the number of free slots for RAM.
If you want to add RAM to your computer, then the first thing you need to do is determine the number of free memory slots on your motherboard. This can be done using programs, but in this case there is a small risk of receiving incorrect information. Therefore, it is better not to be lazy and look for yourself. To do this, you need to completely disconnect the computer, lay it on its side and remove the side cover.
The RAM slots will be located to the right of the processor cooler. Budget or compact motherboards usually only have two slots. Mid-range motherboards usually have four slots, and the most expensive motherboards can even have eight memory slots (in this case they are located on both sides of the processor cooler).
RAM slots
Pay attention to how many slots are free. This is how many RAM modules you can add to your computer. If all the memory slots are already occupied, then in this case you can add RAM to the computer only by replacing the already installed memory.
Step No. 2. Determine the current memory configuration.
When adding RAM to a computer, you should strive to ensure that all memory modules are as similar as possible to each other. They should have the same volume, the same timings and naturally same type(DDR, DDR2, DDR3 or DDR4). Using identical memory modules will avoid possible problems with compatibility.
Therefore, since you have already opened the side cover of the computer, remove one of your memory cards and. There is usually a sticker on the RAM that has all the information you need written on it. You can read about how to remove and install a RAM module at the end of the article.

Sticker with RAM characteristics
If there is no sticker, then you can get information about the installed RAM using CPU-Z programs. Run this program on your computer and open the SPD tab. The characteristics of each RAM module will be indicated here.

Characteristics of RAM in the CPU-Z program
In the upper left corner of the SPD tab there will be a switch that you can use to switch between the characteristics of different memory modules.
Step No. 3. Buy new memory modules.
Based on how many free RAM slots you have, as well as the characteristics of the memory already installed, you can determine which memory modules are needed and how many of them can be installed. The ideal option is to find on sale exactly the same modules as you have on your computer, from the same manufacturer and with the same characteristics.
If you cannot find exactly the same memory, then buy modules from another manufacturer, the main thing is that their characteristics match those that you already have installed.
If you completely change all memory modules, then it is no longer necessary to maintain compatibility with old modules, the main thing is that the new ones are supported by your motherboard.
Step No. 4. Add RAM to the computer.
After required modules Once purchased, you can start using them. If you need to remove already installed modules, then to do this you need to release the two latches that are located on the sides of the module and, holding the module by its ends, carefully pull it out of the connector. In this case, you do not need to apply much force; the module should come out of the connector without difficulty.
Installing a RAM module
Installing the module into the slot proceeds in the same way. Open the latches on the sides and carefully insert the module into the connector on the motherboard. It is important to correctly orient the module in the connector. To do this, you need to pay attention to the connector and the module itself. There will be cutouts on the module that should match the jumpers on the connector (key). Usually the module gets into the desired position in two clicks. After the memory module is inserted into the slot, you need to close the latches on the sides of the connector. After this, you can assemble the computer.
Many users, after purchasing their first computer, are satisfied with their purchase for a long time, use it and are happy. However, over time, the appetites of operating systems, browsers, games and software grow, and the owner of the system unit is faced with a lack of RAM. A natural question arises - how to increase the computer's RAM. A similar need arises when, during work or play, the user begins to encounter system messages about lack of memory. For example,
How to add RAM
In fact, there is nothing difficult in finding an answer to the question of how to add RAM. This is a simple operation that can be performed by a person who has at least a little knowledge of computer components and has “straight” hands. To add RAM to your computer, you need to find out how much RAM is installed in the system unit. this moment, is it possible to increase the volume?
How to expand RAM on a computer
To find out whether it is possible to expand the RAM on your computer, you need to do certain things. However, it should be remembered that before changing the computer, you must completely turn off the power to the system unit.
RAM is sensitive to static voltage and can fail due to normal discharge of static electricity, so when installing additional RAM on your computer, you should avoid clothing and items that can accumulate static charges.
Find out the current amount of RAM
This can be done by clicking right click mouse over the “My Computer” icon and selecting context menu"Properties". Windows will show the amount of RAM installed in the system. In addition, this window will show which operating system installed - 32 or 64 bit. 32-bit OSes do not see more than 4GB of RAM. Additionally, even if you install 4GB of RAM on a 32-bit Windows user 3.75GB, 3.5GB or 3GB of RAM may be available, since part of the address space is reserved for the operation of the video card and other components with peripherals.


What type of RAM is supported. What RAM is currently installed?

How much RAM does the motherboard support?
The second stage is to find out how much RAM is supported by the motherboard. Most motherboards over 3 years old support no more than 8GB of RAM. Modern motherboards are designed to install up to 32GB of RAM, which meets modern development trends computer equipment. In addition, on older motherboards there may be a limit on the size of one RAM module - 2 or 4 GB. Detailed information information regarding your motherboard model can be found on the manufacturer’s website or specialized thematic resources.
Detailed information is provided special programs, for example Aida64 and Everest.


What does this information give us? And this is what she gives. We saw that in this computer The motherboard supports DDR2 RAM. The maximum allowed amount of RAM is 8GB. The motherboard has 4 memory modules of 1GB each. All 4GB are available to the user since Windows 7 64-bit is installed. IN in this case To increase the amount of RAM, you need to replace the memory modules from 1GB to 2GB (4 and 8GB modules are not supported by this motherboard model - information from the manufacturer’s website).


If there are free RAM slots (slots for modules) on the motherboard, you need to install the modules in these slots.
How to add RAM to a computer
The procedure is quite simple. Turn off the power to the computer (and unplug the power cord from the outlet). Remove the side cover and place the system unit on its side to make access to the motherboard easier. Next, open the side latches on the empty RAM slots (by pressing lightly, move them to the side opposite to the connector).

Updated – 2017-02-05
How to add RAM to a computer? Without memory, a computer cannot work. But even with a small memory, it will not be work, but only torment. Any file will take half an hour to open, and some may not open at all. And there’s nothing to say about games. They simply won’t load for you. What to do? How to add RAM to a computer? Is it really necessary to buy a new computer just for memory alone? I can reassure you. New computer no need to buy. Just add memory. It's easy to say, you answer. And I’ll answer you - it’s easy to do.
Nothing could be simpler. Try it once, and this operation will no longer be a problem for you.
More often than not, memory has to be added rather than changed. By itself, it is reliable and rarely fails. I have computers that are already 12-13 years old, and their memory has never failed. And so, we add memory to the computer.
First we need to figure out what kind of memory we need ( DDR, DDR 2 or DDR 3), and which maximum volume memory supported by your motherboard. If you have documentation for the motherboard, then look at what memory slots (connectors) are on your motherboard. If you don’t have documentation, you can look it up on the Internet. Well, if you cannot determine what kind of motherboard you have, then the easiest way is to remove the memory from your unit and show it to the seller.
Before touching the memory, be sure to remove it from yourself, otherwise you risk not adding, but changing the memory completely.
And so, you found necessary memory. Now let's see how to add memory to a computer:
- Disconnect your computer from electrical network. Completely disconnect all cables from the processor unit (keyboard, mouse, speakers, monitor, and other devices connected to it).
- Remove the left cover from the system unit.
- Locate an empty memory slot on the motherboard. They look like this (their color can be bright yellow or red and blue):

- Blow dust out of slots. Grab the memory carefully by the edges. Try not to touch microchips and other parts. Look where the key notch is on the slot and rotate the memory card so that the key on it aligns with this jumper when you insert the card into the slot.
