Which keys to press to reduce brightness. Reducing brightness in the monitor settings
Question from a user
Hello. The brightness on my laptop began to change spontaneously: when the image is dark, the brightness drops, and when it is light, it is restored to its normal level.
How can I get rid of this problem, otherwise my eyes are starting to get tired because of it? OS: Windows 8, graph. accelerator (video card) Intel HD 4000 (built-in).
Good day!
This problem began to appear more and more often after the release of Windows 8 (this OS introduced the ability to adaptively adjust the brightness, depending on the picture on your screen). Also, some laptops are equipped with special software and sensors that determine the level of light in the room and use it to adjust the brightness of the screen.
There is nothing wrong with this, but in certain cases such a change does not allow it to work normally and interferes with the user. In this article I will tell you in detail how you can disable this. spontaneous change brightness...
Eliminate automatic monitor brightness changes
1) Disable adaptive brightness control
This is the first thing to do. This option is available in Windows 8, 8.1, 10. Those who have Windows 7 can omit this part of the article.
You need to open the power settings section:
- or via the following address: Control Panel\Hardware and Sound\Power Options
- or by pressing the Win+R keys and entering the command powercfg.cpl (see screenshot below).

In power settings: follow the link "Setting up the power plan" in the selected mode (in the screenshot below - this is balanced mode. The selected mode is marked in bold black).


Now find the tab among the settings "Screen" and open it. Here in the tab there are 3 key settings:
- screen brightness from battery and network: set the values that suit you;
- screen brightness level in dim mode: set exactly the same values that you have specified in the tab "Screen brightness";
- turn off adaptive adjustment brightness from mains and battery (see screenshot below).
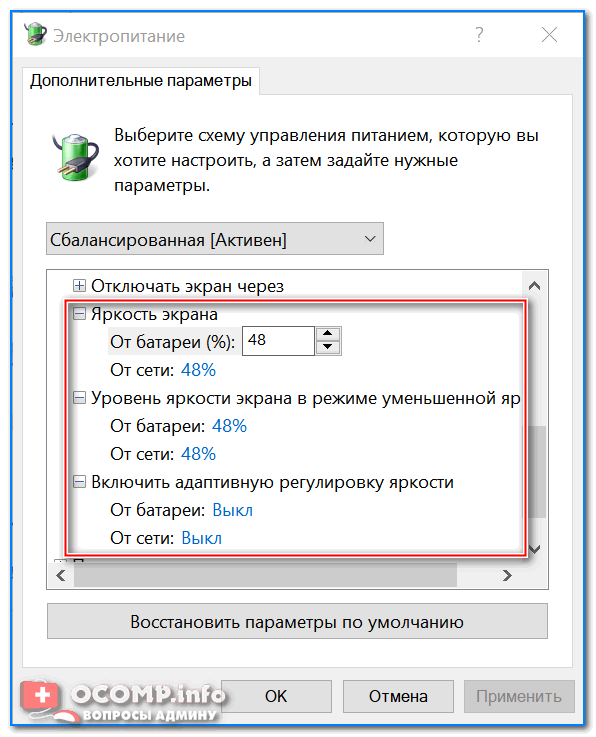
Now save the settings and try to look at light and dark pictures (for example) to evaluate whether the brightness changes. Usually, similar settings completely eliminates this problem...
Update 06/10/2018
If you are using Windows 10, pay attention to its control panel (to go to it, press Win+i). In chapter "System/Display" there is a special a setting that allows the laptop to change brightness as the ambient light changes. Turn it off too!

2) Setting up the power supply for the video card
The laptop itself can reduce the brightness under certain operating modes. For example, IntelHD video cards support display energy-saving technology and extended runtime in games when running on battery power. Similar technologies are available in both AMD and nVidia.
First you need to go to the settings of the video card driver (you can do it through - see the screenshot below), or you can do it through the tray icon, next to the clock.

Settings Intel graphics(trey)

Important!
If you do not have a tray icon, and there is also no link to graphics settings in the control panel, most likely you do not have the drivers installed (it is likely that you have a “universal” driver that was installed when Windows installations). In this case, I recommend programs for updating drivers:
They need to set the following:
- set the energy saving parameter to maximum performance mode;
- disable extended runtime for games on battery power;
- disable the display energy saving technology (screen below - see arrows).

Note!
For example, in video cards from AMD - you need to open the "Power" section, then turn on maximum performance, and disable Vari-Bright technology (this AMD technology, allowing you to adjust the brightness).
Vari-Bright disabled! (AMD Graphics settings) / Clickable

3) Sensor monitoring service
There is one service in Windows that monitors sensors and adjusts the display lighting, depending on the lighting of the room in which your device is operating.
I can say that sometimes the service does not work correctly and can affect the brightness adjustment, even if you do not have any sensors!
How to disable sensor monitoring services
Open a window with services: the easiest way is to press keys Win+R, enter services.msc, press Enter. The method works in all versions of Windows.

Next in the list you need to find the service "Sensor Monitoring Service" , open it. In the column "startup type" set [disabled], and stop the service itself, so that the status appears as "Stopped" (see screenshot below).
Then save the settings and restart the laptop.
4) Laptop control center
Certain laptop models include a control center among the software installed with the drivers. For example, in the line of VAIO laptops from SONY there is VAIO control center .
In this control center, for example, you first need to open the tab "Power supply" and set high performance, as well as disable the function that extends battery life (see screenshot below).

High Performance // Power // VAIO Control Center

Picture Quality // VAIO Control Center
Actually, it is hardly possible to give a description for each of these centers. The VAIO Center is shown above as an example of such software.
There is also something similar in Lenovo laptops: various night modes, dynamic changes in brightness, contrast and other things can significantly change the quality of the picture on the screen. It is recommended to disable them all (by at least at the time of setup and adjustment).
5) Problems with hardware
A change in screen brightness may be due not only to software settings, but also with faulty hardware. In what cases can you determine that the laptop hardware is to blame:
- if not only the brightness has changed on the screen, but also stripes, ripples, and dots began to run (as in the example below);
- if when you increase/decrease the brightness on the monitor, absolutely nothing happens;
- if the brightness changes even without changing the picture on the screen and without changing the lighting conditions in the room;
- if the brightness in different parts of the screen is different.
To help!
If you have stripes and ripples displayed on your monitor, I recommend that you read my other article:

Stripes and ripples on the screen / As an example
Good luck!
It is not surprising that many users want the computer screen to display the highest quality and most acceptable image for a particular user’s eye under certain lighting conditions. This can be achieved, among other things, by adjusting the brightness of the monitor. Let's find out how to handle this task on a PC running Windows 7.
One of the most simple ways Changing the brightness of the screen means making adjustments using the monitor buttons. You can also solve this problem using BIOS settings. But in this article we will focus on the possibilities of solving the problem specifically Windows tools 7 or using software that is installed on a computer with this OS.
All options can be divided into 3 groups:
- Adjustment using third-party software;
- Adjustment using the video card management application;
- OS Tools.
Now we will look at each group in more detail.
Method 1: Monitor Plus
First, we will learn how to solve the stated problem using third party program designed to manage Monitor Plus.
- This program does not require installation. Therefore, after downloading it, simply unpack the contents of the archive and activate executable file Monitor.exe application. A miniature program control panel will open. In it, numbers separated by a fraction indicate the current brightness (in first place) and contrast (in second place) of the monitor.
- In order to change the brightness, first of all, make sure that the Monitor Plus header is set to "Monitor - Brightness".
- If the value is set there "Contrast" or "Color", then in this case, to switch the mode, click the element "Following", presented in the form of an icon «=» , until the desired value is set. Or use a combination Ctrl+J.
- After the program panel appears desired value, to increase brightness, press "Increase" icon shaped «+» .
- With each click on this button, the brightness increases by 1%, which can be observed by the change in indicators in the window.
- If you use the hotkey combination Ctrl+Shift+Num+, then with each set of this combination the value will increase by 10%.
- To decrease the value, click the button "Decrease" in the form of a sign «-» .
- With each click the indicator will be reduced by 1%.
- When using a combination Ctrl+Shift+Num- the value will be reduced immediately by 10%.
- You can control the screen in a miniature state, but if you want to more precisely set the viewing settings various types content, then click on the button "Show - Hide" in the form of an ellipsis.
- A list of content and PC operating modes opens, for which you can set the brightness level separately. The following modes exist:
- Photos (Photo);
- Cinema;
- Video (Video);
- Game;
- Text(Text);
- Web (Internet);
- User.
- After this, the monitor settings will change to those that correspond to the selected mode.
- But if for some reason the values assigned to you do not suit you a certain regime default, they can be easily changed. To do this, select the name of the mode, and then in the first field to the right of the name, enter the percentage value that you want to assign.


Method 2: F.lux
Another program that can work with the settings of the monitor parameter we are studying is F.lux. Unlike the previous application, it is capable of making adjustments automatically for specific lighting, according to the daily rhythm in your area.
- After downloading the program, you should install it. Run installation file. A window opens with license agreement. You need to confirm it by pressing "Accept".
- Next, the program is installed.
- A window is activated where you are prompted to restart the PC to fully configure the system for F.lux. Save your data in all active documents and exit applications. Then click "Restart Now".
- After rebooting, the program detects your location automatically via the Internet. But you can also specify your default location in case there is no Internet. To do this, in the window that opens, click on the inscription "Specify a default location".
- The built-in utility of the operating system opens, in which you should specify in the fields "Postcode" And "A country" relevant data. It is not necessary to provide any other information in this window. Click "Apply".
- In addition, simultaneously with the previous system windows The F.lux program window will open, in which your location will be displayed according to information from the sensors. If it's true, just click "OK". If it does not correspond, then indicate the point real location on the map, and then click "OK".
- After this, the program will automatically adjust the most optimal screen brightness depending on whether it is day or night, morning or evening in your area. Naturally, for this F.lux must be constantly running on the computer in the background.
- But if you are not satisfied with the current brightness that the program recommends and sets, you can adjust it manually by dragging the slider to the left or right in the main F.lux window.


Method 3: Video card management program
Now we’ll find out how to solve the problem using a program for controlling a video card. Typically this application is available on installation disk, supplied with the video adapter, and is installed along with the drivers for the video card. We will look at the actions using an example.
- The program for controlling the video adapter is registered in autorun and starts along with the operating system, working in the background. To activate it graphical shell, move to the tray and find the icon there "NVIDIA Settings". Click on it.

If for some reason the application is not added to autorun or you forcefully terminate it, you can launch it manually. Go to "Desktop" and click on free space right click mice ( RMB). In the activated menu, press "Panel NVIDIA management» .

Another option for launching the tool we need involves activating it through "Panel Windows management» . Click "Start" and then go to "Control Panel".
- In the window that opens, go to the section .
- Once in the section, click on "NVIDIA Control Panel".
- Starts "NVIDIA Control Panel". In the left area of the program shell in the block "Display" move to section "Adjust desktop color settings".
- The window for adjusting color parameters opens. If several monitors are connected to your computer, then in the block select the name of the one you want to configure. Next, go to the block "Choose how you want to set the color". To be able to change parameters through the shell "NVIDIA Control Panels", switch the radio button to position . Then go to the option "Brightness" and drag the slider left or right to decrease or increase the brightness accordingly. Then click "Apply", after which the changes will be saved.
- You can set the video settings separately. Click on the item "Adjust video color settings" in the block "Video".
- In the window that opens in the block "Select the display whose settings you want to change" select the target monitor. In the block "How to make color adjustments" move the switch to position "Use NVIDIA settings» . Open the tab "Color", if another one is open. To increase the video brightness, drag the slider to the right, and to decrease it, drag it to the left. Click "Apply". The entered settings will be applied.


Method 4: Personalization
The settings we are interested in can be adjusted using exclusively OS tools, in particular the tool "Window color" In chapter "Personalization". But for this, one of the Aero themes must be active on the PC. In addition, it should be noted that the settings of not everything displayed on the screen will be changed, but only the borders of the windows, "Taskbars" and menu "Start".


Method 5: Color Calibration
Change specified parameter monitor, you can also use color calibration. But you will also have to use the buttons located on the monitor.
- While in the section "Control Panels" "Design and personalization", click "Screen".
- In the left block of the window that opens, click "Color Calibration".
- The Monitor Color Calibration Tool launches. In the first window, read the information presented there and click "Further".
- Now you need to activate the menu button on the monitor, and in the window click on "Further".
- The gamma adjustment window opens. But, since we have a narrow goal to change a specific parameter, and not to produce general setup screen, then click on the button "Further".
- In the next window, by dragging the slider up or down, you can set the brightness of the monitor. If you drag the slider down, the monitor will be darker, and if you drag it up, it will be lighter. After adjustment, press "Further".
- After this, it is proposed to proceed to control the brightness adjustment on the monitor itself by pressing the buttons on its body. And in the color calibration window, click "Further".
- The next page suggests adjusting the brightness, achieving the result as shown in the central picture. Click "Further".
- Use the brightness controls on your monitor to ensure that the image in the window that opens matches as closely as possible the central image on the previous page. Click "Further".
- After this, the contrast adjustment window opens. Since we are not faced with the task of adjusting it, we simply press "Further". Those users who still want to adjust the contrast can do this in the next window using exactly the same algorithm as they previously adjusted the brightness.
- In the window that opens, as mentioned above, we either adjust the contrast or simply click "Further".
- The color balance settings window opens. This settings item within the topic under study does not interest us, and therefore click "Further".
- In the next window also click "Further".
- A window then opens telling you that new calibration successfully created. It is immediately proposed to compare the current version of calibration with the one that was before the introduction of adjustments. To do this, press the buttons sequentially "Old calibration" And "Current calibration". In this case, the display on the screen will change according to these settings. If, when comparing the new brightness level option with the previous one, you are satisfied with everything, then you can finish working with the screen color calibration tool. You can uncheck the box "Run ClearType Configuration Tool...", because if you only changed the brightness, you won't need this tool. Then press "Ready".


As you can see, the ability to adjust the brightness of computer screens is exclusively standard tools The OS in Windows 7 is quite limited. This way you can only adjust the parameters of window borders, "Taskbars" and menu "Start". If you need to completely adjust the brightness of the monitor, then you will have to use the buttons located directly on it. Fortunately, there is a solution this problem by using a third party software or video card management programs. These tools will allow you to perform full customization screen without using the buttons on the monitor.
It has a significant effect on the comfort of working at the computer. This is especially important if you work in a dimly lit room or dark time days. In such conditions, it is advisable to reduce the monitor brightness below standard level, in order to reduce eye strain.
In this article we will look at two ways to reduce the brightness of a computer monitor. At the same time, the material will be useful for everyone modern versions Windows, including Windows 7 and Windows 10.
There are two ways to reduce the monitor brightness on your computer. The first method is to use the video card control panel.
To do this, right-click on the desktop and go to the video card control panel. If you have a video card from NVIDIA, then the item you need context menu will be called " ".
After opening the “NVIDIA Control Panel”, you need to go to the “Adjust desktop color settings” section, which is located in the “Display” settings block.

Next you need to enable the “Use NVIDIA settings” option and reduce the brightness of the monitor using the “Brightness” parameter. To save the selected brightness settings, do not forget to click on the “Apply” button, which is located at the bottom of the window.

In the case of a video card from AMD, everything is almost the same. You need to right-click on the desktop and select “AMD Radeon Settings" or " Catalyst Control Center". This will open the video card control panel. Next you need to go to the “Desktop Management – Color” section

And reduce the brightness of the monitor using the “Brightness” setting.

The video card control panel on your computer may differ from what is shown in the screenshots, as it depends on the driver version you have installed. But, if you spend a couple of minutes exploring your control panel, you will definitely find settings that will allow you to reduce the brightness of your monitor.
Reducing brightness in the monitor settings
You can also reduce the brightness of the monitor by adjusting the monitor itself. To do this, you need to click on the “Settings” or “Menu” button, which is usually located on the bottom or side of the device.

After this, you need to scroll through the monitor settings using the arrow buttons and explore what options are available there.

Typically, using monitor settings, you can increase or decrease parameters such as brightness, contrast, clarity, and color temperature. To reduce brightness select this parameter and change it using the arrow buttons. After reducing the brightness, simply exit the monitor settings using the “Exit” button.
It should be noted that the methods described above for reducing monitor brightness are used mainly on stationary PCs, since laptops have simpler and available options. You can read more about reducing brightness on a laptop.
Unfortunately, adjusting the brightness of the monitor without using third-party software operating system Windows 7 is almost impossible.
One way to adjust the brightness of the monitor is to use the buttons that are located on the body of the device itself. This option is either immediately displayed on the panel or located in the menu. That is, the brightness adjustment button may be immediately present next to other buttons, or hidden in a special menu that opens through the button of the same name. If the settings on your monitor are only English language, then the brightness in them is called “brightness”.
Then, when you find this function, all you have to do is select the optimal brightness level using the remaining buttons on the monitor. I think you can figure this out without any problems, it’s just that everyone’s monitors are different, so it doesn’t make sense to give an example on mine.
You can also adjust or reduce the display brightness using the video card driver, or rather its settings. I use it on my computer Nvidia video card, so I will give an example on it. Drivers for other video cards have similar or very similar sets of settings tools.
First we need to open " NVIDIA Control Panel". Then in the menu click on " Adjusting Desktop Color Options" and point " Select color setting method"check the box opposite" Use NVIDIA settings
".

Below you will see sliders, by moving one of which you can change the brightness of the monitor (it is also called “Brightness”).

Some users on the Internet also recommend changing the "Power Plan", but for desktop computers this option doesn't work. More current method- install a brighter theme for the desktop, but this method will also not give the desired result.
You can work, play or spend time on the Internet at the computer at different times of the day. For example, during the day in good lighting, the screen should also be bright enough so that what is displayed on it can be clearly seen without having to look closely. But at night, on the contrary, it is better that it is a little muffled and does not hit the eyes.
Therefore, in this article we will figure out how different ways You can change the screen brightness on your computer or laptop.
Let's start with PC. Everything is quite simple here. Since there is no need to save battery power, the brightness is adjusted here relatively rarely. For this purpose, special buttons located on the monitor are used. They can be located either below or slightly behind. Find among them the one with the icon in the form of a sun and a pointer. If the pointer is pointing down, this means a decrease in brightness; if the pointer points up, it means an increase.
Now I’ll tell you about laptops. Here this procedure used more often, especially if the device is unplugged and you need to slightly increase its battery life.
To do this, you can use the “Fn” key in various combinations, which differ depending on the manufacturer of your laptop. Let's give examples of the most popular ones.
If you have ASUS then hold down “Fn” and press the “F5” button to lower, or “F6” to add brightness.

On Lenovo laptops, this is done using the up and down arrows. Press "Fn" and then the desired button. Just pay attention, for example, in the screenshot the arrow points up, and under it there is an orange sun with a downward pointer, which means this button will reduce the brightness.

On HP, the combinations can be different or, as in the figure below, “Fn” and “F2-F3”, or “Fn” and “F9-F10”.
If you have a device from another manufacturer, then I think you understand what buttons to look for. They should have an image of the sun - one larger, the other smaller.

The second way of adjustment is through "Control Panel". Click on the button and select the desired item, for those who have Windows 7. If you have Windows 10 installed, then right-click on Start and select the item of interest.


At the bottom of the window that opens there will be a slider, which you can move either to the right towards the sun, or to the left, then the brightness decreases.

In this window you can set the display brightness separately for running the laptop on battery and mains power. Remember that the smaller it is, the longer the charge will last. At the end, don't forget to click "Save changes".

You can open the required window in another way. Click on the battery icon in the lower right corner and select the item that interests us.

The third way is to adjust the brightness via installed drivers for a video card. Find it in the list of Control Panel items and click on it.

Or expand it in the tray hidden apps and click on the video card icon.

Then you need to select the item "Graphic characteristics".

Another option is to right-click on empty space on the desktop and select the desired item from the menu that opens.

Whatever option you choose, a window like this will open. I have an Intel video card, so it looks like this. If you have a different manufacturer, the appearance of the window will be different.
Here in the left menu you need to find an item so that the “Brightness” field appears in the middle area. Move the marker to the appropriate value. Then click "OK".

That's all. I think now you can easily adjust the brightness of your screen on your computer or laptop. As for me, adjustment using the key combination with Fn is the simplest, and you choose the method that suits you.
Rate this article: