How to select safe mode on Windows 10. Entering safe mode using the SHIFT key
If problems arise with Windows computer, one of the first troubleshooting steps is to download and run in safe mode Windows. Safe Mode is a simple, stripped-down version of the operating system that loads only the most important files and drivers. In safe mode, you can fix a number of errors with drivers and cure your computer of viruses that prevent the system from starting up stably. If earlier you could enter the familiar Windows 7 using the F8 button when you start the computer, then Windows 10, 8 no longer have this function, but there is a trick that will help you return the F8 button to enter safe mode when you turn on your computer with Windows 10 In this guide, we'll look at how to enter and launch Safe Mode in Windows 10 from the desktop and return the familiar F8 button to always enter through it, and we'll look at how to disable Safe Mode to avoid cyclic booting.
Note: The easy ways are at the bottom, provided you can boot into your desktop.
How to start Safe Mode when booting Windows 10
If Windows system 10 won't load until home screen and you need to go into or start safe mode when turning on Windows 10 through the “BIOS”, as for example before in Windows 7, with the F8 key, then you will need to get into the Windows 10 recovery environment using other methods, which are described below. It can be created on another working computer or while yours was still working.
Note: If you can boot to your desktop, then launch Command Prompt as an administrator and proceed to step 3.
Step 1. When you started with installation flash drive, then get to the point installations and click on the link below " System Restore".
Step 2. You will be transferred to additional windows settings 10. Next, go through the parameters Troubleshooting > Extra options > Command line.

Step 3. Enter the following code into the command line (you can copy it in its entirety, you can enter each command via Enter):
c:
bcdedit /set (default) bootmenupolicy legacy
exit

Step 4 . You can now start in safe mode using the key F8 on Windows 10, press the button F8 continuously during system boot until the menu appears with download methods. If you want to go back to how it was, then enter instead of legacy > standard. There will be the following type of command bcdedit /set (default) bootmenupolicy standard .
- Press the restart button on the computer itself many times in a row to trigger an error and bring up the process diagnostic menu.
- Turn on the computer, wait until it boots as much as possible before the error occurs. Next, press and hold the power button on your computer to complete shutdown. Repeat the procedure 3 times, by the 4th time you should see a recovery menu.
- If all else fails, then follow Step 1.
How to add Safe Mode to the OS boot selection menu
Windows 10 now has additional startup options. This will look the same as if you have multiple versions of the OS installed on your computer. If you often use safe mode, then setting up the menu when choosing an OS will be very excellent and convenient. In the picture below I have configured some settings for myself. Let's look at this method.

Note: Before performing this method, read it from the beginning to the end and you will understand the meaning.
Step 1. There will be three commands for the three menus created. Maybe you don’t need three, but only need one menu with safe mode. Launch Command Prompt as Administrator and enter the following commands of your choice.
- bcdedit /copy (current) /d "Safe Mode"- Let's create a safe mode boot.
- bcdedit /copy (current) /d "PSU with network"- Let's create a safe mode boot with a network (Internet access).
- bcdedit /copy (current) /d "BP CMD"- Let's create a safe mode boot with the command line.


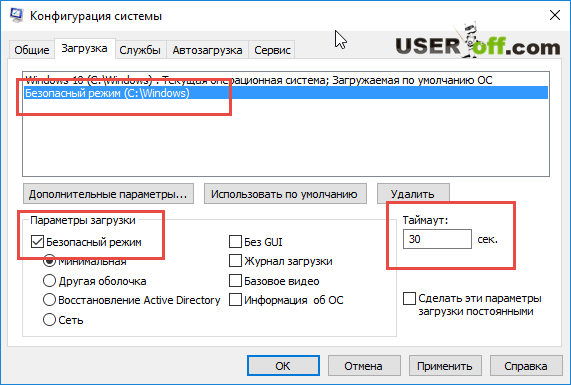
Step 3. The system configuration will open, go to the "" tab. We will see the list that was specified via the command line above. Let's customize each menu.
1) . Select "safe mode" from the list at the top and click on the checkmark at the bottom and select " Minimum". Next, check the "" box and click apply. You can also set a menu timer, for example, after 10 seconds it will automatically load just Windows 10. This way the boot menu will appear in safe mode.

2) . Select "PSU with network" from the list and select "Network" from the bottom and check the " Make these boot options permanent". Click apply and this way we can load safe mode with the network, i.e. with the ability to access the Internet.

3) . Highlight "BP CMD", below select " Another shell"and check the box" Make these boot options permanent." Click Apply and OK.

How to enter Safe Mode in Windows 10
Step 2. You will find yourself on Wednesday windows recovery 10. In this environment, you can reset settings, restore system and much more. In the recovery environment, click on Troubleshooting.

Click the button Reboot.

Click on your keyboard F4 to begin the procedure of starting Windows 10 in safe mode.

How to enter safe mode in Windows 7
Method 1. Windows 7 starts when you press a button F8. Once you have turned on or restarted your computer, press the F8 button at 1 second intervals. The method will work and to Windows XP. After calling up the menu additional settings, select a download option.

The developers of Windows 10 have provided for system recovery processes to take place in automatic mode, but they still retained the ability to enter safe mode. However, familiar to earlier versions of the OS Windows method Login using the “F8” key no longer works in Windows 10.
How to activate a familiar function? What keys and buttons should I press when loading the OS to start in safe mode? Below is detailed description in various ways For Windows boot 10 in safe mode.
Enable Windows 10 to boot in safe mode via msconfig.
To do this you need:
- Press the key combination “WIN” + “R”;
- IN text area enter the command - “msconfig”;
- Confirm by clicking “OK”;
- Then in the menu that appears, open the “Download” tab;
- Select the operating system with a single click of the left mouse button and check the box in the “Safe Mode” column;
- Also in this window, the user can select OS boot modes; it is recommended to leave the “Minimal” checkbox by default;
- Click “Ok”;
- Ready. After restart Windows 10 should boot in safe mode.
Note: To start Windows in normal mode, you need to uncheck the “Safe Mode” box using the same instructions.
This may seem strange to experienced users, but it is very important not to confuse Safe Mode with and be aware of the differences.
Logging into Windows 10 in Safe Mode - Settings.
To restart Windows and open it in safe mode, you need to change the startup options. To do this you need:
- Go to the Start menu;
- Click “Options”;
- Next, in the window that appears, go to the “Update and Security” tab;
- Then in the menu that appears, open the “Recovery” tab;
- Click the “Restart Now” button;
- After that, click “Diagnostics”;
- Click “Advanced options”;
- Next, enter the “Download Options” menu;
- Click “Reboot”;
- Wait for the menu to appear on the monitor additional options start the computer and highlight the appropriate boot method, click on “Enter”;
Logging in safe mode allows you to solve many problems, such as when or you need to change tables, etc.
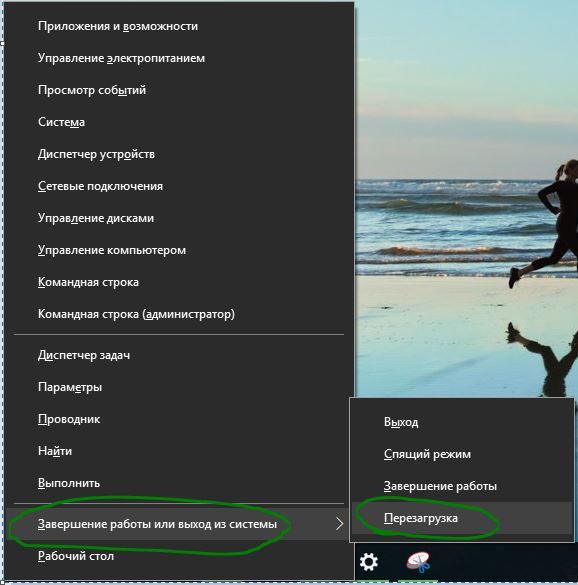
Reboot+Shift starts Windows 10 in safe mode.
The algorithm of actions consists of several sequential stages:
- Enter the “Shutdown” window through the “Start” button;
- Next, hold down “Shift” and click “Reboot”;
- Then using previous instructions restart the PC.
But all these methods work when you can log into Windows 10 and it starts up successfully. What should you do if problems, such as others, occur when logging in? Let's look below.
Login to Safe Mode if Windows 10 won't start at all.
If all the above methods did not help, then you need to use a removable installation media systems, boot disk or USB flash drive.
Algorithm of actions in this situation:
- Boot from a disk or flash drive by changing the startup settings in the BIOS;
- After downloading, select the “System Restore” section;
- Next, go to the “Diagnostics” section;
- Enter the “Additional parameters” subsection;
- Click “Command Line”;
- In the console that appears, type bcdedit /set (globalsettings) advancedoptions true
- Press the “Enter” and “Continue” keys;
- Wait for the additional startup options menu to appear on the monitor and select safe mode;
To restore the standard launch option, you will need to call context menu“Start” - “Command Prompt” and enter the command:
Bcdedit /deletevalue (globalsettings)advancedoptions
When you restart, Windows 10 will work normally.
Here are some simple ways to start Windows 10 in safe mode. If you have anything to add, leave comments below.
The purpose of safe mode is to boot the system in a special mode with minimal use of drivers, utilities and settings. It is very often useful when any problems arise with the operation of the computer. This may be the neutralization of any viruses, search spyware, incorrect operation of the device driver or complete system inoperability up to a blue screen. In these instructions, you can find several options on how to enter Windows 10 safe mode and how to disable it in some cases.
IN earlier versions operating systems, it was very easy to boot into safe mode during boot by pressing the F8 key. But for some reason Microsoft decided to remove this feature.
How to enter Windows 10 safe mode using the reboot command
What's new is the way the system switches to Safe Mode boot mode - through the reboot command. In more early Windows there was no such method and the developers very successfully came up with a key combination with the reboot command.
Step 1: First click on the "Start" button, then on Shutdown and in the menu before clicking on "Restart" press and hold down the Shift key. The system will automatically display an option screen and a menu for selecting the boot method.
While holding down the Shift key, we reboot the system
Step 2: On the first screen, click on “Diagnostics”.

Step 3: On the second screen, select the “Advanced Options” menu item.

Step 4: On the Advanced Options screen, go to Boot Options.

Select download options
Step 5: Confirm reboot to boot the system in a special mode to select the safe mode method.

Step 6: After rebooting, you will see a screen with options. To select one of the types of safe mode, press the F4, F5 or F6 keys. These correspond to menu parameters 4, 5 and 6 respectively. This is what Safe Mode corresponds to in Windows 10.

Enable Safe Mode in the system configuration utility
Exactly the same as in previous versions operating systems (Windows 7 and Windows 8), starting Windows 10 in safe mode is possible through the system configuration service.
Step 1: Press the keyboard shortcut on Windows keyboard+R and enter “msconfig” to launch the configuration utility. After pressing OK or Enter, the system configuration window should open.

Step 2: At the top in the tabs, go to “Download”. This tab allows you to configure the operating system boot parameters. The first thing you need to do is select the operating system for which you need to set safe mode boot parameters. If you have several operating systems, select the one you need. In the boot options, enable “Safe Mode” and select “Minimal” in the options. “Minimal” launches the standard boot mode, “Another shell” allows you to launch the command line, and “Network” adds network support. In the “Timeout” options, specify the time in seconds that will be set when selecting a boot mode before starting the operating system. If you want the safe mode boot option to be selected permanently, check the “Make these boot options permanent” checkbox.
Click “Ok” and restart your computer. After rebooting before starting, the system will give two startup options. One is a normal Windows 10 boot and the second is a Windows 10 boot in safe mode.

Using the Command Line
To quickly create a Safe Mode boot mode, you can use a Command Prompt with administrative rights and enter the command to create a new boot mode.
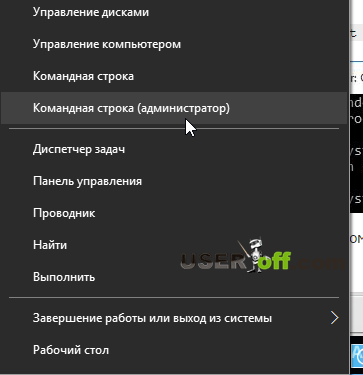
Step 1: Click right click mouse on the "Start" button and in the list of commands, launch "Command Prompt (Administrator"). This type command line has the ability to make changes to the system where administrator rights are required.

Step 2: Enter the command in the command prompt window:
bcdedit /copy (current) /d “Safe Mode”
This command creates in the "Boot" section of the system configuration additional option launch Windows, which will be called “Safe Mode”.

Step 2: Reboot the system and at startup select the second startup option “Safe Mode”. This boot method selection option will always be present before startup.

Step 3: To disable Safe Mode on Windows 10, you need to run the System Configuration Utility. To do this, press the Win+R keys and enter the command “msconfig”.

Step 4: As you can see, the system now has a permanent option to select the download type. To delete, select this entry and click "Delete". After this option, the option to boot into safe mode will be disabled.

Safe Mode in Windows is a kind of “cure” for the ailments that plague your computer. Its essence is to load the operating system, and preferably nothing more. All programs from automatic start, all services, drivers, and possibly viruses will not run in safe mode so that you can identify and fix the cause of your computer's malfunction. In Windows 10, the developers removed convenient function entering safe mode using the F8 key, so I decided to tell you how to enter safe mode Windows mode 10 other ways:
- Through the reset button;
- Through the system configuration utility (msconfig);
- Advanced method using the command line;
- Using special download options;
- Using installation disk with Windows 10.
Attention! If you don't understand how to perform these methods, there is a video below that will help you figure this out.
Safe Mode with Restart Button
This method is convenient and simple, so I decided to talk about it first. You need to click on “Start”, then on the “Shut down” button. A menu will pop up with three ways to shut down; hold down the “Shift” key and select “Reboot”.
The monitor image will turn blue and the message “Please Wait” will appear. After loading, we will see three possible options further actions. The first allows you to continue working on the computer, the second takes you to a further selection menu, and the third shuts down the operating system. You need to select the second option “Diagnostics”.

The Diagnostics menu appears. Now you have to click on “Advanced Options”.

If we click on it, we will see a menu with many icons, select the “Boot Options” item, which will allow us to configure the Windows boot settings to get into safe mode.

Here you will find system boot options that will allow you to select safe mode. Now you need to click on “Restart”:
After a quick reboot you will see blue screen with boot options. We are interested in the options that are under points: 4, 5 and 6. They differ from each other in the loaded drivers and services that can allow network mode or command line. But we need to select the mode number 4, to do this, press the F4 key.
Starting Safe Mode with msconfig
The utility is very useful tools in working with the operating system. Using it, we will now launch safe mode in Windows 10.
To start it this program You need to press the key combination “Win” + “R” on your keyboard and enter “msconfig” in the window that appears, click “OK”. You can also launch the “Run” window more in a simple way– right-click on “Start” and select “Run”.
The system configuration window appears. It contains five tabs, each of which is responsible for specific functionality. Go to the “Boot” tab, it contains settings for safe mode. The first step is to choose an operating system that will boot securely.
In the group of elements called “Boot Options” you need to check the box next to “Safe Mode”, under it you can use the switch to select the boot type, minimal – standard mode, another shell – allows you to use the command line and network – allows you to work with local network and the Internet. We will also set a parameter that defines the timeout, i.e. a time delay before selecting a boot type before starting the operating system.
If such boot settings for a given OS should be made permanent, you can check the box next to the corresponding item. Done, all you have to do is click apply and the next time you reboot you will be asked to choose which mode to start Windows 10 in.

After you go into safe mode and do everything necessary actions, you can go to msconfig and do a normal system boot.
Using the Command Prompt to Enter Safe Mode
I find this method quite advanced and interesting. We will need a command line, to launch it, right-click on “Start” and select “Command Prompt (Administrator)” from the menu that appears.
A small black window appears into which you can enter various commands that the program will execute with the specified parameters. Let's enter the following line: bcdedit /copy (current) /d “Safe Mode”(or any other name) and press Enter. You can now close the command prompt.
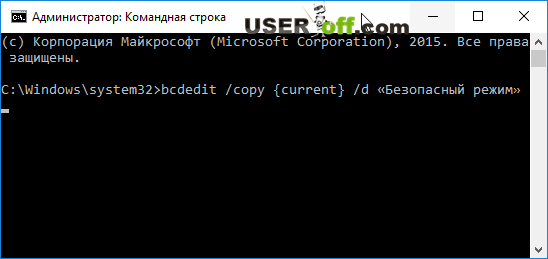
The above command will create new parameter in the msconfig program (we looked at it earlier). In the "Download" section you will see new opportunity launch the operating system, which will be called “Safe Mode”.
When you go to “System Configuration” and go to the “Boot” tab, you need to click on the 2nd item - “Safe Mode (C:/Windows)” and check the box next to “Safe Mode”. Also pay attention that the timeout is at least 10, since if it is less, you may not have time to select the parameter you need.
Now this option will always be present on your system; if it interferes and creates some inconvenience, then this function can be disabled. To do this, you need to run the utility - press the “Win” + “R” keys and enter “msconfig” and press Enter.
A familiar window will appear, go to the “Download” tab. To delete, select the desired item with the left mouse button and click on the “Delete” button.

Now when you turn on the computer, everything will happen without delay.
Special download options
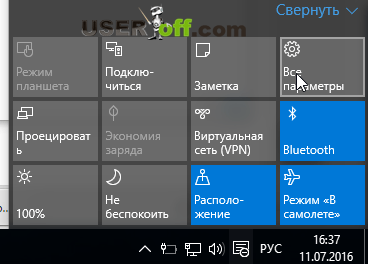
To use this method, click on the notification icon in the lower right corner of the desktop. And select “All parameters”.

The next stage and all subsequent ones are the same as in the first method described in this article, we confirm the reboot.
The computer will begin shutting down before starting Windows A window for selecting a download method will appear. Options 4,5 and 6 correspond to the F4, F5 and F6 keys. All these modes are briefly described in the first method discussed in this article.
Bcdedit /set (default) safeboot minima l and press Enter. Now restart your computer and you will automatically be in safe mode. If you need to return it to its original state (as it was), then enter bcdedit /deletevalue (default) safeboot.
You can also use another method, enter bcdedit /set (globalsettings) advancedoptions true into the command line and then reboot the system. Next, the system will show boot options, where there will be a safe mode. To disable this option, you need to enter in the command line bcdedit /deletevalue (globalsettings) advancedoptions. Attention! This command can be entered in normal Windows mode.
You can launch the System Configuration utility using the search built into the taskbar. Just enter your request and click on the top line in search results. In the window that appears, go to the “Download” tab and check the “Minimal” option. Confirm your choice by clicking on the “OK” button. A dialog box will appear asking you if you want to restart your computer right now. After your consent operating system Windows 10 will boot into Safe Mode.
Method 2: Command Line
Experienced users should remember that you can boot the system in safe mode by holding down the F8 key when starting the computer. However, in Windows 10 this feature was disabled to speed up system startup. To fix this “improvement”, you need to enter just one command at the command line.

- Right-click on “Start” on the taskbar and select “Command Prompt (Admin)” from the menu that appears.
- Type in the command prompt window next command: bcdedit /set (default) bootmenupolicy legacy
- Press Enter. Close the terminal window and restart your computer. Now, when you press the F8 key during system startup, the boot method selection dialog should appear again.
If in the future you want to return everything as it was, you can do this using the following command:
Bcdedit /set (default) bootmenupolicy standard
Method 3: Special download options
This method does not require any tricks from you and seems to lie on the surface. However, how many can boast that in the wilds Windows settings 10 discovered this on their own useful opportunity? Therefore, I decided to include this download method in the article too.
So, open the “Start” menu, click on the “Settings” link, and then follow the address: “Update and Security” → “Recovery” → “ Special options downloads". Click the “Reboot Now” button. You will then be taken to the Select Action screen. It offers three options, of which we are interested in the “Diagnostics” item.

On the next screen, click the “Advanced Options” button and then “Boot Options”. At the end of this long way We are waiting for the desired option called “Enable Safe Mode”. By the way, you can significantly shorten this journey if you simply hold down the Shift button while clicking on the “Shut Down” command in the “Start” menu.