How to restore Windows 7 if it won't boot. We use standard OS tools
Critical errors when starting Windows 7 occur for many reasons: due to hardware failure, due to problems with the system itself, or due to crashes software. In some cases, a direct relationship between cause and effect can be traced if a failure occurred after installing an application, driver, connecting a new device, etc. In other cases, the source of the error is difficult to determine.
Hardware problems
Problems that arise before you start Windows boot 7 are related to equipment, so just a few words about them. The culprit of the failure can be any of the devices, but most often they are RAM and HDD. The message that appears on the screen in case of a critical error will help you understand in more detail.
Every user has ever seen blue screen death (BSOD). We will leave most of what is written there behind the scenes, since to make a diagnosis, only the following is important to us:
- error type - a line at the top of the screen written in capital letters through the underscore (item 1 in the picture);
- error code – a numeric identifier in hexadecimal form and its Extra options(point 2 in the picture);
- the driver or application that caused the BSOD, as well as the address where the failure occurred (point 3 in the picture). In case of problems with the equipment that arise before the initialization of drivers and in a number of other cases, this parameter is not available.

The following data may indicate problems with the hard drive or its controller:
- 0x00000077 – KERNEL_STACK_INPAGE_ERROR
- 0x0000007A – KERNEL_DATA_INPAGE_ERROR
- 0x0000007B – INACCESSIBLE_BOOT_DEVICE
- 0x00000024 – NTFS_FILE_SYSTEM
- 0x0000008E – KERNEL_MODE_EXCEPTION_NOT_HANDLED
Memory errors often make themselves known with messages like this:
- 0x0000002E – DATA_BUS_ERROR
- 0x00000050 – PAGE_FAULT_IN_NONPAGED_AREA
- 0x00000077 – KERNEL_STACK_INPAGE_ERROR
- 0x0000007A – KERNEL_DATA_INPAGE_ERROR
- 0x0000012B – FAULTY_HARDWARE_CORRUPTED_PAGE
- 0x0000007F – UNEXPECTED_KERNEL_MODE_TRAP
- 0x0000004E – PFN_LIST_CORRUPT etc.
Often, RAM malfunction is manifested by a variety of errors that can happen at any time when starting up and operating the computer.
Easy to fix hardware failure often helps BIOS recovery Setup to default settings or, as they say, reset to default. This can be done in several ways: using your own BIOS option, by switching special jumper on the mat. board or temporary loss of power to the CMOS chip (BIOS storage location).
To return BIOS Setup to default settings using its own option, you need to:
- go to the menu by pressing the designated key immediately after turning on the machine (F2, F4, F12, Delete or others - this is written at the bottom of the motherboard splash screen);
- open the Exit tab (usually), place the cursor on the LOAD BIOS DEFAULT option (in some versions it is called LOAD SETUP DEFAULTS or LOAD FAIL-SAFE DEFAULTS) and press Enter;
- press F10 and Yes (or Y) to exit and save the settings.

Other ways are to switch a special jumper for reset BIOS to the CLR CMOS position (name options: CCMOS, Clear CMOS, Clear CMOS, Clear RTC, etc.) or temporarily removing the battery on the board. On some, mat. boards have a special button for this.

If the method does not help, the failure is probably more serious and is associated with a breakdown of one of the devices. At home, you can try to find the problem unit by disconnecting it or replacing it with a similar working one. If this is not possible, you need to contact specialists.
Using Windows 7 Safe Mode
In some cases, startup failure occurs only in normal mode, and in safe mode (safe mode) the system boots without problems. If this is your case, use this opportunity.
To get into safe mode, before you start Windows startup Press the F8 key several times. When you see such a list on the screen, select the desired item from it:

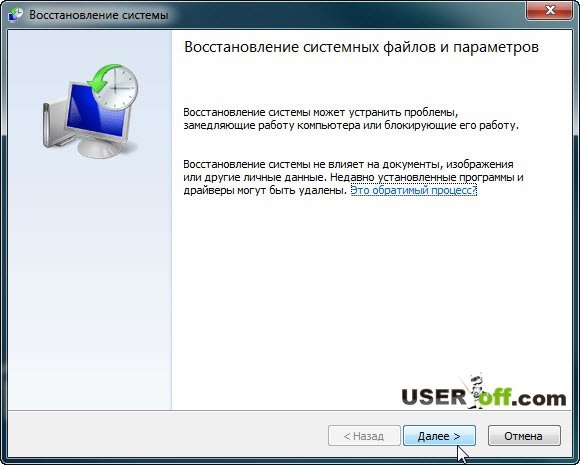
After loading the desktop, you need to open Start, go to the “All Programs” menu, open the “Accessories” folder, then “System Tools” and select “System Restore” from there.

This Windows tool 7 will help fix startup errors caused by corruption system registry, removal or damage important files, installing faulty drivers, virus attacks and other things related to the system and software.
- After launching “Recovery”, you need to select a checkpoint that was created no later than the date when the failure occurred, and then click “Next”.

- After confirming the point selection, click “Done” and wait for “Restore” to complete its work. This will return Windows 7 to the state it was before the boot errors occurred. Registry, files, drivers, updates, programs installed or changed after this date will be deleted or returned to normal state. Files in user folders will not be affected.
Additionally, you can use the system automatic search problems and their solutions. For this:
- boot into safe mode with network driver support;

- Open the Control Panel, select the “System and Security” section from “Settings” and then “Check your computer status”.

- Expand the “Maintenance” tab and in the “Search for solutions for problems indicated in reports” section, click “Search for solutions.”

In some cases, the system generates error reports that are sent to the center Microsoft support. If there is a ready-made solution for your problem, you can use it.
Recovery Environment
If the system does not boot into safe mode, if the recovery tool does not find any checkpoints or does not work, there is one more option - Windows RE. Windows RE is an addition to Windows 7, a recovery environment that works whether the main system boots or doesn't boot. The tools built into Windows RE allow you to:
- fix problems that are interfering normal startup PC;
- undo recent changes by rolling back to a checkpoint;
- check RAM using Windows 7;
- restore the system from an archived image, if it was previously created;
- run the system scan and repair tool sfc files, conduct hard check disk, run antivirus utilities, registry editor, etc.
To get into the Windows RE environment, you need to select “Troubleshoot computer problems” from the F8 menu.

Once you reach the “Recovery Options” window, you will be able to select the tool you need.
Startup recovery
To identify and fix problems that cause Windows 7 to not boot, select the first option from the list of options: “Startup Repair.” This tool will automatically check and fix the MBR (main boot entry), the state of the sections responsible for loading in the registry and system files. Most often, startup errors with Windows 7 can be successfully resolved with its help.

If restoring startup did not help solve the problem, you can use the same already familiar tool to cancel latest changes– “System Restore.” It happens that in a safe Windows mode does not see a single control point, but in Windows environment RE - sees.
To launch this tool in “Recovery Options”, use the second item from the top.

If you have an archived image created during a stable period Windows performance and programs, you can restore from it right here. To do this, connect the drive with the image to the computer, select the third item from the list of recovery options – “Restore system image” and follow the instructions of the wizard.

Diagnostics option Windows memory” will help identify problems with RAM if you suspect it is malfunctioning. Above we have listed which errors when starting your computer may be a sign of problems with RAM. It is possible that it is because of them that your system does not boot.
In addition to memory failures, startup problems can also be caused by the hard drive, or rather, errors file system and “broken” sectors. The recovery environment also allows you to troubleshoot and resolve these issues. To do this, via the command line you need to run system utility chkdsk with /f and /r options, which means to search for and fix errors and restore contents bad sectors, and wait for the results. No user intervention is required in this procedure - it is completely automatic.
And finally - if you suspect that the system does not boot due to viral infection, the recovery environment allows you to run antivirus tools.
To do this, launch the command line and open Explorer through it.
- Enter the command into the command line notepad and press Enter to open Notepad.
- From the “File – Open” menu, launch Explorer - note that in the recovery environment, the drive letters sometimes do not match the letters when Windows boots in normal mode.

- To see all the contents of directories, in the “Files of type” field, check “All files”.

- Go to the folder where it is located antivirus program, for example, the CureIt.exe utility, and run it.
After this, restart your computer. It can be said with a high degree of probability that the next Windows release will be successful.
Unfortunately, our actions are often detrimental to our computer: improper power off, untimely scanning for viruses, system failures and much more, which sooner or later leads to one result - the system stops starting. Undoubtedly, this is an unpleasant situation, but it can and should be dealt with, especially if there are too valuable files on your computer - and even on drive C. I’ll tell you right away, there’s no need to rush to reinstall Windows, because there are plenty of other ways to rehabilitate our friend, which we will talk about in this article. Here you will learn how you can restore the functionality of your system without any additional funds And paid programs using only the basic Windows functionality 7 or 8. Lastly and most importantly, don’t be afraid. After reading this article, you will always know what to do if Windows does not start. As Gagarin said: “Let's go!..”
We will solve the problem in increasing complexity: a black screen opens in front of you. First, try using the “Last good configuration" IN this mode the system saves the last successful (and most importantly, working) session, using which the system can come to life again.

Picture 1
If this does not help, select the “”. This item is sewn onto the hard drive that comes from the manufacturer. Those who had to reinstall the system, having reached disk management (partitioning and formatting), could see a reserved area of about 100 MB. This area is reserved for backup storage of files on your system. Under no circumstances should they be deleted (format the partition). Otherwise it's hi to that bootloader" Troubleshooting your computer» recovery will not run. And in some cases, the system itself.

Figure 2

Figure 3
Restoring computer startup
A menu opens in front of us in which system recovery tools are available. Here we select the item “" In this menu item, the debugger automatically fixes problems and errors that prevent the system from starting.

Figure 4
In the event that item " Troubleshooting your computer» you didn’t have it, you need to use installation disk with Windows 7. Boot from Bios and select "".
If you don’t have a boot disk, you can burn it on any other working OS. It's a matter of two minutes.

Figure 5
After you have done this, you will see the window shown in the Figure below. I will add it again so as not to disrupt the sequence of actions.

Figure 6
Select "" and see what the computer is trying to fix system errors, which interfere with the start. Correction time can reach up to different computers differently. It depends on the technical parameters and the extent of registry damage.

Figure 7
Then press the button “ Fix and restart" This will be followed by a system reboot. If everything went well, the system should work again.

Figure 8
Restoring your computer system
If Windows 7 does not start, let's try the "". Here you will be asked to select a previously created recovery point and return to the state when your computer started.

Figure 9
The following window will open in front of you. Here we just click “Next”

Figure 10
A list of available ones will open in front of you. control points recovery (there may be more than one). I recommend that you check the box " Show other restore points» in order to see all kinds. Sometimes it happens that the work point is hidden. Click the “Next” button

Figure 11

Figure 12
Then click “Finish” and restart the computer. The system should recover to normal functioning, although, in some cases, not completely.
Restoring the system using an archive
If the previous paragraphs did not help, then you can use the “” menu item. This approach is very a powerful tool system recovery, but provided that the system image was created in advance. Proper use of this instrument will allow you to effectively and quickly restore operating systems, and most importantly - completely free, unlike our paid analogues type Acronis true image. Also this option recovery will help you rehabilitate the system in the event that you nevertheless deleted hard section disk with factory settings
Select the item “ Restoring a system image»

Figure 13
If you do not have an image, then you need to do the following actions(on a work computer). We go to the address: ""

Figure 14
After that, select ""

Figure 15
In the next window you are asked to choose local disk, on which the archive with the system will be located

Figure 16
Click “Next" and the system will automatically create and write an image (archive) to that location hard drive which you indicated earlier. Advice: To store the image, choose a disk that has enough space and that will not be clogged with files such as music, movies, and the like. Best at stage hard marking disk create separate section There is approximately 50 GB to store this image.
We check the boxes next to the sections that we want to archive. I recommend that you choose only the system. Click the “Next” button

Figure 17
You will be prompted to archive. Click on the “Archive” button and wait for the process to complete.

Figure 18
After the archive is created, open the folder where it is located. The archive name will be as shown in the Figure.

Figure 19
Let's assume that we stopped at the point shown in Figure 14, and the system image has already been created earlier. Let's try to restore the system. After selection " Restoring a system image» the window gives us.

Figure 20
Click “Next”, after which the computer recovery will begin. Note: all data that was recorded on system disk after creating the image, they will be lost. To save data, you can use a Live disk or connect your hard drive to another workstation and directly transfer the necessary information.
Restoring the system by creating a “recovery disk”
To do this, we again go to the address: “ Start-Control Panel-Backup Computer Data" Select " Create a system repair disk»

Figure 21
After that, in the window, select the item “Create disk"

Figure 22
And we wait for the end.

Figure 23
After the image is created, this disk can be used to restore the system as follows. To do this you will need to put in Bios download With DVD drive. Let’s assume that our system has completely “fallen” and shows no signs of life.
Insert the disk with the image and wait for it to load (sometimes you need to press any key)

Figure 24
Then the download window appears

Figure 25
The system will automatically try to find the installed copy on the computer (the one that does not start)

Figure 26
Here we select “ Restoring your computer using a previously created image»

Figure 27
Here we will use the image that is on the computer.

Restoring a system using the command line
At first sight this method may seem quite complicated, but it is not. The main thing is not to rush and do everything point by point. Click on the menu item “

Figure 29
Open notepad using the command: notepad. In the window that appears, select: “File-open"


Figure 31
Next, go to the folder C:\Windows\System32\Config. This folder contains the RegBack subfolder with system scheduler files, which periodically saves system registry keys.

Figure 32
We delete all files in the Config folder, starting from the DEFAULT file to SYSTEM file (should be removed one at a time). Then we go to the RegBack folder and copy these files with the same names in place of the previously allocated ones (in the Config folder)

The topic that I want to discuss in this article is very popular and talking about it in detail so that you understand how and what to do is not so simple. But still, I will try to describe possible ways What to do if Windows 7 does not boot on your laptop or computer. We will also find out why this could happen?! The task ahead of us is not an easy one, namely, to correct the current situation, but there is no need to be afraid. Just follow the clear instructions and everything will be great! Some points may be suitable for other operating systems, but I will focus on Windows 7.
Dear reader, if you really want to solve the problem, then I strongly recommend reading the article in full, and then drawing some conclusions. I cannot talk about all the nuances in one paragraph.
Safe Mode and Last Known Good Configuration
This is a must try! Reboot the computer, press the F8 key continuously.
Attention! In Windows 8, entering Safe Mode is a little different, so it's best to follow the link below to find out all the details. In the list that appears, we are interested in the item called “Last Known Good Configuration (advanced).” Select and press Enter.
About how to enter safe mode on different systems:
What to do if the information above did not help you? We repeat the steps described in previous paragraph, but select “Safe Mode”.
Next, you can make a choice: fix the problem due to which Windows 7 does not boot manually, or try to do it in semi-automatic mode. Usually I do everything manually, for example, if Windows does not boot after installing the drivers, then I delete the drivers and try to boot. I think you understand that manual method demands from you more knowledge, so Windows offers you another option, which I'll describe below.
If everything loads, go to the Start menu, Control Panel, System and Security. In the “Support Center” tab, click on the inscription “Restore the computer to a previous state.” See the “Run System Restore” button? Great, then you've come to the right place.

Now click it and follow the instructions.
Next, you will need to select a restore point. In my case, I am asked to select a point on the 23rd, and now the calendar shows the 29th. Therefore, you need to click on “Search for affected programs” to find out what actions you will need to take after recovery.

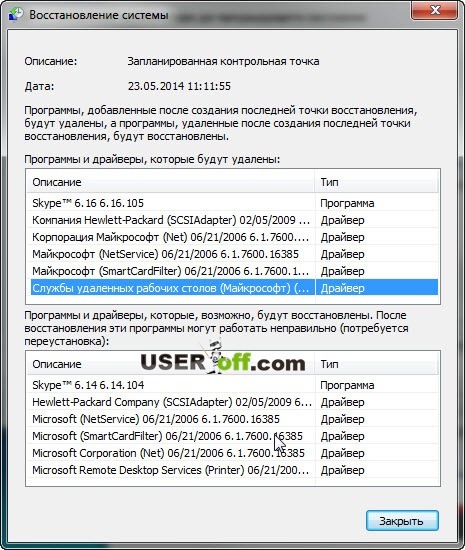
So, you have become familiar with the affected software during system recovery and can now close this window. After closing the window, click "Next".
If you were unable to enter safe mode to restore Windows operation, then there is no need to despair. Below we will look at another method.
Note: at the very beginning, when Windows 7 was just coming out, there was one strange glitch that you might have too. When you turn on the computer, the welcome screen follows and a black screen appears. As I remember, it seemed like there was still an arrow, but nothing else was visible. The cure was very simple - go into safe mode and restart the computer as usual. After that I was able to log into my account without any additional manipulations with Windows.
You may need to reinstall Windows
This option should be considered when you have tried to revive Windows, but all attempts have produced no results.
The very first thing that comes to mind for many, and for me too, is reinstalling Windows 7. But this method, you see, is very long, and if you are a busy person, then access to the computer should be almost constant. Reinstallation is suitable for those who have a lot of free time or do not have time to understand more quick methods, or for those who cannot be helped by any of the methods I have listed below for restoring the Windows operating system.
Dwell in detail on Windows installation I won’t, because I wrote about this on my blog:
Here brief instructions: since you do not have access to the desktop, go to the BIOS, look for the Boot or Advanced BIOS Features tab, or search for it yourself. Then in it we find the line “1st Boot Device”, set the value to CD-ROM. What have we done? What we did is that now when the computer boots, it will boot from the disk that is installed in your CDRom, and not from the hard drive. After turning it on, when the inscription “Press any key...” appears on a black background, press any button and get into the Windows installation wizard. Then follow the instructions on the screen.
You can read more about how to boot from disk in my article: “”.
I decided to talk about the installation at the very beginning, because if you were going to reinstall Windows, then perhaps this is some kind of sign to implement it))). But as I said at the very beginning, we will now try to bring your Windows back to life without reinstalling it.
System Restore
First of all, you can use the function that is in the installation disk “System Restore”. I will give an example of the Windows 7 system, but if you have a different system, then this is not a reason to think that you cannot do on your system. The names of the buttons may differ, but the principle remains the same.
So, for this procedure we need a Windows installation disk or its image (can be downloaded on the Internet). If you are unable to download the image or do not have a disk, then write to me by email [email protected] or contact your friends who have already installed Windows themselves.
If you don’t have a working disk drive or don’t have one at all, then the article “” will help you create a bootable flash drive.
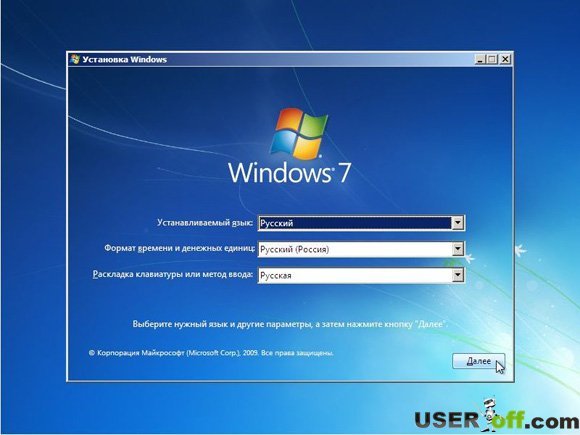
When do you have stock Windows distribution, then insert it into the drive and restart the computer. If the BIOS is configured for installation, you will see the line:

When it appears, press any key.
If it is not there or Windows boots as usual, then you need to make manipulations in the BIOS. Namely, set loading priorities. Usually the hard drive is set in the BIOS settings, since that is where your Windows is installed.
In order for the computer to start booting from the disk that is in your drive, you need to go into the BIOS and specify CDRom as the first device to boot. I have already talked about this above, if you have not read this point, then it’s time to do so.
So, you pressed any key, now a window will appear where you click “Next”.
In the next window you need to click “System Restore”.

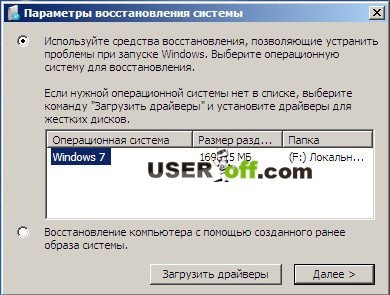
A search will occur. installed systems. If you have one system installed, then accordingly there will be one in the list operating system. Select it and click Next.

Often at this stage a message may appear in which you will be asked to restore the system. If this message will be displayed on your screen, then click “Fix and restart”. After that, try to log into your account.
If the message does not appear, then in the next window you select your system and click “Next”.
After this, a window will appear where you can select system recovery methods.

– automatic solution Problems.
System Restore - you can use this method, but on the condition that this function was turned on.
Restoring a system image – if you have Windows image recovery.
Command line- by using certain commands you can revive Windows. This method will be discussed further.
Now click “Startup Repair”. Now you need to wait a bit for the utility to try to automatically find the problem and solve it.
System Restore via Command Line
Then enter and press Enter.

A list of commands that can be used in this utility will appear; now you need to enter: Bootrec.exe /FixMbr and press Enter.
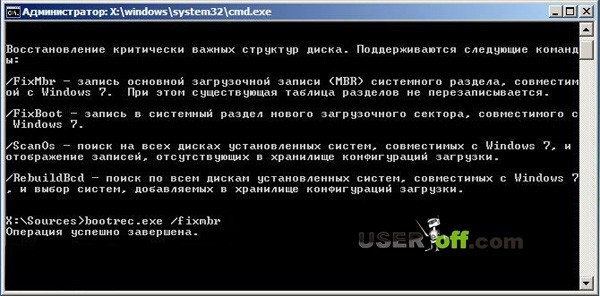
Now enter . exe / , then clicking on Enter. Next, exit the utility by typing exit and pressing Enter. Now you can try to log into your account, since the recovery work is complete.
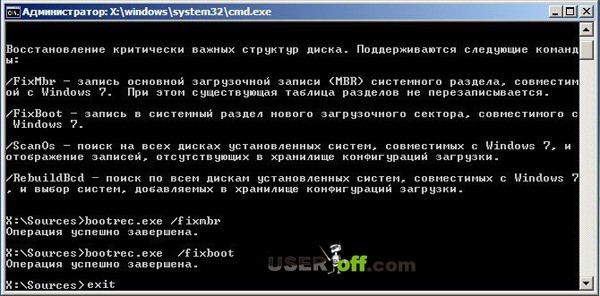
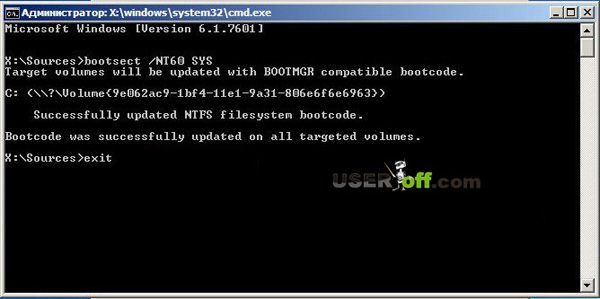
You can also try updating the boot code by entering the command bootsect /NT60 SYS. Then leave as a team Exit.
If the above commands did not help you, then go to the command line and enter Bootrec.exe /RebuildBcd. With this command you will do scanning hard disk to find the systems installed on it.

When the scan is finished, a list of installed operating systems on your hard drive will appear. To add it to the download list, click Y And Enter. After successful completion of the operation, enter Exit and press Enter.

So, with command line We've sorted it out for you. In principle, this should help to get your system to boot.
Inactive hard drive partition
This situation does not occur often, but it is still necessary to talk about it, otherwise the article can be said to be truncated. Let me give you an example, after which you will understand what's what.
Let's say you have several operating systems installed on your computer. Windows systems, which are installed on different hard drives. If the sections hard drives assign incorrect attributes, then you will have problems loading a particular version of Windows.
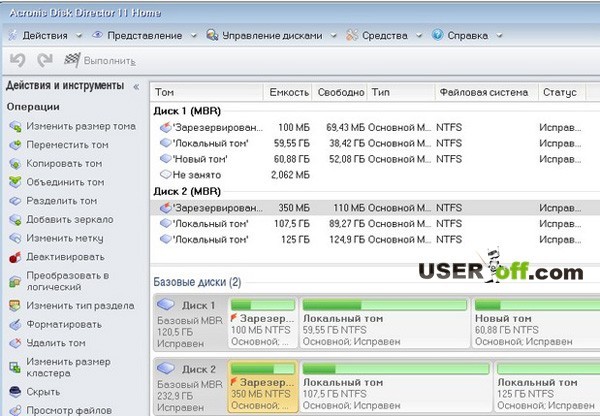
To check or fix this, you can use a boot disk Acronis Disk Director to change partition attributes. So, download and burn boot disk Acronis Disk Director and boot from it. How to do it? Insert the disc into the drive, restart the computer, and it will begin booting from the disc in the drive. But before that, check your download priorities. There should be a CDRom, just like when installing Windows. We have already talked about this in this article above.
When the program loads, pay attention to the checkboxes that are on the hard drive partitions.

In the image above we see that the checkboxes are on the second partitions of the hard drive. You need to make sure that these checkboxes are on the first sections. We got to practice ;). You need to click on each first partition of the hard drive right click mouse and select "Mark as active".
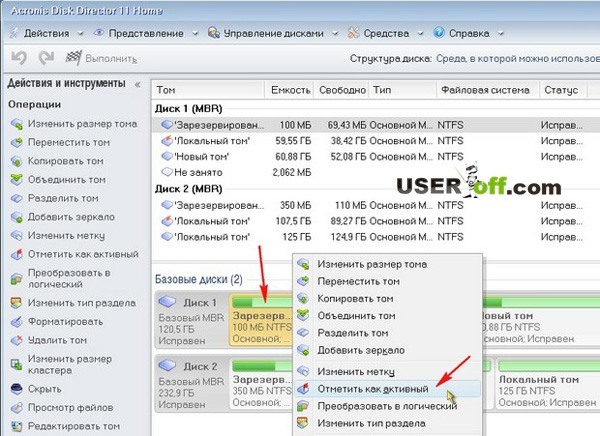
A message should appear where you click “OK”. This is what it looks like after the whole procedure:
Now all that remains is to click on the “Run” checkbox, wait for the operation to complete and restart the computer. Be sure to remove the disc from the drive.
Hardware problems, BIOS and viruses
HDD. If your system unit, or rather, the hard drive makes suspicious sounds: clicking or tapping, that is, there is a possibility that the hard drive needs to be replaced. To make sure of this, you need to open the cover of the system unit, turn on the computer and listen to work hard disk. Also check the connection of the wires with hard drive. It is possible that the wires have become disconnected and the computer cannot see the hard drive.
If you suspect that the problem is with the hard drive, then you need to copy all important data to another medium. Otherwise, you may lose them completely.
BIOS. Go to BIOS settings and put the hard drive first so that the download starts from there. Above we looked at an example where we set up a CDROM; you do the same with a hard drive. Just don’t forget to save the changes in the BIOS by pressing the F10 key.
The second method – you won’t believe it, but it actually works! Just go into the BIOS and, without changing anything there, exit, saving the changes that in fact did not exist (by pressing the F10 button). I personally once fixed my friends’ laptop this way, and when they asked me how I did it, my answer was: “Magic and nothing more 😉.” So give it a try, maybe everything will be much easier than you think.
Viruses. Sometimes viruses prevent Windows from booting. If there are viruses on your computer, you need to scan the entire disk for viruses. Here are articles that will be useful to you: “” and “”.
Of course, if you check your hard drive for viruses, you will need to disconnect it and connect it to another computer, since in your case Windows will not load. Or you can use special boot programs, with which you can check your computer for viruses even if you cannot boot your Windows. Here are a couple of them: and.
Attention! There are cases when, after installing updates, Windows 7 stopped loading! Therefore, you may want to try uninstalling recent updates that were installed before the Windows boot problem occurred.
Important! If you see a specific error on your screen, I recommend using a search in Google or Yandex. You can enter into the search not only the error code, but also the words that are used in it. Thus, you will save your time searching for the problem and its solution.
Important! If the system unit makes squeaks when turned on, then you need to use this squeak to determine the problem. Ask how? Here's an article on this topic: "".
That's all I wanted to say. The article turned out to be long, and I sincerely hope that at least one of the methods I described helped you.
Says a lot of unnecessary things, but there is useful information for you:
Hello friends! I have already written many articles about what to do if Windows 7 does not boot. But I haven’t written yet about what you need to do first if your computer refuses to start, or maybe I did :). Well, it’s okay, twice is better than never :).
This will be some advice on how to hit the first one ambulance system in case of failure. I usually write similar tips and describe in them how to restore Windows 7 if a specific error occurs. But today I will write how to try to cure the system from the appearance various errors and loading problems.
If you turn on the computer, but it frankly does not turn on. Well, you know how it happens, a certain error appears, a blue screen appears, or the computer simply reboots itself, then you need to try to start the computer with the last successful configuration with working parameters.If we talk about what can cause Windows to stop booting, there are a lot of options. For example, a failure may occur after installing some program or driver. After cleaning your computer from viruses. After incorrect completion of work (when, for example, there was a power outage). I had a problem where I normally turned off my computer in the evening, but in the morning it wouldn’t start, and it seemed like I hadn’t installed anything, but then this happened.
In such cases, the first thing we do is try to start the computer with the last known successful configuration. If this does not help, then you need to look for other ways to solve the problem, for example, searching by error. But as my practice shows, it very often helps to bring the computer back to life. Moreover, all these actions can be done in a few minutes. Now more details.
How to start Windows 7 with Last Known Known Configuration?
Everything is very simple. Reboot the computer and immediately actively press the key F8.
 A black window will appear with a choice additional options downloads. Choose “Last Known Good Configuration (Advanced)” and press “Enter”.

What is the reason for Windows 7 not starting on my computer? The following factors may affect the possibility of an error when starting Windows: infection of the computer with viruses, malfunction of the hardware configuration, errors during software installation, imperfection of the operating system.
You need to find the true reason for issuing them; to do this, you must first understand what stages the Windows 7 download consists of. It consists of 3 main stages, which in turn are divided into stages:
Windows 7 boot stages
First stage – OSLoader
Immediately after the BIOS code is executed, the first boot stage begins. Here on the first the stage is underway connecting the main drivers that are required to read data from the hard drive. After this, “winload.exe” begins loading the kernel, loading the “SYSTEM” registry hive into RAM, as well as the “BOOT_START” program.
The duration of the first stage is no more than three seconds. It ends when the Windows 7 logo is displayed on the monitor.
Second stage – MainPathBoot
MainPathBoot is the main and time-consuming stage. The duration sometimes reaches several minutes. The stage begins with the display of the Windows 7 logo on the monitor and ends when the desktop starts to launch.
PreSMSS stage
The operating system kernel is determined, “plug and play” is loaded, “BOOT_START” programs and computer component drivers are determined. If errors appear, this indicates a problem with the computer components.
SMSSInit stage
Next, control passes to “SMSS.exe”. The remaining registry hives are determined and included in the operation of the “auto” type program. At the final stage, “Winlogon.exe”, the operating system login utility, takes control. "SMSSInit" is completed when the monitor displays a menu with user name and password.
Here errors indicate malfunctions of the video card or its drivers.
WinLogonInit stage
It starts with the launch of “Winlogon.exe” and ends with the appearance of the desktop by loading “Explorer.exe”. Includes implementation scenarios group policies and loading services. This is the most processor-intensive step and usually takes a long time.
Here errors indicate problems with the services of programs not included in Windows, for example, an antivirus program.
ExplorerInit stage
Continues from loading the shell and ends with loading the window manager. During the stage, shortcuts begin to appear, in parallel loading startup programs. This stage characterized by the most heavy load for processor, hard drive and RAM.
Here errors indicate defects in components or the need to upgrade them.
Third stage - PostBoot
Lasts from the moment the desktop is displayed and ends with the complete opening of programs from startup.
Errors indicate problems with applications that appear in the startup list or the presence of infected files on the computer.
Errors that occur during startup stages
By considering what errors occur at various stages of system startup, it is possible to identify specific problems.
Errors due to defects in computer components:
- Repeated errors of a driver indicate a hardware defect associated with this program;
- Multiple problems with various stages, indicate a RAM defect;
- If there is no image on the computer monitor, but there are Windows sounds, then this speaks of incorrect operation video devices;
- If it is impossible to start launch windows or its interruption, you should check the serviceability of the hard drive;
- If it happens complete shutdown When starting up, the power supply or motherboard may have failed.
Missing or faulty boot files
The display of “Bootmgr is missing” on the monitor indicates the absence or malfunction of boot files, and sometimes there is simply a blank black screen.
 If the computer does not have the Bootmgr loader, the system will not boot. This partition is sometimes accidentally erased by the user himself when using a boot disk.
 Also necessary files to start the system are located on the C: drive in the Windows folder.
Registry problems
 Windows can sometimes restore it on its own using the Recovery Wizard.
Restoring the operating system startup
Recovery Environment
Windows 7 has " Windows Recovery Tools WRT". To restore, you need to select “Troubleshoot computer problems” from the F8 menu.
 Next, a menu will appear - you need to select “Startup Repair”.
 This will restore startup settings and files.
Recovery methods
When software type errors, “System Restore” will help the operating system. 
Manual recovery
In case of absence positive result After using system tools, it is possible to manually restore the registry from backup copy, which is located on C: in the WindowsSystem32configregback directory. You need to copy the files from it to the WindowsSystem32config directory.
File recovery
Exists useful program"sfc.exe" which can be run in the recovery environment. You must specify the following: parameters and location of the download folder and offline directory system (Windows directory). The /offbootdir and /offwindir options.
If startup problems persist, you will need to manually restore boot files.