How to enable location service on ipad. How to enable geolocation on iPhone? What are the advantages of such technology
Have you noticed that your iPhone is quickly draining battery power? In this case, pay attention to what functions are enabled on your smartphone. It is possible that a rather demanding and “gluttonous” location option is activated on the device. Were we right? Then be sure to read this article. After all, in it we will tell you how to disable geolocation on an iPhone. We will also discuss why it is needed in general, which applications cannot work without it, and much more. etc.
First of all, let's figure out what kind of service this is. Geolocation is special program, which allows you to determine the location of a smartphone (or other device) using satellite communications. Why is it needed? Everything is extremely simple. Geolocation is necessary for correct operation many applications and services:
- cards,
- navigation,
- weather,
- “Find iPhone” service, etc.
Actively uses geolocation and the Photo program. It determines and calculates your location, assigns appropriate tags to pictures, making it easier to sort and find necessary photos. By indicating the coordinates, it is easier for other people to understand where the shot was taken. Probably everyone has noticed similar captions with the place where the photo was taken on various social networks.

So in fact, geolocation is very useful option. But sometimes it only wastes the gadget’s battery power. Therefore, it is not worth keeping it constantly activated. Even if you have access to charger throughout the day, it is best to remove geolocation. And activate the option only as needed.
How to disable geolocation on iPhone?
You won't need any complex actions to disable geolocation on iPhone with any version of iOS (including the latest - iOS 10 and 11). In addition, the procedure is the same for all Apple smartphones. That is, if you follow the scheme described below, you can easily remove the location function on the most popular models iPhone – 4s, 5s, 6, 7, 8, se, etc.
- The very first step is to go to “Settings”.
- Then we look for and select the item (section) “Privacy”.
- Next, tap on “Location Services”.
- Move the switch to the left.
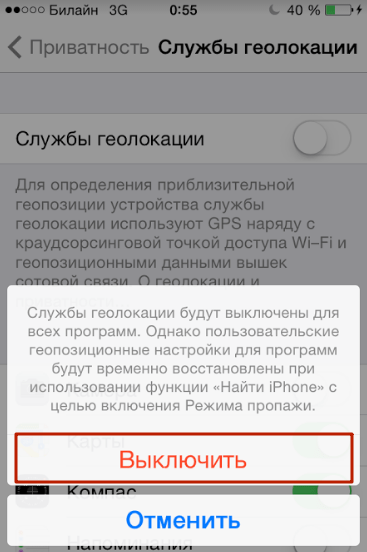
- Confirm disabling the function in a pop-up window. That's all!
If you want, on the contrary, to activate the function, then simply do the same thing (you will only need to move the slider to active position). Thus, the service can be controlled in just a few clicks.
By the way, you can refuse to use geolocation when working with specific applications. This is done in the “Location Services” section by disabling certain programs in the list.
For reference! On some iPhones after updating to iOS11 a bug appears. It manifests itself in the fact that the geolocation icon is constantly lit. This glitch does not bother some users at all. But there are those who are trying in every possible way to remove the geolocation icon. If you also want to fix this error, then simply restart your device or re-enable/disable the geolocation service.
Today we will look at how to enable geolocation on the iPhone 5s (for example) and related services that ensure the smooth operation of the device, as well as programs for collecting and processing confidential information.
To answer the question “Where to enable geolocation on an iPhone,” we will try to figure out what the meaning of this function is and who will find it useful.
Many of us don’t know how to turn on the location search service on the iPhone, and we also don’t know how to turn it off. There's nothing complicated about it. Read the table of contents in the instructions carefully and choose the most suitable solution to the problem for you.
Location services on iPhone. What are they and how are they useful?
Geolocations on iPhone are an integral part of your device. They allow you to track your location throughout the day. It all depends on the settings, which have a fairly flexible functional interface. One of the most striking examples is searching for the most convenient restaurant or cafe for you, the nearest taxi, car sharing car, as well as a free hotel room.
Most services that determine the location of you and your iPhone in particular are easily configured via standard settings. To set up geolocations on iPhone, Apple allocates an entire menu item in which you can enable or disable elements that use location data, including system services.
You must understand perfectly well. How more apps use data about your location, thereby faster battery The iPhone discharges and becomes unusable over time. This is why flexible configuration of geolocations on the iPhone is so important, which we will tell you in more detail later.
How to enable location service on iPhone?
To answer this question, we should find the location of geolocations in the iPhone settings. Go to Settings - Privacy - Location Services.
You can customize each application as you wish. We advise you to take a detailed look at the services and applications or games that you use most often. Flexible setup can significantly save your iPhone's battery life.
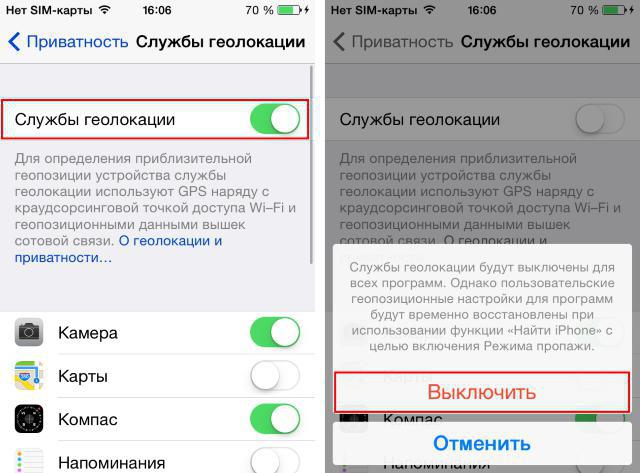
To enable the service for determining the approximate geoposition of the iPhone, check the slider moved to the right. If tracking is working properly, the slider will be green, as shown in the screenshot.
For reference! Enable geolocation on iPhone 6 or newer iPhone models 7 It won’t be difficult for you. Our instructions are universal and created on updated version software– iOS 11.
How to set up geolocation on iPhone?
The needs of the applications that users install on their devices are different from others. That's why we can't say exactly what you should turn on or off in your location data settings. But we will try to provide detailed information about system location data so you can make the most informed decision when turning features on or off.
To set up geolocation on your iPhone, go to the “Location Services” menu item, which you already know from the previous step of the instructions. Scroll to the bottom of the list of suggested options. Go to System Services. This will also allow you to answer one of the popular questions: “Geolocation on an iPhone, where can I find it?”
To determine the location of a person or iPhone, you should carefully prepare geolocation settings. This is necessary so that no one else but you can change the GPS settings or completely disable the Find My iPhone tracking services.
You should introduce restrictions on the use of settings in your iPhone menu. Go to “Settings” - “General” - “Restrictions”. Enter the preset passcode. Scroll through the restrictions settings to the “Privacy” - “Location Services” section.
Make sure location services are turned on and the restrictions checkbox is set to “Prohibit changes.” Also, before introducing restrictions to prohibit changes, we advise you to check the settings of the Find iPhone function. The settings should match those shown in the screenshot. Introducing such changes to geolocation settings will help answer the main question “How to determine the location of an iPhone.”
If you did everything correctly, now no one except you and the person who knows the access code will be able to disable geolocation services on the iPhone. They will simply be “Inactive”.
How to find a person by iPhone geolocation from a computer?
It's very easy to do. Go to the official Apple website.
If you are doing this for the first time, you will have to go through two-factor authentication on your computer and allow your account icloud records trust the browser. So, let's go to the site. Enter your login, i.e. mailing address and password. Information about two-factor authentication, as shown in the screenshot below.
At this time, on your iPhone, a pop-up window with a city map asks you for permission to access account. Click "Allow" and enter the six-digit authorization code (on PC) that appears on iPhone display.
After passing two-factor authentication, the following question will appear on the computer: “Trust this browser?” If you are going to determine the location of the iPhone using home computer, feel free to click “Trust”
Then you will be taken to the main icloud menu. It looks like this:
To determine iPhone location from your computer, click Find iPhone. If you carefully read the previous settings item, you will see a map of the current location of you or your device.
Don't forget, when you search for an iPhone, the device will display running service geolocation, unless you have disabled it in the settings. This way you can discreetly determine a person’s location using their iPhone or vice versa.
Find your iPhone through your computer if it is turned off. Is it possible?
This is possible, but the search system will give you a previously noticed address that was attached to your account. Ultimately, the Find My iPhone function will display the last registered address of your device's location on the map. If iCloud server will not communicate with the iPhone, the point on the map or geolocation mark will be gray.
If you have any questions, we will be happy to answer them in the comments. Our instructions for setting up and determining the location of the device are suitable for any iPhone on iOS >11.
Details Benks Created: September 03, 2017 Updated: November 18, 2017Geolocation is the process of finding the iPhone's location. Unfortunately, the importance of geolocation is usually underestimated, despite the fact that without it it will not be possible to use a navigator, attach geotags to a photo, or find an iPhone using the function of the same name. Users are more familiar with the negative characteristic of geolocation – “gluttony”: by disabling the function, you can significantly increase the duration battery life gadget.
Fortunately, the procedure for activating / deactivating geolocation is quite simple - you can turn it on while using the navigator, and keep it off the rest of the time.
The user encounters a request to activate geolocation when initial setup iPhone and, as a rule, unknowingly confirms it. Therefore, the issue of disabling geolocation is more pressing than turning it on. You need to deactivate the function like this:
Step 1. IN " Settings"find the section " Privacy" (on some versions of iOS - " Confidentiality") and go into it.
Step 2. Proceed to the subsection " Location services" - he comes first on the list.

Step 3. Switch the toggle switch " Location services» to the inactive position.

Step 4. Confirm your intention to deactivate geolocation - click " Switch off».
Please note that the iPhone has flexible settings: you can allow some applications to use geolocation, and prohibit others. To do this, you need to adjust the sliders located in the block below.
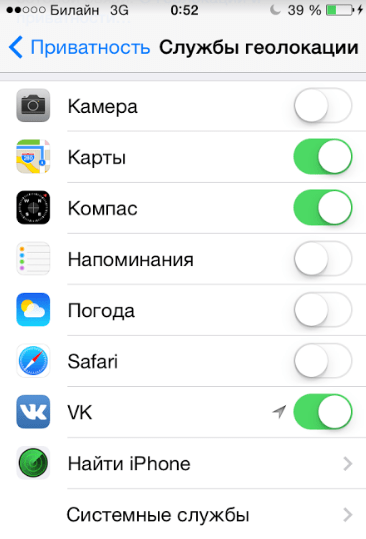
For example, with the configuration as in the figure, you will be able to use navigation, but geotags will not be attached to your photos.
With flexible settings, the main toggle switch " Location services" must be enabled.
Do I need to disable geolocation of system services?
Subsection " System Services" is located at the very bottom of the block with a list of applications that require geolocation.

A user who visits this subsection will see the following:

Before deciding whether to disable geolocation for system services, you should figure out what functions at least some of them are designed to perform.
The system services listed are common to most iOS versions. There is no need to describe all services - and it is clear that their main goal is to collect confidential data on consumer preferences and sending information to Apple. People who claim that Americans are spying on Russians through smartphones are not too far from the truth.
If you do not want Apple to replenish its statistical databases by tracking your movements and purchases, switch the toggle switches in the “ System Services» to the inactive position. It is recommended that all Yabloko members do this: benefits iPhone owner no from services, but the charge is consumed faster because of them.
How to enable geolocation on iPhone?
The algorithm for how to enable geolocation on an iPhone differs only slightly from the disabling method described above only slightly. The user also needs to follow the path " Settings» — « Privacy» — « Services geolocation" IN last section he will see that there is only one slider (the main one), and there is no list of applications that use geolocation.

You need to activate the toggle switch, then disable geolocation from those applications that do not really need this function.
Are geolocation and GPS the same thing?
Users who believe that geolocation and GPS are synonymous are mistaken. Geolocation- This general concept, related to determining the location of the device; GPS is a trademark of the American satellite system navigation. Most often, geolocation uses GPS technology – hence the misconception about the equivalence of concepts.
However, in order for geolocation to be available, it is not at all necessary to turn on GPS - other ways to calculate positional data are possible:
- Via Bluetooth. The location of the object is determined using special beacons Beacon, which are located in public buildings - airports, hypermarkets. In terms of accuracy, this technology is inferior to GPS, because it provides reliable results only if the object is stationary.
- Based on stations mobile communications . The smartphone knows from which station the GSM signal is sent to it and where this station is located. Therefore, using special application, which contains a database of stations, you can use geolocation without GPS. Reliable results using this method can be achieved in megacities where the network coverage density is high, but in small cities determining geolocation through stations is problematic.
- Based on the Earth's geomagnetic field. Navigation based on the planet’s geomagnetic field is the idea of Saratov scientists. Each point on Earth has a unique set of characteristics, which can be used to determine the location of an object (including an iPhone). The technology is only being tested, but large advances are already being given to it.
Despite the fact that geolocation and GPS are various concepts, and there are several ways to calculate positional data, on this moment quite accurately The location of an object can only be determined via GPS.
What to do if geolocation doesn't work?
If geolocation doesn't work, it's hardly a problem mechanical failure any iPhone part (for example, GPS module). Most likely the problem lies in program level. What to do if the function refuses to function?
Step 1. Proceed to the section " Location services"and make sure that for specific application geolocation is activated.
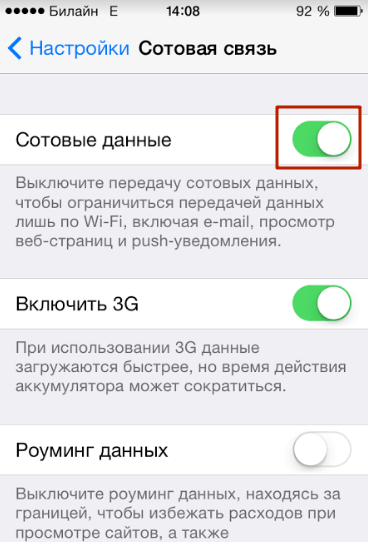
Step 2. Check if the Internet is turned on on your iPhone. The network makes it possible to more accurately position the device. Go to the section " cellular » Settings and make sure the Cellular Data slider is in the active position.
Step 3. If the above steps do not produce results, reset the settings after creating a backup copy (instructions for creating copies can be found). Follow the path " Settings» — « Basic» — « Reset" and select " Erase content and settings».

This reset will erase all data from your iPhone.
You need to check whether geolocation works on a “clean” smartphone, that is, before restoring from backup copy. If the function still does not work, you should contact the service.
More often than others, owners of a jailbroken iPhone encounter problems with geolocation. Such users are recommended to install from the store Cydia tweak called libLocation: It is completely free and helps in better positioning of the jailbroken gadget.
Conclusion
If you don't know what it is geotags for photos, and consider navigation on an iPhone unnecessary, most likely you don’t need the geolocation function at all. It is recommended to turn it off - thanks to this measure, you can ensure that your gadget “lives” in offline mode longer. Don't forget about deactivation system services, which do not bring any benefit to the owner of the gadget, but drain the battery faster.
Geolocation - what is it? A similar name is special service, which will seem extremely convenient modern people. But not everyone knows how to use it. Below we will talk about the features of this application. In reality, everything is much simpler than it seems. And when proper preparation citizens will be able to cope with the task very quickly.
Description of the service
So what is geolocation? This is the name of the program/service for tracking the location of people on a map using mobile devices. The service operates like a smart watch.
Thus, geolocation is a utility for spying on citizens. Not everyone knows how to use it. Often you have to secretly install the corresponding application on your computer. mobile phone. After all, in modern gadgets geolocation is not so common among “default” software.
Methods of use
So, geolocation (we have already found out what it is) is a program for showing a person’s location on a map in real time. You could say this is a kind of spy.
IN real life There are several ways to use geolocation. Namely:
- working with third-party services;
- use of cellular operator services;
- using the Geolocation service on iPhone;
- surveillance using Android.
Also, anyone can download and install it for themselves third party application to determine the location of another person. Next we will look at all these techniques.
Telecom operators
But that's not all about such a concept as geolocation. What else could it be? The search engine service has a similar name. Using it is actually not difficult. In particular, if you do not use geolocation secretly. Otherwise, the process will cause a lot of trouble.
You can activate the service through telecom operators. Their application being studied is called “Navigator” or “Locator”. You can use them on the service website or from mobile device send a request in the prescribed form, and then check where the person is.
The algorithm of actions will be approximately as follows:
- Connecting the operator option on the phone that will be monitored.
- Enable the service on your smartphone.
- Sending USSD or SMS request to right moment. You can simply enter the phone number of the subscriber you want to find on the geolocation website.
- Familiarization with the information provided.
If the request was sent from a phone, the user will receive a message with an image of a map on which this or that subscriber will be displayed. Everything is extremely simple and clear.
There are several disadvantages to this geolocation:
- the need to install the option on the monitored phone;
- limited number of connected and tracked numbers;
- high prices for the service (if used frequently).
Therefore, many try to look for other techniques. And this is a completely doable task. The main thing is to approach its solution correctly.
Connection with operators (numbers)
How to enable geolocation from mobile operators? It all depends on the service company. The following options are possible:
- "Beeline" - send empty message to number 5166, and then install the Latitude app for Android.
- "Megafon" - dial USSD request *140№#. To track the subscriber, use the "Navigator from Megafon" website or the command *140*subscriber_number#.
- "MTS" - activation occurs after submitting a request like *111*788#. To add a subscriber to the geolocation list, you need to write an SMS in the format “Add name number” and send it to number 6677. It is better to track the position through the website
- "Tele2" - connection occurs by dialing the combination *119*01#, adding a new contact - *119*1*number#, receiving information about a person's position - *119*2*number#.
It's actually not that difficult. But you have to understand that the service you are studying works with some errors. It displays the position of the phone with a difference of up to 1 kilometer (in the city center - up to 200 meters).

Third party software
Geolocation on Android is most often activated through third party programs and applications. Most of them are paid.
Algorithm of actions in in this case will be like this:
- Install spyware on the monitored phone. Something like "Phone Tracker", Hellospy, Talklog will do.
- Configure information transfer parameters.
- From a computer or phone, send a request for pre-installed software.
- Get information about the device's position.
Fast, simple and convenient. Discover spyware can only latest versions antiviruses. But finding a working geolocation is problematic.
iPhone and surveillance
But that is not all. IN iPhone geolocation built-in This is a service that it is advisable to activate after turning on the phone for the first time.
To cope with the task, you must:
- Open the main menu of the phone.
- Go to "Settings" - "Privacy".
- Select the Location Services option.
- Set the toggle switch to the "On" position.
- If necessary, set up a geolocation connection with other applications on the gadget.
After this, you can use geolocation using cloud service iCloud. This is done like this:
- Go to icloud.com.
- Sign in using AppleID.
- Click on the "Geolocation" button.
- Select your device at the top of the screen.
- Click on the line "Find iPhone".
It is done. Now you can familiarize yourself with the information provided. This is how people can track their Apple devices.
Shutdown
How to disable geolocation? The answer depends on how the option is connected. In the case of telecom operators, you will have to contact the relevant organizations or use USSD requests. If we're talking about about spyware, you just need to remove it.

On Apple devices you need to do the following:
- Go to the gadget settings.
- Find "Privacy" - "Location Services".
- Set the switch to the "Off" position.
Now the answer to the question: “Geolocation - what is it?” won't cause any trouble. After all, you are already familiar with this application.
Thanks to the presence of GPS in Apple products, and in particular in the iPhone, the user can not only find the desired street, but also exit difficult situation. But to fully use this function, you need to familiarize yourself with the intricacies of working with GPS. Our review will help beginners (and not only) users of Apple products learn how to use navigation competently, quickly and efficiently.
We determine the location using navigation in the standard Compass and Maps applications
The iPhone application "Maps" (in English maps) makes it possible to find out the location using GPS systems or wireless Wi-Fi networks. You can determine your location on a satellite, regular or hybrid map. To do this, you need to choose the type of cards that will best help you at the moment. This function makes it possible to understand where you are and in which direction you need to continue moving.
Step-by-step instructions for locating

Finding directions using the Compass app
No less effective method find out directions using GPS enabled and Compass apps. This short instruction will help you get acquainted with this application:
- Opening home screen using the Home button;
- Now go to “Utilities”. A folder with many icons should open;
- Find the compass image and click on it. A corresponding screen should appear in front of you, showing your direction. The compass on the iPhone differs from the real one in that on the iPhone it functions regardless of the orientation of the smartphone;
- If you need to open the Maps application at the same time as the compass and see the location, then click on the “Location” button.
The compass itself:

If you're wondering whether the GPS and Compass app use magnetic north or true north, our answer is it can use both. To accurately select the “north” you need, in the Compass application, click on the Info button. On the screen that appears, select Magnetic North or True North. A check mark will appear next to the option you select. Don't forget to click "Done" to save the result.
Planning a route
The Maps application can not only help with location, but also suggest the path to the place you need, show you exactly where to go, tell you about the condition of the roads (are there any traffic jams), and help you find the shortest and most convenient route. In standard mode GPS app creates a route for a car, but you can also create routes for people on foot iPhone users and people who use public transport. Here are the detailed instructions:
- Take the iPhone and press the “Home” button;
- Click on “Maps”;
- Click on the curved arrow on the screen;
- Select “Start” on the screen.
It looks something like this:

To set a route, we need to delete the “current geoposition”. To do this, click on the cross next to it. If you need the route to go from where you are standing, do not change or delete the “Current Location”. If you need to enter the starting point of the route, then enter the exact address in the line. After this, a line will appear containing the destination address. If everything is entered correctly into the iPhone, the exact driving line will appear on the iPhone display in front of you, which you need to follow to the very end.

The route will appear on the GPS screen, with a green pin indicating the starting point and a red pin indicating the ending point. If the GPS can offer multiple route options, the screen will display alternative options. Click the “Start” button and the first screen with instructions should open. By clicking on the “Directions” icon, the “routes” tab will open in front of you, where the full directions for the route are given.
Directions for traveling on foot or by car public transport
To do this, in GPS we click on the image with the bus, which will reveal to us details related to movement on public transport. By clicking on a pedestrian, you will see information about the duration of the hike and its kilometer. The problem is that information about transport schedules and routes quickly becomes outdated, so it is recommended to check it with your data. Walking can also be unsafe - for example, the path indicated by GPS may run through prohibited bridges or railway tracks. Therefore, review the entire route carefully on your iPhone before starting your hike.