How to reduce the size of an image in Photoshop. How to Quickly Reduce Image Size in Photoshop and Maintain Quality
Good day! If you have hundreds of megabytes in a small folder with photos? Or do pictures take more than 10 minutes to be sent by mail, even with decent Internet speed? Or is it like this, does it take half an hour to send an archive of photos to a flash drive? Welcome to the right place, in the article I will tell you in which program and how to reduce the size of a JPG file without losing quality.
Compressing an image is a simple science. You can reduce all the pictures in one folder en masse, at one time, this is called batch processing. Or process each image separately. Let's talk about these methods.
How to reduce Jpg file size - a little necessary theory
Regarding the JPG format (and its variant JPEG), there are 3 ways to resize files. The size of PNG, BMP, GIF and other graphic formats can be adjusted only by the first method.
- Reducing the image resolution (number of pixels) without losing quality;
- Reduced quality without reducing resolution;
- Simultaneous reduction in both resolution and quality.
Any photograph is a collection of pixels. In modern cameras their number exceeds 2-4 thousand horizontally and vertically. This is a lot, and megabytes “grow” from such a resolution. Does this improve image quality? Almost none, especially for non-professional photographers during everyday shooting. Since changing the resolution of a photo can be almost painless for quality, many people use this method to make the image smaller.
I will definitely tell you about the most convenient methods in a note; all you have to do is choose the one that suits you.

By compressing the image by 2 times (by 50%, in terms of graphic editors), we will reduce its area (and volume!) by 4 times, school geometry in practice.
It is logical to reduce the number of dots in order to reduce the size of the photo - and not notice any changes in quality.
An alternative option for JPG files is to leave the image resolution at its original size, but allow the computer to reduce the quality. Some blurriness, smoothing, or fuzziness is acceptable. We can assume that the compression quality in graphic editors is something like this:
- 100% — there is no compression of the image;
- 90% — the default setting in many programs is minimal compression;
- 80% — deeper degree: files are compressed quite strongly;
- 70% — still an acceptable loss of quality, but within reason;
- 50% and below– a radical reduction in the appearance of the pattern, noticeable to the naked eye.
How to compress an image: workshop in graphic editors
We will experiment with this “still life”: an ordinary telephone photo that does not pretend to be artistic, rather of the “terrible to show” class, but suitable for a family archive.
Technical details: JPG format, resolution 2560 by 1920 pixels, source file weight is unacceptable 2.44 MB. Before compressing a photo, we recommend copying it to a separate folder so as not to lose the image during the compression process.

Source file: 2.44 MB, with an extension of 2560x1920 pixels
Compressing an Image in Paint
It’s in vain that this standard graphic editor included with Windows is considered a frivolous tool. Firstly, it is very interesting and useful to teach “dummies” the basics of PC literacy, and secondly, it is available everywhere and always - and when a more powerful program for working with graphics is not installed on the computer, its capabilities will come in handy more than once.

Opening the source in Paint: the number of dots is amazing, but their number does not mean beauty or quality. Scale: 100%.
To open an image in Paint, you need to right-click on the file and select "Edit".
This editor doesn't allow you to manually adjust the JPG compression level, but it feels like it sets it to around 80%. It is enough to resave the file to get 1.83 MB instead of the original 2.44 MB. By eye, the level of quality remains almost the same.
The image was compressed to 1.83 MB after resaving in Paint in 2-3 clicks and 10 seconds.
Paint has a way to reduce the pixel size of an image. This is a button "Resize". When you click it, a dialog box appears asking you to enter new horizontal/vertical dimensions as a percentage of the original number of points.
Let's choose 50 to 50: 2 times less length and width means an area 4 times less. By the way, the resolution must be changed equally in both dimensions, otherwise the picture will be deformed.

Function “Change picture resolution” standard in most graphic editors, from primitive Paint to monstrous Photoshop.
The result is 616 kilobytes. Not enough for a family archive, but great for publishing on websites. Without a magnifying glass, the difference with the source is barely noticeable.
616 kilobytes with a resolution of 1290×960 px.
Note that 0.6 megabytes was obtained not only as a result of changing the resolution, but using a “combined” method - the image size in Paint is also adjusted by reducing the JPG quality by about 85%. It is impossible to change the value of the compress parameter in the desired direction. Paint does this automatically.
Reducing Image Size in Photoshop
This powerful editor can be used for the tasks described. But it’s like transporting a bag of groceries not in a car, but calling a Kamaz. Photoshop is an overly powerful application for something as simple as reducing the weight of a photo.
Opening this program and saving the file in it will take much more time than the compression itself. However, to make our instructions complete, we will also describe how to compress an image in Photoshop.
After opening the file in Photoshop, you should select the “Image” section, click on it to the “Image Size” item. As shown in the picture below.

A dialog box will open where you can manually set the height and width of the picture. OK button – save the file. The same dialog is called hotkeys “Ctrl+Alt+I”, quick saving of the result, keyboard shortcut – “Ctrl+S”.

Second way to reduce file size pictures or photos, this is to apply quality when saving. Whatever you think is suitable for you. Let me show you with an example how to do this.

A window should open with settings for saving the image in the desired quality and format. I will continue to torture my photo with the doggies. Let me remind you that the file size is exactly 2.44 MB, let's see what we can squeeze out of it.
Choose from above - 4 options. Look at the quality changes during compression, you can move the image by previewing it.
Please note that at the top left is the Source, then they come with compression.
If you look at the second option, the quality has not changed, and the weight of the image has decreased to 1.6 MB, when choosing quality 72. A completely suitable picture for storing or sending by mail.
You can also set the image size before saving. Which you need. And click save, select the recording path and you're done.

The best compression programs. Batch Processing
Paint is always at hand, but it’s too primitive. Photoshop is excessively bulky and clumsy. What programs are best to compress JPG? Good viewers are also image managers! Their advantage is support for batch compression: simultaneous processing of all or several selected files in any folder instead of manually changing pictures one by one.
ACDSee, XnView and IrfanView: just three of the many programs for compressing images en masse. Even the thoroughly commercial ABC has a free but fully functional version. If the program is not Russified, you should remember the word Compress - “Compression”. Let's look at batch compression technology using the XnView graphic browser as an example.
Having opened one of the files in the target folder, double-click on it. A filer window will open with previews of all images.

The XnView viewer and editor says that 9 files take up almost 20 MB. Disorder!

Viewers also have the “JPEG Compression” function without reducing resolution.
Image compression in online services
Although it is convenient and correct to have a program at hand to resize a graphic file, you can use numerous online services for this task.
The principle of operation is completely similar to the work of classic PC applications: either compression, or resizing, or both actions at once. All parameters are customizable.
The disadvantage of the online method is the need to send an initially large file: this process takes some time. Web services for compression are usually free, but you also need to download the result back to your PC.
The waste of time is justified if the number of files being reduced does not exceed several pieces per month. Any specific recommendations? Please, those online services that I use myself.
TinyJPG.com - Foreign service
Not a bad foreign service, without unnecessary settings. The service will do everything for you, just specify the location on your PC to download the pictures, after which the compression process will begin automatically.

I’ll warn you right away that the site has compression restrictions for unregistered users - 20 images with a maximum size of 5 MB.
Upon completion of the process, it is possible to download all files in one archive or one at a time, as is convenient for you.
IMGonline.com.ua - convenient and understandable
If you use this service, you can change the size of the image itself, as well as compress the file itself with the desired quality. I wrote about what quality is acceptable at the beginning of the article.

One of the free online services.
Both services allow you not only to play with sizes and quality, but also to edit pictures. There is a detailed help system. Which I advise you to read before using.
In other operating systems, including mobile ones, the principles and settings of compression technologies are the same.
Processing drawings in Mac OS
Let's look at the process of working with images on a Mac. For example, pictures can be perfectly compressed by the standard Preview application: there is no need to install additional software, even for batch processing. Preview on Mac knows how to resize several photos at once.
Select one or several images, open them in preview, then select Tools > Adjust Size, and fill in the required values. And save.

Conclusion
We recommend experimenting with image compression yourself, copying them to a test folder first so as not to lose important photos. After 3-4 attempts, you will understand in practice how to reduce the size of an image in an optimal way, with the most suitable compression, width and height parameters.
- Install and use every day any quality image file manager.
- Forget about Photoshop: it is too powerful and clumsy editor for such simple tasks.
- Use online services only when there are no other methods at hand - and use Paint for single files.
Disclaimer: no dogs were harmed during the artistic or programming experiments. :)
17.11.2014 27.01.2018
After studying this lesson you will learn in Photoshop:
- Reduce photo size
- Reduce the size of an individual object in the photo
- Transform photos and objects - twist, compress, flip and flip.
In this article I will tell you how to use Photoshop to reduce a picture, image, text, layer, individual object - everything that can be reduced in Photoshop. Photoshop allows you to quickly and easily reduce objects without losing image quality.
After all, it often happens that it is necessary to reduce a photograph or picture before sending it by mail or uploading it to any website in order to show it to people. The huge original sizes of photos are not suitable and therefore Photoshop comes to the rescue to make the photo smaller.
I will be using Photoshop CS 6 to perform the reduction operations.
How to make a photo smaller
First, open the desired photo in Photoshop. Click CTRL+O or File - Open (File - Open) and select the desired photo on the disk.
The photo was opened in Photoshop:
The photo is a huge size 1600x1200 pixels. But for example, we need 600x450 or so.
There is a way to reduce the photo proportionally, to do this, go to the menu Image - Image size (Image - Image Size). In English Photoshop this window looks like this:

We see the meanings Width And Height (Width And Height), make sure the values are shown in pixels, but if you need you can view and change in centimeters and other measurements.
Enter the width instead of 1600 to 600 and you will see how the height is automatically adjusted to 450 so that the photo resize is proportional.
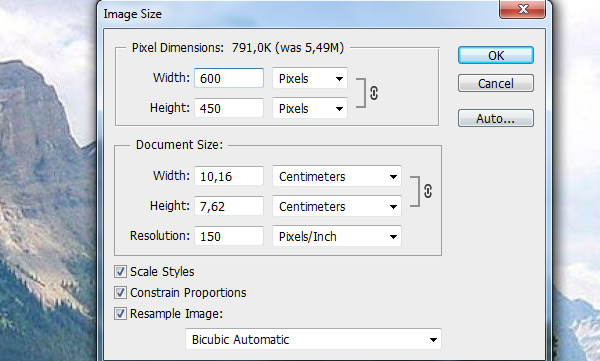
Click OK and that's it! Our photo has been reduced in size:

Select the desired area and zoom out
But what if we don’t need the whole photo, but part of it? And we need to reduce this part, but not proportionally and in our own opinion. The function we used before will not work for this.
Let's say we have this picture with balloons and we opened it in Photoshop:

But we don’t need all the balls, we only need the blue one and we need to reduce it a little. To do this, select a tool Crop Tool(in the Russian version it is called Cropping) - using it we can select the area of the image we need and crop it. Namely the blue ball.
The tool itself on the panel looks like this:

Select the desired area:

Click Enter on the keyboard - we will cut out this ball and the rest of the image will be deleted.

Great. Now we need to make the ball smaller. You can use the function as in the previous step. Or you can do it differently, while maintaining the size of the image. First, let's get rid of the background and make it plain. To do this, we need to select the ball, cut it out and place it on a separate layer. And on another layer we will make the background.
Using a tool Polygonal Lasso Tool select the ball.

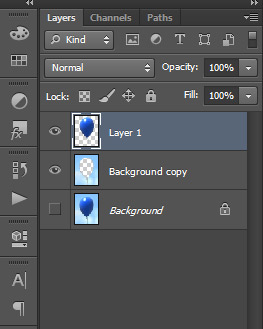
Click CTRL+X to cut it and copy it. After you click, it will disappear, and behind it there will be a transparent background. Press CTRL+V immediately to insert the ball. The ball is inserted a little to the side from the original place. And it will be immediately inserted automatically onto a new layer:

Now we'll quickly make a different background so that the ball doesn't seem cut out. But the old background is not suitable because there is a cut-out area due to the ball, and since we will make the ball even smaller, it will be even larger.
Create a new layer under the ball and fill it with any color:

Of course, the ball does not look neat, but the purpose of this article is to tell you how to reduce it in Photoshop, and not cut it out. Read about how to cut in Photoshop and in what ways in our other article.
Now let's make the ball smaller. Select the ball layer and click CTRL+T(or menu Edit - Transform - Scale(Edit - Transform - Scale)) and you will see how a frame appears around the ball to make it smaller:

Now drag the squares to scale the ball. You can make an image smaller as needed while maintaining the overall size of the document in Photoshop. You're scaling down an individual object that's on a separate layer, not the entire image document.

You can apply all these methods as you need, in any order. Knowing these techniques, you will cope with any task in which you need to reduce something in Photoshop.
I was prompted to write this article by a frequently asked question - “How to properly compress a photo and not lose the quality of the picture?” I'll try to answer it quite simply.
I would like to correct myself right away, another reason for writing was the decision to increase the maximum allowable size of published photographs to 1024 pixels on the wide side, while maintaining the maximum allowable file size of 100 KB.
So, let's begin. The described method is the simplest and most accessible, so I am sure that you can master it and remember the procedure the first time.
Step 1. Open the file.
Launching Photoshop, Program menu choose File-Open in the opened Dialog box find the required file and open it in Photoshop.
Step 2: Framing
It is strongly recommended to remove all unnecessary, unnecessary information from the photo (cans, ashtrays, cigarette packs, relatives and pets. Exception: Oleg Yakushenko’s Cat), that is, simply crop the image.
To do this you need to use the tool Rectangular area(highlighted in red in the second photo) and select the desired area. We must remember that to maintain the proportions of the photo, the aspect ratio must be 4 to 3 (resolutions 600:450, 800:600, 1024:768, and so on). 
After selecting an area in Program menu choose Image-Crop, the extra area will be discarded and the object of interest to us will remain.
Step 3: Resizing the Image
In this case, the original photo had the following parameters
Resolution 2592:1944 pixels, file size 2Mb. After cropping
the resolution has become 2208:1563 pixels, which will become visible if in Program menu choose Image-Image Size
in the window Image Size in the column Width set the required resolution, in our case 1024, click Yes and we see how our picture has become smaller 

We have changed the image size, now all that remains is to compress the file itself to the desired size.
Step 4. Compress the file
Without closing the window, select File-Save As in the window that opens, select the folder to save, you can also change the file name.
Attention Be sure to check anything in the column File type was JPEG, otherwise you most likely will not be able to upload the file to the site. 

After the command Save Window will open JPEG options
Below in the column Size the current file size is visible ~143.93 KB, we need to reduce it to at least 100 KB
To do this, in the column Image Options Smoothly move the slider to the left. It is not recommended to compress a file with a quality lower than 5; it is better to reduce the image size even more

The second photo shows that the file size has decreased to ~86.32 KB, which is what we needed.
As a result, from a large photograph with a size of 2592:1944 pixels and a “weight” of 2 MB, we received a cropped image with a resolution of 1024:725 pixels and a “weight” of ~86 KB. 
Before sending photos, it's a good idea to work with Image correction: white balance, brightness, contrast, etc., but I will try to talk about this in the next article.
There are times when you need to quickly reduce the amount of space on your computer's hard drive that JPG photos occupy. It is desirable that the procedure takes place without significant loss of image quality. There are several simple ways to make a photo “lose weight.”
Is it possible to reduce JPG size online
The weight of the image is taken to be its volume in megabytes, which sometimes needs to be made smaller. This procedure is extremely necessary for those who often work with photographs, because modern devices take pictures of considerable size. It will not be possible to store a significant number of “heavy” drawings - this requires an additional hard drive, and often the price of another information storage is high. However, special programs have already been created that reduce the volume of pictures. In addition, before installing them, you can try compressing photos online.
On the World Wide Web you can find many services with which you can figure out how to compress photos in JPG format to fewer megabytes. They all work on the same principle - the user uploads the required image to the site, presses just one button, and after a while the system asks to save the image with a reduced size to the computer. Internet services are completely free, so this method of compressing photos without losing quality is considered one of the best and fastest.
As a standard, such portals have many additional functions and capabilities - cropping the image, rotating it in the desired direction, mirroring it, or even adding beautiful frames/effects. The resources are freely available, so to find them, you just need to enter a query into any search engine, and in a second you will receive a whole list of photo compression sites.
How to compress a JPG file
It also happens that the speed of the Internet or the technical data of the computer/browser do not allow you to upload photos to the network. Then special services come to the rescue that can compress photos without losing quality. You can use third-party utilities or standard ones (Windows basic set). Therefore, before you reduce a JPG file, you need to understand on what principle these programs do their work.

How to compress a photo to the desired size in Paint
Paint is a standard Windows program for processing any images, so there is no need to install it. With its help, you can easily compress photos to the desired format. There is no need to download it; it is already present in the basic set of the operating system. The program is easy to use - just a few mouse clicks are enough for the picture to become the desired size. How to reduce JPG file size using Paint:
- Open the picture in Paint (right-click on the photo, “open with”, select Paint).
- On the top workbar, select the “resize” tool.
- Select the “horizontal” option and change the specified value downward.
- Enter a similar value in the “vertical” section.
- Click OK.
- Save the modified drawing.
How to reduce the weight of a JPG file in Photoshop
A very popular service that will help you figure out how to reduce the size of a JPG file without compromising quality is Photoshop. A graphic editor with a large set of functions can frighten inexperienced users with an abundance of incomprehensible buttons. However, if you know the sequence of actions, it will be easy to reduce the number of megabytes of photos. Before you can compress JPG using Photoshop, you need to install it. What to do after this:
- Open the picture in Photoshop (right click on the photo, “open with”, select Adobe Photoshop).
- Alternatively, the picture can be opened directly from the utility – “File” tab – “Open” item.
- In the top work area of the “Image” menu, then select “Image Size”.
- The window that opens will allow you to select all the necessary proportions of the photo (size of centimeters/pixels, width).
- At the bottom of the window, be sure to check the “Maintain proportions” checkbox (when you change the parameters, they will be edited evenly).
- In the "File" menu, select the "Save As" sub-item.
- Choose a JPEG format that will retain the original quality.
- After selecting the format, click on the “Save” button.

Other ways to compress JPG without losing quality
To process an image and reduce its weight, you can use third-party utilities, online web services - some of which are free, while others will have to be paid for. They provide different percentages of image compression, which is important - without affecting the quality. If you don’t know how to reduce the size of a JPG file, then in the table below you can find the necessary programs to help with this simple task:
|
Utility/web service |
Platform |
Compression, percent |