How to find out the disk status. How to check the hard drive on a laptop
Many PC users hardly think about checking the status of their HDD. Checking the hard drive is, first of all, necessary for early detection of errors in it.
If you manage to identify problems with your hard drive in advance, you will be able to save all the important information stored on it until it finally fails.
In this material, we will describe, using specific examples, the procedure for checking the status of the HDD, and also tell you what to do in a situation if your hard drive is faulty.
How to check the status of your hard drive
You can check the status of your hard drive using various utilities that read the status of your hard drive from its self-diagnosis system SMART. SMART technology is now installed on every hard drive produced. SMART technology was developed back in 1992 and is still being improved to this day. The main goal of SMART is logging the hard drive aging process. That is, information such as the number of HDD starts, the number of spindle rotations and many others is collected. More SMART watches for errors"screw", both software and mechanical and, to the extent possible corrects them. During the monitoring process, SMART performs various short and long tests to identify those same faults. In this material we will look at such programs that can read information from SMART:
- Ashampoo HDD Control 3;
- Defraggler;
- HDDlife;
- Victoria.
Each program on the list, in addition to reading SMART readings, offers a number of functions and tests that, to one degree or another, extend the life of the hard drive. But the most interesting is the program Victoria. The Victoria program, in addition to determining the HDD state, can also produce REMAP of bad sectors. That is, she can hide bad sectors by replacing them with spare ones, if available. Essentially, the REMAP procedure can completely restore the hard drive. It is also worth noting the possibility of fixing the hard drive thanks to the console application “ chkdsk" The console program "chkdsk" can fix file system errors, which will allow you to avoid reinstalling Windows.
Ashampoo HDD Control 3
First we will look at the program Ashampoo HDD Control 3. Let's run this utility on a computer running Windows 10.
The Ashampoo HDD Control 3 window displays the message “ ✓ OK", as well as the inscription " This hard drive has no problems" This information means that the hard drive in question is in perfect order. If when opening the program you see the message “ Error", as well as the inscription " This hard drive has a problem", this means that it has bad sectors or is overheating. To view complete information about the health of the “screw” taken from the smart, you need to click on the footnote “” located in the central block.
In addition to viewing information from the smart device, Ashampoo HDD Control 3 can launch self test S.M.A.R.T. And surface inspection test. You can test these tests in the "" block.

By performing these tests, you can also identify problems with the HDD. In addition to taking readings from smart devices and tests, Ashampoo HDD Control 3 can:
- Perform defragmentation;
- Clean the system of debris;
- Find and delete duplicate files;
- Securely erase files from the HDD, without the possibility of recovery.
The presence of such functionality of Ashampoo HDD Control 3 in monitoring the health of the drive and additional functions puts the utility in first place.
Defraggler
Utility Defraggler primarily intended for defragmentation, but besides this she can read SMART readings. The utility is free and any user can download it from the website www.piriform.com. After launching the utility, you need to go to the “ State».

In the window you can see that the utility displays a message about the status of the screw, like “ GOOD" - this means that he is completely fine. If you see the message " Error" in status, this will mean that the hard drive has bad sectors and it’s time to change it. The utility is quite simple and is suitable primarily for novice PC users who want to monitor the health of the HDD and defragment it. I would also like to note that the utility supports all current operating systems, from Windows XP to Windows 10.
How to check your hard drive using HDDlife
Utility HDDlife It has a nice interface and immediately provides the information we need, which is responsible for the serviceability and breakdown of the screw.

From the image above you can see that in the health block there is " OK!", which means that everything is fine with the HDD. To view smart details, you just need to click on the link “ click to view S.M.A.R.T. attributes».

If you see a message in the health block " DANGER!", this means that your HDD will soon become unusable.

In this case, you need to replace the old hard drive with a new one. The HDDlife utility is, first of all, suitable for novice PC users, since its simplicity will make it easy to monitor the health of the “screw”. In addition to the standard utility, the developer also releases HDDlife for Notebooks, which is designed for laptops. The laptop version has the same functionality as the standard version, but can also perform HDD noise level control. It is also worth noting that the program supports all current operating systems, from Windows XP to Windows 10.
Victoria
Program Victoria is being developed in a version for DOS and by Windows. For our example, we will use the Windows version of Victoria, which can be downloaded from http://hdd-911.com. Victoria is currently available in version 4.47. By launching the Victoria utility, we will be taken to such a window.

Victoria does not have a beautiful interface, as in previous utilities and is written in such old languages as Delphi And Assembler.
In the first tab of the quiz " Standard"is all information about installed hard drives to the computer.
Second tab " SMART» needed for smart reading. To display smart results, you must click the Get SMART button, after which the results will be displayed.

In the hard drive in question, Victoria discovered 1212 bad sectors. This number of BAD sectors is critical, so in this case it is necessary to full backup all data from the HDD. To repair a hard drive using the REMAP test in Victoria, you need to go to the “ Tests" and select the mode " Remap" After these steps, you can begin the procedure of reassigning bad sectors to backup ones with the Start button.

The REMAP test in Victoria can take a very long time. The test time depends on the number of BAD sectors. This test of the Victoria utility does not always help, since there may not be any spare sectors left in the screw.
Please note that using Victoria tests, you can damage the serviceability of the HDD and the information on it.
How to check if a disk is healthy using “chkdsk”
It may happen that by checking the S.M.A.R.T. values. Using the utilities described above, you did not find any problems, but the system still behaves unstable. Instability can manifest itself as blue screens of death and freezes in programs. This behavior of the Windows operating system is caused by file system errors. In this case, the console command “ chkdsk" By running the "chkdsk" command, you can fully restore functionality Windows OS. For this example, we will take a computer with the new Windows 10 operating system. First of all, we will open the console in Windows 10 as an administrator. This can be easily done by right-clicking on the “ Start» and selecting the item we need.

In the running console, execute the following command CHKDSK F: /F /R After checking using the command application “chkdsk”, the result of the check will be displayed in the console.
Now let's look at the command " CHKDSK F: /F /R» more details. Immediately after the command “chkdsk” comes the letter “ F" - this letter local disk, where we correct errors. Keys " /F" And " /R» fix errors in the file system, and fix bad sectors. These keys are almost always used, unlike the others. You can view the remaining keys with the command chkdsk /?
It is also worth noting that in Windows 10 the capabilities of the chkdsk application have been significantly expanded thanks to new keys.
How to check your hard drive's health using DST
Abbreviation DST deciphered Disk Self Test, that is self test disk. Manufacturers specifically integrate this method into the HDD, so that later, using special software, they can perform DST self-diagnosis, which will identify problems. By testing the “screw” using DST you can get information about possible hard drive failure. It is especially convenient to use DST on servers and computers of enterprises, where reliable storage of information plays an important role. Now let's look at using DST using HP laptops as an example. For new HP laptops with support UEFI BIOS There is a special diagnostic menu " Startup Menu" This menu is launched using combination of power key and key ESC.

To run system tests, press the F2 button.

In the window that appears, DST is called Hard Disk Test. After selecting it, a self-test will start.

Other manufacturers also have a DST method, only the launch on a PC from other manufacturers differs from that discussed above.
Checking your hard drive in Linux
For example, let's take a computer based on the Ubuntu 16.04 operating system. To do this, let's launch a terminal in Ubuntu. In the terminal, type the following command: sudo apt-get install smartmontools This command should install
If you don't like working in console mode, you can install a graphical utility Gnome-disk-utility. In it you can see everything you need about the HDD and its condition.

Let's sum it up
In this article, we described how you can monitor the status of the HDD, as well as how to fix its sectors and file system, if possible. From the material it becomes clear that monitoring the status of hard drives is very important, as it allows anticipate HDD failure.
If you have discovered that your hard drive is problematic, then do not put off replacing it until later. The problematic “screw” can fail at any moment, and you will lose all the information stored on the computer.
We hope our material will be useful to our readers and will completely help solve the problem of checking a hard drive.
Video on the topic
HDDScan
The program is designed to check hard drives and SSDs for bad sectors, view S.M.A.R.T. attributes, changing special settings, such as power management, spindle start/stop, acoustic mode adjustment, etc. The drive temperature value can be displayed in the taskbar.
Features and Requirements
Supported drive types:- HDD with ATA/SATA interface.
- HDD with SCSI interface.
- HDD with USB interface (see Appendix A).
- HDD with FireWire or IEEE 1394 interface (see Appendix A).
- RAID arrays with ATA/SATA/SCSI interface (tests only).
- Flash drives with USB interface (tests only).
- SSD with ATA/SATA interface.
- Test in linear verification mode.
- Test in linear reading mode.
- Test in linear recording mode.
- Butterfly reading mode test (artificial random reading test)
- Reading and analyzing S.M.A.R.T. parameters from disks with ATA/SATA/USB/FireWire interface.
- Reading and analyzing log tables from SCSI drives.
- Launch S.M.A.R.T. tests on drives with ATA/SATA/USB/FireWire interfaces.
- Temperature monitor for drives with ATA/SATA/USB/FireWire/SCSI interfaces.
- Reading and analysis of identification information from drives with ATA/SATA/USB/FireWire/SCSI interfaces.
- Changing AAM, APM, PM parameters on drives with ATA/SATA/USB/FireWire interfaces.
- View information about defects on a drive with a SCSI interface.
- Spindle start/stop on drives with ATA/SATA/USB/FireWire/SCSI interface.
- Saving reports in MHT format.
- Printing reports.
- Skin support.
- Command line support.
- Support for SSD drives.
- Operating system: Windows XP SP3, Windows Server 2003, Windows Vista, Windows 7, Windows 8, Windows 10 (NEW).
- The program should not be run from a drive operating in read-only mode.
User Interface
Main view of the program at startup
Rice. 1 Main type of program
Main window controls:
- Select Drive – a drop-down list that contains all supported drives in the system. The drive model and serial number are displayed. Nearby there is an icon that determines the expected type of drive.
- S.M.A.R.T. button – allows you to get a report on the state of the drive based on S.M.A.R.T attributes.
- TESTS button – displays a pop-up menu with a selection of read and write tests (see Figure 2).
- TOOLS Button – Displays a pop-up menu to select available drive controls and functions (see Figure 3).
- More button – shows a drop-down menu with program controls.
When you click the TESTS button, a pop-up menu offers you one of the tests. If you select any test, the test dialog box will open (see Figure 4).
Rice. 2 Test menu

When you press the TOOLS button, a pop-up menu will prompt you to choose from the following options:
Rice. 3 Function menu

- DRIVE ID – Generates an identification information report.
- FEATURES – opens a window of additional program features.
- S.M.A.R.T. TEST – opens the S.M.A.R.T window. tests: Short, Extended, Conveyance.
- TEMP MON – starts the temperature monitoring task.
- COMMAND – opens a command line build window.
Test Dialog Box
Rice. 4 Test dialog box
Controls:
- The FIRST SECTOR field is the initial logical number of the sector to be tested.
- Field SIZE – the number of logical sector numbers for testing.
- Field BLOCK SIZE – block size in sectors for testing.
- Previous button – returns to the main program window.
- Next button – adds a test to the task queue.
- Only one surface test can be run at a time. This is due to the fact that the author of the program has not yet been able to obtain stable, high-quality results when running 2 or more tests simultaneously (on different drives).
- A test in Verify mode can have a block size limit of 256, 16384 or 65536 sectors. This is due to the way Windows works.
- The test in Verify mode may not work correctly on USB/Flash drives.
- When testing in Verify mode, the drive reads a block of data into the internal buffer and checks its integrity; no data is transferred through the interface. The program measures the readiness time of the drive after performing this operation after each block and displays the results. Blocks are tested sequentially - from minimum to maximum.
- When testing in Read mode, the drive reads data into the internal buffer, after which the data is transferred through the interface and stored in the program's temporary buffer. The program measures the total time of drive readiness and data transfer after each block and displays the results. Blocks are tested sequentially - from minimum to maximum.
- When testing in Erase mode, the program prepares a block of data filled with a special pattern with a sector number and transfers the data to the drive, the drive writes the received block ( the information in the block is irretrievably lost!). The program measures the total time of block transmission and recording and drive readiness after each block and displays the results. Blocks are tested sequentially - from minimum to maximum.
- Testing in Butterfly Read mode is similar to testing in Read mode. The difference is in the order in which the blocks are tested. Blocks are processed in pairs. The first block in the first pair will be Block 0. The second block in the first pair will be Block N, where N is the last block of the given section. The next pair will be Block 1, Block N-1, etc. Testing ends in the middle of a given area. This test measures reading and positioning time.
Task management window
Rice. 5 Task manager

This window contains the task queue. This includes all the tests that the program runs, as well as the temperature monitor. The manager allows you to remove tests from the queue. Some tasks can be paused or stopped.
Double-clicking on an entry in the queue brings up a window with information about the current task.
Test information window
The window contains information about the test, allows you to pause or stop the test, and also generates a report.
Graph Tab:
Contains information on the dependence of testing speed on the block number, which is presented in the form of a graph.
Rice. 6 Graph Tab

Map Tab:
Contains information about the dependence of testing time on the block number, which is presented in the form of a map.
Rice. 7 Map tab

You can select Block Processing Time in milliseconds. Each tested block that took longer than the "Block Processing Time" will be logged in the "Report" tab.
Report tab:
Contains information about the test and all blocks whose testing time is greater than the “Block Processing Time”.
Rice. 8 Report tab
Identification information
The report contains information about the main physical and logical parameters of the drive.
The report can be printed and saved to an MHT file.
Rice. 9 Example of identification information window

S.M.A.R.T. report
The report contains information about the performance and health of the drive in the form of attributes. If, according to the program, the attribute is normal, then a green icon appears next to it. Yellow indicates attributes that you should pay special attention to; as a rule, they indicate some kind of drive malfunction. Red denotes attributes that are outside the norm.
Reports can be printed or saved to an MHT file.
Rice. 10 Example of a S.M.A.R.T. report

Temperature monitor
Allows you to evaluate the storage temperature. Information is displayed in the taskbar, as well as in a special test information window. Rice. 11 contains readings for two drives.
Rice. 11 Temperature monitor in the taskbar

For ATA/SATA/USB/FireWire drives, the information window contains 2 values. The second value is displayed in the taskbar.
The first value is taken from the Airflow Temperature attribute, the second value is taken from the HDA Temperature attribute.
Rice. 12 Temperature monitor for ATA/SATA disk

For SCSI drives, the information window contains 2 values. The second value is displayed in the taskbar.
The first value contains the maximum permissible temperature for the drive, the second shows the current temperature.
Rice. 13 Temperature monitor for SCSI disk

S.M.A.R.T. tests
The program allows you to run three types of S.M.A.R.T. tests:
- Short test – usually lasts 1-2 minutes. Checks the main components of the drive, and also scans a small area of the drive surface and sectors located in the Pending-List (sectors that may contain read errors). The test is recommended for quickly assessing the condition of the drive.
- Extended test – usually lasts from 0.5 to 60 hours. Checks the main components of the drive, and also completely scans the surface of the drive.
- Conveyance test – usually lasts several minutes. Checks drive nodes and logs, which may indicate improper storage or transportation of the drive.
A SMART test can be selected from the SMART Tests dialog box, which is accessed by clicking the SMART TESTS button.
Rice. 14 SMART Tests Dialog Box

Once selected, the test will be added to the Tasks queue. S.M.A.R.T information window test can display the execution and completion status of a task.
Rice. 15 Information window S.M.A.R.T. test

Additional features
For ATA/SATA/USB/FireWire drives, the program allows you to change some parameters.
- AAM – function controls drive noise. Enabling this function allows you to reduce drive noise due to smoother positioning of the heads. At the same time, the drive loses a little performance during random access.
- APM function allows you to save drive power by temporarily reducing the rotation speed (or completely stopping) the drive spindle during idle time.
- PM – function allows you to set the spindle stop timer for a specific time. When this time is reached, the spindle will be stopped, provided that the drive is in idle mode. Accessing the drive by any program forces the spindle to spin up and the timer is reset to zero.
- The program also allows you to force stop or start the drive spindle. Accessing the drive by any program forces the spindle to spin.
Rice. 16 Information window for additional ATA/SATA drive capabilities

For SCSI drives, the program allows you to view defect lists and start/stop the spindle.
Rice. 17 Information window for additional SCSI drive capabilities

Using the Command Line
The program can build a command line to control certain drive parameters and save this line to a .bat or .cmd file. When such a file is launched, the program is called in the background, changes the drive parameters in accordance with the specified ones, and closes automatically.
Rice. 18 Command line build window

Appendix A: USB/FireWire Drives
If the drive is supported by the program, then tests are available for it, S.M.A.R.T. functions and additional features.
If the drive is not supported by the program, then only tests are available for it.
USB/FireWire drives supported by the program:
| Storage device | Controller chip |
| StarTeck IDECase35U2 | Cypress CY7C68001 |
| WD Passpopt | Unknown |
| Iomega PB-10391 | Unknown |
| Seagate ST9000U2 (PN: 9W3638-556) | Cypress CY7C68300B |
| Seagate External Drive (PN: 9W286D) | Cypress CY7C68300B |
| Seagate FreeAgentPro | Oxford |
| CASE SWEXX ST010 | Cypress AT2LP RC7 |
| Vantec CB-ISATAU2 (adapter) | JMicron JM20337 |
| Beyond Micro Mobile Disk 3.5" 120GB | Prolific PL3507 (USB only) |
| Maxtor Personal Storage 3100 | Prolific PL2507 |
| In-System ISD300A | |
| SunPlus SPIF215A | |
| Toshiba USB Mini Hard Drive | Unknown |
| USB Teac HD-15 PUK-B-S | Unknown |
| Transcend StoreJet 35 Ultra (TS1TSJ35U-EU) | Unknown |
| AGEStar FUBCP | JMicron JM20337 |
| USB Teac HD-15 PUK-B-S | Unknown |
| Prolific 2571 | |
| All Drives That Support SAT Protocol | Majority of Modern USB controllers |
USB/FireWire drives that the program may support:
| Storage device | Controller chip |
| AGEStar IUB3A | Cypress |
| AGEStar ICB3RA | Cypress |
| AGEStar IUB3A4 | Cypress |
| AGEStar IUB5A | Cypress |
| AGEStar IUB5P | Cypress |
| AGEStar IUB5S | Cypress |
| AGEStar NUB3AR | Cypress |
| AGEStar IBP2A2 | Cypress |
| AGEStar SCB3AH | JMicron JM2033x |
| AGEStar SCB3AHR | JMicron JM2033x |
| AGEStar CCB3A | JMicron JM2033x |
| AGEStar CCB3AT | JMicron JM2033x |
| AGEStar IUB2A3 | JMicron JM2033x |
| AGEStar SCBP | JMicron JM2033x |
| AGEStar FUBCP | JMicron JM2033x |
| Noontec SU25 | Prolific PL2507 |
| Transcend TS80GHDC2 | Prolific PL2507 |
| Transcend TS40GHDC2 | Prolific PL2507 |
| I-O Data HDP-U series | Unknown |
| I-O Data HDC-U series | Unknown |
| Enermax Vanguard EB206U-B | Unknown |
| Thermaltake Max4 A2295 | Unknown |
| Spire GigaPod SP222 | Unknown |
| Cooler Master - RX-3SB | Unknown |
| MegaDrive200 | Unknown |
| RaidSonic Icy Box IB-250U | Unknown |
| Logitech USB | Unknown |
USB/FireWire drives that the program does not support:
| Storage device | Controller chip |
| Matrix | Genesis Logic GL811E |
| Pine | Genesis Logic GL811E |
| Iomega LDHD250-U | Cypress CY7C68300A |
| Iomega DHD160-U | Prolific PL-2507 (modified firmware) |
| Iomega | |
| Maxtor Personal Storage 3200 | Prolific PL-3507 (modified firmware) |
| Maxtor One-Touch | Cypress CY7C68013 |
| Seagate External Drive (PN-9W2063) | Cypress CY7C68013 |
| Seagate Pocket HDD | Unknown |
| SympleTech SympleDrive 9000-40479-002 | CY7C68300A |
| Myson Century CS8818 | |
| Myson Century CS8813 |
Appendix B: SSD drives
Support for a particular drive largely depends on the controller installed on it.
SSD drives supported by the program:
| Storage device | Controller chip |
| OCZ Vertex, Vertex Turbo, Agility, Solid 2 | Indilinx IDX110M00 |
| Super Talent STT_FTM28GX25H | Indilinx IDX110M00 |
| Corsair Extreme Series | Indilinx IDX110M00 |
| Kingston SSDNow M-Series | Intel PC29AS21AA0 G1 |
| Intel X25-M G2 | Intel PC29AS21BA0 G2 |
| OCZ Throttle | JMicron JMF601 |
| Corsair Performance Series | Samsung S3C29RBB01 |
| Samsung SSDs | Samsung Controllers |
| Crucial and Micron SSDs | Some Marvel Controllers |
SSD drives that the program may support:
Additional Information
Version HDDScan 3.3 can be downloaded version 2.8
| Support: |
Sooner or later (it’s better, of course, if early) any user asks himself the question of how long the hard drive installed on his computer will last and whether it’s time to look for a replacement. There is nothing surprising in this, since hard drives, due to their design features, are the least reliable among computer components. At the same time, it is on the HDD that most users store the lion's share of a wide variety of information: documents, pictures, various software, etc., as a result of which an unexpected failure of the disk is always a tragedy. Of course, it is often possible to restore information on apparently “dead” hard drives, but it is possible that this operation will cost you a pretty penny, and will cost you a lot of nerves. Therefore, it is much more effective to try to prevent data loss.
How? It’s very simple... Firstly, do not forget about regular data backups, and secondly, monitor the condition of the disks using specialized utilities. We will consider several programs of this kind from the perspective of the tasks being solved in this article.
Control of SMART parameters and temperature
All modern HDDs and even solid state drives (SSDs) support S.M.A.R.T technology. ( from English Self-Monitoring, Analysis, and Reporting Technology (self-monitoring, analysis and reporting technology), which was developed by major hard drive manufacturers to increase the reliability of their products. This technology is based on continuous monitoring and assessment of the condition of the hard drive using built-in self-diagnosis equipment (special sensors), and its main purpose is the timely detection of possible drive failure.
Real-time HDD status monitoring
A number of information and diagnostic solutions for diagnosing and testing hardware, as well as special monitoring utilities, use S.M.A.R.T technology. to monitor the current status of various vital parameters that describe the reliability and performance of hard drives. They read the relevant parameters directly from the sensors and thermal sensors that all modern hard drives are equipped with, analyze the received data and display them in the form of a short tabular report with a list of attributes. At the same time, some utilities (Hard Drive Inspector, HDDlife, Crystal Disk Info, etc.) are not limited to displaying a table of attributes (the meanings of which are incomprehensible to untrained users) and additionally display brief information about the state of the disk in a more understandable form.
Diagnosing the condition of a hard drive using this kind of utility is as easy as shelling pears - just read the brief basic information about installed HDDs: basic data about drives in Hard Drive Inspector, a certain conditional percentage of hard drive health in HDDlife, and the “Technical Condition” indicator in Crystal Disk Info ( Fig. 1), etc. Any of these programs provides the minimum necessary information about each of the HDDs installed on the computer: data about the hard drive model, its volume, operating temperature, operating time, as well as the level of reliability and performance. This information makes it possible to draw certain conclusions about the performance of the media.
Rice. 1. Brief information about the “health” of the working HDD
You should configure the monitoring utility to launch simultaneously with the start of the operating system, adjust the time interval between checks of S.M.A.R.T. attributes, and also enable the display of the temperature and “health level” of hard drives in the system tray. After this, to monitor the status of the disks, the user will only need to glance from time to time at the indicator in the system tray, where brief information about the state of the drives available in the system will be displayed: their “health” level and temperature (Fig. 2). By the way, operating temperature is no less important an indicator than a conditional indicator of the health of the HDD, because hard drives can suddenly fail due to simple overheating. Therefore, if the hard drive heats up above 50 °C, then it would be wiser to provide it with additional cooling.

Rice. 2.Display HDD Status
in the system tray with the HDDlife program
It is worth noting that a number of such utilities provide integration with Windows Explorer, due to which a green icon is displayed on the icons of local drives if they are working properly, and if problems arise, the icon turns red. So you are unlikely to forget about the health of your hard drives. With such constant monitoring, you will not be able to miss the moment when some problems begin to arise with the disk, because if the utility detects critical changes in S.M.A.R.T. attributes. and/or temperature, it will carefully notify the user about this (with a message on the screen, a sound message, etc. - Fig. 3). Thanks to this, it will be possible to copy data from the dangerous media in advance.

Rice. 3. Example of a message about the need to immediately replace the disk
Using S.M.A.R.T. monitoring solutions in practice to monitor the status of hard drives is completely easy, because all such utilities work in the background and require a minimum of hardware resources, so their functioning will in no way interfere with the main workflow.
Control of S.M.A.R.T. attributes
Advanced users, of course, are unlikely to limit themselves to assessing the condition of hard drives by viewing a brief verdict from one of the utilities presented above. This is understandable, because according to the decoding of the S.M.A.R.T. attributes. You can identify the cause of failures and, if necessary, take precautionary measures. True, to independently control S.M.A.R.T. attributes, you will need to at least briefly become familiar with S.M.A.R.T technology.
Hard drives that support this technology include intelligent self-diagnostic procedures so they can “report” their current status. This diagnostic information is provided as a collection of attributes, that is, specific characteristics of the hard drive used to analyze its performance and reliability.
B O Most of the important attributes have the same meaning for drives from all manufacturers. The values of these attributes during normal disk operation may vary within certain intervals. For any parameter, the manufacturer has determined a certain minimum safe value that cannot be exceeded under normal operating conditions. Unambiguously determine critically important and critically unimportant S.M.A.R.T parameters for diagnostics. problematic. Each of the attributes has its own information value and indicates one or another aspect of the work of the medium. However, first of all you should pay attention to the following attributes:
- Raw Read Error Rate - the frequency of errors in reading data from the disk caused by the fault of the equipment;
- Spin Up Time - average spin-up time of the disk spindle;
- Reallocated Sector Count - number of sector reassignment operations;
- Seek Error Rate - frequency of occurrence of positioning errors;
- Spin Retry Count - the number of repeated attempts to spin up disks to operating speed if the first attempt fails;
- Current Pending Sector Count - the number of unstable sectors (that is, sectors awaiting the reassignment procedure);
- Offline Scan Uncorrectable Count - the total number of uncorrected errors during sector read/write operations.
Typically S.M.A.R.T. attributes are displayed in tabular form indicating the attribute name (Attribute), its identifier (ID) and three values: current (Value), minimum threshold (Threshold) and the lowest attribute value for the entire operating time of the drive (Worst), as well as the absolute value of the attribute (Raw). Each attribute has a current value, which can be any number from 1 to 100, 200, or 253 (there are no general standards for upper bounds on attribute values). The Value and Worst values for a completely new hard drive are the same (Fig. 4).

Rice. 4. Attributes of S.M.A.R.T. with a new HDD
Shown in Fig. 4 information allows us to conclude that for a theoretically serviceable hard drive, the current (Value) and worst (Worst) values should be as close as possible to each other, and the Raw value for most parameters (with the exception of the parameters: Power-On Time, HDA Temperature and some others ) should approach zero. The current value may change over time, which in most cases reflects deterioration of the hard drive parameters described by the attribute. This can be seen in Fig. 5, which presents fragments of the S.M.A.R.T attribute table. for the same disk - data were obtained with an interval of six months. As you can see, in the more recent version of S.M.A.R.T. the frequency of errors when reading data from the disk (Raw Read Error Rate), the origin of which is determined by the hardware of the disk, and the frequency of errors when positioning the magnetic head unit (Seek Error Rate) have increased, which may indicate overheating of the hard drive and its unstable position in the basket . If the current value of any attribute approaches or becomes less than the threshold value, then the hard drive is considered unreliable and should be replaced urgently. For example, a drop in the value of the Spin-Up Time attribute (average spin-up time of the disk spindle) below a critical value, as a rule, indicates complete wear of the mechanics, as a result of which the disk is no longer able to maintain the rotation speed specified by the manufacturer. Therefore, it is necessary to monitor the condition of the HDD and periodically (for example, once every 2-3 months) carry out S.M.A.R.T diagnostics. and save the received information in a text file. In the future, these data can be compared with current ones and certain conclusions can be drawn about the development of the situation.
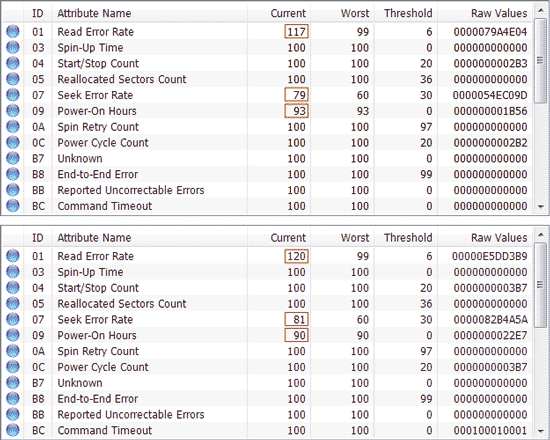
Rice. 5. S.M.A.R.T. attribute tables obtained at six-month intervals
(more recent version of S.M.A.R.T. below)
When viewing S.M.A.R.T. attributes, you should first of all pay attention to critical parameters, as well as parameters highlighted by indicators other than the base color (usually blue or green). Depending on the current state of the attribute in the S.M.A.R.T. utility output. in the table it is usually marked in one color or another, which makes it easier to understand the situation. In particular, in the Hard Drive Inspector program, the color indicator can have green, yellow-green, yellow, orange or red - green and yellow-green colors indicate that everything is normal (the attribute value has not changed or changed insignificantly), and yellow, orange and red colors signal danger (the worst color is red, which indicates that the attribute value has reached its critical value). If any of the critical parameters are marked with a red icon, then you urgently need to replace the hard drive.
In the Hard Drive Inspector program, let's look at the table of S.M.A.R.T. attributes of the same drive, which we briefly assessed using monitoring utilities earlier. From Fig. 6 it can be seen that the values of all attributes are normal and all parameters are marked in green. The HDDlife and Crystal Disk Info utilities will show a similar picture. True, more professional solutions for analyzing and diagnosing HDDs are not so loyal and often mark S.M.A.R.T. attributes more meticulously. For example, such well-known utilities as HD Tune Pro and HDD Scan, in our case, were suspicious of the UltraDMA CRC Errors attribute, which displays the number of errors that occur when transmitting information over the external interface (Fig. 7). The cause of such errors is usually associated with a twisted and poor-quality SATA cable, which may need to be replaced.

Rice. 6. Table of S.M.A.R.T. attributes obtained in the Hard Drive Inspector program

Rice. 7. Results of assessing the state of S.M.A.R.T. attributes
HD Tune Pro and HDD Scan utilities
For comparison, let’s take a look at the S.M.A.R.T. attributes of a very ancient, but still working HDD with periodically arising problems. It did not inspire confidence in the Crystal Disk Info program - in the “Technical Condition” indicator, the disk condition was rated as alarming, and the Reallocated Sector Count attribute was highlighted in yellow (Fig. 8). This is a very important attribute from the point of view of the “health” of the disk, indicating the number of sectors reassigned when the disk detects a read/write error; during this operation, data from the damaged sector is transferred to the reserve area. The yellow color of the indicator for the parameter indicates that there are few remaining spare sectors with which to replace the bad ones, and soon there will be nothing to reassign the newly appearing bad sectors. Let's also check how more serious solutions assess the condition of the disk, for example, the HDDScan utility widely used by professionals - but here we see exactly the same result (Fig. 9).

Rice. 8. Assessing a problematic hard drive in CrystalDiskInfo

Rice. 9. Results of S.M.A.R.T. diagnostics of HDD in HDDScan
This means that it’s clearly not worth delaying the replacement of such a hard drive, although it may still serve for some time, although, of course, you cannot install an operating system on this hard drive. It is worth noting that if there are a large number of reassigned sectors, the read/write speed drops (due to the unnecessary movements that the magnetic head has to make), and the disk begins to noticeably slow down.
Scanning the surface for bad sectors
Unfortunately, in practice, monitoring SMART parameters and temperature alone is not enough. If the slightest evidence appears that something is wrong with the disk (in the case of periodic program freezes, for example, when saving results, reading error messages appear, etc.), it is necessary to scan the disk surface for the presence of unreadable sectors. To carry out such a media check, you can use, for example, the HD Tune Pro and HDDScan utilities or diagnostic utilities from hard drive manufacturers, however, these utilities only work with their own hard drive models, and therefore we will not consider them.
When using such solutions, there is a risk of damaging data on the scanned disk. On the one hand, if the drive really turns out to be faulty, anything can happen to the information on the disk during scanning. On the other hand, we cannot exclude incorrect actions on the part of the user who mistakenly starts scanning in write mode, during which data from the hard drive is erased sector by sector with a certain signature, and based on the speed of this process, a conclusion is drawn about the state of the hard drive. Therefore, compliance with certain precautionary rules is absolutely necessary: before launching the utility, you need to create a backup copy of the information and during the test, act strictly according to the instructions of the developer of the relevant software. To get more accurate results, before scanning, it is better to close all active applications and unload possible background processes. In addition, you should keep in mind that if you need to test the system HDD, you need to boot from a flash drive and start the scanning process from it, or completely remove the hard drive and connect it to another computer from which you can start testing the disk.
As an example, using HD Tune Pro, we will check the surface of the HDD for bad sectors, which did not inspire confidence in the Crystal Disk Info utility above. In this program, to start the scanning process, just select the desired disk, activate the tab Error Scan and click on the button Start. After this, the utility will begin sequential scanning of the disk, reading sector by sector and marking sectors on the disk map with multi-colored squares. The color of the squares, depending on the situation, can be green (normal sectors) or red (bad blocks) or will have some shade intermediate between these colors. As we see from Fig. 10, in our case the utility did not find full-fledged bad blocks, but nevertheless there is a significant number of sectors with one or another read delay (judging by their color). In addition to this, in the middle part of the disk there is a small block of sectors, the color of which is close to red - these sectors have not yet been recognized as bad by the utility, but they are already close to this and will move into the bad category in the very near future.

Rice. 10. Scanning the surface for bad sectors in HD Tune Pro
Testing a media for bad sectors in the HDDScan program is more difficult and even more dangerous, since if the mode is incorrectly selected, the information on the disk will be irretrievably lost. The first step to start scanning is to create a new task by clicking on the button New Task and selecting the command from the list Suface Tests. Then you need to make sure that the mode is selected Read- this mode is installed by default and when used, the hard disk surface is tested by reading (that is, without deleting data). After this press the button Add Test(Fig. 11) and double-click on the created task RD-Read. Now in the window that opens you can observe the disk scanning process on a graph (Graph) or on a map (Map) - fig. 12. Upon completion of the process, we will get approximately the same results as those demonstrated above by the HD Tune Pro utility, but with a clearer interpretation: there are no bad sectors (they are marked in blue), but there are three sectors with a response time of more than 500 ms (marked in red color), which pose a real danger. As for the six orange sectors (response time from 150 to 500 ms), this can be considered within normal limits, since such a response delay is often caused by temporary interference in the form, for example, of running background programs.

Rice. 11. Running disk testing in HDDScan program

Rice. 12. Results of disk scanning in Read mode using HDDScan
In addition, it should be noted that if there are a small number of bad blocks, you can try to improve the condition of the hard drive by removing bad sectors by scanning the disk surface in linear recording mode (Erase) using the HDDScan program. After such an operation, the disk can still be used for some time, but, of course, not as a system disk. However, you should not hope for a miracle, since the HDD has already begun to crumble, and there are no guarantees that in the near future the number of defects will not increase and the drive will not completely fail.
Programs for S.M.A.R.T. monitoring and HDD testing
HD Tune Pro 5.00 and HD Tune 2.55
Developer: EFD Software
Distribution size: HD Tune Pro - 1.5 MB; HD Tune - 628 KB
Work under control: Windows XP/Server 2003/Vista/7
Distribution method: HD Tune Pro - shareware (15-day demo version); HD Tune - freeware (http://www.hdtune.com/download.html)
Price: HD Tune Pro - $34.95; HD Tune - free (for non-commercial use only)
HD Tune is a convenient utility for diagnosing and testing HDD/SSD (see table), as well as memory cards, USB drives and a number of other data storage devices. The program displays detailed information about the drive (firmware version, serial number, disk capacity, buffer size and data transfer mode) and allows you to set the device status using S.M.A.R.T data. and temperature monitoring. In addition, it can be used to test the disk surface for errors and evaluate the device's performance by running a series of tests (sequential and random data read/write speed tests, file performance test, cache test and a number of Extra tests). The utility can also be used to configure AAM and securely delete data. The program is presented in two editions: commercial HD Tune Pro and free lightweight HD Tune. In the HD Tune edition, you can only view detailed information about the disk and the S.M.A.R.T. attribute table, as well as scan the disk for errors and test for speed in read mode (Low level benchmark - read).
The Health tab is responsible for monitoring S.M.A.R.T. attributes in the program - data from sensors is read after a set period of time, the results are displayed in a table. For any attribute, you can view the history of its changes in numerical form and on a graph. Monitoring data is automatically recorded in the log, but no user notifications are provided for critical changes in parameters.
As for scanning the disk surface for bad sectors, the tab is responsible for this operation Error Scan. Scanning can be quick (Quick scan) and deep - with a quick scan, not the entire disk is scanned, but only some part of it (the scanning area is determined through the Start and End fields). Damaged sectors are displayed on the disk map as red blocks.
HDDScan 3.3
Developer: Artem Rubtsov
Distribution size: 3.64 MB
Work under control: Windows 2000(SP4)/XP(SP2/SP3)/Server 2003/Vista/7
Distribution method: freeware (http://hddscan.com/download/HDDScan-3.3.zip)
Price: for free
HDDScan is a utility for low-level diagnostics of hard drives, solid-state drives and Flash drives with a USB interface. The main purpose of this program is to test disks for the presence of bad blocks and bad sectors. The utility can also be used to view the contents of S.M.A.R.T., monitor temperature and change some hard drive settings: noise management (AAM), power management (APM), forced start/stop of the drive spindle, etc. The program works without installation and can be launched from portable media, for example flash drives.
HDDScan displays S.M.A.R.T. attributes and temperature monitoring on demand. S.M.A.R.T report contains information about the performance and “health” of the drive in the form of a standard attribute table; the temperature of the drive is displayed in the system tray and in a special information window. Reports can be printed or saved as an MHT file. S.M.A.R.T. tests are possible.
The disk surface is checked in one of four modes: Verify (linear verification mode), Read (linear reading), Erase (linear writing) and Butterfly Read (Butterfly reading mode). To check a disk for the presence of bad blocks, a test in Read mode is usually used, which tests the surface without deleting data (the conclusion about the condition of the drive is made based on the speed of sector-by-sector data reading). When testing in linear recording mode (Erase), the information on the disk is overwritten, but this test can somewhat heal the disk, ridding it of bad sectors. In any of the modes, you can test the entire disk or a specific fragment of it (the scanning area is determined by indicating the initial and final logical sectors - Start LBA and End LBA, respectively). Test results are presented in the form of a report (Report tab) and displayed on a Graph and a disk map (Map), indicating, among other things, the number of bad sectors (Bads) and sectors whose response time during testing took more than 500 ms (marked in red ).
Hard Drive Inspector 4.13
Developer: AltrixSoft
Distribution size: 2.64 MB
Work under control: Windows 2000/XP/2003 Server/Vista/7
Distribution method: shareware (14-day demo version - http://www.altrixsoft.com/ru/download/)
Price: Hard Drive Inspector Professional - 600 rub.; Hard Drive Inspector for Notebooks - 800 rub.
Hard Drive Inspector is a convenient solution for S.M.A.R.T. monitoring of external and internal HDDs. Currently, the program is offered on the market in two editions: the basic Hard Drive Inspector Professional and the portable Hard Drive Inspector for Notebooks; the latter includes all the functionality of the Professional version, and at the same time takes into account the specifics of monitoring laptop hard drives. Theoretically, there is also an SSD version, but it is distributed only in OEM supplies.
The program provides automatic checking of S.M.A.R.T. attributes at specified intervals and upon completion issues its verdict on the condition of the drive, displaying the values of certain conditional indicators: “reliability”, “performance” and “no errors” along with a numerical temperature value and a temperature diagram. Technical data about the disk model, its capacity, total free space and operating time in hours (days) is also provided. In advanced mode, you can view information about disk parameters (buffer size, firmware name, etc.) and the S.M.A.R.T attribute table. There are various options for informing the user in the event of critical changes on the disk. Additionally, the utility can be used to reduce the noise level produced by hard drives and reduce HDD power consumption.
HDDlife 4.0
Developer: BinarySense Ltd
Distribution size: 8.45 MB
Work under control: Windows 2000/XP/2003/Vista/7/8
Distribution method: shareware (15-day demo version - http://hddlife.ru/rus/downloads.html)
Price: HDDLife - free; HDDLife Pro - 300 rub.; HDDlife for Notebooks - 500 rub.
HDDLife is a simple utility designed to monitor the status of hard drives and SSDs (from version 4.0). The program is presented in three editions: free HDDLife and two commercial ones - basic HDDLife Pro and portable HDDlife for Notebooks.
The utility monitors S.M.A.R.T. attributes and temperature at specified intervals and, based on the analysis results, issues a compact report on the condition of the disk indicating technical data about the disk model and its capacity, operating time, temperature, and also displays the conditional percentage of its health and performance, which allows Even beginners can navigate the situation. More experienced users can additionally look at the table of S.M.A.R.T. attributes. In case of problems with the hard drive, it is possible to configure notifications; You can configure the program so that if the disk is in normal condition, the scan results are not displayed. It is possible to control the HDD noise level and power consumption.
CrystalDiskInfo 5.4.2
Developer: Hiyohiyo
Distribution size: 1.79 MB
Work under control: Windows XP/2003/Vista/2008/7/8/2012
Distribution method: freeware (http://crystalmark.info/download/index-e.html)
Price: for free
CrystalDiskInfo is a simple utility for S.M.A.R.T. monitoring the status of hard drives (including many external HDDs) and SSDs. Despite being free, the program has all the necessary functionality to monitor the status of disks.
Disk monitoring is performed automatically after a specified number of minutes or on demand. At the end of the test, the temperature of the monitored devices is displayed in the system tray; detailed information about the HDD indicating the values of S.M.A.R.T. parameters, temperature and the program’s verdict on the state of the devices is available in the main window of the utility. There is functionality for setting threshold values for some parameters and automatically notifying the user if they are exceeded. Noise level management (AAM) and power management (APM) are possible.
Unfortunately, a considerable part of modern HDDs work normally for a little more than a year, then various kinds of problems begin, which over time can lead to data loss. This prospect can be completely avoided if you carefully monitor the condition of the hard drive, for example, using the utilities discussed in the article. However, you should also not forget about regular backup of valuable data, since monitoring utilities, as a rule, successfully predict disk failure due to mechanical faults (according to Seagate statistics, about 60% of HDDs fail due to mechanical components), but they are not able to predict the death of a drive due to problems with the electronic components of the disk.
Hello admin! I read several articles on your website about the Victoria program and a question arose. What, the latest operating system from Microsoft - Windows 10 - is so flawed and does not have a built-in hard drive diagnostic tool? Is it really not possible for it to determine the state of the hard drive on which it is installed and is it necessary to download third-party programs? I have a new laptop with Windows 10 and if there is such a tool, then please tell me about it in your articles. I also wanted to ask. In one of your comments, you said that it is useless to run the hard drive status check utility built into Windows 10 - CHKDSK to find and fix bad sectors (bad blocks). Why? After all, on all sites like yours it is written that chkdsk, launched with the /R parameter, can fix bad blocks!
How to find out the status of your hard drive using built-in tools in Windows 10
Hello friends! There are about a dozen articles on this topic on our website, but what’s interesting is that I didn’t tell you about this method, but it nevertheless exists.
In fact, you can find out the status of the hard drive in Windows 10 using built-in tools, but these tools will simply tell you: “Yes, the condition of the disk is good” or “The condition of the disk is bad,” but how bad is it and is it worth urgently copying data from HDD and replace it, or you can wait at least until tomorrow, that’s what they won’t tell you. Why?
In simple words, the operating system simply reads the self-diagnosis readings of the hard drive (S.M.A.R.T.) and if it is GOOD (good), then the system tells us so - “The disk is working fine.” If the S.M.A.R.T status of the hard drive is BAD (bad), then the system will indicate that the disk is faulty. But in life everything is relative and very often the HDD is on the verge of failure, and Windows still shows us that the disk is working normally.
In short, if you want to accurately diagnose a hard drive, then you can’t do without special programs and even chkdsk won't help you. I will try to prove this to you in today's article.
To find out the status of your hard drive in Windows 10 using built-in tools, you need to go to« Control Panel»
"Security and Service Center"

"Service"

As you can see, Windows 10 evaluates the condition of the hard drive as normal: All drives are working fine. OK.

But in fact, if you now run a special program for diagnosing hard drives, you will see that the condition of the hard drive is C (Alarm!) and it is full of unstable sectors that the built-in firmware of the hard drive could not fix.

The Victoria program will say the same thing.

How else can you find out the status of your hard drive using the built-in tools of Windows 10 or how to use the disk check utility (chkdsk). Running disk check from the GUI
Windows 10 has a disk check utility called chkdsk and you can run it directly in the graphical interface or using the command line. After checking, the utility will issue a full report on the state of the file system of your operating system installed.
Note: On many sites you may read that the chkdsk utility, run with the /R parameter, can fix bad sectors (bad blocks), but in fact this is not the case. Bad sectors can be reassigned to good sectors from backup tracks only by the technical control firmware built into the hard drive. disk status. What the chkdsk utility does is fix errors in the NTFS or FAT32 file system and it is best to use the utilitychkdsk to fix file system errors, not to diagnose the condition of the hard drive. Let me explain a little.
You all know that the minimum unit of information on a hard disk is a sector, the volume available to the user is 512 bytes. When formatting a hard drive into a file system, all sectors are combined into clusters (one cluster is placed on several sectors); accordingly, a cluster is the minimum area of the file system. So here it is, utility chkdsk does not work with hard disk sectors, but at a higher level - with clusters. In turn, the Victoria and MHDD programs are used to check hard disk sectors, not clusters; therefore, they do not treat the file system.
Go to the Computer window and right-click on the drive (C:), select “Properties”

Go to the “Service” tab and click on the “Check” button

"Check disk"

The disk is being checked for errors.

The disk has been successfully verified. No errors found.
Click on "Show details"

The Event Viewer window opens. You can view the scan results on the “Details” tab or Double-click the left mouse on the “Details” link
A hard drive (hard drive, hdd) is the main storage device for information on your laptop or PC. Its name is associated with physical properties: unlike floppy disks, disk data is recorded on hard plates, which can be made of aluminum or glass using the principle of magnetic recording. Very often, system slowness is associated with a faulty hdd, so before you send your laptop for repair, find out how to check the hard drive on your laptop and try to fix any errors you find yourself. We tell you how to do this in Russian in this article.
How to test a laptop hard drive?
HDD diagnostics using built-in tools of the Windows operating system
Regardless of which version of the OP you are using, the system has special built-in functions and utilities with which you can test the hard drive on a laptop.
Option one: in the “My Computer” folder, select the hard drive that you want to scan for errors. Next, click Properties > Tools > Run Scan. The computer can simply perform a reporting analysis, or it can immediately correct hdd errors (to do this, check the boxes for requests for automatic correction of system errors and recovery of system sectors). After this setting, click the Start button. If the system displays an error due to the inability to scan the hard drive it is currently using (usually this happens when scanning drive C), select “Disk scan schedule”. After this, you just need to restart the laptop (or PC), and during boot time a test for problems will occur. Its duration can vary from a minute to an hour, and after that the OP will be launched.
Option two: check disk utility. Detects file system errors on a hard drive or floppy disk and corrects them. To run it, open the command line console (necessarily with administrator rights) and enter the command CHKDSK [volume[filename]] /F/V/R/X/I/C/L[:size]]/B , where
“[volume]” is the disk being checked (written as a letter + a colon, for example C:),
“[file name]” files that need to be scanned (if you need to scan the entire disk, there is no need to enter this),
/F means fix errors in the volume,
/V prints the full path and name of each file,
/R executes a command to search for damaged sectors and restore the contents that survived (the presence of the /F command is required for its execution),
/X will pre-mount the volume if necessary,
/I will enable less strict checking of index elements, /C will command skip checking of loops inside,
/L[:size]] will set the size of the log file,
/B Enables re-evaluation of damaged clusters.
At the same time, the full set of commands is used extremely rarely; the most common commands are /F and /R (when entering the letter designations of all other commands in the console, you just need to skip them, for example chkdsk D: /F/R). After entering the command in the console line to check the disk for errors, you will be prompted to run this command the next time you start the system; to confirm, press Y + Enter and reboot.
P.S. You can find out how to launch the administrator command line for your version of the operating system on the Internet; for example, in Windows XP, to open it you need to go to Start > All Programs > Accessories > Command Prompt.
It is quite possible that performing a disk check using the console and the utility is not clear to you, especially if you are not very familiar with the system. Well, don’t despair: special software has been developed and released especially for such cases, which will help you test not only more clearly, but also more completely. For those who still haven’t solved the question of how to test the hard drive of a laptop or desktop computer, we have collected the most popular free programs that will cope with the task.
Diagnosing the hard drive for errors using various programs

The most common program for scanning a hard drive for errors is Victoria. Although it should be immediately noted that its use also requires some experience and ability to handle software, it is not intended for beginners. You can download the program image for free from the official website. After this, we take the following steps in the following sequence:
- Unzip the downloaded data;
- Burn data to CD/DVD;
- Boot from the disk on which you recorded the files;
- Select the Victoria program for your device;
- After launching the program interface, we find the desired disk (if the program itself has not identified it, press F2 to do this): press P and select the desired volume (by the way, for the SATA interface you need to select the HDD port “Ext. PCI ATA/SATA”);
- To check the disk surface, press the F4 key;
- After physically checking the hdd surface of the laptop/computer, an error check is performed and incorrectly functioning areas are corrected;
The procedure is long, usually from 40 minutes to 2-3 hours. - Finish: Remove the disk and restart the system.
Well, despite the popularity of this software, it is obvious that Victoria, being a powerful tool for diagnosing and correcting disk errors, is not intended for beginners. But besides this, there are several other good programs that can cope with such a function as checking the hdd on a laptop/PC.
Seagate SeaTools– a free program for beginners in the field of checking hard drives. It can also correct identified errors, which means it is in no way inferior to the widespread Victoria program.
The program tests disks of all brands. You can download it for free from the manufacturer’s official website. It can work on two platforms - as a utility for Windows (while waiting for this, download “SeaTools for Windows”) or as an iso image that is downloaded to a separate disk, like the Victoria iso image (to do this, download “Seagate for DOS” from the site). At the same time, its significant advantage over the previously discussed program will be a complete Russian-language reference description-instructions on how to check the hdd on a laptop/PC (help section). It will help you understand the processes and results of the disk scan.
Active users of such software will agree that the Seagate SeaTools and Victoria programs are perhaps the most useful tools in identifying and eliminating hard drive errors. If the first is suitable for beginners, especially for users from Russia, since it has a Russian-language version, then the second will be useful for experienced users, or at least for those people who can fluently understand English vocabulary related to computer technology. There are other programs that will allow you to do testing, but they are either suitable for a certain type of disk, or do not identify hard drive errors as fully as possible; That's why we've looked at only the best options for checking hdd.
And finally, our general advice for all those who feel abnormal operation of the hdd on a laptop or desktop computer (for example, its excessively noisy operation) and in general for all those who have personal computers: be sure to back up your data and be prepared for a long repair or even replacement of the hard drive of your equipment.