How to install windows 7 basic. Windows trial period
Subject self-installation of Windows, one of the most popular among computer and laptop users.
Sooner or later, everyone is faced with the need to install or reinstall their operating system, and then the search begins for friends who can do this. It’s not uncommon for such acquaintances to provide this service for money, but there is demand in the market, which means you can make money on it.
Well, I suggest you learn to cope with this task yourself and no longer spend money on it. To install, we need a disk or flash drive with a Windows distribution. Articles that may be useful if you don’t know how to burn a disc and how to upload to a CD-ROM:
- How to quickly burn a disk image
- How to set disk boot in BIOS
- How to set the BIOS to boot from a flash drive
- How to extract files from an ISO image
- How to create a bootable USB flash drive with Windows
So, if you have everything ready, then you can start. I’ll give you one piece of advice: if you’re installing Windows on a laptop, write off the product key right away so you don’t turn it over during the installation process.

I will install Windows 7 from a flash drive, the settings in the BIOS are set, so immediately after restarting the computer, the installation begins. If you are installing from a CD, then at the very beginning, you may have to press any key on the keyboard to confirm the installation will start

At the very beginning, we are asked to select a language, I leave “Russian” and click “Next”

Everything is clear here, one button “Install”

We accept the license terms

At this step we are asked to choose whether to update the existing Windows or perform a new (full) installation, I choose the second option

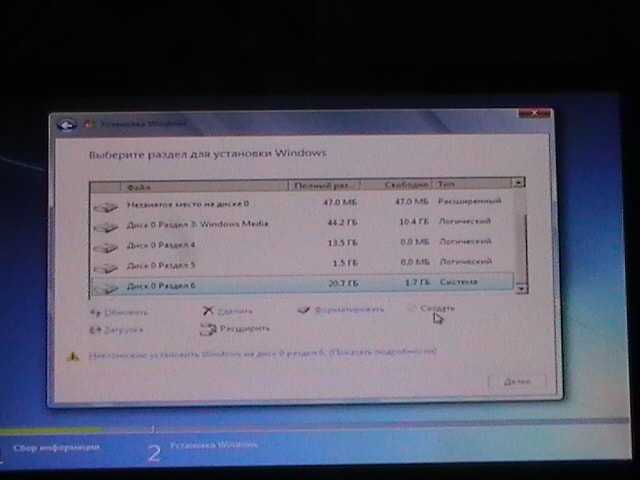
Be especially careful here, my hard drive is divided into two (C:) and (D:), and there is also a small system partition, 100 Mb in size. For proper installation, if you are reinstalling an existing system, I recommend formatting the system disk where Windows and this small partition are already installed. I transferred all the important data to disk (D:) in advance, I don’t touch it! Click on the link "Disk Settings"

Now I select the necessary disks one by one and click “Format” (Be careful, all data will be permanently deleted, save them in advance!)


The necessary disks have been formatted, proceed to installation, click the "Next" button

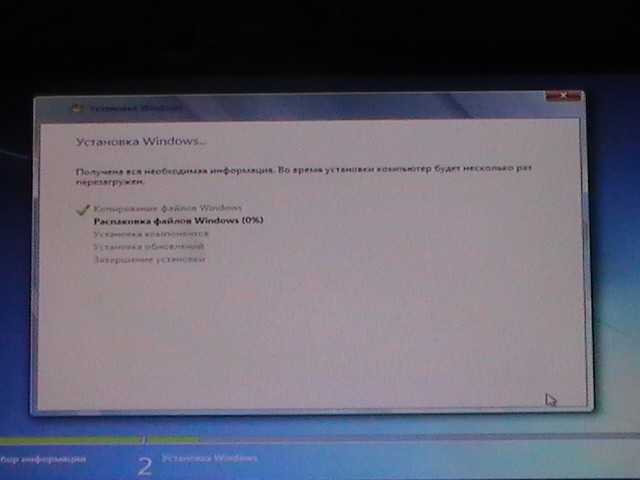
The process of installing data from the disk (flash drive) starts

At the end of the process, the system will automatically reboot, at this moment do not forget to set the default settings in the BIOS or remove the flash drive, otherwise this stage may be repeated :)

We see the familiar installation window, we sit and wait, don’t touch anything, the computer reboots itself

After the reboot, the equipment will be automatically checked and configured

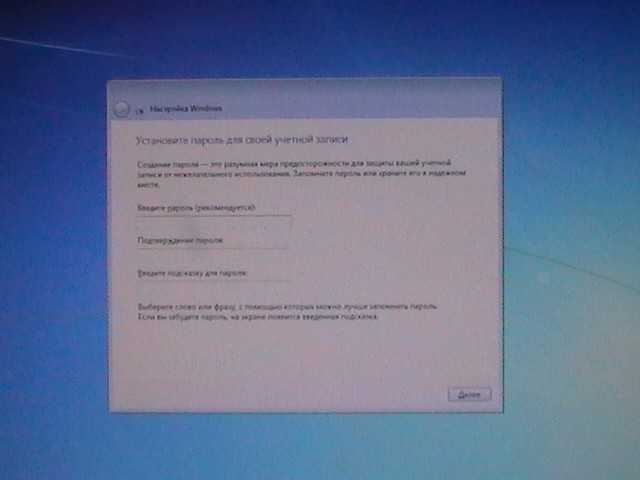
The final stage of installation, here we need to enter a username and come up with a computer name, a username, as you guessed, you also need to come up with, you can write your own :)

You can immediately screw up your account, just to be on the safe side, write down your password somewhere; people often forget it later.

In this window you need to enter the same (license) product key that is located on the sticker on the bottom of the laptop or on the system unit. Click "Next"


Checking if the date and time are correct

Windows finishes applying settings

Done, the desktop appears, installation is complete!

Now all that remains is install drivers and necessary software. As you can see, everything is very simple, now you can earn money by installing only licensed software!
Do you want to install Windows 7 on your computer or laptop, but don’t know how? It's not as difficult as it seems. Although the first time, of course, will be difficult. But, once you figure it out, you will become a real “IT master” and will be able to independently install Windows 7 on any computer or laptop.
Before installing Windows 7, print this page. This will make your task much easier. After all, during the installation of Windows 7 there will be no access to the Internet. The only exception is when you have a second PC, laptop or smartphone, from which you can, if necessary, access the site again and see what to do next.
- You bought a new laptop or computer. Everything is clear here. In most cases, laptops or PCs either do not have any operating system at all, or do not have the one you need (for example, the ancient MS-DOS).
- You didn’t like Windows 10 or 8, and you want to install the good old “seven”.
- There was a malfunction, a virus or ransomware advertising banner was caught, the computer or laptop does not turn on, etc.
Let's dwell a little on the last point. If problems occur with your computer or laptop, do not rush to reinstall Windows. Firstly, reinstalling the operating system is done as a last resort when other methods have not helped.
Secondly, remember that after installing Windows, all data is erased, at least on local drive C. And these are all your programs: browsers, video players. And you will have to install everything again.
Thirdly, there are no guarantees that reinstalling Windows will help solve the problem. But the files on local drive C will be deleted permanently in any case.
Therefore, first, try to look for other solutions to restore your PC or laptop. For example, the following articles may help you:
You can also always look for other articles on this blog or through Google/Yandex.
Preparing to install Windows 7 OS
The first thing you need to do before installing Windows 7 on your laptop is to copy all important information. At least from local drive C. After formatting, all data on it will be erased.
If you bought a new computer or laptop, you can skip this step. In all other cases, this is a prerequisite!
Therefore, save all files, documents, pictures, audio tracks and videos from your desktop and from the “My Documents” folder. It is also recommended to look at the local drive C - important information is also written to it quite often. Where to save? On a disk or flash drive. Another option is to upload files to online services (Yandex.Disk, Google Drive, etc.).
By the way, sometimes you can copy some programs along with the settings. For example, bookmarks and passwords from the browser you used.
The second point that needs to be made is to determine what bitness of Windows 7 you need - x86 or x64. Everything is very simple here. If you have 4 GB of RAM (or more) installed on your laptop or computer, then you need to install Windows 7 x64, and if less, then x86.
Why is that? The fact is that the x86 version does not see 4 GB of RAM. The maximum that it shows is 3.25 GB.
How to find out the amount of RAM? If you have a new computer, look in the documentation. And if it’s a laptop, then the characteristics are indicated on its case (or on the box).
If you already have Windows installed, then the amount of RAM can be viewed as follows:
The third thing that needs to be done before installation is to burn a digital copy of Windows 7 to a disk or flash drive.
If you already have a boot disk (bought or given in a store along with your PC), then skip this step.
Burning a DVD is easy. After all, you've probably already recorded films, music, games? This can be done through Nero, Alcohol 120% and other programs.
As for the USB flash drive, there are some difficulties. Therefore, in this case, I recommend reading -.
Where can I get a Windows 7 image or installation disk? Can be purchased in store or online.
And the last thing you need to do before installing Windows 7 is to prepare drivers for your laptop or PC. Driver discs are usually included with your computer. If you have them, then you can skip this point.
Laptop owners are not provided with disks, so you need to install drivers from the manufacturer’s official website (search by the name of your model).
If you skip this step, you may be left without internet. After all, you need to install a driver for it. USB ports may also not work. That is, a mouse. And in the end you will have to go to a friend or acquaintances and download the drivers from them.
This completes the preparatory process. Check again that you have saved all the important data, then connect a USB flash drive or insert a DVD with the Windows 7 installation image and restart your laptop/computer.
Setting up BIOS for installing Windows 7
Perhaps setting up the BIOS is the most difficult stage for most users. Especially for beginners.
In addition, the difficulty here is that the BIOS versions may differ on different PCs and laptops. And the buttons to enter the BIOS too. As a result, some users cannot even enter the BIOS. Therefore, to avoid problems with this, let’s consider in detail what needs to be done and how.
So, when you have prepared everything, restart the computer, and immediately when the screen turns on, repeatedly press the Del button (for PCs) or F2 (for laptops). If you did everything correctly, you will see the BIOS screen. Something like this:

Or this:


There are 4 devices displayed here – First Boot Device (first), Second (second), etc. By default, the first one is the hard disk (Hard Disk or HDD). And you need to put the CD-ROM (disk) or USB-HDD (flash drive) on the first line - depending on which device the seven will be installed from.
How to do it? On a PC, you usually need to highlight the first item, press Enter and select the desired option from the drop-down list.

On laptops, the device boot priority can be changed using the arrows or F5-F6 buttons. Control keys are usually located on the right or at the very bottom of the BIOS screen.

When you select the desired device (CD-ROM or USB-HDD) in the first item First Boot Device, be sure to save the settings and then exit the BIOS. Which save button? This is also written at the bottom of the screen (usually F10).
If you have a BIOS UEFI (new version), then simply drag the desired icon (disk drive or flash drive) to the first place with the mouse and click “Exit” in the upper right corner.

After this, the laptop or computer will reboot and the installation of Windows 7 will begin.
If all this is too complicated for you, there is another option to configure booting from a disk or flash drive without going into the BIOS. For this you can. But this method only works on new PCs and laptops.
Step-by-step instructions for installing Windows 7
Immediately after rebooting, you will see a black screen with a single line.

Here you need to press any button - for example, Space.
If this message does not appear, it means that you did not save the BIOS settings. Check them again. If everything is fine there, then either you did not write the bootable USB flash drive correctly, or the disk is damaged and the computer/laptop does not see it (the disk drive may not be working).
After clicking the button, you will see a black screen with the inscription “Windows is downloading files...”.

Wait for the system to copy everything. After this, a new window will appear on the screen. Select Russian language and click “Next”.

In the new window, click the “Install” button.

If there are several versions of Windows 7 recorded on a disk or flash drive, you need to choose the appropriate one. We have already figured out the x86 and x64 bit depth, so decide for yourself here. As for the version, it is better to choose “Maximum”. Although there is almost no difference between it, “Home”, “Beginner” and “Professional”, so this is not so important. Select the desired item and click “Next”.

Agree to the license terms (check the box) and proceed further.

Choose the full installation.

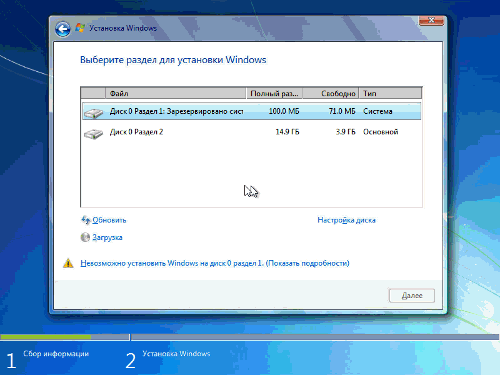
A window will open asking you to select a partition for installing Windows 7. But here it’s worth going into more detail.
How to partition a disk during first installation?
If the installation is performed on a new computer or laptop (i.e. for the first time), then you will see only one line - “Unallocated disk space”.

And in this case, you need to split the hard drive into 2 partitions - local drive C and D (more is possible, but this is not necessary). To do this, select this line, click the “Create” button, indicate the disk size (in megabytes) and click the “Apply” button.

Don't know how much 50 GB is in megabytes? Write a number at random - for example, 50000. And then see what volume the system will show for the created partition. If it turns out too little, select it, click the “Delete” button, and try again, specifying a larger number.

For Windows 7 to work properly, you need to create a special partition with a capacity of 100 MB where boot files will be stored. So when the next window pops up, just click OK.

When you specify the required volume for local drive C and create it, “Partition 2” will appear. This is him.

After that, select the “Unallocated space” line again, click “Create”, and then the “Apply” button. After this, local disk D (“Partition 3”) will appear.

If you forget to do this, then after installing Windows 7 there will be only one local drive C. And partition D will “evaporate” into thin air. You'll have to reinstall Windows again. Therefore, before moving on, make sure that the “Unallocated Space” option is no longer there.
To install Windows on local drive C, select “Partition 2” and click “Next”.

If you reinstall Windows 7, then the following window will appear on the screen:

In this case, you need to select “Section 2” and click the “Format” button. This will delete all data on it. When the formatting process is complete, select this section again and click “Next”.
By the way, if you want to distribute the volume differently between local drive C and D, you can delete them and create them again, specifying a different size. How to do this is written in the previous paragraph. But remember: in this case, the information will be deleted on the local drive D too! As a result, your PC or laptop will be clean, as if you had just bought it. Therefore, perform this procedure only if you have saved all the necessary files.
Continue installing Windows 7
So, you were able to partition your hard drive or format it before installing Windows 7 and clicked the “Next” button. After this, the operating system will begin to install. Wait until the files are copied.

After this, the computer/laptop will reboot and you will again see the familiar black window with a single line.

Under no circumstances press anything on the keyboard, otherwise everything will start all over again.


After this, the computer or laptop will reboot a second time.
Well, the main thing is already behind us, all that remains is to fill in some fields:
- Indicate the username and computer name (if you plan to play games, it is better to write in Latin).

- You don’t have to set a password - in that case, just move on.

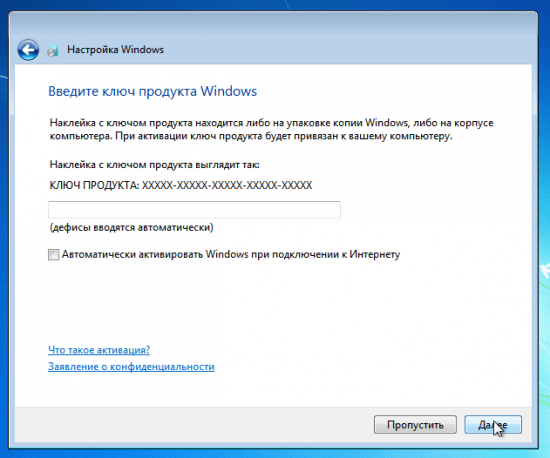
- If you have a digital copy, you also don’t have to specify the activation key (usually Windows 7 is activated automatically when you connect to the Internet). To skip this step, click Next. And if you bought a disc, then enter here the code that is written on the sticker.

- Here it is recommended to select the “Delay decision” option (you can change these settings later).

- Select your time zone, specify the time and click “Next”.

- If Windows automatically finds drivers for the Internet, then in the new window select “Home Network”.
- Wait while the desktop setup is completed.

- Congratulations – you have just been able to install Windows 7 on your laptop or computer yourself.

What to do after installing Windows 7?
First of all, reboot your laptop or computer, go into the BIOS and change the device boot priority back. That is, put the hard drive (Hard Disk or HDD) in first place, and lower the CD-ROM or USB-HDD to second or lower.
Also, after installing Windows 7, the Internet and USB connectors may not work. This is because there are no drivers. Therefore, at the next stage you install them.
This is precisely why you need to prepare all the necessary drivers in advance before installing Windows 7. Especially for the Internet. After all, how will you download them if you don’t have access to the network?
And one more nuance - when you turn on your computer or laptop, you may see two Windows 7 (during boot).

The first one was installed by you, and the second one was saved in a hidden section (“reserved by the system”). However, the extra line can be deleted. To do this, do the following:

Ready. After the reboot, the second Windows 7 will no longer exist, and you will not see the operating system selection menu.
If you have any questions, ask them in the comments.
If you have reached this page, it means you have decided to reinstall Windows 7 and need help with the installation. Below I will tell you in detail all the stages, starting with loading Windows on your computer and ending with Activating Windows and a short introductory video. And so let's get started. The first thing you need to do is download the Windows 7 image itself; there are two types: 32x and 64x. How to understand what bit depth you need, very simply in the computer properties there is information about your hardware, we are interested in the RAM line (installed memory). If you have 4 GB or more installed, you need a 64-bit version, everything below is 32-bit.
When we have already decided on the bit depth, we proceed to download the Windows 7 image. Click on the green button “Download Windows 7 Ultimate” and a torrent file called ru_windows_7_ultimate_with_sp1_x86.iso.torrent will be downloaded to your computer. We launch it to proceed to downloading via torrent program. If the file asks you to open it through any program, then uTorrent is not installed. follow the link to download it.
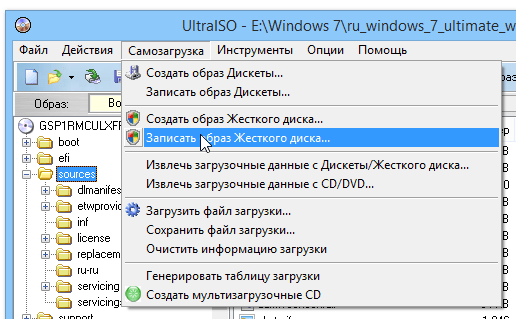
While Windows is in the process of downloading, we will download and install the UltraISO program. Using it, we will write the image to a disk or flash drive.

After installing UltraISO and loading Windows, let's start recording to a disk or flash drive. Launch UltraISO and perform the actions as in the screenshot:

Open the image with the program and perform recording.

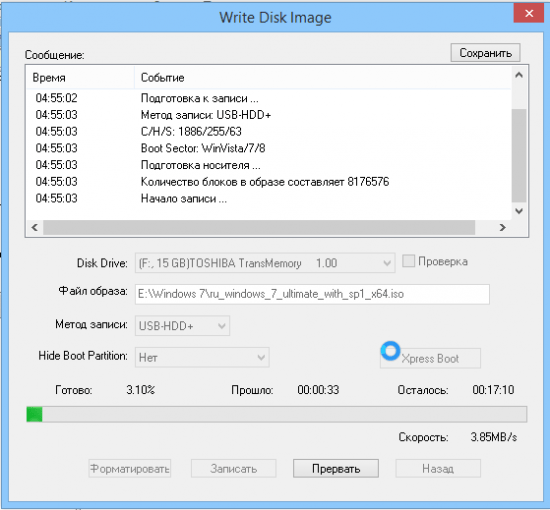
We wait for the process to complete and close the program window. Now your flash drive or disk is ready to start outside the system.
Well, now the most interesting thing is, we need to tell the computer to start from our media; for this we need to call the BOOT MENU. Usually these are the DEL or F8 keys, but there are exceptions, it all depends on the manufacturer of your motherboard - below are the buttons from which you can call the BUTMENU from various motherboards.

If you did everything correctly, you will see a type of menu with a boot selection, control using the arrows and the ENTER key.

After selecting the BOOTMENU, it will begin copying the “loading in Windows file” files to start installing Windows 7. In the first installation window, you must select a language and click Next.

In the next window, click Install.

Selecting the installation type, click “Full installation (advanced options)

And here is the most important window, selecting the partition on which the installation will be performed. For proper installation, you must format the system drive C where your old Windows is located. Ideally, it is better to delete it and also the partition where the MBR is stored; it usually weighs 100 MB. To do this, select the section and click Delete. “Unallocated disk space” will appear. Click “Create”, specify the disk size or leave it unchanged and click “Apply”
Now it’s a matter of time, as soon as you click Next, copying files to install Windows 7 will begin. You can remove the flash drive or disk after the first reboot and watch the installation process until the Select user name window appears. Enter any desired name and click Next.

In the Windows product key entry window, uncheck the “Automatically activate Windows when you connect to the Internet” checkbox and click Next.
That’s the whole simple installation process, a familiar desktop will appear in front of you - which means that Windows 7 Ultimate is installed.
Another important and mandatory process is Windows activation. On the desktop, find a shortcut called “Activator”, launch it and do everything as shown below in the screenshots.
Standard tools in the Windows 7 Home Basic, Starter edition are not possible install theme, so you have to resort to special programs. These recommendations differ greatly from the editions above.
You will need to install two programs:
- Personalization Panel - a program that adds a “personalization” item to the menu called up by right-clicking together, where there are no shortcuts, i.e., on empty desktop space.
- Universal Theme Patcher – the utility patches Windows files, replacing them with its own.
Download a third-party theme and place its files in the Themes directory, which is located in C:\Windows\Resources\. Most theme archives contain folders with designs, fonts, icons and a file (theme name.Theme).
If the archive contains a Fonts folder, then place its contents in C:\Windows\Fonts. It is responsible for the fonts of the installed theme in Windows 7.
Now try clicking on a file with an extension at the end (.Theme) and you will see a warning.

That's why you can't install theme on Windows 7 Home Basic, Starter. Now we will get around this trouble.
Patching system files using the Universal Theme Patcher utility
This is a small program that replaces files and does not require installation. Do the following algorithm:
1. download and unpack the archive.
2. The files of interest here are: UTPatch-x64.exe (for 64-bit OS) and UTPatch-x86.exe (for 32-bit OS). Run according to bitness of your Windows 7 OS on behalf of the administrator.
Note: The initial edition always has a 32-bit version.
3. In the window, select the language “Russian”, click “OK”.

4. Then you will see information about how many files need to be patched. Check it out and click yes.

5. Press the 3 buttons called “patch”. In some situations, two are available.
Note: If all buttons are disabled, it means that your Windows 7 Home Basic already patched.
You can get the original files back by clicking on the "restore" button.
6. When you press the last button, you will be prompted to reboot, click “yes”. Then proceed to install the next program.

Install the Personalization Panel and implement personalization in the Windows 7 Home Basic edition menu
The application will add personalization options similar to Windows 7 Ultimate, but before using them, follow these steps:
2. Select the language “Russian”, click “OK”. A welcome window will open, in which click “next”.
3. In this window, check “normal installation” and click “next” until the installation is complete, since you don’t need to change anything else.

4. At the last stage, click “install” and after a while “done”.
Now go to your desktop, your Windows 7 Home Basic and right-click on the empty (free space). You will notice that a “personalization” option has appeared in the menu.

The window looks like the Maximum edition. Here you can change the Windows 7 Home Basic and Starter desktop background, screensaver, sounds, .
The list will show the standard, downloaded themes and their location. Select one of them and click the “apply theme” button. Enjoy the results.

This is how you can install theme on Windows 7 Home Basic and Starter, which were originally deprived of this function. The program is convenient because it collects the necessary personalization settings in one place and adds advanced features. For example, it is possible faster than through the control panel. The developers have done their best, and now you won’t have to update to a higher edition.
Hello! Today I will write about the most sacred thing that can be in the computer business, this is about how to install Windows 7. I think that everyone at least once had such a problem as “Windows crashed”, and only specialists can reinstall it and charge you a considerable amount of money.
But you think so, today I will write how to install Windows 7 yourself and completely free. I've been meaning to write this article for a long time, but never got around to it. Until I myself needed to reinstall Windows 7 on my computer. I quickly figured it out and took photos for this article. I apologize in advance for the quality of the photo, I took the photo with a video camera. And then I will describe point by point what is needed to install Windows 7 and how to actually install it.
This article describes in detail the installation process of Windows 7. But I wrote another article in which I collected. Take a look, I think you will find it useful.
What do you need to install Windows 7?
1. Naturally, we will need a disk with Windows 7. You can buy it in a store or download it on the Internet. After you download it, it will most likely be in .iso format; I wrote about how to burn a disc in the article.
2. Before installation, we need to “save” your files that are located on the disk on which your operating system is installed. Usually this is drive “C”, the fact is that during the installation process we will format it and all files from it will be deleted. If you have a new computer (only from the store), then this does not concern you, but in another case, you need to transfer all the files from drive “C” to another drive. Data stored on the desktop and in a folder "My Documents" will also be deleted!
3. And the last thing you need to prepare is to put it in BIOS booting from a CD/DVD drive, so that we can boot from it first (By default, the computer boots from the hard drive). I wrote about what BIOS is and how to enter it here and. You can check how your computer is configured; you may already have boot from the drive installed. Just insert the Windows 7 disk into the drive and restart the computer; if the computer boots from the disk, then everything is OK (you will see the white text and dots). Well, if the PC does not boot at all, or Windows starts loading, then you need to configure the BIOS. Preparations for installation are completed, let's move on to installation. I already wrote about that.
Installing Windows 7
1. Place the disc in the drive and restart the computer. If you did everything correctly during preparation, then you should see a white inscription with dots. You need to quickly press any key. Next you should see this picture:


3. After this, we see this picture, on which we click “Install”


5. At the next stage, click “Full installation”

6. Now comes the fun part. If you already had an operating system, and your hard drive is already broken, then do this: We look in the list for the partition that we need (we need drive “C”), opposite it should be written “System”. The names may differ from what I have. For example, I have “Disk 0 Partition 6”, yours may be different. If you are sure of your choice, then click “Disk Settings” and “Format”, confirm, wait for completion, see that our disk is selected (Remains selected) and only after checking everything again, click “Next”. When formatting, all data from the partition you selected will be deleted!
If you have a new computer, then you will need to partition the disk. In your case, you will only have an unmarked area. I described in detail the process of partitioning a new hard drive in the article. Do this: Select it (the unmarked area), click “Disk Settings” and “Create” and enter the size of the first partition. The first partition that you will create will be a partition for the system (drive “C”), I advise you to allocate 50-100 GB for this partition. The remaining unmarked area needs to be divided, preferably twice. Let's create again and enter, for example, 200 GB, and with what remains we create another partition and you should get a picture similar to mine:

7. After clicking on the “Next” button in the previous paragraph, the process of copying files and installing Windows 7 will begin.

8. Now let’s move on to setting up Windows 7. Enter the user name and click “Next”

9. Enter the password, or not, as desired and click “Next”
10. If you have a key, then write it down, and if not, then uncheck the “Activate when connected to the Internet” and click “Next”


12. Last stage. Specify time zone, time and date. And of course, click “Next” :)

13. That's it, I congratulate you! Windows 7 is installed, a couple more beautiful pictures and the desktop is in front of you.


Updated: January 11, 2013 by: admin