How to install mods on your minecraft server. How to install plugins and mods on a Minecraft server
The Minecraft game, beloved by millions, is itself interesting due to the variety of tasks it offers. However, there is a way to make it many times more interesting - install special modifications that add additional features in gameplay. Moreover, this is also suitable for multi-user resources. What are the nuances of installing mods on the server?
You will need
- - administrator rights
- - setup files on Minecraft Forge and ModLoader
- - installer for the desired mod
- - any archiver
Instructions
Ordinary players have no right to such actions. The administrator must carry out some preparation before executing them. Be sure to copy all game saves to a folder specially created for this purpose - in case of any server failure when installing plugins. Then, even if something like this happens, you can easily restore the original state of the resource. Otherwise, all its users will be forced to start gameplay from scratch.


 6. Check the functionality of the server, it will look something like this:


 Another mod is installed, but this is more of a base than a mod, we stop the server.

 So we installed this mod, since it is global, I recommend deleting the world folder to generate a new world with mod objects.
In this article I will tell you in great detail how to install mods on Minecraft game
, so if you want to diversify your Minecraft with mods, but don’t know how to install them in the game, then here is an excellent installation guide.
The guide is suitable for both the licensed version of Minecraft and the pirated version, there is no difference.
What is needed to install mods on Minecraft?
Minecraft game one of the versions.Hands.
99% of modern mods are installed by copying the mod file into the Mods folder, but let's do it in order:
On this moment 98% of mods use a special mod loader called , and about 2% use .
Therefore, this article will show the example of Minecraft Forge, which is installed in a completely similar way.
Let's start installing the mod:
Step 1.
Let's find out what version of the game you have, launch the game and in the game menu you will see the version:Step 2.
Great, let's say we have Minecraft 1.12.2, now we need (link), download it for minecraft 1.12.2.
There are 2 types of automatic installer, file installer as program .exe and installer file .jar, there is no difference between them at all, but for many players the .jar file opens as an archive, or it simply doesn’t start, so it’s just download the .exe installer and run it.
Installation example:

Step 3.
Now open your minecraft launcher (the program that launches the game). A new version of Minecraft should appear in it with the forge postscript:
Here is an example from two launchers:


Choose Minecraft version with the postscript Forge, we launch, if it starts, great, close the game immediately.
If it doesn’t start, you probably already have mods or mod files in your game folder that prevent the game from starting, you need to look at the error. Read the news below about the reasons for the game not launching.
Step 4.
Now we need to select the desired mod for Minecraft, the mod version must match the game version, i.e. mods for 1.12.2 are only suitable for 1.12.2, rarely (or if indicated) mods from 1.12 can be suitable for version 1.12.1 or 1.12.2, try it.
Download the desired mod, also read quick installation for each mod, in some cases there may be some additional actions.
Step 5.
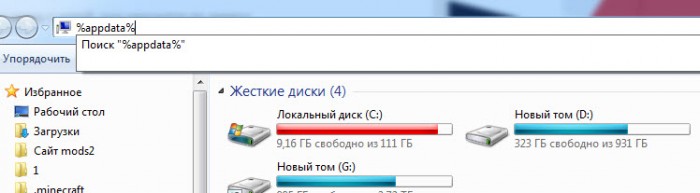
Simply, in any folder, type %appdata% into the address bar and press Enter:
Installing the mod in the game, first we need to get into the game folder, it is located at:
C:\Users\ Your_User\AppData\Roaming\.minecraft
If you can't find the folder
Appdata:
You need to enable showing hidden folders and files.
Or press start - enter this in the find field: %APPDATA% and press enter, there you will find the .minecraft folder.
Or you can enter the combination Win + R on the keyboard (the Win button is the button between Ctrl and Alt on most keyboards, there is a Windows icon on it).
In the window that appears, enter %APPDATA% and press Enter. There you will find the Roaming folder, and in it.minecraft.
Some launchers may change the name of this folder to something else, for example to .tlauncher
If you have Windows 10, then open Explorer and go to the “View” tab. Then click on the “show or hide” area and check the “hidden items” option. 
Next, you can find this folder where she should be.
Inside a folder .minecraft you will find a folder mods, if it doesn't exist, create it.
Copy the downloaded mod file to the mods folder, launch the game - the Forge version of the game.
Done, you are beautiful.
Possible problems and their solutions:
I can't open the Forge installer, for example forge-1.12.2-14.23.1.2556-installer.jarAnswer: download and install.
After installing some mods, the game does not start, it crashes at startup without an error:
Answer:
This happens, there is a problematic mod, or one mod is not compatible with another mod, or some mod requires an additional mod to work. Look for incompatible mods by deleting mod files, update mods to more latest versions. (mod version, not game version).
Perhaps the mod requires additional libraries, usually the authors and those who post news indicate the need to install additional mods, read the news with the mod in more detail.
It is extremely rare, but it happens that the mod version is not compatible with new version Forge, if the mod is old, you will probably have to find and install more old version Forge.
You will probably have to stop using the problematic mod.
The game starts, but a message is displayed, there is no game menu.
Answer: As a rule, if a critical error has not occurred, then Minecraft Forge tries to report possible reason, For example:
1) Some mod requires a more recent version of Minecraft Forge. (For example forge-1.12.2-14.23.1.2556-installer.jar - where 1.12.2 is the game version, 14.23.1.1.2556 is the version of the loader itself), you will probably have to install a more recent Minecraft Forge loader.
2) Some mod requires an additional mod, it will be written there, the mod name requires: name, you need to find this mod and throw it into mods.
3) You copied a mod for another version of the game into Mods, then it usually says that this mod requires the game version such and such.
What to do if after installation Forge games does not start, or does not start at all.
Answer:
Save your minecraft world, delete all the contents in the .minecraft folder, download the game version again, and go through Forge installation again.
Or find another launcher for minecraft, similarly delete everything from the .minecraft folder, install the game with another launcher,
Before you start installing a mod on Minecraft, you must definitely copy all your saves for the game to some folder, in case the saves are deleted, you can restore them without any problems.
1 . First of all, you need to download any mod for the game. There are a huge number of mods for Minecraft; you can select the modification you are interested in in the section .
2 . After downloading the mod, you need to open the file called minecraft.jar.You can find it in this folder: Name- userAppDataRoaming.minecraftbin. If you haven't found the minecraft .jar file, you can find it using Search, enter minecraft .jar into the search and the explorer will give you the results. You can also see other search options in the article.
3 . Opening minecraft.jar by using WinRar.

4 . At the same time, you need to open the mod file and copy it to system file minecraft games .jar. Please note that mods can contain not only files, but also folders, this means that you must copy them. In these screenshots we show you an example of installing a mod for minecraft from Zhar

5. Delete the folder with the name META- INF , she is in minecraft.jar.Save the changes and close WinRar.

6. Open the game, the mod works!

If the game does not work correctly or you get a black screen during startup, then you need to do this:
Delete the minecraft .jar file, the one located in the folder atC:UsersName_ userAppDataRoaming.minecraftbin.
After this, you need to start the game again, it should automatically restore this file and work correctly again.
It may happen that you did not copy all the files. If you still want to install this mod, then carefully make sure that you have copied all the files to the game system file. Everything will work only when the downloaded mod is working; if the mod is broken, then reinstalling it will not help.
Installing the mod on the server
Installing the mod on the server is almost the same, except that you need to copy the mod to a file called minecraft_server.jar And No need delete folder META-INF.
How to install individual mods on Minecraft version 1.6.1
So let's start installing the mod for version 1.6.1
Go to the folder %appdata%/.minecraft /versions
Copy the folder 1.6.1 and paste it as 1.6.1 (mod name) - now there should be 2 folders 1.6.1 (mod name) and 1.6.1
Let's go to new folder and change the name jar files and json exactly the same as the folder
Open json using Notepad or some other text editor and replace:
"id": "1.6.1",
on
"id": "1.6.1(mod name)",
You need to do the same with the jar file
mod installed!
Be sure to watch the video on installing the mod on the server
Let's install a mod called Cube World
Installation
1. Go to the game folder %appdata%/.minecraft /versions
2. Copy and rename the folder 1.6.1 to Cube_World_1.6.1 Now you have 2 folders 1.6.1 and Cube_World_1.6.1
3. In the new folder, change the name of the files 1.6.1.jar and 1.6.1.json to Cube_World_1.6.1.jar and Cube_World_1.6.1.json
4. Open the file Cube_World_1.6.1.json with Notepad
5. Change "id": "1.6.1" to "id": "Cube_World_1.6.1" and save the changes
6.Open Cube_World_1.6.1.jar using the archiver and copy all the mod files to Cube_World_1.6.1.jar. Remove the META-INF folder from the Cube_World_1.6.1.jar file
7. Open the minecraft launcher and create new profile. In the window with versions Use version select Cube_World_1.6.1