How to remove optional Windows 7 updates. Actions after uninstalling updates
Uninstalling updates in Windows 7 is important if, after installing them, difficulties arise with already installed programs or software that you intend to install. This procedure does not take much time or effort, but it is not stable, that is, what you fought for can be run into. In order to avoid getting into such a situation, you should create recovery points in a timely manner; they will help you avoid having to perform such actions, but this article will help you solve a problem that has already arisen.
Updates are needed to optimize the performance of your system, but the main goal is to update the security system.
Since hackers don't sit idly by preying on sensitive data, Windows does the same and keeps up with the times in taking security measures. You shouldn’t take such actions lightly, so you should promptly monitor the release of fresh updates; the problem also often arises with a still “crude” update, which may not work correctly in your environment due to the complex of software, drivers and installed hardware on the computer .
Most often, if services, utilities, games and similar applications worked fine for you and at a certain point they refused to continue doing so, this is due to updates or viruses. Checking for viruses on your computer is not difficult or time-consuming, so you can easily do it. The situation with updates suits us better; first of all, we need to find out what exactly was the reason. Usually the application itself was updated and crashed, but if several software products failed at the same time, then there is a high probability of problems in the system. Of course, you know at what point everything went wrong, so you can easily determine the date of the fatal update, then follow one of the instructions.
You can remove an update in Windows 7 using standard methods already built into the system, but there is also a more convenient way using programs.
 2. In the menu on the left, select the “Win Manager” section and in the drop-down list “Windows Updates”;
 3. After building the list (it takes a little time), you can select the desired item and click the trash can next to it or select the “Batch update” option, select several desired options at once and delete at the same time by clicking on the corresponding button below.
Before deleting, you will be automatically prompted to create a point to which at the right time you can roll back the system in the event of any Windows malfunctions.
Also, immediately after removal, you can run a “Power Scan”, which will check if there are any traces of this software left on the system. This feature will help you keep your system clean and control the level of clogging.
 Disabling updates in Windows 7
Perhaps you don’t want to receive updates at all, because of a situation that has happened, or because they cause you some other inconvenience, then it’s easier for you than to download, install and remove them from the system all the time, just disable such a service. In our operating system this is done extremely simply.

- Go from “Start” to “Control Panel”;
- Find the “Windows Update” item and click on it;
- In the “Settings” tab, in the “Important updates” section, select “Don’t check for updates.”
 In the same way, you can remove updates that have not yet been installed if you install updates manually, that is, it is downloaded and then you are given a choice. Everything happens exactly the same, so there is no point in describing everything again.
Among other things, when you remove updates, you reduce the resource costs for their use and free up space taken up by them. The truth is that you are unlikely to be able to feel the difference, since Microsoft does not create pointless updates and nevertheless, users who have disabled this function do not experience difficulties at all for years, although this does not always happen.
If you still have questions on the topic “How to remove updates in Windows 7?”, you can ask them in the comments
if(function_exists("the_ratings")) ( the_ratings(); ) ?>
The problem of lack of free space on the system disk is one of the most pressing topics for any user, especially for Windows 7 users who use Windows Update. When you regularly update Windows, you may notice that the amount of free space on the system disk decreases noticeably. The thing is that all installed updates are saved in a special system folder “WinSxS” in case the installed update is rolled back. In fact, unused update files are not needed by the system and can be safely deleted without harm to Windows, especially since they take up a lot of space.
How to properly delete these files in order to clean the system and not harm it?
Until recently, it was necessary to resort to various kinds of tricks using the DISM utility.
In October last year, Microsoft released a special update that allows you to remove outdated Windows update files without affecting system performance. The update is designated KB2852386 and can be downloaded manually from the official Microsoft website: http://support.microsoft.com/kb/2852386 or using the "Windows Update Center". The update is installed only on Windows 7 SP1 and is not suitable for owners of Windows Vista or Windows 8. It is worth noting that the update checks the authenticity of the Windows you are using and this update may already be installed.
After downloading and installing the update, open Explorer by clicking on the Computer shortcut and open the properties of the system drive (usually drive C), to do this, right-click on the drive and select “Properties” in the context menu. In the “General” tab, click on the “Disk Cleanup” button.
Also, to launch the Disk Cleanup utility, just type the command cleanmgr in the command line and press the Enter key.
After which the system disk cleanup utility will begin.

After the utility scans the disk for unused files and folders, a window will appear with a list of files that can be safely deleted. It is worth checking the box “Cleaning Windows updates” and clicking the “OK” button. If you do not have such an item, then the update mentioned above is not installed.

The system will begin removing unnecessary and unused updates; this process may take a long time. After uninstallation, restart your computer and wait until the updates are removed.
The appearance of a system utility for cleaning unused Windows updates will allow users to use the system partition space much more efficiently, this is especially true for owners of system SSD drives.
You can also use third-party utilities such as Slim Cleaner and Auslogics BoostSpeed to clean system files, including old Windows updates. viewer
Name Removing required updates does not fully reveal the meaning of what is described in the article, since it is not entirely clear what exactly is meant by the term “mandatory”. The material could be titled as Removing uninstallable updates, but then it is not entirely clear why they suddenly became undeletable: by the will of the developer or due to errors with the component storage. There is also an option to designate as deleting updates that are not intended to be deleted, but this is somehow redundant or something.
Just recently I discovered one curious feature of some updates: they are not removed by standard operating system tools. In practice, a situation arose in which I could not remove the “broken” update from the system. As we delved deeper into the topic of the issue, it turned out that there are different types of updates in Windows, and that the particular case of the inability to remove some of them is not at all the result of any local error, but rather reflects a feature. Apparently, this is explained by the architectural nuances of the update mechanism. In practice, it is difficult to create a system of update relationships in which each update will be completely autonomous, that is, independent of the others, and, accordingly, can be deleted without any consequences. But even more important is that some updates for the system are truly critical, since they are quite deeply integrated into it. For example, the update mechanism itself (service stack) is provided by a set of modules (installer, libraries, etc.) that are necessary for installing subsequent updates and on which the performance of the mechanism as a whole depends. Accordingly, all servicing stack updates that introduce algorithmic changes cannot be simply removed, since then some features of these algorithms that were already installed in subsequent service packs will no longer be available. Removing such updates is fraught with serious consequences for the system, such as destruction of the component store, and as a result, potential problems with the performance of the operating system itself. In fact, everything is so scary, since there are only about a dozen such mandatory (non-removable) updates, for example in the Windows 7 system :) But it’s still worth knowing about this nuance, as well as having an understanding of how exactly to perform removing required updates.
Problem
From a technician's point of view, installing and uninstalling system updates are considered trivial tasks. In our age of the global Internet, updates to the system are constantly installed, often completely unnoticed by the user. Updates are security fixes for various components, modules containing additional functionality of existing applications, as well as new software. However, along with the tasks of installing updates, there are often tasks of removing system updates. The reasons for this can be completely varied, ranging from the need to simply reinstall any of the updates to achieve correct functionality and ending with the need to correct dependency problems and the integrity of the component repository.
The system provides several ways to remove updates from the system, for example through the component Windows Update, applet Installed updates. In this case, the user simply selects (marks) the update he is interested in by clicking the left mouse button and by right-clicking, opens the Delete menu, or selects the item of the same name from the top panel:
everything is trivial here. But with mandatory updates, everything is somewhat more complicated, since during similar actions we do not see the usual controls:

when trying to remove this component from the command line using the wusa utility:
wusa /uninstall /kb:2522422
the error is given: The Microsoft Windows update is required for this computer and cannot be uninstalled.
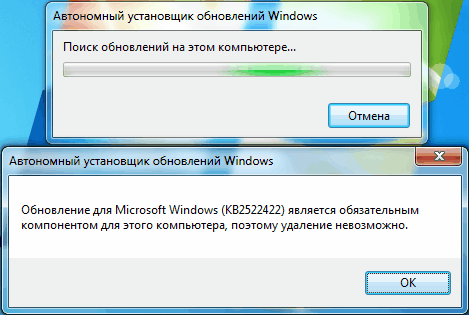
In this case, the specialist has a reasonable question: why are you doing this to me? :) The fact that the system considers some updates mandatory and does not allow them to be deleted does not at all guarantee that these updates cannot be damaged and cause various kinds of problems. Therefore, in some cases there is a need for removal. Is it possible to remove such uninstallable updates from the system?
Solution
The changes described in this section may result in the component store not working!! You perform the actions given in this section at your own peril and risk!!
Therefore, act extremely carefully, preferably making a full backup of the system or creating a restore point. The main thing is to understand why you are doing all this. If you need to correct the consequences of a crooked update, then uninstall the required update and then install it again. In a successful scenario, after uninstalling/reinstalling a non-removable update, you will be able to correct the consequences of a crooked update, but in the worst case scenario, you will render the system inoperative, since the update may turn out to be key. The result may be damage to the component store with the error STATUS_SXS_COMPONENT_STORE_CORRUPT.
At what level is it ensured that such mandatory updates are not uninstallable? At the parameter level in configuration .mum files.
Mum file (Microsoft Update Manifest) is a Windows update configuration file in XML format containing package parameters: name, identifier, installation language, dependencies, action flags, and others. Used as an identifier (symbolic name) of a service (stack) for the purpose of performing enable/disable/remove operations on a package using various service utilities (for example, the Package Manager (pkgmgr)). The manifest file contains the name of the update being served in its name and is located in the %WinDir%\servicing\Packages directory;
Msu file (Microsoft System Update/Microsoft Service Pack) is an isolated Microsoft Update package containing metadata (describing each service pack contained in the .msu file), one or more .cab files (each .cab- the file contains individual update modules), .xml file (describing the update package, used by the Windows Standalone Update Installer wusa.exe to perform the update installation process), properties file (the file contains property strings that the wusa.exe utility uses.
The .mum file has a parameter called permanence that takes two values: removable and permanent. Service packs that are not desirable to be removed from the system are declared by Microsoft developers as “permanent”, while all other (regular) service packs are marked as “removable”. Therefore, the process of changing the update type from undeletable to deletable comes down to changing this parameter in the corresponding .mum file.
General algorithm of actions
At the request of readers, the algorithm of actions is presented for the widest possible audience of users, so I tried to describe the process at an accessible level.
- After installing a typical system update, the corresponding .mum files are placed inside the %Windir%\servicing\Packages\ directory. Therefore, open it in C:\Windows\servicing\ and place the cursor on the Packages subdirectory.
- Often there is a problem with access to objects in the %Windir%\servicing\Packages\ directory, since full access permissions are set only for the TrustedInstaller system account. Therefore, to make changes to access rights, right-click on the Packages directory, select Properties and then go to the Security tab. In the window that opens, immediately after the “Groups and Users” section, click the Edit button, then click Add, in the window that opens, write All in the input field, click Check names, select from those found, click OK, then set full rights for the newly added group. Close the window, in the main window Security, at the very bottom click the Advanced button, in the window that opens again, in the “Permissions” tab, select the newly created group (All), click the Change permissions button, then at the very bottom of the new window check the “Replace all” checkbox permissions of a child object to permissions inherited from this object", click OK everywhere, closing all windows.
- We go to the Packages directory, look for the .mum file(s) related to the update to be removed. They usually have a name containing the full name of the package being sought:

- Open the found file for editing:
- We look for a line containing the word permanence, replacing the parameter value with permanence="removable" . In the example above, this is line number 4. Next, close the file and save the changes made.
- We perform similar actions for all .mum files associated with the required non-removable update package, since some updates may have two or more .mum files associated with them.
- After finishing the editing process, close all windows related to updates. In some cases, changes take effect instantly, that is, the update will become available for removal immediately after opening and re-indexing in the section
In October, Microsoft released a number of updates for users of its products, some of them led to, but there is one update that all Windows 7 fans have been waiting for for a very long time. We are talking about the update KB2852386(http://support.microsoft.com/kb/2852386), which allows you to remove outdated updates (updates that have been superseded by newer updates) using a new option in the standard Windows 7 Disk Cleanup Wizard - Windows Cleanup Tool ( cleanmgr.exe) . This update is optional; it can be installed through the Windows Update service or by manually downloading it from the Microsoft website.
Let us remind you that in Windows 7, when installing any system update, system files are replaced with new ones, and their old versions are stored in the directory WinSxS(C:\Windows\WinSxS). Thanks to this approach, you can safely remove any system update at any time. However, this approach leads to the fact that over time, as new updates are installed, the WinSxS directory increases significantly in size (it turns out that the older the system is and the more updates are installed, the larger the size of the WinSxS folder), which cannot but worry users, especially happy owners of SSD drives and drives with a small system partition size. Previously, Windows 7 lacked a standard utility for deleting outdated update files, so to reduce the size of the WinSxS folder you had to resort to various tricks.
Note. In Windows 7/2008, it was possible to delete unused files that were left after installing SP1. This could be done using the following command from our favorite DISM utility: dism /online /cleanup-image /spsuperseded
Naturally, after executing this command, it will become impossible to roll back the installation of Windows 7 SP 1.
Now, thanks to the updated version of the Windows 7 Cleanup Wizard, you can remove outdated Windows updates, which will significantly reduce the size of the WinSxS folder.
Requirements for installing update KB2852386
- The update is intended only for
- If you download the update yourself from the Microsoft website (the link is at the beginning of the article), you will be asked to run the Windows authentication utility (Genuine Windows Validation). When installing an update through the Update Installation Center, you will not have to perform manual validation.
How to clean the WinSxS folder in Windows 7 by removing outdated updates

Note. It is important to understand that after performing disk cleanup using this wizard, it will be impossible to uninstall updates that replaced deleted updates.
How to automate cleaning of the WinSxS folder
In the event that it is necessary to remove unused Windows 7 updates on many machines at once (don’t run around all of them and perform all these operations manually!), we will resort to simple automation.
To do this, we need to make certain changes to the registry and run the cleaning command on a schedule.
You need to add a DWORD value to the registry with the name StateFlags0011(in fact, the last two digits can be anything in the range from 0 to 65535, the main thing is to remember them, because we will use them in the future) and the value 2 to the registry branch
HKEY_LOCAL_MACHINE\SOFTWARE\Microsoft\Windows\CurrentVersion\Explorer\Update Cleanup
Advice. The specified change to the registry can be made, for example, using group policies (Logon script, GPP, etc.).
All that remains is to use any automation tool (for example, using the schtasks, at, SCCM or logon script task scheduler) to execute the command:
Cleanmgr /sagerun:11
The specified command will start automatic removal of outdated Windows 7 updates and remove unused files from the WinSxS directory
Advice. It would be logical to run this update once a month, for example every first Monday of the month, i.e. before the next one.
What about Windows 8?
In Windows 8 and 8.1, the Windows Update Cleanup Wizard is a standard feature.
The article discusses ways to uninstall all updates in Windows 7 at once. Since OS developers have not built in such a function, you cannot do without third-party software.

Why are updates needed?
Anyone who hears the word “updates” for the first time will say that these are certain measures aimed at improving the product. Their task is to correct bugs and shortcomings in any program, not necessarily in Windows 7. For example, a year after the release of the application, the company decided to improve the interface and released a package of updates that the user must download and install, after which he will see these changes.
Updates in Windows 7 are usually aimed at fixing security problems and compatibility of the operating system with drivers and programs. This also includes compatibility issues with programs that require installation of the Microsoft .Net Framework software platform, etc.
Unfortunately, you cannot avoid problems with updates - after a while they become irrelevant, as new ones appear to replace them. In this regard, there is a “dump” in the partition with installed updates, and you want to have more free space on your hard drive.
There is only one solution: remove all Windows 7 updates and reinstall only the ones you need. But what if you have a thousand of them? Windows 7 does not have a function that allows you to uninstall all updates at once, so you cannot do without third-party software.
Problems that may arise during a deupdate
It is recommended to create a system restore point, since the methods discussed in this article can lead to unpleasant consequences, for example, certain programs may fail to work, the OS may begin to “slow down,” which may result in a system crash, etc. The only way to fix this is to roll back Windows 7 to the point when the updates were installed.
Not all updates will be removed, only those that do not require user action. The remaining updates will have to be uninstalled manually.
First, let's look at a simpler method that will take literally a few minutes of your time, while the second one is longer and requires certain software. All these processes will not interact in any way with the update center. Just in case, temporarily disable the search for updates to successfully complete operations.
Uninstalling Windows 7 updates via batch file
Do you know a method to remove updates via the command line? So, this method simplifies it: now you won’t have to enter the command “wusa.exe/uninstall/ update number” every time - all possible updates will be automatically removed from your computer.
Let's create a file with the extension .bat (batch file). To do this, write the following code in notepad:
- @echo off
- color 0A
- mode con: cols=40 lines=12
- setlocal enabledelayedexpansion
- Set templist=%TEMP%\listTMP.txt
- set list=%USERPROFILE%\Desktop\uninstall_updates.cmd
- echo.
- echo.
- echo Please wait
- echo.
- echo.
- if exist %templist% del %templist%
- if exist %list% del %list%
- wmic qfe get hotfixid>>%templist%
- call:1 "KB" "KB:"
- echo DONE
- timeout /t 3 /nobreak > nul
- exit /b
- for /f "tokens=1* delims=]" %%a in ("find /v /n "" ^<"%templist%"") do (
- if not "%%b"=="" (set line=%%b) else (set line=not)
- set newline=!line:%~1=%~2!
- set newline=!newline:not=!
- echo wusa.exe /uninstall /!newline!/quiet /norestart>>%list%
- ::set templist=%list%
- goto:eof
Then save with .bat at the end of the file name, selecting “All files.” After running it, uninstall_updates.exe will appear on your desktop. To begin the update removal procedure, run it and wait for the process to complete (the command line window will automatically close).
In my case, when the program finished its work, only 90 modifications remained out of 233. We can safely say that its task was partially completed. Restart your computer to reconfigure Windows.
Uninstalling updates using Revo Uninstaller
To complete the update removal process, we need the Revo Uninstaller program. You can buy it on the developer’s website for $39 or download it somewhere, it’s up to you.
After launching Revo Uninstaller, we see a list of programs available for removal, but there are no updates here. To fix this, in the top menu, click on the “Tools” tab and select the section with parameters (Alt + O). In the navigation panel on the left, click on the “All programs” item and check the necessary settings: show system updates, show system components, click “OK” and you will notice significant changes in the list of programs - applications will appear, the name of which will contain the update number.
Select them and click “Delete”. Of course, this method requires certain actions from the user, but you do not have to manually click on each component in the Windows 7 update center.