How to reset the system to factory settings. Detailed instructions for resetting Android settings to factory settings
The need to reset settings on Android can arise in completely different situations: the device has started to freeze, or you simply cannot unlock it. And if no actions help solve the problem, Hard Reset is a real opportunity to restore the functionality of the device. From the article you will learn what to do.
(!) If you have forgotten your pattern, PIN or password, please read these instructions first: and .
Well, if after these manuals you still need help with unlocking or you have other problems with the device, read this article carefully. It is worth noting that after a Hard Reset, only data from the internal memory will be deleted from the phone or tablet. SD files, photos, music, videos, etc. will remain untouched.
Method 1. How to reset settings on Android via Recovery
The first method is relevant for those whose device does not turn on at all, is malfunctioning, or needs to regain access to the smartphone system:
1. Turn off the device.
2. Now you need to get into Recovery mode. To do this, you need to press and hold a certain key combination until the screen lights up. Depending on the device manufacturer, the combination may differ:
- Volume down + power button
- Volume up + power button
- Volume up/down + power button + home button
- Volume up + volume down + power button
How to enter Recovery Mode on phones of various brands is written in.

Using the volume up and down buttons you can move up and down respectively, and confirm your choice with the power/lock button. In newer devices, the Recovery menu may be touch-sensitive.
3. Select “wipe data/factory reset”.

This way you agree to clear the internal memory of your smartphone/tablet.

5. And at the end “reboot system now”.

The whole process will take no more than a minute. After all the Android actions, the phone or tablet will reboot and the factory settings will be restored. You will receive the device as it was when you first started it.
Meizu Recovery Mode
Meizu made their own recovery mode instead of the classic Recovery. To get into it, use the combination “ON” + Volume “UP”. Check only the “Clear data” item and click “Start”.

Executing Wipe from Recovery on Xiaomi
The Xiaomi engineering menu loads when you hold down the Power and Volume “+” keys. It is available in several languages - to switch from Chinese to English, click:

1. Select "Recovery"

2. Click “OK” if you are going to enter Recovery mode.

3. Click "Wipe data". Here the sensor does not work, use the Power and Volume keys to select and move.


5. Confirm by clicking "Confirm".

6. The device will inform you that Wipe has been successfully completed. Open the main menu.

7. To reboot your smartphone, select “Reboot”.

8. Then “Reboot to System”.

Method 2. How to do a Hard Reset through settings
1. Go to Android settings.
2. Open the “Backup and Reset” item. Don't forget to complete.

3. Select Factory Reset.

4. Then click "Reset phone (tablet)".

5. If a pattern or password is installed, you need to enter it.

6. Finally, click “Erase everything.”
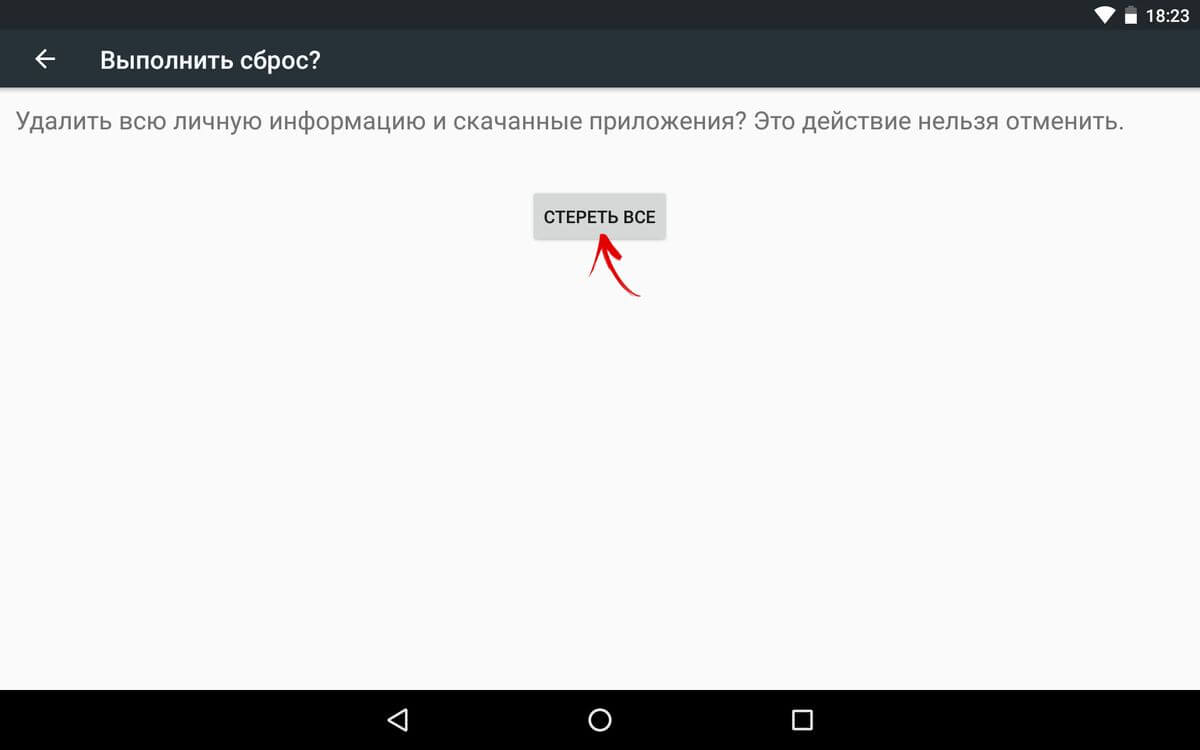
After this, all data from the internal memory of the device will be reset.
On Android 8.0 Oreo and higher
The Settings menu in Android 8.0 has undergone major changes. Now the “Reset to factory settings” function is located in the “System” → “Reset” section.

On Meizu
In Flyme OS, the path to the function is different from stock Android: go to “Settings” → “About phone” → “Storage” → “Reset settings”.
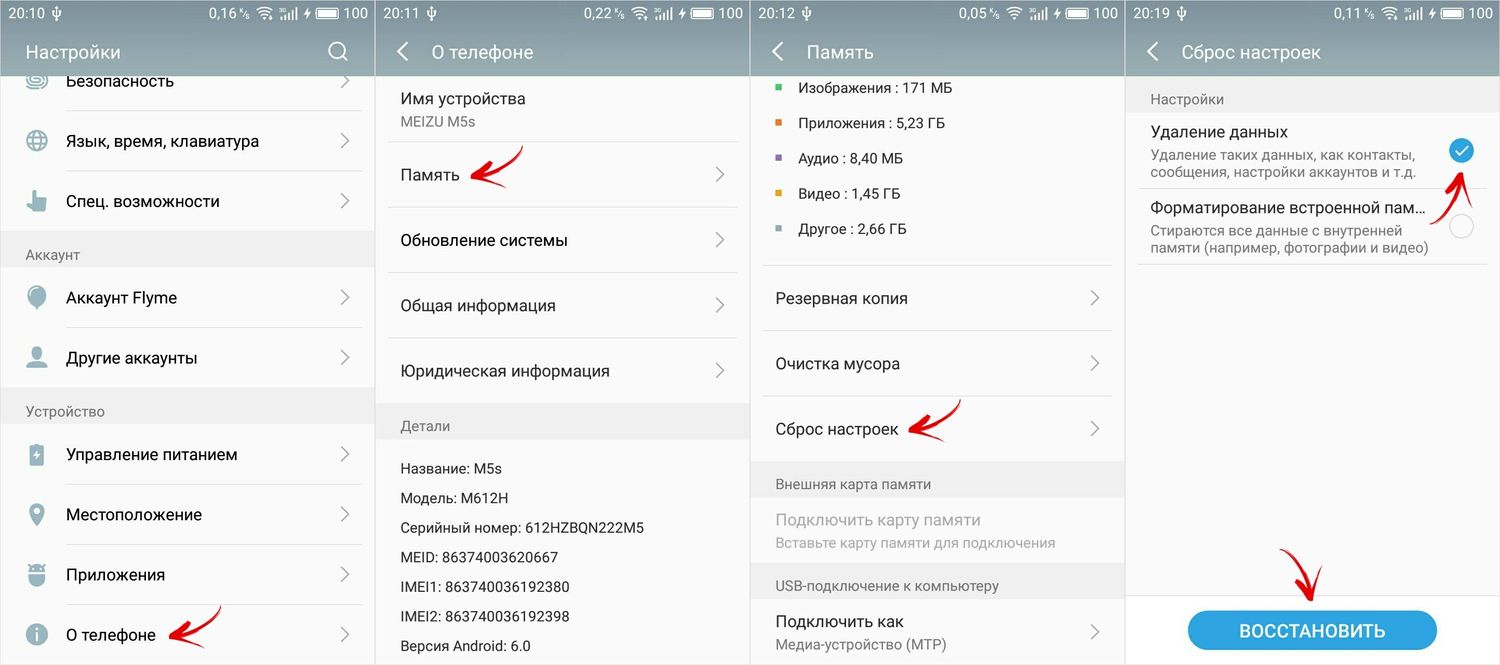
Check "Delete data" and click "Recover".
On Xiaomi
In MIUI, the developers hid the Factory Reset function in “Advanced Settings” - watch the video instructions:
On Xiaomi smartphones, the USB drive is also cleared, so take care of creating a backup in advance if you want to save photos, audio and other files.
Method 3: Factory reset on Android
This method is even simpler than the previous ones. In the dialer, dial one of the following. Perhaps none of them will work, it all depends on the manufacturer:
- *2767*3855#
- *#*#7780#*#*
- *#*#7378423#*#*
Also try entering these codes into “Emergency Call”.
4. Perform Hard Reset from Fastboot mode
You can clear the internal memory of an Android device using the Fastboot utility for PC when the device is loaded in the mode of the same name (if the smartphone has one). Installation and launch of the program, as well as ADB and USB drivers, is described in. On devices such as Nexus, Pixel, Huawei, HTC, Sony, Motorola, the latest LG, you must first unlock the bootloader:
- On Nexus - with fastboot oem unlock command
- On Nexus 5X, 6P and Pixel – activate the “OEM unlock” option in the “Developer options”, use the fastboot flashing unlock command
- For others, you additionally need to obtain an individual code on the manufacturer’s website
(!) Unlocking Bootloader is done via Fastboot and immediately makes Wipe. In the future, to reset the phone, just follow the steps in the instructions.
Put the device into Fastboot mode. There are 2 ways:
First. Turn off your smartphone. Then press and hold the “ON” + volume down buttons until Fastboot mode appears. This keyboard shortcut may vary depending on the manufacturer.

Second. Carefully study how to work with ADB and Fastboot, the link to the article is above. Connect your phone to your computer by activating USB debugging (see). Then enter the ADB command via Command Prompt (or PowerShell on Windows 10) running as administrator and press Enter:
To have Windows PowerShell run this command, add the following at the beginning:
It will turn out like this:

The device is loaded in firmware mode. To erase data, just run one of the commands (don't forget to add .\ when using PowerShell):

To reboot the device use:

5. How to delete data from your phone using the Find Device service
Google has developed a special service "Find device", with which you can not only track your phone, but also reset its settings. To do this, the device must be connected to the Internet.

2. Google will find devices associated with this account. Click Erase Data.


4. Confirm your selection by clicking Clear.

As a result, the internal memory on the smartphone or tablet will be cleared.
6. If TWRP Recovery is installed
Unlike the standard recovery mode, custom recovery mode allows you to reset specific partitions, and not all settings at once.
To do this, open “Wipe” in the main menu.

If you just want to do a Factory Reset, drag the slider to the right.

If you want to format specific sections, select "Advanced Wipe".

Mark the sections that need to be cleaned and swipe to the right.

To reboot Android, click "Reboot system".

That's all. In fact, there shouldn’t be any difficulties with resetting settings on Android; the whole process will take no more than 5 minutes.
(4,80 out of 5, rated: 25 )
Instructions
To return settings on your computer, in the Start menu, find the “Add or Remove Programs” item. Click on the shortcut and wait until a list of installed programs appears in a new window. Select the one you want and click “Change”. After this, the program installation wizard will open and prompt you to select the action you need to perform. Select “Restore” and wait for the process to complete. But this option is not always suitable, since the selected program may be completely removed from the computer.
The most successful way may be to roll back the system to the previous value. To perform it, you also need to go to the “Toolbar” from the “Start” menu and select “System Settings”. Click on the appropriate icon and click the button labeled “Run System Restore.” After which a new window will open, on the right side of which the following text will be written: “To begin, select the task you need to complete.” Check the option “Restore your computer to an earlier state” and click “Next”. Then, in the calendar on the next page, select the day in bold, and in the window on the right, select a restore point. Click the “Next” button again and wait for the system rollback process to complete. After this, the computer will reboot and offer to save completed tasks. settings.
Please note that changes to all previously saved documents will not be affected by a system rollback. This way they will remain the same. So you don’t have to worry about their safety.
If the “Toolbar” is not displayed in the classic view, but by category, to restore the system, you will need to select the “Performance and Maintenance” section, then select the “System Settings” item. It is indicated by a wrench icon. Next, you should follow the steps described in the first paragraph.
Another way to roll back the system can be implemented through “Start”, in the menu of which in the section you will need to find “All programs” and then go to the “Standard” folder. Find “System Tools” in it and select “System Restore”.
Sources:
- how to restore computer settings
It happens that in the hope of improving the performance of a device, for example, a video card, you update the driver for it. But instead of the expected result, you get even slower graphics performance. In this case, it is most convenient not to install the old driver, but to roll it back update.
Instructions
Open the Start menu. Right-click on the Computer icon. In the drop-down menu, click on “Properties”. The “Systems” window will open in front of you.
Helpful advice
If after rolling back the driver the system functionality is not restored, then click the “Delete” button. Then install the old driver again.
If reinstalling the driver did not solve the problem, then restore the system to the date when everything worked properly.
Owners of the iPhone 3G often complain about the deterioration of the device's performance after installing new firmware. Indeed, the iPhone 3G is not fast on the latest firmware. The situation can be easily corrected having rolled back Software to one of the previous versions. Let's see how this can be done.

You will need
- iTunes installed on your computer and the required firmware version.
Instructions
So, you have iTunes installed and the . Launch iTunes and connect your iPhone using a USB cable. In the menu on the left, click on your iPhone icon. In the main window, click the "Restore" button to back up all your iPhone data. Once the backup is complete, click the Refresh button while holding down the Shift key. Choose File firmware from the folder on yours and click “Open”. Rollback will be performed firmware to the version you choose.
Helpful advice
While installing the firmware, do not disconnect your iPhone from the computer under any circumstances. Don't flash the firmware if your iPhone's battery is running low.
Sources:
- Forum apple-iphone.ru
Almost every laptop that you can buy at a computer hardware store comes complete with an operating system. This has its advantages: you don’t have to spend money on buying an operating system, and there’s also no need to waste time installing the system. The presence of an operating system on a laptop's hard drive indicates that the hard drive contains a hidden partition that is used to restore factory settings. Some users deliberately overwrite this partition to increase disk space; some are not even aware of the existence of this partition.

You will need
- Use keyboard shortcuts to restore factory settings.
Instructions
If you did not know about the existence of this hidden drive and want to use it for its intended purpose, you can use special keyboard shortcuts. To properly use the function and application programs, you must know these keyboard shortcuts. The so-called must be pressed during loading, i.e. at the moment when the operating system crashes and cannot boot on its own. When you press the hotkeys, you will be taken to the settings recovery menu.
Samsung – press F4;
Fujitsu Siemens – press F8;
Toshiba - press F8;
Asus - press F9;
Sony VAIO - press F10;
Packard Bell - press F10;
HP Pavilion - press F11;
LG - press F11;
Lenovo ThinkPad - press F11;
Acer – in BIOS, activate Disk-to-Disk (D2D) mode, then press Alt+F10;
Dell (Inspiron) – press Ctrl+F11
Sources:
- hotkeys on asus laptop
The world-famous multimedia player iPod is constantly being improved by Apple programmers. Almost every year new firmware for this player is released, which increases the functionality and also adds new features to this player. But for each user, a certain version of the firmware looks different: one person likes the new features, while another may not like these features. Apple's update system allows you not only to update the firmware version, but also to return it to the previous one.

You will need
- iTunes software, iPod player.
Instructions
When updating, you may encounter the appearance of new functions that may not suit you; to roll back the new firmware, you need the iTunes program, preferably the version that was produced for the first time. Uninstall this program, and after rebooting, install the recently downloaded version.
If an error appears indicating that there is a violation in the integrity of the iTunes Library.itl file, open the folder C:\Documents and Settings\User\My Documents\My\iTunes (for Windows XP) or C:\Users\User\Music\iTunes (for Windows Vista) in Explorer. Then rename it to iTunes Library_old.itl file
Download the old version of the firmware or find it on your hard drive. Start your iPod in DFU mode. Connect it to your , then launch iTunes. Press and hold 2 keys (Home key and Power key) until it turns off completely. One second after the player turns off, press the player's power button and keep the Home button pressed.
After some time, iTunes will detect your , but the player will not light up. You can now release the Home button. This operation is required, otherwise the player will simply turn on. In the program, select the “Recovery” mode. Hold down the Shift key, then specify the firmware. After performing a firmware recovery, all data from the player’s media will be erased.
Video on the topic
Sources:
- how to install firmware on samsung
Almost every person knows that equipment tends to fail, and it’s the same with computers - over time, they can break down or work unstably, causing constant freezes or crashes. Often the solution to this problem lies in resetting your settings; you need to go to the factory settings.

You will need
- Computer, knowledge of the basics of working with a motherboard.
Instructions
Often, a computer malfunction occurs when you don't expect it. Return to allows you to return your computer to stable operation. As a rule, more than 50% of failures occur due to changes in the system settings of the motherboard, the so-called values. When the processor is set to extremely high values, it starts to heat up. When the temperature reaches a limiting state, the user of a personal computer notices malfunctions in the system.
To avoid the motherboard from working properly after malfunctions occur, you must return the BIOS to default settings. This can be done without opening the system unit itself. To do this, you need to turn on the computer or restart it if it was turned on. When loading the BIOS, press the Delete key on your keyboard.
In the BIOS menu that opens, find the Load Bios Default menu line, then press the F10 key (save and exit BIOS). In the dialog box that opens, you will see a request to perform the selected action, press the Y key. After the computer restarts, the BIOS will return to the settings.
If for some reason this cannot be done, you can use other methods, for example, removing the battery from the motherboard - this will allow you to return to the default settings. You may need a "+" screwdriver for this.
Turn off the power to the system unit and turn its back side towards you. Use a screwdriver to remove several screws to remove the side cover.
Find a small battery (it looks like a tablet) and pick it up with any sharp object. After removing the battery, wait a few seconds (at least 5-7 seconds), then put it back in its place. All that remains is to put the side cover of the system unit in its place and screw in the screws.
Sources:
- return laptop to factory condition
Game developers have their own concept for releasing games: initially, a basic version of the game is created and released, and then various patches are created as gamers use it. If you have installed a patch for the game World of Warcraft and do not know how to return the previous version(the addition did not suit you), use the advice described below.

You will need
- World of Warcraft game installed on your computer.
Instructions
During installation, most of the files inside the game folder are replaced with copies. By default, many games create directories that contain source files. Of course, you can try to simply install it again from the original disk, but this creates a chance that the saved recordings will not work.
To restore the necessary files, you need to use the special Repair program, which is included in the distribution of any Blizzard product. But for it to work correctly, you need to prepare absolutely all the game files. Copy them from the C:Program FilesWorld of Warcraft folder to any other directory (this is done just in case, for recovery).
Return to the original directory with the game, select all folders except the Data directory. Please note that you need to delete the folders, but the files that go below the directories do not need to be touched.
After that, open the Data folder and delete 2 files from it: patch.MPQ and patch-2.MPQ. These files are nothing more than a newly installed patch. Then open the realmist.wtf file (located in the C:Program FilesWorld of WarcraftData folder
uru) using any text editor and clear its contents. Enter the following sentence: set realmlist eu.logon.worldofwarcraft.com. Don't forget to save the file when closing by clicking "Yes" in the dialog box that appears.
In the main game folder, find and double-click the Repair.exe file. When the message Cannot connect to the server to appears, run the file again. In the Blizzard Repair window that opens, check the 3 boxes next to the existing items and click the Reset and Check files button. After the message Blizzard Repair has successfully repaired World of Warcraft appears, close the utility window.
Now launch the game and check it out version. If you wish, you can install another version on top of this one.
Operating system it runs on computer, determines the time and date using its own clock. If computer connected to the Internet, then from time to time one of the OS components contacts the exact time server in order to “check the clocks” and make the necessary adjustments to its own system time. However, only seconds are compared, but not hours or dates, so the user can mislead the internal “watchmaker” and manually set the desired day and hour.

Instructions
To for computer and today's day has become yesterday, you need to “rewind” its system time by a day. This can be done either from the BIOS settings panel during the next boot computer and also from the operating system itself. The second method is much more convenient, so try starting changing the system time with it. In Windows OS, left-click on the digital clock in the lower right corner of the screen - in the notification area of the taskbar. This action in the latest versions of the system - Windows 7 and Vista - opens a window with an analog clock and calendar.
Click on the inscription “Change date and time settings” - it is placed under the calendar and clock and is intended to access the system clock settings you need.
On the “Date and Time” tab (it opens by default), you won’t have to look for the right button for long - it says “Change date and time.” Click this button and another window will open in which the calendar and clock are duplicated, but this time their readings can be changed.
In the calendar, click on yesterday's date, and you can complete the operation. If you need to change the time, do it in the window under the analog clock. Then click OK in both this window and the next.
In earlier versions of Windows, the procedure is slightly different. In Windows XP, double-click the digital clock in the tray and immediately after that you can begin changing the date and time - these settings without additional intermediate windows.
There is another way to open a component with date and time settings, which is equally applicable to different versions of Windows. It consists of “manually” calling the required OS component by file name. Press the Win + R key combination, enter the name of the file timedate.cpl and click on the OK button.
Sources:
- how to return a computer to the store
Applying the factory settings of a mobile computer allows you to correct errors associated with incorrect configuration of this device. This procedure is carried out programmatically or mechanically.

You will need
- - Screwdriver Set;
- - metal spatula.
Instructions
First try performing a factory reset using the BIOS menu functions. Turn on your mobile computer and press the key required to display the advanced options menu. Typically you need to press Esc, F2 or F12. Function key information is displayed at the bottom of the screen during boot laptop.
After entering the boot menu, select BIOS and press Enter. In the start window of the launched menu, select the Use Default Settings item. In some models of mobile computers, it may be called Set Default or BIOS Reset.
Press Enter. Once the warning window appears, press the Y key. Now go to Save & Exit. Press Enter again and wait for the reboot laptop.
In some situations, incorrectly configured settings will cause the mobile PC to fail automatically or not at all. In such cases, it is necessary to perform a mechanical reset. Prepare a set of tools necessary for opening laptop.
Remove the screws that support the underside of the case. Remove the hard drive, DVD drive, and RAM modules. Carefully remove the cover, having first disconnected some cables. To do this, it is better to use tweezers or narrow pliers.
Find the CMOS Reset button. Sometimes it is called BIOS Default. Press it and hold it in this position for several seconds. If the described button is missing, try removing the puck-shaped battery from the socket.
After this, close the exposed contacts using a screwdriver or tweezers. Assemble the mobile computer case. Be sure to connect the cables to the correct connectors. Connect all extracted elements. Turn on the laptop and check its functionality.
Sources:
- restoring laptop to factory settings
After installing new hardware or software, your computer may become unstable. To correct this situation, Windows has a built-in option to restore to an earlier state. systems.

Instructions
To start it recovery systems, you will need administrator rights. From the Start menu, select All Programs, then Accessories, System Tools, and Recovery systems" Select the required action: restore the system or create a restore point. To continue, click “Next”. If you have chosen recovery, mark the date closest to the one in operation systems problems started.
Open the program launch window using the Win+R combination or click “Run” in the “Start” menu. Enter the command %SystemRoot%system32
estore
strui.exe. The recovery window will open systems. This code can also be written into the address bar of any folder on your computer.
There is another way to find recovery systems using the command line. Enter the msconfig command and go to the “Tools” tab. In the task list, find "Recovery" systems" and click "Run".
From the Start menu, select Help and Support. In the search box, enter "Recovery" systems" In the “Select a task” list, find the item you need.
Launch recovery systems possible by selecting the appropriate download option. After turning on the computer, press F8 and in the menu that appears, use the Up and Down keys to select “Load last known known configuration.” Select the desired date from those proposed by the system.
To set recovery options, in the “Control Panel” click on the “System” icon and in the properties window go to the “Recovery” tab systems" The properties window can be called differently. Right-click on the computer icon and check the “Properties” option.
Restore original settings on mobile phone settings possible at any time. Only in this case it is necessary to take into account that in this case the user will lose all previously set parameters - from calls to changes in the call log and a number of other settings.

You will need
- - mobile phone.
Instructions
Despite the fact that returning to factory settings does not affect the memory card, it is recommended to remove it from the device before starting work. Although you can leave it: nothing should happen to the data saved on the microSD - photos, music, videos - during a rollback.
If you have the option to back up your phone data, be sure to take advantage of it. You can make a backup using a computer and special Internet sites that synchronize all your phone data. Outlook, Pim Backup, Spb Backup, Sprite Backup and others will be of great help in saving backup data.
To restore your phone to factory settings, go to the main menu. Then find the Settings or Options section. Then go to the “Restore default settings” item. Depending on the model of the device, the names of the operations may vary slightly. However, be aware that if you find the words “ ”, “Restore default settings”, “Reset device settings”, this is the place for you.
Go to this section and indicate the desired operation. The “Restore only” option will help you return to standard settings and at the same time save all personal data, messages, images and music. settings"(alternatively, the phone can use the inscription "Only settings"). You can delete all information stored on your phone by selecting the “Restore All” operation.
In some cases, the user may be required to enter a lock code to return to factory settings. By default, it is 12345, unless another combination of numbers was entered into the phone as a “password”. You can also find the blocking code in the instructions for your mobile device. Be careful: entering the code incorrectly may result in your phone being blocked, and then you will have to contact a service center for help.
As a rule, on most phones, the factory reset function is located in the “Settings” menu, where you will need to find the “Phone” section, then the “Phone Management” item and then the “Initial Settings” option. Although on different models of mobile devices, the path to rollback may differ slightly from the location indicated above. For example, on Nokia X1 everything is much simpler. In "Settings" just find the item "Restore defaults" settings" and press the "Select" key.
The Windows operating system has a calendar and clock. Programs installed on computer, focus on the systemic time. To return time ago, you need to use the “Date and time».

Instructions
Component "Date and time"by default is displayed in the notification area on the taskbar - an electronic clock in the lower right corner of the screen. If you don't see this clock, set it to appear. To do this, right-click on the taskbar. In the drop-down menu, left-click on “Properties”.
Alternative method: Press the Windows key or the Start button, open Control Panel. Click the "Taskbar and Start Menu" icon in the "Appearance and Themes" category. A new dialog box will open. In it, go to the “Taskbar” tab and place a marker opposite the “Show clock” field in the “Notification Area” group. Click on the "Apply" button and close the properties window.
When the clock appears on the taskbar, move the cursor to it and double-click with the left mouse button. The Date and time" It can also be called through the “Control Panel”. To do this, left-click on the “Date and time" in the category "Date, time, language and regional standards".
In the dialog box that opens, make the “Date and time" Use the Time group to set the clock back. Under the analog clock there is a field with the clock in electronic form: using the mouse, select the fragment with hours or seconds and enter the values you need. Or use the arrow-shaped buttons located to the right of the clock field.
If necessary, edit the data in the “Date” group by setting the desired year, month and day. Click on the "Apply" button for the new settings to take effect and close the "Properties: Date and Time" window. time" You can test yourself: create any file and open its properties. In the Created field on the General tab there should be time, corresponding to the settings you specify.
To quickly correct malfunctions in the operating room, a special function is provided. To start OS recovery, special disks are used. Sometimes this process can be carried out through the menu of the system itself.

You will need
- Windows boot disk.
Instructions
If your operating system boots but is unstable, run the recovery function. To do this, go to the computer control panel by clicking on the desired item in the Start menu. Select the "System and Security" submenu.
In the launched menu, click on the “Select another recovery point” item. Click "Next". Now check the box next to “Show other restore points.”
Left-click the desired archive and click the “Search for affected programs” button. After some time, the system will display a list of applications that will be removed during the OS recovery process. Typically these are programs that were installed after the checkpoint was created.
If you are satisfied with this archive, click the “Next” button. Wait while the operating system performs the necessary operations. After this, the computer will automatically restart. When using relatively old checkpoints, several system restarts may be required.
In a situation where the OS does not boot, use a boot disk to start the recovery. Insert the specified DVD drive into the drive and run it in DOS mode.
Open the Advanced Recovery Options menu after launching the program from the disk. Select "System Restore". Use the algorithm described in steps 3, 4 and 5.
After you restart your computer for the first time, be sure to enable startup from your hard drive. It is best to use the quick device change menu when initially loading the program from disk.
Video on the topic
As a result of a computer failure or incorrect user actions during operation, system or program settings may change. To get them back, try performing a system rollback.

Computers love “cleanliness,” both on the hard drive and from dust on the hardware. If the second issue can be dealt with more simply - just clean it, then the first issue is not so easy. The main problem for novice users is the desire to install more “useful” programs and the inability to properly use the computer’s disk space, which leads to problems with its operation. When the situation is at its peak, users have no choice but to reset Windows to factory settings. Our article will describe in detail how to restore the system to its “out of the box” form for different versions, starting with Windows 7.
What is a Windows factory reset?
Let's start with the fact that factory settings are the PC configuration that was installed initially and is the main one for this piece of equipment. All changes that were made by the user during use “disturb” the factory settings and the computer is no longer considered new. Reset to settings “out of the box” - transition to the original state, i.e. getting rid of user settings in general, and, in some cases, even from files and other data that remained after it.
It is recommended to perform a reset only when it is really necessary. Please note that if you have previously reinstalled Windows, either yourself or using computer system wizards, you may not be able to return to factory settings. The whole point is that if you reinstall it incorrectly (stupidly from one disc on which a pirated copy of Windows is recorded), a special recovery partition disappears on the hard drive, on which a copy of the installation version is stored.
This indicates that you cannot simply switch to factory settings - you will need the same distribution that was used initially, and not any other (even if the Windows versions are the same). Otherwise, you will not return the computer to its original form (in software terms) in any way. Therefore, treat reinstalling Windows more judiciously and seriously - if you use the services of wizards, ask them to reinstall Windows so that the recovery partition is not affected. If, nevertheless, the recovery partition was deleted, all you can do is install any convenient version of Windows using a clean installation method (with the removal of all data) and at least somehow create the appearance of a factory reset.
How to reset Windows 7 to factory settings
Unfortunately, the "seven" does not support a quick reset to factory settings, which is an obstacle to returning the computer to its original form without the use of additional knowledge. If you have the task of returning your computer to its original state, you can use the following options:
- Through V "Additional download options";
- Using your distribution that came with your PC or laptop.
If you are more inclined to the second option, then you just need to boot from the distribution and select system recovery there. Then everything will happen as usual.
In the case of the first option, you need to go to the menu "More download options". For most computers (laptops), this can be done by pressing the F8 key, which must be pressed immediately after the computer starts booting (without leaving standby or hibernation mode). When it is downloaded, you need to select "Troubleshooting your computer".
Next you will be taken to the window "System Recovery Options". It contains some features that can actually be used before loading the system as a whole. Among them, either a built-in reset or a proprietary one will be hidden. In this case, for example, we have the option of restoring the Toshiba laptop to factory settings.

You will need to go to this item and follow the prompts of the built-in utility so that you can restore the factory settings. Please note that all files on your hard drive that you have used/saved will be permanently deleted.
How to reset Windows 8|8.1 to factory settings
In the case of Windows 8, things are more favorable. The system interface allows for the use of a built-in factory reset program directly from the “Control Panel”, as well as from the “Advanced Boot Options”. Let's look at this in more detail to improve understanding.

How to reset Windows 10 to factory settings
The “top ten” still has the same recovery functionality as in Windows 8, but to get there you need to go a slightly different path.

Today we’ll look at how to reset Windows 10 to factory settings and roll back the system to the state of just the installed operating system. The topic requires detailed consideration due to the virtual absence of these functions in previous editions of Windows and the concept of storing an image to roll back the state of the operating system.
The beauty of the “ten” here is that to implement the procedure described above you do not need an installation disk, a bootable flash drive with software like True Image, or an image of a working system.
Attention, you should proceed to follow the instructions only as a last resort, when the only solution to the problem is to re-install Windows 10. When the instructions fail, simply install the operating system, making sure that no data is damaged in the process.
All emerging and possible problems accompanying the process of rolling back the “tens” are discussed in the last section. If you encounter one of them, move to the bottom of the page.
Why is this necessary?
Before you learn how to reset Windows 10, you should know why you should reset it in the first place. Returning the operating system to its original state is necessary in cases where it is not functioning properly and a return to normal operation is not possible.
The function is also a complete replacement for reinstalling Windows 10, but with some advantage: saving personal files (documents, application settings).
Performing a reset from a running system
This method of resetting the “tens” is only possible when it starts. Everything is done quite simply.
1. Call up the new “Options” menu (this is most quickly done using the “Win + I” combination).
2. Click on the “Update and Security” element.
3. Go to the “Recovery” subsection.

4. In the first section of the window that appears, click on the “Start” button.
It happens that the operating system reports that it is unable to find the files required to perform an operation. In this case, go to the next section of the article.
5. Select the most suitable option from those proposed (the first is recommended, but it all depends on the situation).

Next comes the branching: if you chose the second method, you will be prompted to format the disk or simply clean it. Here too, everything depends on the situation. For example, when you are going to sell a computer, the option of completely wiping the disk is better, but the process can take a long time if the hard drive is large or there are many bad sectors on the surface of the magnetic plate.
6. In the last window, click “Reset” if you haven’t changed your mind.

The button will start the process of automatic installation of the operating system, during which the PC will restart 2-3 times. As a result, the computer will start with the new operating system.
When you select the option to save personal data, the Windows.old directory will appear on the system partition, where a copy of all files from the previous Windows 10 is stored (for example, the contents of the desktop, the “Downloads”, “My Documents” directories).
Clean installation of "tens" using the Refresh Windows Tool
One of the first Windows 10 August updates for 2016 introduced the Refresh Windows Tool, which allows you to roll back the operating system or reinstall it while saving user documents.
The utility copes with system rollback in situations where the first method did not work for some reason.
1. As before, go to the recovery options.
2. In the last section, click on the icon “Find out how to start over with...”.

3. After this, the Microsoft website will open in the browser, where at the bottom you need to click: “Download the tool now.”

4. After downloading, launch the application, agreeing to the terms of its use.
5. Select the option to save personal information or set the method for deleting it, which we reviewed in the previous section.
All other actions are carried out automatically.

The completion of the process may be delayed due to many factors (computer performance, no fragmentation of files on the system volume, damage to some sectors of the system disk, a significant amount of information has been selected).
After booting your computer with clean Windows 10, it is a good idea to perform the following procedure:
- call the command interpreter Win+R;
- enter “cleanmgr”;
- execute the command;
- Click on the “Clean up system files” icon.

As a result, you can free up to 23 GB or more of disk space.
Resetting the system when it won't start
In this section we will look at how to reset Windows 10 if it refuses to boot. This is where motherboard or laptop manufacturers' tools, or a bootable flash drive or system recovery disk, come in handy.
For devices whose users acquired licensed Windows 10 when purchasing a computer, there is a basic method for resetting it. This is the use of a certain key combination to roll back the device.
In most cases, when a system rollback is required, the computers were not purchased with a licensed “top ten”, so you will need a recovery disk/flash drive. You need to boot from it into recovery mode.

1. Having started in the recovery environment, click on the troubleshooting item.

4. In the operating system selection menu, select Windows 10.
5. If you are confident in your actions, click on the “Return the computer to its original state” icon.
6 Afterwards, we get acquainted with the list of actions that will be performed automatically.
This means deleting applications, resetting system settings to factory settings, and then installing Windows 10.
7. Click “Return to original state” if you are sure of the need to perform the operation.
This will start the system recovery process, which is accompanied by a reboot of the computer.
Tip: if you changed the BIOS settings (changed the priority of boot devices) to boot from bootable media, change their order back.
Possible problems with resetting Windows 10

It happens that when you try to roll back the “ten” to its original state and restart the computer, a window appears with the text “Problem when returning the computer to its original state. No changes were made." The error indicates problems with the resume files located in the WinSxS directory (they are damaged, missing, or have been modified by the author of the assembly). If, after an unsuccessful attempt, the “ten” starts up properly, be sure to check the system files for integrity and the hard drive for damaged sectors.
If all else fails, perform a clean installation of the operating system, remembering to take care of important information on the system disk.
The second common mistake is asking to insert a CD (flash drive) with operating system installation files. For these cases, the Refresh Windows Tool was developed, which was discussed in the second section of this article. Another solution may be to use a flash drive/disk with Windows 10 installation files of the same bit depth and edition as the operating system installed on the computer.
The second option for the action algorithm, if it was not possible to return the operating system to its previous state due to the lack of media with recovery files, is to register your own image with a snapshot of the system to restore it. But at the same time, the “ten” must work properly, because operations are carried out in its environment.
- Download the Windows 10 disk image file.
- We mount it through the virtual drive emulation tool and copy the “install.wim” file located in the “sources” directory to the “ResetRecoveryImage” folder created on any partition other than the system one.
- Instead of a physical drive emulator, you can use any archiver.
- We launch the command line with administrative privileges and enter a command like “reagentc /setosimage /path “D:\ResetRecoveryImage” /index 1”, where the path to the directory created in the third step is “D:\”.
These actions create and register a recovery image in the system.

After successful completion of the operations, we again launch the automatic reinstallation of Windows 10, having previously called it a backup copy. This will speed up the process of reverting to the current OS state if problems arise.
If you have any questions, other problems or new solutions, do not hesitate to write about it in the comments.
They do not always take a prudent approach to downloading applications to a device - many, admiring the abundance of free software in the AppStore, install everything without thinking about the usefulness of the programs. It is the lack of free memory that is usually the reason why the iPhone begins to perform worse: for example, it freezes or reboots spontaneously. If such “symptoms” appear, then it’s time to “clean” the device’s memory - this can be done by resetting the iPhone to factory settings.
Before resetting your iPhone to factory settings, you should back up the data stored on your phone using iTunes– then, if necessary, important information can be restored. You can create a backup in two ways:
Step 1. In the AppStore context menu, follow the path “ File» — « Devices» — « Create a backup».
Step 2. Click the device icon in the top panel and in the “ Review» click « Create a copy now».

It will not be possible to “resurrect” all data using a backup copy - only the following will be available:
- Contacts.
- Application Contents " Notes».
- Photos.
- Messages and call history.
- Phone settings and network settings.
Games, applications and music will not be restored.
Reset iPhone via Settings
You can reset the settings on your iPhone without connecting the gadget to the computer at all - you need to do this:
Step 1. Go to " Settings" and select the section " Basic».

Step 2. Scroll to the end and select the subsection " Reset».

You will see that the device offers several reset options, including:
- Reset settings on iPhone. With such an operation, all personal information that the user stored on the gadget will remain in place. But, say, alarm clocks and standard application settings will be reset. This short-term operation (the reset lasts no more than 1 minute) can help with periodic iPhone freezes.
- Erase content and settings. This type of reset is useful when an Apple user wants to give away or sell a used iPhone. The buyer receives a completely “clean” gadget without traces of prior use - including de-authorization Apple ID. This operation is longer and takes about a couple of minutes (depending on how “cluttered” the memory is).
- Reset network settings. This operation helps if, after replacing the SIM, the gadget cannot find the network of a new service provider and access the Internet via 3G. Personal information will definitely not be affected by such a reset.
Before resetting your iPhone, pay attention to these “safety rules”:
- Before resetting (especially the second, longest type), recharge the gadget to at least 25-30%. If the iPhone “dies” while erasing data, most likely it will have to be restored through iTunes and cable.
- iPhone with jailbreak (eg. Pangu) as a result of erasing the content, it will end up in “eternal apple mode”. Again, you will need to restore through iTunes with preliminary introduction of the gadget into DFU mode or Recovery Mode.
How to reset an iPhone via iTunes?
If necessary, reset the settings via iTunes First of all, you should disable the " Find iPhone"(if it is activated). To deactivate on your device, follow the path “ Settings» — « iCloud» — « Find iPhone" and turn the toggle switch to the "OFF" state. Then connect the gadget with a USB cable to the PC and follow these simple instructions:
Step 1. Click on the " Device", and you will find yourself in the section " Review».

Step 2. Click the button Restore iPhone..."

Step 3. In the window that appears, click " Restore» again - this way you confirm the request.

After that iTunes It will download the software to the gadget itself and return the iPhone to its original settings. When resetting the settings in this way, contacts, SMS, calendars, alarm clocks and notes will not be affected, but you will have to say goodbye to multimedia files.
Completely reset settings via Hard Reset
Reset via Hard Reset needed in such a situation: the user has forgotten the security password and cannot deactivate " Find iPhone" - the enabled function, in turn, prevents the settings from being restored through iTunes in a softer way.
It’s not for nothing that such an operation is called “hard” ( Hard) – resetting may result in all personal data being lost. Therefore, contact Hard Reset It is recommended only after other options have already been tried and were unsuccessful.
Recovery via Hard Reset done like this:
Step 1. Connect the gadget to your PC and launch iTunes normally.
Step 2. Enter your smartphone into DFU mode in the following way: simultaneously hold down the " Home" and the power button and count to 10. Then release the " Power" and continue to hold " Home» until the characteristic sound of connection in iTunes. After entering the gadget into DFU mode, there is no point in looking at its screen - it will be just black, without icons and images.
Step 3. Talk to iTunes, and you will see that the window has changed and only one button remains available - “ Restore iPhone..." You need to press it.

You will have to wait quite a long time for the initial settings to be restored - about 10 minutes. When the reset is complete, the user will have to choose one of two options: reactivate the gadget or try to return the deleted data through a backup copy to iTunes. To implement the second option, you need to go to the section “ Review» device and press the button « Restore from copy».


Conclusion
Unfortunately, the problems of smartphone users are not limited to gadget freezes - quite often, owners of even such secure devices as the iPhone become victims of fraud: attackers find out the security password, change it remotely and begin blackmail and extortion - your humble servant has also found himself in this situation. There is no question of transferring money - the blackmail will never end - but a simple reset to factory settings via iTunes will help leave intruders “out of their depth.” The main thing is not to neglect such an opportunity as creating backup copies: then, even after a “hard” reset, you will be able to restore important data.