How to make a footnote in Word at the bottom of the page. Footnotes in Word: learning how to make them How to make several footnotes on one page
There are hardly many printed publications that do not use footnotes. They have become an integral part of fiction and scientific literature, periodicals and official documentation. Thanks to footnotes, any clarifications and clarifications can be removed from the text by placing them in a specially designated field. Thus, the structure of the source information is not disturbed, readability is improved, working with text and finding the necessary details is simplified. Using a special tool, you can add footnotes to files created using the popular text editor MS Word.
MS Word supports two main types of footnotes: footnotes and endnotes. Regular ones are located at the bottom of the page and are separated from the main text field by a horizontal line. These are the most common, but are only suitable for posting a small number of short notes.

If you need to give detailed explanations on certain issues, indicate sources of information, provide quotes and opinions, it is better to use the end ones. For them, one or several pages are allocated after the entire information block of the document or section.

In addition, the marking of footnotes varies. In the last century, symbolic designations were popular. The first footnote was replaced with a “*”, the second with a “**”, and so on. Modern standards for the design of documents and printed publications recommend designating footnotes in Arabic numerals in ascending order.
Add a regular footnote
Placing a footnote at the bottom of the page is very simple. In this case, the program will automatically assign it a number and separate the text fields. Place your cursor where you want the footnote to appear, then do the following:

Note! Footnote text may or may not be counted toward the total number of words and characters in a document. This feature is responsible for the item in the “Statistics” menu, which can be called up from the “Review” tab.

Adding an endnote
An endnote is inserted using the same algorithm as a regular one. As in the first case, first of all, you should mark the required place in the text with the cursor. Then:

You may have noticed that by default endnotes are marked with Roman numerals rather than Arabic numerals. The next section will tell you how to change this and other footnote settings.
Editing footnotes
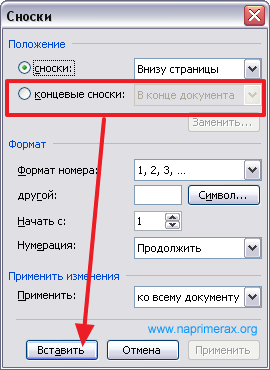
You can change the basic settings for footnotes and endnotes using the advanced menu. It allows you to set the specific location of an object (1), change the type of marking (2), set the initial numbering values (3) and perform a number of other actions.
The controls listed above look like this in the dialog box that opens.

To open the expanded menu, you must click on the corner icon of the “Footnotes” field in the “Links” menu.

On a note! In the end, I would like to note that you can significantly speed up the placement of footnotes by using keyboard shortcuts. Thus, the combination CTRL+ALT+F places a footnote at the bottom of the page, and CTRL+ALT+D places an endnote.
Video - How to add a footnote in Word
As you create a text document, you may need to use footnotes to explain the meaning of individual words or terms. Footnotes are especially often necessary when writing abstracts, reports, scientific articles or dissertations.
Sometimes Word text editor users create footnotes manually, but this approach is time-consuming and not very correct. Because Word has special tools for this. In this article we will talk about how to correctly make a footnote in Word 2003, 2007, 2010, 2013 or 2016.
How to Add a Footnote at the Bottom of a Page in Word 2007, 2010, 2013, or 2016
If you are using the text editor Word 2007, 2010, 2013 or 2016, then in order to make a footnote you you need to place the cursor in the place that your footnote should link to, go to the “References” tab and click on the “Insert Footnote” button. After this, a footnote will appear at the bottom of the page and you can enter the text you need into it.
You can also include a footnote at the end of the document. This is done in a similar way. Place the cursor in the right place, Go to the "References" tab and click on the "Insert Endnote" button.

If necessary, you can customize the appearance of footnotes in your document. For this click on the small button to the right of the “Footnotes” block on the “References” tab.

After this, a window with footnote settings will open.

Here you can change the location of footnotes (at the bottom of the text or at the bottom of the document), as well as the format for numbering footnotes (numbering with numbers, letters, Arabic numerals, etc.). In order for the settings changes to be saved, do not forget to click on the “Apply” button before closing the window.
How to make a footnote in Word 2003
In Word 2003, footnotes are done a little differently. To do this, you need to place the cursor in the place that the footnote should refer to, open the menu “View – Link” and select “Footnote” there.

After this, a window with settings for footnotes in Word in 2003 will appear on the screen. As in more modern versions of Word, here you can change the location of the footnote and its format. For example, in order to insert a regular footnote, you need to select the position of the footnote “Bottom of the page” and click on the “Insert” button.

If the footnote should be located at the end of the document, then select the position of the footnote “At the end of the document”.
After selecting all the desired settings, click on the “Insert” button" As a result, a footnote will appear in the document into which you can enter text.
In conclusion, we offer you some useful tips for working with footnotes in the Word text editor:
- If a footnote is no longer needed, you can delete it. To do this, simply remove the footnote marker that you placed in the text.
- By double-clicking on the footnote marker at the bottom of the page, you can quickly move to the point in the document where this footnote was placed.
- You can start footnote numbering at any number.
- The "References" tab has a "Next Footnote" button that allows you to quickly move to the next footnote in the document.
- The Links tab has a Show Footnotes button that lets you quickly navigate to footnotes at the end of a text, sheet, or document.
- Footnote settings can be applied not only to the entire document, but also to individual sections.
Footnotes in Microsoft Word are something like comments or notes that can be placed in a text document, either on any of its pages (regular footnotes) or at the very end (endnotes). Why is this necessary? First of all, for collaboration and/or checking assignments, or when writing a book, when the author or editor needs to provide an explanation of a particular word, term, phrase.
Imagine someone sent you a MS Word text document that you must view, check and, if necessary, change something. But what if you want the author of the document or some other person to change this “something”? What to do in cases where you just need to leave some note or explanation, for example, in a scientific paper or book, without cluttering the contents of the entire document? This is exactly what footnotes are for, and in this article we will talk about how to insert footnotes in Word 2010 - 2016, as well as in earlier versions of the product.
Note: The instructions in this article will be shown using Microsoft Word 2016 as an example, but they are also applicable to previous versions of the program. Some points may differ visually, they may have a slightly different name, but the meaning and content of each step are almost identical.
Using footnotes in Word, you can not only provide clarifications and leave comments, but also add links to text in a printed document (often, endnotes are used for links).
Note: If you want to add a bibliography to a text document, use the commands to create sources and links. You can find them in the tab "Links" on the toolbar, group "Links and bibliography".
Footnotes and endnotes in MS Word are numbered automatically. You can use a common numbering scheme for the entire document, or you can create different schemes for each individual section.
The commands needed to add footnotes, endnotes, and edit them are located in the "Links", group "Footnotes".

Note: The numbering of footnotes in Word changes automatically when they are added, deleted or moved. If you see that the footnotes in a document are numbered incorrectly, the document most likely contains corrections. These corrections must be accepted, after which the footnotes and endnotes will be correctly numbered again.
1. Left-click in the place where you want to add a footnote.

2. Go to the tab "Links", group "Footnotes" and add a footnote or endnote by clicking on the appropriate item. The footnote mark will be placed in the required location. The footnote itself will be at the bottom of the page if it is normal. The endnote will appear at the end of the document.

For greater convenience, use keyboard shortcuts: "Ctrl+Alt+F"- adding a regular footnote, "Ctrl+Alt+D"- adding a trailer.
3. Enter the required footnote text.

4. Double-click the footnote icon (either footnote or endnote) to return to its mark in the text.

5. If you want to change the footnote location or format, open the "Footnotes" in the MS Word control panel and perform the required action:


How do I change the initial value of footnotes?
Regular footnotes are numbered automatically, starting with the number "1", terminal - starting with the letter "i", followed by "ii", then "iii" and so on. In addition, if you want to make a footnote in Word at the bottom of the page (regular) or at the end of the document (end), you can also set any other initial value, that is, set another number or letter.

1. Open the dialog box in the tab "Links", group "Footnotes".
2. Select the required initial value in the field "Begin with".
3. Apply the changes.

How to create a footnote continuation notice?
Sometimes it happens that a footnote does not fit on the page, in which case it is possible and necessary to add a notice about its continuation so that the person who will read the document is aware that the footnote is not finished.

1. In the tab "View" turn on the mode "Draft".


3. In the list of footnotes areas that appears, click "Notice to continue footnote" ("Notice to Continue Endnote").

4. In the footnotes area, enter the text needed for the continuation notice.
How do I change or remove the footnote separator?
The text content of a document is separated from footnotes, both footnotes and endnotes, by a horizontal line (footnote separator). When footnotes go to another page, the line becomes longer (footnote continuation separator). In Microsoft Word, you can customize these dividers by adding pictures or text.
1. Turn on draft mode.

3. Select the separator type you want to change.

4. Select the desired separator and make the appropriate changes. 
- To remove a separator, simply click "DELETE".
- To change the separator, select a suitable line from a collection of pictures or simply enter the desired text.
- To restore the default separator, click "Reset".
How to remove a footnote?
If you no longer need a footnote and want to delete it, remember that you need to delete not the text of the footnote, but its symbol. After the footnote sign, and with it the footnote itself with all its contents, are removed, the automatic numbering will change, moving to the missing item, that is, it will become correct.
That's all, now you know how to insert a footnote in Word 2003, 2007, 2012 or 2016, as well as in any other version. We hope this article was useful to you and will help you significantly simplify your interaction with documents in a Microsoft product, be it for work, study or creativity.
Content
When creating a text document in Microsoft Word, you may need footnotes. They are used to clarify the meaning of individual words or terms. Footnotes are often used in abstracts, dissertations, as well as scientific articles and reports. To create them, the program has special tools.
How to make a footnote at the bottom of a page in Word
Regular notes are located at the end of the page. They are found in works of fiction to explain the meaning of words unfamiliar to the reader. To create a link to a particular term using the text editor Microsoft Word 2007, 2010, 2013 or 2016, follow the instructions:
- Move the mouse cursor to the place in the text where the note will apply. (Figure 1)
- In Word's top menu, click on the "References" tab and click "Insert Footnote." (Figure 2)

- Enter the text that you want to appear at the bottom of the page. This completes the insertion of the footnote. (Figure 3)

- An alternative option for creating a note is to use the Alt+Ctrl+D button combination. Press these buttons at the same time, and you will see a place in the document where you can insert the text necessary for explanation.
Endnote in Word
This type of note is located at the end of the entire document or its individual sections. It is often found in scientific articles, abstracts, and independent works as a list of references. The difference between such a footnote and the usual version is that it is not page-by-page. Creating an endnote in Word 2007 and later looks like this:
- Place your mouse cursor where you want the footnote to link. Select the “Links” tab located on the ribbon (top menu) of the program. (Figure 4)

- Open advanced formatting options to change the type of element you paste. (Figure 5)

- In the window that opens, select “Endnotes.” There you can change the numbering format (numbers, letters, Roman numerals) and decide on the number of columns. (Figure 6)

- Click on the “Insert” button and add the desired text. (Figure 7)

- To replace all endnotes with normal ones, or vice versa, open advanced formatting options. Select the desired option there and click the “Replace” button, click “OK”. (Figure 8)

How to insert a footnote in Word 2003
In Microsoft Word 2003, notes are inserted differently. They are formatted like this:
- Move the mouse cursor to the desired location, open the “View” menu and, by clicking on the “Link” item, select “Footnote”. (Figure 9)

- In the window that opens, configure the note to be added. There you can change its location (normal or end) and select the optimal format. Then click "Insert". (Figure 10)

- A space for the note appears in the document. Paste the required text there. You can set up a note for the entire document or for individual parts of it.
Word has a lot of necessary functions for the user. In this article we will look at one of these functions - placing footnotes in a document.
Quite often you can find them in fiction, scientific literature or magazines. They are also used in explanatory notes, reports, coursework and diplomas.
With their help, the author can give an explanation for the word or phrase used in the document, if it is an abbreviation, then its decoding. A footnote can also be used to insert the literature from which a piece of text was taken.
They are also very convenient for the reader, because when reading they are not distracted by various explanatory phrases that are in no way related to the main text. And if necessary, you can simply look down and look at the explanations given by the author.
So, in order to make footnotes in Word, open the document and go to the “Links” tab. Here is the section that interests us.
At the bottom of the page
To make a regular footnote at the end of the page, place the cursor after the desired word or phrase and click on the button "Insert Footnote". Then write the explanation you need below.
In this case, they will be numbered in order in the document. Add another one on the same sheet - there will be number 2, then on the next one - there will be number 3, and so on.

At the end of the document
To insert it at the end of the document, click on the button "Insert Endnote". Thus, all those made in the text will be displayed at the end of the document; they are also numbered in order throughout the document.

Now let's look at all the functions that can be applied to them. Click on the small arrow in the "Footnotes" section. As a result, a window will open in which you can specify the necessary parameters for them.

On each page from 1
If you need the numbering of footnotes to start anew on each sheet, then in the functions window, configure the parameters as shown in the figure below. You can select the desired number format.
If you click “Insert”, it will be added to this page with the configured parameters once. If you click “Apply”, then later when you click the button "Insert Footnote", for each new page the numbering will start from the beginning.

After the text
In the options box, you can choose to add a footnote at the bottom of the text rather than at the bottom of the page.

For each section with 1
If your text is divided into sections or chapters, and you want the numbering to start over in each chapter, then in the functions window select numbering "In every section".

Please note that at the end of each chapter there should be "Section break (from next page)". To do this, on the tab "Page layout" open the drop-down list “Breaks” and select from it "Next page".

If you want to change the number format to A, B, C... in one section, instead of 1, 2, 3... - then in the functions window select the number format and click apply "To current section", then click the “Apply” button at the bottom.
In the same way, you can add them immediately after the text for one section, and put them at the bottom of the sheet in another.

At the end of the section
To ensure that footnotes appear at the end of each section rather than at the end of the page, configure the options in the Functions window as shown in the figure below.
If you choose to apply "To current section", then all of them will be at the end only for the selected section. For all others, they will remain in order at the bottom of each sheet. If you choose to apply "To the entire document", then footnotes will appear at the end for each section.

When you hover the cursor over any of them, its text will be displayed. If you double-click on it in the text, the page in Word on which it is explained will open. To see where it is located in the text, double-click on the desired explanation with the mouse.
How to remove footnotes
To delete a footnote, place the cursor behind it and press Backspace twice.

It seems like she told me about all the points that you need to know in order to make a footnote in Word. If you have any questions, ask them in the comments and I will try to help.
Rate this article: (1
ratings, average: 5,00
out of 5)
Webmaster. Higher education with a degree in Information Security. Author of most articles and computer literacy lessons