How to make a flash drive bootable. Entering special commands
This method installation is suitable if you are the owner of a netbook or your CD/DVD drive has failed and you need to install Windows 7. This method is also good because the process Windows installations 7 from a flash card is several times faster than from a CD or DVD.
Before you start Windows entries 7 to a flash drive, copy all important data from the flash drive to other storage media ( HDD where Windows will not be installed, another flash card, disk, etc.), since during the process of formatting and writing the Windows 7 image to a flash drive, all data on it will be destroyed.
First way
If you are creating bootable USB flash drive If you are on the Windows 7 operating system, you will need the program Windows 7 USB/DVD Download Tool, which can be downloaded from Of. Microsoft website following the link.
If you are creating a bootable USB flash drive under the Windows XP operating system, you will need to install Microsoft. NET Framework 2.0
And Microsoft Image Mastering API 2.0. Of course, if you already have them installed (usually the first program), then you do not need to install them again.
1) Insert the USB flash drive into the laptop.
2) Launch the program. Click the button Browse.
3) Select ISO Windows image 7 and press the button Open.

4) After you have specified the Windows 7 ISO image, click the button Next.

5) Click the button USB device.

6) Your flash drive should appear in this window. Click the button Begin copying

7) Click on the button Erase USB Device

8) Click Yes.
9) The process of writing the Windows 7 image to the USB flash drive will begin

10) When recording is complete, the status will change to Backup completed. Close the program

Second way
For the second method you will need a program Ultra ISO.
1) Insert the USB flash drive into the laptop.
2) Launch the program. In Windows 7 and Windows Vista It is recommended to run the program as an administrator.
The UltraISO program is paid, but you can use a trial period, we will consider this option. Click the "Trial period..." button

3) Select a menu item File ->Open...

4) Select the Windows 7 ISO image and click the button Open.


6) In the field Recording method: select USB-HDD. Click the button Format.

7) The formatting utility will launch. Click the button Begin.

8) Click OK.

9) After formatting, a success window will appear. Click OK.

10) Close the program.

11) Press the button Write down.

12) Click Yes.

13) The process of writing the Windows 7 image to the USB flash drive will begin.

14) Upon completion of recording in the column Event The message “Recording complete!” will appear. Close the program.

Third way
For the third method, we need the WinSetupFromUSB 1.0 Beta 7 - program.
Note: the link has a newer version, but the principle remains the same.
1) Insert the USB flash drive into the laptop.
2) Launch the program. In Windows 7 and Windows Vista, the program must be run as an administrator.

In field USB disk selection and format your flash drive should be listed.
Note: If the flash drive is not detected, then format it using the PeToUSB or HPUSBFW utility.
Also, the flash drive may not be detected if it is inserted into the laptop after the Winsetupfromusb 1.0 Beta7 program has been launched and for it to be detected, just press the button Refresh.
3) Click the button RMPrepUSB.

4) Mark the following lines: WinPEv2/WinPEv3/Vista/Win7 bootable (CC4), NTFS. Place a check mark next to it Boot as HDD (C: 2PTNS). Click the button 6 Prepare Drive.

5) Click the button OK.

6) Click the button OK.

7) After this, something like this will appear Dos window.
Warning: Do not close this window. It should close automatically.

8) After Dos the window will close click the button Exit.

9) Check the box next to it Vista/7/Server 2008 - Setup/PE/RecoveryISO. Click on the square on the right.

10) A window will appear Browse folders in which you need to choose virtual drive in which the ISO image of Windows 7 is mounted.
After you have done this, press the button OK.

11) Press the button GO. The process of writing Windows 7 to the USB flash drive will begin.

12) At the end of recording, a small window will appear. Click OK.

13) Close the program.

Fourth method
The installation method is quite simple, so anyone can do it! For this we need:
1) Windows 7 image
2) Flash drive with a capacity of at least 4GB
3) A program for creating and editing ISO images, ultraISO from the above method or free MagicDisk
You can take any media from a regular flash drive to an SD card, but not less than 4GB!
4) Launch command line(in Windows XP this is standard->command line. In Windows Vista/Windows 7, open Start, at the very bottom there is a search, enter cmd and open with administrator rights).
5) Next on the command line enter diskpart, the disk management utility will open.

6) Next, in the diskpart utility itself, enter: list disk, this will display all the physical disks of the PC, namely disks and not partitions.
Among them we are looking for our flash drive.

7) Then we execute the command select disk #, Where # This is the number of our flash drive.
IN in this case The flash drive on the screen is number 1, therefore s elect disk 1. All further manipulations will be carried out only with this disk.
8) Execute the command clean, clean the drive, then the command create partition primary- create a new partition on the disk.
9) After creating a new section, write select partition 1, select this section for manipulation, enter active, thereby making the section active.
10) Now for the flash drive to be visible in bios, you need to format it in NTFS format, which is what we do as a team format fs=NTFS.
11) Next, you need to activate the process of connecting the device and assigning letters to it, we do this with the command assign.
That's it, the preparation process is complete.

Installing Windows 7
You can record the distribution using any file manager or a free one.
In this case, you need to somehow open the image of the installation disk with the OS, this can be done with any disk emulator, Alcohol or MagicDisk, create an image and copy everything from it with a file manager to our prepared flash drive.
Everything, the creation process installation flash drive completed, now we try to install the OS by first setting it in bios.
Well, that’s all, which of the four methods of creating a bootable flash drive to use is up to you.
Inclusion in BIOS boot from a flash drive
Before you start installing Windows 7 from a flash drive, you need to go into the BIOS and enable booting from the flash drive.
To enter the BIOS you need to press a certain key when the computer boots. On desktop computers This is the Del key. On laptops, the F2 key is most often used.
Usually, when you turn on the laptop, a screen appears on which at the very bottom there is a line that says which key you need to press in order to enter the BIOS.
If you do not have such a line, then you need to look at the information on how to enter the BIOS User Manual walking with a laptop.
1) Insert the flash drive into the laptop if it is not inserted.
2) Turn on the laptop, if it is on, then reboot.
3) Go to BIOS.
Using an example, the whole process will look as shown below; if your BIOS is different, then the principle will remain the same. If you have questions, write in the comments.

4) Go to the tab Boot. In it, in boot order, you need to put our flash drive in first place, using the arrow keys and keys F5 And F6. That is, we use the arrow keys to select our flash drive, and use the key F6 we take her to the very top.
To find out which keys you need to use to set the boot order, see the tips on the right.
The name of the flash drive should appear in the line USB HDD.
Also, the flash drive may appear in the line USB KEY.
To save changes and exit the BIOS, press the key F10. (Depending on the BIOS manufacturer, the key may be different. See tips on the right or below).

5) A window will appear asking in English whether to Save changes and Exit? You are taking Yes.

6) After this, a reboot will occur and the Windows 7 installation process will begin.
Installing Windows 7 from a USB flash drive
If a bootable USB flash drive with Windows 7 was created using programs WinSetupFromUSB 1.0 Beta 7, it will appear first green screen. Select Start Vista/Win7/Server 2008 Setup or PE/Recovery ISO from partition 0.

Next, the Windows 7 setup program will launch.
Write in the comments what is not clear and what questions you have.
In this article, we will look in detail at how to make a bootable USB flash drive for Windows 7. I have repeatedly received emails about how to create a bootable USB flash drive for Windows 7, but to convey the information, just words are not enough, because there are some nuances that you need to know.
Now let's figure it out with you when you need to create a flash drive with Windows 7. Sometimes while working on a personal computer, laptop or netbook, the need arises to download from some external device. This may be needed to recover from any failures, eliminate the consequences of a virus infection, or simply when reinstalling operating system.
On desktop computers this problem, as a rule, is solved with the help of CD/DVD media, but for other devices, for example, netbooks that do not have a disk drive, using a bootable USB flash drive is often much easier than looking for an external DVD-ROM. I have it, but ordinary users Those who need to install Windows 7 from a flash drive do not need to buy it. Since they will not do this procedure often.
This is what the external drive looks like:

I would also like to note that those users who recently bought a computer, laptop or netbook that has USB ports 2.0 and USB 3.0, must connect the USB flash drive with Windows 7 to USB 2.0. Because Windows 7 does not support USB 3.0. Define USB port 3.0 are easy, they are usually colored blue. Look at the photo below:

In any case, you will understand this when an error appears and further installation of Windows 7 will be impossible. Below in the photo you can see how it will look on your monitor 😉: 
I recommend that you read the first method and about Windows program 7 USB/DVD Download Tool, because they are the most reliable options for creating an installation flash drive with Windows 7. The first method is good because you will not need to use any programs, all you will need is to do this procedure already installed Windows 7. Of course, if it is not at hand, then proceed to method number two.
What you need to know before creating a flash drive
Before starting the process, you need to check that certain conditions are met:
- Availability of installation Windows disk 7 or an image with the Windows 7 operating system;
- Availability of a “clean” flash drive with a size of at least 4 GB. If there is information on it, it must be copied somewhere, because during the work the USB drive will be formatted and all its contents will be destroyed;
- Support boot/select from flash drive in BIOS.
I hope there are no difficulties with the first two conditions, but I’ll say a few words about the third. Actually, installing an operating system is a topic for a separate article, but in short it’s done like this. In the moment bootstrap computer we enter BIOS settings(on most computers, to do this, immediately after turning on the power, press or hold DELETE key). For one of the most popular BIOS versions start menu looks something like this:

Next, go to the “Advanced BIOS Features” menu and there we find the “Boot Sequence” item. It specifies the sequence of devices from which the BIOS will try to boot the computer. After that we look at everything possible options selection in the “First Boot Device” item. If there is anything related to USB there, it means booting from flash drive possible.

After any changes in the BIOS, remember to save using the “F10” key.
So, if all the conditions are met, then you can move on to the topic of the article, how to make a bootable USB flash drive for Windows 7. In this article, we’ll talk about four methods that are the most popular.
Why am I talking about more than one method? Each user has preinstalled programs, and one of the programs may already be on your computer. Why install other programs, because you can use the ones that exist.
By the way, there is an article on the blog about how to install Windows 7 when your computer has a disk drive: "". It will also be useful when you create a bootable USB flash drive and begin installing Windows 7.
The procedure for creating a flash drive via the command line
As I said above, this method is one of the most proven, which is why I want to talk about it at the very beginning of the article.
In the following three methods, you will learn how to make a bootable USB flash drive with Windows 7 using specially created programs with convenient graphical interface. But the Windows 7 operating system has a built-in feature that does not require downloading any utilities, but it makes you work hard by typing a lot of letters on the keyboard.
If any of the readers saw those times when all work on the computer was carried out by typing various commands in DOS system(white letters on a black screen, English-language commands and no multitasking!), then he will probably experience some nostalgia for the old days.
And for those who believe that Windows has always been graphical, they are deeply mistaken.
All work is carried out in the so-called command mode Windows. To go there, click the “Start” - “Run” button.

Enter “cmd” in the field and click “OK”.

A black screen appears in which we type commands, each of which is completed by pressing the “Enter” key.

To make everything clear, I will provide screenshots after each command. This way you will know that you are doing everything right.
Diskpart – enters disk management mode. You may be required to confirm running as an administrator - enter the administrator password and click “Yes”.

List disk – displays a list of all disks, serial numbers starting from scratch.

Be especially careful here: all drives are displayed, including HDD partitions. So, correctly identify the desired flash drive. It's not difficult: it's listed after all hard drives and has a size you know.

Let's say that the flash drive is number 3. We type select disk 3. For example, if you have it in 4th place, then type select disk 4 accordingly.
Attention! Let me remind you, so as not to make a mistake, you can calculate your flash drive by size (look in the “Size” column).

After this, a message will appear on the screen confirming that you have selected some kind of media. It says: “Disk 3 selected.”

Now, if you are 100% sure that you are selected correct number media, enter the “Clean” command. This command completely deletes all files. I hope that you have already copied all the data from the flash drive; I talked about this at the very beginning of the article.

Type the command “Create partition primary” and press “Enter”. For those who want to know what will happen now - the creation of a primary partition on the disk.

Your section has been created.

Now enter “Select partition 1”.

Enter the command “active” to mark it as active and press “Enter” as always.

Enter "Format fs=NTFS". We format our flash drive as a file one NTFS system. This operation will take a few minutes.

We are waiting for the formatting to finish.

After formatting the flash drive, a corresponding message will appear.

Enter the Assign command. As a result of executing this command, the utility will automatically create new disk, for example, H: and will give information window with a message about this event.

All necessary actions were committed with a flash drive. Type Exit. We're finally leaving command mode.

Now we have an empty but bootable USB flash drive. All that remains is to copy the files from the Window 7 distribution onto it and you can begin the installation. Making a bootable Windows 7 USB flash drive via the command line is easy, the main thing is to remember all the steps.
UltraISO program
UltraISO - extremely useful utility for working with disk images. It will be useful not only for our current purposes, and therefore I recommend that you familiarize yourself with its capabilities. The program is not free, but it has a trial version with quite suitable functionality for our task. Download the program here: and click on the “Free Trial” link.

We select a language from a long list (Russian is also available, among others). Click on any arrow in the “Russian” line (these are links to download from different site mirrors).

After downloading the program, run it to install.

In the next window, read the license text (optional) and select “I accept the terms of the agreement” and click “Next” again. Friends, who reads program licenses? I personally don't ;).

Now you need to specify the location on the disk where the necessary files will be copied. Leave it as default and click “Next”.

We receive an offer to create a shortcut to launch in the Start menu. We agree by clicking the “Next” button again.

If you want to add a program shortcut to your desktop, click on the first checkbox.

We are ready to install the program, click the “Install” button.

When copying files is finished, click “Finish”.

If everything is correct, click on “Trial period...” and go to home screen programs.


Insert the flash drive into your computer, laptop or netbook.
Then go to the “Bootboot” menu and select “Burn image” hard drive».

After that, click “Format”.

Set the file system to NTFS, FAT32 is selected on the screenshot:


After formatting, click “Burn”.

Select "Yes".

We are waiting for the Windows 7 bootable USB flash drive to be created.

Now you can install Windows 7.

Microsoft utility
Usage special program from Microsoft allows you to make a bootable USB flash drive for Windows 7 in many ways similar to the previous case, except that the utility is free and you can use it as much as you like. It's called Windows 7 USB/DVD Download Tool, download the program using .
To work with the program, you must install Microsoft .NET Framework 2.0. To download it, follow the link.
After downloading the program, launch it and click “Next”.

The next window displays information that everything is ready for installation. We confirm by clicking on the “Install” button that we agree to install this program.

Often the operating room Windows system fails. Often many people cannot even determine the cause of the failure. It could be a virus downloaded along with a useful program or the removal of some vital important file. Of course, this file can be restored, but what if you simply don’t have an installation disk at hand or you don’t know how to restore the system? The situation can be complicated by the fact that you need a computer or files from it (documents for studies or work, even the same photographs) here and now. What to do then? Option one is to have a bootable USB flash drive with you, and now we will figure out how to make it. A bootable flash drive is a way to boot an operating system from removable media, that is, you will not be left without a computer. The disadvantages include limited functionality, but you will be able to copy all the necessary files and will not worry that anything will happen to them when you reinstall the OS.
Create bootable media using the command line
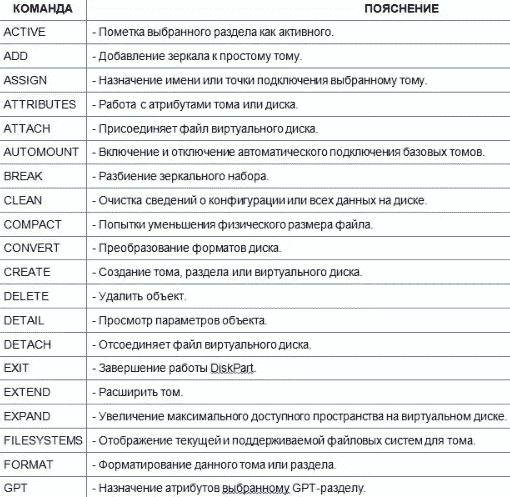
Even a person who knows nothing about computers can create a bootable USB flash drive; for this he will only need complete instructions. As a matter of fact, we wrote it precisely for you. Let's start with the most difficult thing - through the command line. On the plus side: You don’t have to download additional software for this, but you will have to tinker a little more. On the other hand, you will finally learn what the command line is and what it represents. So, let's begin:If you would like to become more familiar with the commands presented in the fourth paragraph, this information will be useful to you:
In any case, it will not be superfluous.
Create a bootable USB flash drive using the UltraISO program
With the most in a complicated way finished, we suggest moving on to a simple one - for this you will have to use third-party software, namely the UltraISO program. From its name you can already understand that it works with disk images in .iso format. It is in this format that images of operating systems are most often distributed - from the old Windows XP to the modern “Ten”.Through the program you can create, burn and mount disk images. Moreover, as you understand, it copes well with another purpose - creating bootable flash drives, moreover, quite quickly and without unnecessary movements on the part of the user: 
As you can see, everything is much simpler here - you don’t need to enter any commands, just a few mouse clicks are enough. If this method does not suit you for one reason or another, you can always return to the first or go to the third - use official utility from Microsoft, intended exclusively for creating external bootable media.
How to Make a Bootable USB Flash Drive Using Windows USB/DVD Download Tool
If you think the first method is too time-consuming and complicated, and you don’t trust the second because of your participation in creating a bootable flash drive third party program, then the third one is clearly created for you:
Now you understand that nothing is impossible in any of the above methods. Choose the one that appeals to you the most, create a bootable USB flash drive and, finally, don’t worry about being left without a computer when you need it so much. Remember that to boot from a flash drive you should set correct settings in the BIOS - for each motherboard and laptop model they are set differently.
Boot Windows flash drive very easy to do. This article will describe three simple quick ways creating a bootable USB flash drive from a ready-made ISO image. All methods are free and popular, although among them there are simpler and complex options, using different software. Also, all utilities work fully in Windows XP.
If you have a new laptop or computer with BIOS UEFI, and whose hard drive is used GPT style placement of tables, then on such a computer you can also install Windows 7 using a different algorithm. Also, if the device, computer, laptop, netbook, etc. has a USB 2.0 port and USB 3, and you decide to install from a bootable USB flash drive to such Windows device 7, then undoubtedly you should connect the flash drive to USB 2.0 port because Windows 7 itself does not support the USB 3 port type, which are usually marked in blue.

If the bootable USB flash drive is connected via USB 3, then the attempt to install Windows 7 will fail with the following error:
"Not detected required driver floppy drive optical disks. If you have a flash drive, floppy disk, DVD or CD with such a driver, please insert this media."
Creating a bootable USB flash drive
Now the first thing you definitely need is an ISO image of the operating system. Secondly, this is the need to take care of the flash drive itself. Since this media will be formatted, the data from the flash drive must be moved to a safe, secure place. It is also important to note that the size of the flash drive must be strictly at least 4 gigabytes.It is imperative to check and make sure that a specific motherboard definitely supports loading such a plan (from a flash device).
- Creating a bootable USB flash drive using means (recommended last, since it is not a very effective method);
- Created by ;
- Utility;
Creating a bootable USB flash drive using UNetBootin
You need to download the program and run it (the program is portable and works without installation).
You need to check the box called ISO image, and then select the letter of the USB drive.

The location of a specific image must be specified manually.

Next, click open.

Now just click OK.

There is a short process of copying system files to the flash drive.

After a short extraction necessary files our bootable flash drive is completely ready.

Creating a bootable USB flash drive using UltraISO
A little difficult decision in contrast to the above is the use of the program Ultra ISO. However, you can quickly understand the program by following the instructions. The functionality of the program is written in understandable Russian, and the trial period under the license is completely functional and suitable for our purposes.
Next, you need to select the Russian language and download the program, which is very simple. Run as administrator, then select trial period use.

In front of us is a regular program window.

The next step is to find our ISO image on your hard drive, which contains the operating system. It is worth recalling that such an image can be created by any other program, and then specified here. In the main UltraISO window, click right click to the file, and in the menu that opens, select the open option.

Next, we indicate our image with the system, in our case it is a Windows 8.1 image, which is located in the installation folder. Find the image in your place and click open.

You can also now place a flash drive in the slot of a netbook or laptop. You must select the Bootstrap menu in the main window of our program and click on the entry image of a tough disk. The inserted flash drive should be present in this window.

Next, click record.

A prompt will appear indicating that your flash drive will be erased, we agree.

Next, we wait for the recording process to finish.

Now you can carry our operating system in your pocket.
Bootable flash drives are used to install operating systems on personal computers and laptops. They work exactly like installation DVDs. The BIOS can recognize such a flash drive due to the presence of a special boot sector on it - MBR - and run the programs stored on it. This article describes how to make a USB flash drive bootable, how it differs from regular media, what programs are needed, and so on.
What is a bootable USB flash drive?
On physical level such a flash drive is no different from any other USB storage medium. You can create it from any device: make from external hard disk, removable solid state drive or a regular flash drive. The only requirement is the availability of the required amount of space on the device.
Unpacks onto a bootable USB flash drive special image operating system, in ISO format. An entire structure is created on it: a boot MBR sector, a table with the addresses of the necessary files, directories with services needed during installation, and so on.
Creation is usually carried out using special software. There are many paid and free programs, which allow you to work with ISO images and do bootable usb-flash drive. However, you can create it manually: using the command line, mark it up yourself boot sector, write to it necessary files and so on. 
This process is quite complex. Regular users there is no point in it. It is required for experienced computer specialists who want to make a multi-boot USB. It allows you to install several operating systems and select which one you want to install directly in the BIOS.
Programs for working with ISO images
There is enough a large number of various programs which can help you create a bootable USB. With their help, you can often burn an image to a DVD or make an image from a ready-made disk. For example, if you have installation disk Windows 7, you can simply copy its contents to a flash drive. This is much more convenient, as it allows you to install the operating system even on computers that do not have a DVD drive.
Another way to get the image is to upload it online. if you have license key, you can download the original ISO directly from the official Microsoft website. To do this, you need to do the following: go to https://www.microsoft.com/ru-ru/software-download/windows7 if you want to create a flash drive for Windows installations 7, and enter your code in the text field. If it turns out to be correct, you will be given permission to download from Microsoft's servers.

Otherwise, you will need to find the image on the Internet. There are many websites called torrent trackers where you can find the files you need. You can burn to a flash drive or disk as original Windows installer, so take advantage ready-made assemblies. They may include large sets of drivers for many devices, pre-installed useful programs, activators and so on.
This article discusses exclusively free software, with which users can easily and quickly make themselves a bootable USB flash drive.
Windows7 USB Download Tool
This official utility from Microsoft, designed to create bootable media and burn images to DVD. Working with it is completely free. Follow the instructions provided:

Please note that creating bootable media from a regular flash drive will destroy all data. It will no longer be possible to restore what was lost. Therefore, it is highly recommended that you carefully check the USB media you use.
WiNToBootic
Another free application, with which users can make a bootloader for the operating system. It can be downloaded from the official website of the program - http://www.wintobootic.com/. Just follow the provided link and click on the green “Download” button on the right top corner pages. 
To your Personal Computer The archive will be saved in zip format. To work with the program, you need to unzip it. You can use any free archiver, for example WinRar or SevenZip.