How to make a system recovery disk. Installation flash drive for Windows via UltraISO
Standard ability to create rescue disk Windows recovery 10 was inherited from the “seven”. They create such a disk in case there are difficulties in the operation of the OS that prevent loading and contains such tools as:
- Automatic troubleshooting of problems that prevent the system from loading;
- Restoring from a previously created image (backup);
- Return the OS to the rollback point.
How to create a rescue disk regular means Windows 10 and how to actually use it if you have problems booting the system? We will discuss these issues in detail below.
When is a recovery disk necessary?
A recovery disk can only be created for computer devices, the assembly of which includes a CD/DVD drive. Unlike bootable media with resuscitation software from third party developers, most of which provide for recording on a flash drive, the emergency disk can only be written to a CD/DVD disc. But this is by no means an infringement on the capabilities of owners of devices without a CD/DVD drive. The fact is that the recovery disk is not the only means of accessing the standard Windows resuscitation capabilities. IN system environment recovery can be accessed by using installation disk with Windows 10, which can also be created using a flash drive.
To revive the current OS using its installation disk, no financial costs will be required. The distribution kit with Windows 10 on the Microsoft website is available completely free of charge. It is supplied via Media utilities Creation Tool, you need to download and run it.

The utility is in a single process and Windows distribution 10 will download and immediately create bootable USB flash drive. If you encounter problems booting the system, you need to boot from the flash drive and, at the stage of starting the installation of the new OS, select the item indicated in the screenshot below. Access to the toolkit does not require entering a product key.

As you can see, the rescue disk is so necessary tool you can hardly name it. However, its presence is welcome if there is no other computer in the house with which you could quickly create a bootable USB flash drive with installation files systems.
Preparing to restore Windows
An emergency recovery disk is created for a specific Windows bit depth 10. In this case, a universal rule applies, as for programs installed inside the system - 32-bit bit depth is suitable for both 32-bit and 64-bit Windows 10. While a 64-bit rescue disk is useful only in the case, respectively , 64-bit version.
A rescue disk will be of little use if a rollback point has not been created in advance within the OS itself or a system image has not been prepared ( backup copy).
Creating a recovery disc
The emergency recovery disk is part of the standard toolkit for backing up OS files. This functionality is located in one of the sections of the control panel. To section Reserve copy you can get there not by wandering around the control panel, but by yourself in a simple way– using intra-system search. In Windows 10, the search button is located right in the taskbar, so it’s a sin not to take advantage of this convenience.
Enter in the search field key query the desired partition and get directly to the system backup parameters.

Click the "Create a system image" button. Select a CD/DVD drive in the drop-down list if there are several of them. Next, click the “Create Disk” button.

We will see a notification that, in particular, talks about the OS bit depth.

Creation is complete.

The Windows 10 recovery disc is suitable for computer devices both based on regular BIOS firmware, and with BIOS UEFI.

Now you can put the emergency disk somewhere in a secluded place. His further fate is to wait for a critical system failure.
Booting from a rescue disk
Let's say Windows 10 won't boot. The time has come to use emergency means. We take out the recovery disk and set it to BIOS loading from a CD/DVD drive. We confirm by pressing any key that the device is loaded from the CD/DVD.

The interface is Russian, but you can choose any other keyboard layout. In our case, we’ll simply confirm the Russian one.

Select an action – section “Diagnostics”.


In the next window we will see everything available tools reviving Windows 10.
Startup Recovery
You can try to solve the problem with Windows 10 not booting first using the boot troubleshooting method. This is the mode automatic elimination problems that prevent the OS from starting.

You shouldn't place much hope on this tool. Just like the in-system troubleshooting tool, the boot troubleshooting tool won't do much good. After a short diagnostic of the computer, in most cases it will be stated that it is unable to solve the problem.

Rollback to a restore point
Rollback point is the most convenient tool that allows you to do so with minimal data loss. Naturally, it is necessary that rollback points are periodically created - either manually by the user himself or automatically (using a task scheduler). The process of creating a rollback point takes much less time than the process of creating a system image (backup). And the rollback point saves space on your PC. However, a rollback point is more vulnerable than a backup copy, which can be stored on an alternative hard drive and will be very useful if the main drive fails.
To roll back to an earlier state of the OS in the event of serious problems with the system, boot from the rescue disk, go to the additional parameters and select the first option.


Select the current rollback point from among the existing ones. The most complete list of them will be available after setting the option to show other points. Click “Next”.

Click “Finish” in the rollback confirmation window.

We further confirm the launch of this process.

Once the system rollback is complete, the computer must be restarted. After the reboot, we will find the system exactly in the state in which it was at the time the rollback point was created.
Restoring from a system image
If it was previously created using the standard backup functionality, and the OS suddenly stops loading, it’s time to use this image by booting from the recovery disk. Having reached, as indicated above, the menu additional parameters, accordingly, choose the second option.

We leave the default image found by the system or select another using the appropriate option in the first window. Click “Next”.


Click “Finish”.

Confirm the decision with the “Yes” button.

As with the rollback point, the system will be returned to the state it was in when the image was created.
Have a great day!
It makes sense to use the Windows 7 recovery disc when the OS has suffered a serious failure, resulting in neither the OS itself nor the troubleshooting menu loading when you press F8 during startup. Therefore, you need to make a recovery disk in advance, using standard Windows 7 tools or offers from third-party developers. The latter may have even more extensive functionality, so you should also pay attention to recording a rescue disk.
How to create a Windows 7 rescue disk
In the OS in question, there is already a way to create a rescue disk that has sufficient functionality to solve most problems associated with loading or abnormal operation of the system. Let's look at the process step by step:
In a few minutes, the recording will be completed and you will have a media with which you can solve most problems with Windows 7.
How to use the rescue disk
To boot using the installer or use boot disk must first be configured accordingly BIOS image. In general, the procedure is as follows:

Please note that modern computers and laptops are equipped with a more secure UEFI BIOS. To log in from the rescue disk, you will have to disable the Secure Boot. The methods for doing this differ on desktop PCs and laptops, so it’s best to contact the manufacturer of your specific device for help.
Recovering Windows 7 from disk
After the restart, the recovery application will open, where the first step is to select the language for working with the program and click “Next”. When logging in using the installation disk, to switch to this mode in the installation window, click on the “System Restore” link. After this you can start direct work with the program:

Using an installation disk can usually get rid of many problems, for example, restoring Windows boot loader 7. If it is not restored automatically, you can use the command line:

Using control points
The second point will force the program to try to return Windows 7 to its previous stable state. Windows 7 allows you to create saves the most important parameters using restore points. The OS tries to create them before any important changes - installation large applications, drivers, etc. To roll back the OS, do the following:

You need to be prepared for the fact that previously installed applications will disappear after rolling back to an earlier configuration and will have to be installed again. See which installed programs you can lose it after a rollback by clicking on the search button for affected programs.
Restoring a system from an image
Using an installation disk may not always make the system operational again. In this case, standard recovery disk tools suggest using Windows image 7, the creation of which is the task of the user himself:

You can also select the image yourself by highlighting the very last item in the selection window.
If you are not satisfied with the set of recovery tools that the standard boot boot provides Windows disk 7, you can run other utilities.
 For example, a good set of recovery tools for this OS is offered by the MSDaRT 6.5 program.
If you previously created an image of the main hard section disk, then at any time if critical failures occur in Windows work 7 it can be deployed. No data written to this partition will be saved after the copy is deployed, but you won’t have to waste time searching and installing drivers and some necessary programs, installed into the system immediately after its installation.
Restoring Windows 7 from a working system
Archive required sections The disk can be used on any available media - DVDs, an additional hard drive or an external hard drive with a USB interface. Suitable separate section on the same HDD, but in this case data security is not guaranteed. If the device is damaged, some or all of the data on it may be lost, which fully applies to the created backup copy.
If the OS, albeit with errors, is slow, but loads and works, and no recovery methods improve the situation, then you can deploy the archive image directly from under the loaded system. For this:
From the disk to which the save will be deployed, all old information. If it has value, then you can archive it in the next wizard window user files by clicking on the corresponding button below. 
To go straight to Windows archiving, click “Skip”, after which a new window will open prompting you to continue the action after restarting the computer.
Working with the recovery tool
After rebooting, a couple will appear sequentially dialog boxes, which will ask you to select a language and enter your user credentials. Next you will have to work with the main parameters window:

Restoring the image if the system cannot be booted
If after turning on the computer the boot does not occur and boot into Windows in normal mode there is no way, try pressing F8 and opening the additional boot options window. From here you can get to the recovery options module if you select the very first troubleshooting item. 
Further actions have already been described in the section describing working with this tool. But in case of critical failures, often pressing F8 and trying to go to boot options does not bring results. In this case, you cannot do without a Windows 7 installation or boot disk and the recovery environment located on it.
How to extract individual files from an image
Sometimes a system archive can be useful not only for deploying Windows 7 if it cannot be cured, but also for retrieving accidentally deleted important files, which have been archived. To do this, it must be connected as virtual HDD:

All that remains is to open the computer icon on the desktop again and make sure that a new one has appeared here virtual disk. You can work with it in the same way as with any partition, restoring any necessary information from there.
Features of creating and storing a backup copy
Before creating a copy of the system, you should decide on which drive(s) you will store it on. Users often use DVDs for these purposes, but you need to understand that then it will be possible to restore Windows 7 only by booting from a flash drive or other drive if the OS is no longer able to start on its own. You will have to do this because this disk is not bootable.
Often another problem arises unexpectedly. If after creating a full HDD image using standard using Windows If you have modified its partitions, then when you try to restore a copy, an error window may appear. It will inform the user of the need to format the disk from which the recovery environment was loaded. Even a comeback HDD partitions to the state before changing their sizes will not correct the situation. 
One fine day you sit down at the computer. Press the button on system unit or on a laptop. And in the next minutes you realize that the day begins somehow strange. Namely, that Windows 7 does not boot. Or a strange screen loads with a bunch of incomprehensible messages, but for some reason with the Windows logo. This usually predicts that you will spend some time in the pleasant task of restoring your system.
And the awkward fact is that the cause of such a not very fun event can be anything. Starting from the failure of the system itself, ending with tricks malware. We don't take into account hardware failure, since this option can take from an hour to several days, and will end with the replacement of components. In case of malware, you can always try to restore the system by checking with an anti-virus LiveCD, for example, from Dr.Web CureIt.
But what if the problem is not sinister viruses and problematic pieces of hardware? And it’s trivial that one of the system libraries is damaged due to a malfunction operating system Windows? Let's think about it. The first thing that comes to mind is to open the box of disks and find the treasured Windows installation disk. So you reached into the box, and suddenly you realize that the day continues to make you happy. There is simply no disk. You break into a cold sweat. You start thinking further. “Hmm. But I wasn’t too lazy at one time and created a bootable Windows recovery disk according to the instructions on ida-freewares!” And with relief in your soul, you begin to revive your fallen system.
Note: The following instructions apply to Windows 7/Vista. For Windows case XP, it is better to use special assemblies from the network, or various LiveCDs, such as "Zver CD", which include a fairly large set of tools for system recovery. Plus, in such assemblies everything is brought to a more or less understandable state, so you can always find the treasured items in the “check” style Windows integrity" etc.
- Open the Start menu
- Type "new" (without quotes) in the "Search programs and files" box
- Select "Create a system repair disc"
- A dialog box will open containing a list of your CD/DVD drives
- Insert a blank disc and select the desired disc
- Click the "Create Disk" button
Alternative path: Control Panel -> System and Security -> Backup and Restore. In the left pane, select "Create a system repair disc" and then follow all steps starting from step 4.
After the disc has been burned, put the disc somewhere safe and secure. safe place. We hope you never have to take it out of there. However, it is better to be prepared for problems than to hope for chance.
Note: The created disk will allow you to quickly deal with most of the common problems that can happen with Windows. If you're having problems that your recovery disk can't solve, the problem is probably not as simple as it seems. Therefore, be mentally prepared that you may have to spend a little more time than you planned. However, this is exactly where you need to start in any case.
Note: Of course, you can go the other way. Namely, create disk images for quick recovery your system. Or contain a disk that duplicates the system partition, which will be launched in case of problems with the main one system partition. But, this will require some knowledge on your part (or a desire to learn) and a willingness to spend time and a little patience on the setup.
Recovery from image implies replacing all personal data on your hard drive with files from the image, or in other words, if you created an image using the Data Archiving tool local disk(C:), then unfolding this image in place, you will replace all your existing files on this disk with data from the image.
The article is written as a continuation, where we learned how to create an Image of the Windows 7 operating system in case of a serious malfunction; here we will restore our data to its place, even when our Windows 7 will not boot at all.
Note: If you are interested in the process on DVDs and USB portable hard drive, as well as on old hard drive IDE interface(connected to the laptop via a special adapter), follow the link and read.
Recovery from image
According to my observations, serious users install Windows 7 and divide the hard drive into two volumes and call them, for example, (C:) and (D:). On the drive (C:) they have the operating system Windows system 7, and on (D:) all personal data. Next, they create a disk image (C:) and save it on another partition of the hard drive, that is, on (D:). Disk (D:) is not archived, because according to users, it usually happens rarely, which actually happens.
And then there was a problem with the Windows 7 OS, the system takes a long time to load, freezes and is unstable, our users, in the language of motorists, kick the wheels for a while (use a rollback using restore points), but the car still does not drive, and Windows 7 does not work ok then they restored from image drive (C:) and a working Windows 7 from the archive replaces the inoperative one, that’s all.
- The most serious ones create an image of both the drive (C:) containing the operating system files and the drive (D:) with personal data. You may notice that if you have one hard drive, where then should you store the image of the two partitions (C:) and (D:)? It is specially purchased for this purpose. additional hard drive SATA or portable hard USB disk, which must be formatted as a file NTFS system. Restore In this case, your data from the image must be carefully, together with the faulty Windows 7 located on the drive (C:), you can replace all your files on the drive (D:), which means you first need to copy everything you need, for example, to the same most portable hard drive USB. All this is written and shown in the article Creating a system image, now let's restore.
How to restore Windows 7 from the archive image we created
Windows 7 still works and starts, but with significant errors (below we will look at cases when the operating system does not load at all), rolling back using restore points did not lead to success, and we decide to restore the entire operating system from a disk image (C:).
Start -> Control Panel->Backing up computer data->
Restore system parameters or computer->

Advanced recovery methods->

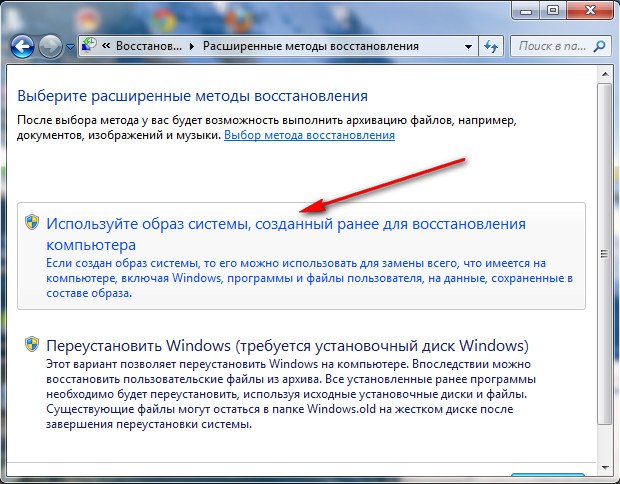
in this dialog box, you can select the Archive button and the archiving setup will start, using it, you can create an archive of your data from those disks on which you will deploy the system image, thereby saving them, read more in our article. If we copied our data previously, click the Skip button.

Restart, the computer will restart and this keyboard layout selection window will appear

Russian

Selecting a user


The second option, you and I cannot boot into a running Windows 7 at all, how then can we start recovery from the image?
We turn on the computer and, for example, a black screen appears or blue screen with a critical error. Launch the Windows 7 Recovery Tool, press F-8 in the initial phase of booting the computer. A menu opens, select Troubleshooting your computer.

The third option is the most difficult, but you can handle it: the screen is black, Windows 7 Recovery Tool cannot be launched, Additional options downloads are not available, nothing happens when you press the F-8 button. How to get to the created image with a working Windows 7. In this case, only the Windows 7 Recovery Disk, on which the Recovery Environment is located, will help us.
- Note: you can learn how to create and how to use a Recovery Disk from our article. Also in this case, the Windows 7 installation disk can help, it also contains a recovery environment.
So I'll show you how to restore Windows 7 from an image using a recovery disk. We insert it into the drive, reboot, the BIOS should be set to boot from the drive, then the System Recovery Options program starts.

Press Enter quickly, otherwise the prompt to boot from the disk will disappear.

The recovery environment starts, again you need to select the keyboard layout,
Ispol download the latest system image and our Windows 7 is restored.
The system image is always created with a VHD extension and is located in the WindowsImageBackup folder.

We use the system image as an additional hard drive
For example, we need to extract a file from the image, and not restore the entire image, we just need to connect our image, like virtual hard disk, in Disk Management.
Start -> Computer -> click right click mouse and in the context menu select Control -> Disk management->Action -> Attach a virtual hard disk
