How to view hidden folders on Windows. How to show hidden folders or show hidden files
Some users do not know how to split one disk into several logical partitions, but this can be very useful. If you have several logical partitions, you can store information not on the system volume. In this case, the risk of losing it when reinstalling the system or formatting the disk is sharply reduced. This article will tell you several ways on how you can create a second volume D, like using standard means, and using third-party software.
Using Disk Management to create a new partition
The built-in disk management utility allows you to do everything necessary actions, while this program is present in all the latest Windows versions. To run it you need pressWin+R enter diskmgmt.msc.
In the window that opens you need select drive C(or another section that you want to divide), you need to right-click on it and select the item “ Shrink Volume" In the next window you need to write the size of the new volume D, according to the standard everything is indicated there free space. But it's worth leaving system disk at least ten gigabytes free space for new programs and system files. 
After this it will begin formation process. At the end of it, unallocated space will appear on which you need to right-click. 
Here you just have to select the item marked in the picture. In the next window you need to select letter for the new volume, in our case it is D. 
Then it was suggested write the name volumes, and also select the file system and cluster. Here everything can be left as default. After this, formatting will be performed and the new logical partition will become available for use.
Using the command line to partition disks
Separation can also be done using the console. To do this, you will have to open it with administrator rights and enter the following operators:


Application of Aomei Partition Assistant Standard
There are quite a lot of applications that help manage logical partitions, as well as cut off and create new partitions. You can find many examples on the Internet, but here we talk about one utility. After the user downloads and installs it, you need to go to Main menu, select the desired hard drive, then right-click and select “”. 
In the next section you will have to indicate the number of megabytes for a new section. 
Then all you have to do is click OK, and then Go.
After this, the device will reboot and you can use the new partition.
Beginner users sooner or later have to look for ways to ensure the security of personal data on their computer. In one case, files can be encrypted or packed into a password-protected archive, in others you have to hide directories with personal photos and other data in the wilds file system or make them invisible in Explorer windows.
When it comes time to access the contents of a hidden directory, the question arises: how to show hidden folders in Windows 7. We hid it, but we don’t know how to show it back. This short but detailed article will answer the question posed.
Hidden folders and files are physically no different from regular ones. The only difference is that the former have the “Hidden” attribute active. It can be assigned to any file system object to which the user has access. Many system directories, for example, are invisible to the user by default in order to protect system files from inexperienced users.
Conductor
The point of any of the methods (except for using third-party software) is to change the value of the system registry key responsible for visualizing hidden folders in Windows 7.
- Solving the problem begins by launching Explorer, for example, using the Win + E key combination (the contents of the “My Computer” directory will open).
- Click on the “Arrange” button located under the window header.
- In the “Tools” drop-down menu, click on the “Folder Options” item.
The same window opens through the main menu of the explorer.
- Press the Alt key to display the main menu.
- In it, click on the “Service” item.

- From the drop-down list, select “Folder Options...”.

- Switch to the “View” tab.

- Scroll through the list of options in the “Advanced Options” frame.

- To return hidden directories, move the switch next to the “Hidden folders and files” option to the second position – “Display hidden files…».

- Click “OK” to save the new settings graphical shell Windows.

Now Explorer will display all file system objects with the “Hidden” attribute, and this does not require a computer restart, re-authorization in the system, or even a window refresh.
Icons with low brightness and color saturation indicate that files/folders have been assigned the “Hidden” attribute.

You can also get to the settings window, familiar from the previous section, through the control panel.
We launch it in any convenient way.

If its elements are shown as categories, go to the “Design and Personalization” section.

Here we click on “Folder Options”.

In the case where control panel elements are displayed as small or large icons, the Folder Options applet is already in the main window.

By the way, the quickest way to open a window with directory parameter settings is to use the “control folders” command. It should be done through search bar or the Run window. The key combination Win + R will help you do this.

Registry Editor
You can also change the value of the key that allows you to manage hidden objects manually using the registry editor built into Windows 7. To do this, let's launch it.
- Open the “Run” window through Start or with the key combination Win + R.
- Enter and execute the “regedit” command.

Administrator privileges are required to perform this operation.
- Expand the HKEY_CURREN_USER hive, where all settings related to the current account are stored.

- Go to the path: “Software\Microsoft\Windows\CurrentVersion\Explorer\Advanced”.
- Call up the context menu of the key with the name “Hidden” and click “Change...”.

- Enter “1” as the new key value and press Enter or click “OK”.

- All that remains is to re-enter the directory where the hidden objects were. You can also update its contents using the F5 key or the button located to the right of the address bar.

Total Commander
Many Windows users preferred to Explorer file manager Total Commander due to the program’s enormous advantages in convenience and functionality. To enable the display function hidden directories and files, we perform the following chain of operations.
- From the main menu, call the “Configuration” command.

- In the drop-down menu, click on the item “Settings: Panel Contents”.

- Activating the “Show hidden folders” option will help you display hidden directories. We mark it with a checkbox and apply the settings.

After saving the settings and closing the configuration window Total Commander will start showing hidden folders.
How to hide information
You can hide a folder or file by assigning the corresponding attribute to it/him. This is done as follows.
- First you need to open the “Properties” of the object via context menu or using the keyboard shortcut Alt + Enter.
- Check the box next to the “Hidden” option in the “Attributes” frame.

If you clear this checkbox, the hidden file/directory will be displayed in the Explorer window.
- Save the new settings by selecting the appropriate options in the warning window.

Regarding removable drives
After removing Win32 viruses that hid all files on the flash drive and replaced them with themselves, you have to change the attributes of all affected objects. A little trick will help you see their list and make them visible for the current media without activating the option to visualize hidden directories and files in Explorer.
- Open the contents of the flash drive in Explorer or a file manager, use the right mouse button to call up the context menu of the free area and create a new text file with any name and resolution “bat” (when renaming it, replace “txt” with “bat”).

- Through its context menu text file call the “Change” command.

- We insert next line“attrib -s -h -r -a *.* /s /d” and close text editor saving the changes made.

- Execute this file double click left key and wait for the window to close command line.

As a result, the “Hidden” attribute will be removed for all objects located on the flash drive, and they will become visible without changing any settings.
Find hidden files
Find and display directories and files that have the “Hidden” attribute, called the Hidden program File Finder from the SecurityXploded team. She doesn't change anything at all system settings. The program will only scan the specified directory or disk, filter all found files and folders by the “Hidden” attribute and display a list of found objects to which it is assigned. If you want to find data hidden by someone (photos, films and even catalogs) without changing Windows settings 7, install and launch Hidden File Finder.
- In the main window, click on the directory icon with a green arrow and indicate the scanning source.

If you check the “Perform complete computer scan” option, the program will check all digital storage devices available to it.
- If necessary, call up the application settings by clicking on the red button with a gear image and exclude it from the search unnecessary objects(labels, empty files and directories).

- Click “Start Scan”.

- We are waiting for the procedure to complete. It will be marked by the appearance of an information window, which we close.

The window displays only those file system objects that are assigned the “Hidden” attribute. Moreover, the names of the catalogs are highlighted in blue.
Through the context menu of any object or their group, you can go to the selected directory, open a file, make it visible or delete it.

Choose the method that is most suitable for your case, because none of them is universal.
Video instruction
Most often hidden are system files and folders. The operating system makes such files hidden for security purposes, because the user can, through carelessness or ignorance, delete or change any of the files necessary for the normal functioning of the system as a whole, which can lead to serious consequences: from errors to complete system collapse. By hiding files, Windows protects itself from preventing the user from ever having such a temptation.
Some applications and programs sometimes hide their files from users for the same reason. Hiding own files both folders and users themselves, when they do not want anyone to find this data.
Hidden file by appearance different from a regular file. When the system displays hidden files and folders, you can see that the icons of hidden folders or the names of hidden files appear translucent.
How to See Hidden Files and Folders in Windows XP
There are two ways to display hidden files and folders - through the Control Panel or through Windows Explorer.
1. Display via the “Control Panel”. You need to go to the “Control Panel”, this is done through standard menu“Start”: “Start” - “Control Panel”. In the window that opens top menu Click on the “Tools” item and click on “Folder Options” in the drop-down menu. A properties window will open in which you need to select the “View” tab. In this tab in the window additional parameters select “Hidden files and folders” and check the box next to “Show hidden files and folders”. Save the changes - click “Apply” and “Ok”.
2. Display via Windows Explorer. We go to Explorer: double-click to open the “My Computer” item, or simultaneously press the Win and E keys. In the top menu of Explorer, select “Tools” and then proceed by analogy with the first point: select “Folder Options”, then “View”, look for item “Hidden files and folders”, click “Show hidden files and folders”, “Apply”, “Ok”.
After the manipulations have been carried out, files and folders hidden until this moment become visible to the user and can be worked with in the same way as with regular files. However, there is a way to work with hidden files and folders without making them visible on the system. They can be searched and opened using any file manager, for example using the popular Total Commander.
To do this, open the file manager, select the “Configuration” item, click the “Settings” section. A settings window will open, consisting of two parts. On the left side of the window, look for the “Panel Contents” item. By clicking on it, we see a list of options on the right side of the window, among which we look for “Display files” and check the box next to “Show hidden/system files”, then click “Apply” and “Ok”.
These are folders that have the Hidden attribute set. Typically, folders with this attribute are not displayed in Explorer. In order for hidden folders to begin to appear, you need to make changes to the operating system settings. In this material you will learn how to show hidden folders in Windows 7.
In order to force the Windows 7 operating system to show hidden folders, we need to open any folder and press the ALT button on the keyboard.
After pressing the ALT key, under address bar A series of drop-down menus will appear: File, Edit, View, Tools and Help. Here we need to open the “Tools” drop-down menu and select “Folder Options”.

After this, a small window called “Folder Options” will open in front of you. In this window you can configure all the basic parameters that relate to the display of folders, files and drives in Windows Explorer 7.

It should be noted that if you are unable to open the “Folder Options” window through the drop-down menu, then you can use the search in. To do this, open the Start menu and type “Folder Options.” After this, the Windows 7 operating system will find the desired program and will offer to open it.

So, you have opened the “Folder Options” window, in order to show hidden folders in Windows 7 you need to go to the “View” tab and find the options that are responsible for displaying hidden folders.
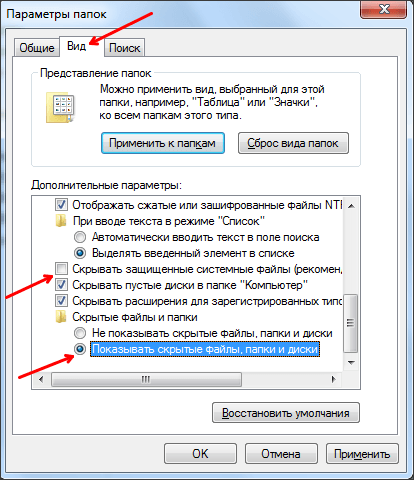
You need two parameters:
- “Hide protected system files” – you need to disable it;
- “Show hidden files, folders and drives” – you need to enable it.
After making changes, close the window by clicking on the “OK” button to save the changes. After this, you will be able to see hidden folders and files. Now, if there is such a need, you can remove the “Hidden” attribute and the folder will become normal. To do this, click right click mouse over the folder and select “Properties”. After that, disable the “Hidden” function and close the window.

Once you have cleared the “Hidden” attribute, you can disable the display of hidden folders. Further this folder will be displayed anyway.
Most computer owners have dealt with hidden folders.
Sometimes this Windows tool is very useful for hiding your documents.
But it often happens that malicious programs have settled in elements hidden by developers, and the files urgently need to be opened and cleaned.
Why does Windows hide some of the system files and how to see them, how to make folders invisible yourself?
What are invisible files for?
Hidden elements- these are ordinary folders, but they are not displayed like all the others.
These elements use the “hidden” attribute.
IN Windows interface such documents are not displayed by default.
Do not be mistaken that by hiding some folders, you can free up space on your hard drive. They will weigh the same as regular ones.
Folders are invisible for several reasons.
- Developers operating systems they deliberately make invisible some of the system files, which an inexperienced user can mistakenly delete, disrupting the operation of their computer. At everyday use the user does not need to look into them and change anything, so many do not even know about the existence of these “invisible” ones.
- Users themselves sometimes hide some documents. This is especially true if the computer is working or children use it.
- This function is also convenient to use if you have a lot of files on your computer that you rarely use. So that they don't borrow extra space and did not interfere with finding and viewing more important documents; they can be hidden.
- You should not exclude the influence of viruses on your PC. They can be the cause of folders that have disappeared from view.
Files can be made visible on the hard drive as a whole or in a specific part of it.
Experts offer several options for solving this problem.
The easiest way
To use it, we will turn to Explorer.
1. Open the first folder you come across or press the Windows + E key combination.
2. Then select the line "View" in the main menu. Then click on "Show or hide" and select the item "Hidden Elements" .
Showing hidden folders
This solution is also quite simple. It will not be difficult to complete it, even if the user is not particularly computer literate.
- Need to open "My computer" ;
- Find the section at the top left "Service" , from the displayed list you need to select the line "Folder properties" (For Windows 7 or Windows 8, select "Folders settings" ).
- A new window will appear, from which you should go to the tab "View" ;
- At the bottom of the displayed list, mark the phrase "Show hidden files and folders" (When it comes to versions Windows systems 7 and Windows 8, your point is ), click on this line, then click "Apply" , and then to Ok;

- In a situation where there is a need to view hidden system files and folders, you need to uncheck the item in the same list "Hide protected system files" .
- But such an action is recommended to be performed only as a last resort.
It happens that the menu is not visible on the computer "Service" . In this case, use Alt key(there is a possibility that it is not displayed all the time).
You can also go to this window in another way:
- While in a folder, you need to select the command "Arrange" . It can be found in top corner on the left, directly below the address bar;
- In the menu that pops up we find "Folder and Search Options" .
- Here again we find ourselves in "Folders settings" and move to the menu "View" .
- We put a mark on the proposal again "Show hidden files, folders and drives" .
- Click Ok
Changing folder properties
After carrying out these simple manipulations, you will again be able to see hidden folders, along with everyone else.
In order to achieve this, it is enough to remove the attribute "Hide" from invisible folders.
- We start by clicking on the invisible folder using the right mouse button and finding the menu item "Properties" .

- On the screen we will see a window showing the properties of the hidden folder. We will need to remove the check mark from the item "Hidden" and complete the operation by clicking on Ok.
- If the folder you need contains other documents, the window will ask you to remove the attribute "Hidden" specifically from this folder or from it and all the folders in it. If your task is to make all attachments visible, select the appropriate item and click on Ok.
This is how easy it is for you to display everything invisible folders.
If you then need to turn off visual viewing of hidden documents again, you can perform this task in the Folder Options window.
Use the system registry
Use the first method various reasons sometimes it doesn't work out.
For example, malware hid any documents on your PC and blocked the ability to customize the operating system.
Then you can try to solve the problem with the help of the system registry.
There it is necessary to adjust the parameters that are responsible for displaying invisible elements, which means returning them to their normal appearance.
So let's get started:
1. Go to the menu "Start" (it is located in the lower left corner of the desktop on the control panel);
2. Click on the word "Run" . In the window that appears, enter the word "regedit" and press Enter (For PCs with systems version seven and eight, you will need to enter the word "regedit" directly to the menu search bar "Start" ). Having done all this, you will see on the monitor system registry, we need to find the item we need in it.
3. The window on the left will display a list of sections available in the registry. You will need to move step by step from section to section: HKEY_CURRENT_USER, Software, Microsoft, Windows, CurrentVersion, Explorer, Advanced.
4. Move to the required section on the right side of the window, then find the parameter "Hidden" , click on it twice and replace it in the displayed window in the line "Meaning" number zero to number one. If it turns out that the required parameter is not in this section, you need to create it. Click on empty space in the right part of the registry window, right-click and click in the list that opens "Create" , and then - "Parameter" . Rename the newly created parameter to "Hidden" and assign it a value of one by clicking on it twice.
5. Now you need to go to the registry key: HKEY_LOCAL_MACHINE, SOFTWARE, Microsoft, Windows, CurrentVersion, Explorer, Advanced, Folder, Hidden, SHOWALL.
6. In it, look for the “CheckedValue” item to assign it the value one. Using the method indicated earlier, we create this item in its absence and also enter the number one here.
Hidden folders in Windows 10
How to make an invisible folder.
Turning to command line functions
The Command Prompt in Windows helps you perform many tasks in the operating system.
To display the command line on the screen, click on the menu "Start" , then click on "Run" .
In a new window enter "Cmd" and click OK. (For the seventh and eighth versions, enter the letters "Cmd" to the search menu bar "Start".
A command line window will appear on the monitor.
To see invisible documents in specific folder, first of all you will need to enter it.
To achieve your goal, enter the following commands one by one (after each of them, press Enter):
- X:, where X is the designation name local disk(for example, D), on which the files or folders you need are located.
- cd (for example, cd c:/windows/), where hidden documents are located.
- After you have moved to the desired directory, all you have to do is familiarize yourself with its contents. If you want only hidden folders and files to be displayed in the window, write: dir /a:h (if you enter the “dir” command without parameters, then only visible objects will be displayed on the screen).
- To achieve normal functioning of former hidden folders that you will need to view through Explorer while in the same directory, run the following actions for each object: attrib –s –h. This command will remove the “hidden” and “system” attributes (if the files or folders are actually system files, the “hidden” attribute cannot be removed from them). Note! If file or folder names contain spaces, you must write them in quotes (for example, attrib –s –h “Hidden folder 1”).
We turn to auxiliary programs
Many programs have been developed for Windows to help make hidden documents visible.
One of the most convenient and frequently used is Total Commander.

Download, install and run the program.
Then we begin our task.
- Open the menu "Configuration" , which is located at the top of the window;
- In the list that appears, select "Settings..." ;
- In a new window we look for the item "Contents of panels" and we head towards it;
- In the middle of the window there are settings items. Phrase must be marked "Show hidden/system files" and press the button "Apply" .
After completing these steps, you will be able to view the contents of invisible folders in the main window of the Total Commander program.
They will be displayed to you along with all the others.
How to prevent opening hidden files?
There are times when other users should not be allowed to change the visibility of hidden folders. It can be done.
The parameters that are in the registry will help us CheckedValue, In chapter HKLM\Software\Microsoft\Windows\CurrentVersion\Explorer\Advanced\Folder\Hidden\Showall.
As a rule, its value is determined by the number one.
By specifying the number zero for it, we will cut off the ability to show hidden files.
This method is quite effective, but since Windows 8\Server 2012, the visibility of hidden files in Explorer has been changed using a checkbox "Hidden Elements" , which cannot be influenced by such settings.
Also, prohibitions are not possible when using the “Total Commander” program and its analogues. They will still be able to find hidden elements.
What to do if you need to hide a file
The opposite situation also happens. Let's say you need to hide some documents or files. It's easy and won't take much time.
Your actions:
1. Right-click on the folder or file you selected to hide;
2. Find the property line at the bottom of the drop-down list;
3. In the window that appears, check the word "Hidden" ;

4. Click on "Run" , then Ok.
How do you know if invisible folders are visible again?
It's easy to check.
- Just go to "My computer" ;
- Next, select the folder "Program Files" . In it, the former “invisibles” will have a translucent appearance, clearly standing out from the rest.

Conclusion
In the end, I would like to advise you to pay more attention to the security of your computer - use good antivirus programs, update them regularly, do not insert unverified flash drives into the device.
But, if your PC does become a victim of an attack by viruses that hide folders or hide in invisible files, don’t be afraid, but act.
Just use one of our suggested methods for identifying hidden folders. It works!