How to assemble the system correctly. How to build a gaming computer
In the first part of a detailed manual on assembling a computer with your own hands, we will talk about installing a processor on the motherboard, installing its cooling system and installing RAM.
Introduction
In recent years, the computer industry has experienced a real boom in demand in the mobile PC segment. Smartphones, laptops, ultrabooks, all-in-one computers and, of course, tablets that have flooded the market are increasingly displacing classic desktop computers from our lives. This trend is evidenced by various reports from various analytical agencies.
But ten years ago everything was completely different. Sales of system units and components for them were the main source of income for many computer companies, and low-power and expensive laptops were practically not regarded by users as an alternative to a stationary home PC.
It was this time that can be called the heyday of “self-assembly,” when the vast majority of system units sold were assembled not at company-owned plants or factories, but in small pavilions of computer markets, by the hands of self-taught sellers. The users themselves did not lag behind them. The most creative and experienced of them preferred to independently assemble the future PC itself at home. And we must admit that this approach had many advantages. Individual components tended to cost less than the complete computer. Moreover, you could choose a suitable hardware manufacturer, eliminating the possibility of low-quality equipment appearing on your desktop, made by nameless handicraft Chinese companies (it was called “noname”).
Today, self-assembly of a system unit is becoming less and less common among users. And this is not surprising. As we have already noted, on the one hand, the desktop PC market is now experiencing a decline due to the rapidly increasing popularity of mobile computers. On the other hand, huge competition and the development of IT technologies have made it possible to saturate the market with inexpensive computer devices, making “self-assembly” impractical for the sake of saving money.
And yet there are still many enthusiasts who prefer not only to independently create the configuration and select components for their future electronic machine, but also to assemble it all with their own hands. This is especially true for mid- and top-end high-performance computers. After all, it is this approach that allows you to choose the right balance between the installed devices and their cost, without worrying that, for example, in addition to a powerful processor, you will be installed with a weak video card with a large amount of video memory, which simply will not be used. Also in this case, there are always ample opportunities for subsequent modernization of the system unit, modding and prompt minor repairs.
Thus, despite the fact that assembling a PC with your own hands is gradually fading into the background, this issue still remains relevant. Therefore, we decided to prepare material, or rather even a manual, for novice users, which will tell you in detail how to assemble a system unit yourself at home.
Before assembly
Before starting assembly, let's get acquainted with the components that will make up our future computer. Here it is worth mentioning right away that we in no way encourage you to assemble a PC of the same configuration and from the same parts that will be involved in this material. All the equipment used to demonstrate the assembly is purely the personal preference of one person and has nothing to do with advertising of certain brands and manufacturers.
So, in our case, solutions from Intel were chosen as the main platform for the future computer, which included a motherboard based on the Z77 chipset with an LGA 1155 socket and a quad-core Core i5 processor. To cool the processor, a low-noise tower fan was selected.

The rest of our assembly included: a pair of 4 GB DDR3 RAM modules, a GeForce GTX 580 video card, a 1 TB hard drive and an additional internal fan for airflow, a DVD-RW optical drive, a medium-sized ATX case and a power supply with power 700 W.
In order to assemble all this into a single whole, we need only one tool - a medium-sized Phillips screwdriver, preferably with a magnetic tip. And of course a pair of straight hands.
Everything is ready to begin assembly and now it’s time to remember one important detail - static electricity, which in some situations tends to accumulate on our body. All computer components, with the exception of the power supply, are low-voltage equipment and can easily burn out even from the shortest high-voltage discharge. But banal combing of hair or rubbing against woolen items can lead to the accumulation of a static charge of several thousand volts. So imagine what could happen if you cut it on some computer part?
To avoid unfortunate consequences, be sure to touch any metal object, such as a heating pipe or refrigerator, before handling components. If your body was electrified, then in this case, the accumulated charge will instantly discharge. Also, during assembly, it is better not to wear things that can contribute to the accumulation of static electricity.
It is advisable to carry out the assembly itself on a surface that does not conduct electricity (wood, plastic). If the work table is covered with a cloth tablecloth, then it is better to remove it for a while, since many fabrics tend to accumulate static electricity.
Processor Installation
At the first stage of assembly, we will install the processor and RAM into the motherboard, and also mount the CPU cooling system. Of course, you can first screw the motherboard into the case, and only then do the above steps. But here it is important to know that some processor fans have mounts, some of which are located on the back side of the motherboard, which may make it impossible to install it when the board is already inserted into the case.
Finding the processor socket on the motherboard is very easy. It has a rectangular shape with sides measuring more than 4 cm, so it is quite difficult not to notice it.

One of the main design differences between Intel and AMD processors is the fact that the former uses contact pads to connect to the connector on the motherboard, while the latter uses contact pins.

Accordingly, motherboards also have different sockets, which for Intel microprocessors are equipped with soft spring-loaded legs, and for AMD, with many tiny holes. Let us remember that in our case we are dealing with an Intel processor and an LGA socket.
Before installing the processor, you must open the connector by pressing the metal lever and pulling it to the side.

Once released from the mount, move the elevator lever up, after which the clamping frame will open.

To prevent incorrect installation of the processor in the socket, manufacturers make auxiliary docking cutouts in the design of their cases. Intel has semicircular recesses on the case, while AMD has beveled corners.

After opening the socket, we take the processor and install it into the socket without any effort or pressing, so that the mating cutouts align.

Now we close the clamping frame by inserting the protrusion located on it with a recess under the limiter, and return the metal elevator lever to its original place, thereby pressing the processor to the contacts located in the connector.

At this point, the black protective cap on the pressure frame should fly off, after which it can be thrown away. At this point, the installation of the processor can be considered complete, so let’s move on to installing the cooling system.
Installing a CPU Cooling System
Today there are a large number of different cooling systems on the market, which use different methods of attachment to the motherboard. Of course, it is difficult to talk about all the nuances within the framework of one material, but this is not necessary, because, as a rule, many coolers with unusual mounting systems are supplied with detailed instructions for their installation.
We will look at the two most common methods of installing fans, which are used with certain nuances in the vast majority of cooling systems.
To install the cooler in the motherboard next to the processor socket, there are four holes.

In most cases, the cooler mount for modern Intel processors contains four legs, which are inserted into these very holes and secured there by pressing on them from above. To avoid distortions, it is better to fasten them crosswise.

Standard fan for processorsIntel
To dismantle fans with this type of fastening, you need to turn the head of the leg counterclockwise 90 degrees, and then pull it up. After removal, rotate all legs to their original position.
Motherboards with sockets for AMD processors are equipped with a special frame for installing the cooling device, to which the standard cooler is attached with two screws. So everything is simple here.

Let's move on to our case. We did not use the original Intel fan, replacing it with a more advanced tower cooler with low noise levels. Its installation on the motherboard is somewhat different from the standard procedures described above. Here, to increase the stability of the cooler, a special frame is used to mount it, located under the processor socket, to which it is subsequently screwed. It is with its placement that we will begin.
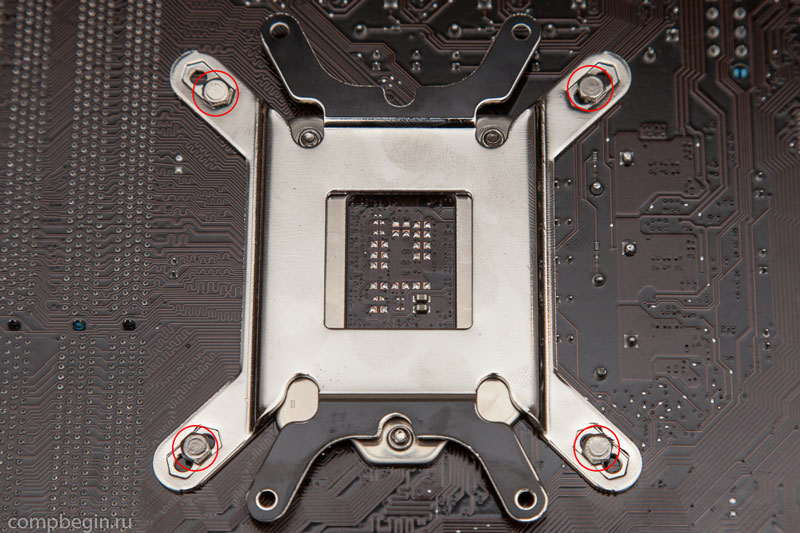
We attach the frame to the back of the motherboard in such a way that all four holes on both parts are aligned. Then we insert the screws included in the kit and fasten the nuts onto them on the other side of the board, to which the frame will be attached, pressing the base of the radiator into the processor cover.

Cooling of the processor occurs due to the heat exchange process between its cover and the base of the cooler. Ideally, the lid and base should be completely adjacent to each other, which would ensure maximum heat dissipation efficiency. But in practice this is very difficult to achieve, since their surfaces have roughness. Therefore, in order to increase the contact area, liquid thermal paste is used to fill microvoids, thereby improving heat transfer between the surfaces of devices.
As a rule, in many solutions, including inexpensive and standard coolers, thermal paste is applied to the radiator of the cooling system at the factory. So all you have to do is properly secure the fan to the motherboard. But in our case, you will have to apply the thermal paste yourself, since the tube with it is included separately.
You should know that thermal paste should be applied in a very thin layer. The principle, the more the better, does not apply here, as this will only harm normal heat transfer. For application, you can use any available means, as long as your imagination is enough. We used a regular cotton swab, first moistening its ends a little so that the cotton would not peel off.
Squeeze a small amount of thermal paste from the tube onto the processor cover.

Then spread it evenly over the entire area.

Now, everything is ready to install the cooling system. We take the radiator and remove the protective film from its base.

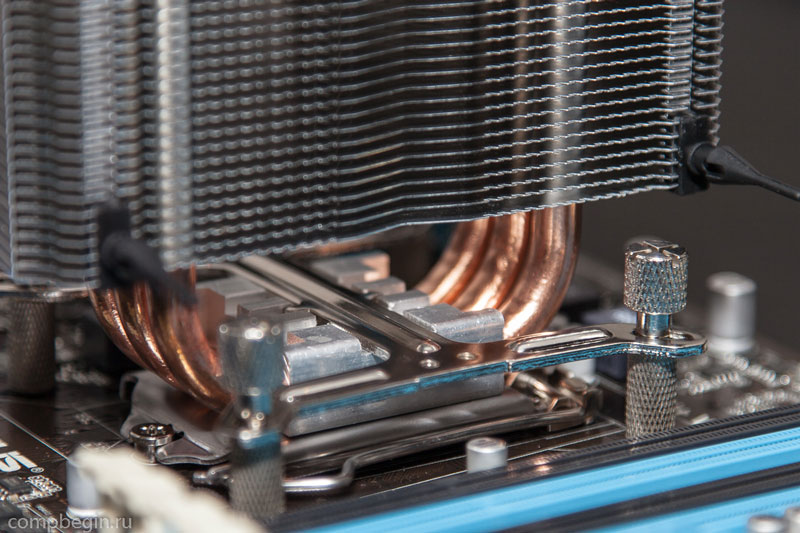
We install the radiator on the processor and secure it using a special clamping frame and nuts that are screwed onto the screws we prepared earlier. To avoid distortions of the radiator, tighten the nuts crosswise.
Now all that remains is to connect the fan to the control connector on the motherboard, and then put it on the radiator, after which the installation of the cooling system can be considered complete.
The connector on the motherboard for the processor cooler is always located next to the processor socket, has four contacts and the name CPU_FAN.

It should be taken into account that the cooler itself may often have a three-pin connector, which in any case will be compatible with the one located on the motherboard. The presence of the fourth pin is not mandatory, since it is responsible for an additional function that makes it possible to use various automatic fan speed control modes, depending on the processor temperature, using the motherboard BIOS.
Regardless of which connector you have on the cooler, to avoid incorrect connections, auxiliary notches are always placed on it, so it is almost impossible to make a mistake when connecting the fan to the motherboard.
Our first stage of assembly is completed by installing RAM. This is a very simple procedure, as you will soon see for yourself. Slots for installing memory are not at all difficult to find, since they have an elongated shape, are always located next to the processor socket and are painted in pairs in different colors. By the way, they have appeared more than once in many previous photographs.
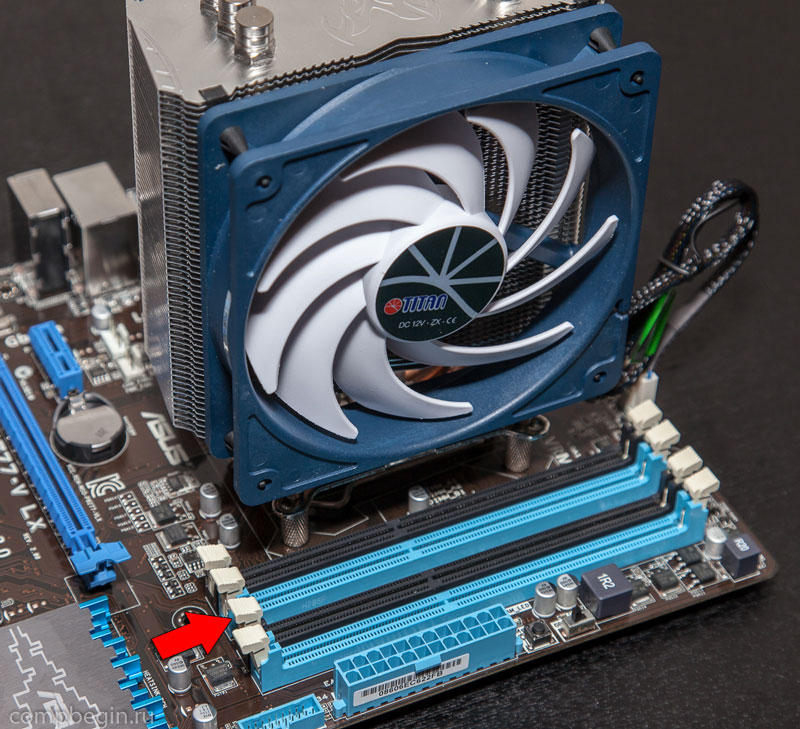
In our case, we have four connectors in black and blue colors, which makes it possible, if desired, to install four memory sticks respectively. In general, different motherboard models may contain 2 (low-cost models), 4 (standard) or 6 (legacy models) RAM slots. As you can see, in any case their number is even. The fact is that it is customary to install memory modules in pairs to enable dual-channel mode, which doubles the speed of data exchange between the RAM and the central processor. That is, if you want to have 8 GB of RAM, then you should buy two 4 GB sticks. Of course, you can install a single 8 GB memory chip instead, but in this case the computer's performance will be reduced.
It’s not for nothing that the manufacturer paints the RAM slots in pairs in different colors. These are the so-called “banks”, each of which has its own color. To use the dual-channel mode, you need to install a couple of memory chips in one bank, and not at random. For example, in our situation, we fill either both black slots or blue ones.
Before installing the modules, move the white locking levers located on the sides of the selected connectors to the sides. Next, using light pressure, carefully insert the memory stick into the slot.

In this case, it is necessary to align the notch on the memory module with the jumper in the connector on the motherboard.

After making sure that the bar is inserted into the slot, fix it by pressing from above on the corners of the memory until a characteristic click is heard. The side clamps should return to their original position.

We do the same with all the other planks.
At this point, the first and most important stage of assembly can be considered complete.

Don’t be surprised, but after installing all the components described above, you can start the system for the first time and check its functionality. After all, most modern processors have a built-in graphics core, and motherboards have integrated connectors for connecting a monitor. Having temporarily connected the power supply to the processor and motherboard, it is not difficult to turn on the assembled system by closing the corresponding contacts on the “motherboard” with any metal object, for example, a screwdriver. Only experienced users should perform this trick. Well, if this is your first assembly, then go straight to the second stage.
Let's first determine the amount of the budget for the PC we are building, and also clarify that this budget applies to what will be placed in the system unit - this amount does not take into account the monitor, keyboard and mouse, since these components are the subject of a separate discussion.
And in this article, when talking about an inexpensive computer, we will mean a budget for assembling a PC “from scratch” of no more than 30,000 rubles. For assembly we need the following components:
- CPU;
- Motherboard;
- HDD;
- System case with power supply;
- Video card;
- Optical drive for CD/DVD discs.
Microprocessor selection
The computer processor is the main center of the computer's computing capabilities, and recently the graphics core has also been transferred to its substrate, so the assembly can exist without an external video card. However, in our case we are talking about a powerful PC, so we need an external video card.
The choice of processor will determine the base platform of our PC. Today, the most popular platforms are Intel and AMD. We will build on the Intel platform, since processors from the computer giant Intel are considered more efficient and economical, although they are inferior in graphics capabilities to their AMD counterparts.
There is no point in saving on a microprocessor, since we want a powerful computer. We will also provide for the purchase of a boxed version of the microprocessor, which comes with a heat sink unit. Our choice will be a microprocessor with an LGA 1150 socket, which is by far the most common. The cost of this component should not exceed $100, and therefore a good solution in this case it will be a Pentium G3220 or G3240. Its cost will not even exceed $90.
Motherboard
What we should save on is when choosing a motherboard, but even here the savings should be within reasonable limits. By selecting a microprocessor, we have significantly narrowed down our motherboard options, as we now only need to choose from those that provide the LGA 1150 socket.
 Savings in choosing a motherboard concern its layout. We don't need to buy a motherboard equipped with connectors that will never be used - this applies, for example, to RAID arrays. And the more connectors and “wider” wiring, the more expensive the motherboard. For our needs, it is enough that the motherboard has USB, SATA and one PCI-Express connectors for connecting a video card. In addition, almost all modern solutions have a built-in LAN port and VGA connector. In our budget case, we shouldn’t choose from full-size ATX, but mATX is quite suitable. Let's choose a motherboard from GigaByte - this is the GA-B85M-D2V board. It costs about $80, so we've already spent $170. Its connectors and ports are sufficient not only to connect internal PC components, but also to connect all the necessary computer peripherals.
The motherboard we selected has two slots for DIMM memory sticks of the DDR3 type. At the same time, the supported frequency is 1333-1600 MHz, and the memory capacity is up to 16 GB.  In our case, at first 4 GB will be enough - we will fill only one slot. However, it is necessary to understand that in 32-bit Windows the user will have access to a little less than 4 “gigs”. A smaller amount of memory cannot place a modern PC in the category of powerful ones, since the same Windows 8 operating environment (64-bit version) already requires 2 GB of memory, and modern applications are also very demanding in this matter. Therefore, our choice will be on Kingston DDR3 4Gb 1600 MHz memory. Its cost is about 50 dollars, and therefore the total amount of our purchase has already reached 220 dollars.
Video card
This is a component that you shouldn’t skimp on either, since it is the video card that is responsible for generating and outputting the computer’s graphics.  The higher the memory capacity of the graphics card, the higher the monitor resolution your PC can support, and the higher its bit depth, the faster graphics can be generated and displayed. In our case, we will need a budget option with a 64-bit bus and 2 GB GDDR3 memory. Let's choose a video card from the company Sapphire worth 80 dollars. In the future, it can be easily replaced with a more powerful one. Thus, the total amount of our purchase grows to $300, and we still have to choose a system unit, an optical drive and a hard drive.
HDD
Now we don’t need to purchase external hard drives in bulk, we need an internal HDD - we’ll opt for a classic hard drive and won’t consider solid-state drives.  The most common average hard drive size today is 500 GB, but some “terabytes” are only $10 more expensive. If we come across an IDE interface, then we skip such an HDD and pay attention to the SATA interface. In our case, for example, hard from Western Digital WD10EZEX. The volume of this HDD is 1 TB, and the spindle speed is 7200 rpm. It also has a 64 MB cache and a SATA 3 interface, which is supported by our motherboard. The hard one we chose cost about $85, bringing our total purchase to $385.
System unit
 To combine all the purchased components, we will need an inexpensive system unit with a 400 W power supply - this power is enough to service the purchased components. Since we chose a motherboard of the micro-ATX form factor, it is enough for us that this case supports motherboards of this particular form factor. But in the future, the computer user may want to upgrade it, and therefore we will choose a case that also supports motherboards of the full-size ATX form factor. In this case, a case, for example, from Logicpower with a built-in power supply for $30, is perfect. Thus, our amount increased to $415.
Optical drive
For full-fledged work, we also need an inexpensive optical drive that can play the contents of CDs and DVDs. We will need a drive with a SATA interface that costs no more than $25.

Our purchase did not exceed $500, but we assembled a fairly powerful computer with good technical performance and the ability to further modernize it. The motherboard, for example, allows you to add another memory stick and a number of expansion cards. The video card can be replaced with a more powerful one, and the case supports the ability to replace the motherboard itself with a full-size ATX version. In addition, the cooling system in the case can be improved by installing an additional case cooler. At the same time, we invested less than $450-500. It should also be taken into account that you will have to spend money on two data cables for the hard drive and optical drive, but their cost is incomparably less than the amount spent on assembly.
Assembling a computer with your own hands— each of us at least once faced a situation when, trusting a sales consultant, we chose a ready-made personal computer. But after a few months I realized that for the same money I could have purchased a much more productive option. To ensure that a similar story does not happen to any of our readers in the future, we have prepared instructions on how to assemble a computer yourself.
This process actually turns out to be much simpler than many non-technical users assume, but it still has a number of nuances, which we want to dwell on in detail in our material. We’ll start with a brief reminder of what a computer consists of and how not to make a mistake in choosing components.
System unit - how to choose components?
When a buyer walks into a computer hardware store and sees the breadth of choice of motherboards, processors, video cards and other components, it seems to him that in order to connect all these devices together he needs to have at least a doctorate in technical sciences. But not everything is so bad, computer hardware manufacturers took care of us and many years ago adopted a single standard - Advanced Technology Extended, which unifies all the computer hardware. That's why we are free now.
Selecting components is the most difficult task when assembling a PC, much more labor-intensive than connecting them together, but this material is dedicated to the latter task, and you can find a comparison of the characteristics of video cards and processors in our other publications.
The basis of our entire future system is the motherboard, as its name suggests. It has virtually no effect on performance, but is responsible for the proper operation of all components of our computer.
The entire process of assembling a PC essentially consists of connecting components using connectors and wires to the board, and therefore you should first evaluate what kind of computer you would like to have as an output and, based on this, choose a motherboard with a certain number of RAM cells suitable for desired processor socket and so on.
Another important characteristic of the motherboard is the form factor - the size of the case you will need depends on it, so be careful and when purchasing a large E-ATX board, do not expect to fit it into a compact case. The main thing is not to worry and assembling a computer with your own hands- everything should work out.
Installation of the processor, RAM and cooling system.
To build a computer at home, we suggest starting with an “open bench” rather than immediately installing your components into the case without knowing whether the system works or not. The process is as follows: we connect all our parts to the motherboard, update the board firmware, install the operating system and test the resulting assembly for errors and conflicts. If they are not identified, then we are happy to install it all in the case.
Let's start the process by installing the heart of our future PC - the processor. We must remember that the two market leaders in processor production - AMD and Intel - fundamentally use different socket designs; the former have the contact pins on the processor, while the latter prefer to place them in the socket.
To install an AMD processor, you need to lift the metal lever, insert the legs into the holes provided for them, and then return the lever to its original position. Thus, we will close the processor contacts with the socket contacts and securely fix this position.
When installing Intel, you should lift the lever and the clamping cover, and after installing the processor, do these steps in reverse order. Both types of processors should be installed in a strictly defined position, which is indicated by arrows on the processor itself and the motherboard socket.
As for cooling the processor, you need to remember that they are all installed differently and the only reasonable action would be to strictly follow the instructions. For example, AMD has a passion for fasteners using plastic lugs, while Intel, in principle, does not use such a design solution. In general, most processor coolers are quite universal, and therefore can work with chipsets from both companies, but be careful when choosing - there are also models that are loyal to only one brand.
Do not forget that many coolers can be installed in two positions, which determines which wall the heated air will exit through - the back or the top. Therefore, before installation, weigh the potency of both options and your body and choose the most productive one.
After we have secured the radiator and installed the fan on it, all that remains is to connect the power connector to the corresponding connector on the board, called CPU_FAN. More expensive motherboards can provide two similar connectors designed for two coolers at once.
So, to complete the initial work, all we have to do is install the RAM modules into the DIMM slots. Each stick has a security key that prevents you from inserting it the wrong way around; also, you will not be able to insert memory of one type, for example DDR3, into a slot on the motherboard that is not intended for it. Thus, installing RAM is the simplest process in the algorithm for assembling a personal computer.
Most processors have a dual-channel set of RAM, and therefore it is recommended to insert an even number of sticks. It must be remembered that a fairly large processor cooler may block the RAM slots on some motherboards, and therefore it is worth thoroughly studying their compatibility before purchasing.
Applying thermal paste to the processor
Many beginners make a common mistake and think that assembly consists solely of assembling parts a la a construction set. No less important for the performance of the processor than itself and the cooling system is thermal paste, which helps their tandem demonstrate maximum performance. As a rule, a small layer is already applied to the fan base, so this is not necessary during first assembly.
However, if it is missing, simply add a couple of drops of the composition and spread them in an even layer over the area of the heat distribution cover of the CPU. On the contrary, excess will reduce the thermal conductivity between the processor and the cooler, which will negatively affect the performance of the computer. If you decide to assemble a computer with your own hands, then at least do not harm it.
Installing the motherboard into the case
The main line when choosing a case for you should be the one that is responsible for the supported form factors of the motherboards. The following are the maximum possible sizes of installed components - believe me, when the time comes for wiring, you will thank yourself for choosing the most comfortable case in which you can install all the desired hardware without unnecessary manipulations.
To install the motherboard, you first need to tighten the external and internal threaded mounting nuts. As a rule, all the bolts and nuts come with the housing, they are standardized, so it is unlikely that you will need to look for something unique to install your assembly. Having secured the plugs and tightened the nuts, you can move on.
Connecting Case Controls to the Motherboard
The panel of a standard case is usually equipped with on/off buttons, as well as USB ports and a headphone jack. As a rule, these interfaces are located at the bottom of the motherboard, and therefore we find them and connect them to the case.
The set of wires is very standard:
- PWR_SW is responsible for the on/off button;
- RESET_SW activates the reset key;
- HDD_LED (“plus” and “minus”) activates the drive activity indicator;
- PWR_LED (“plus” and “minus”) is responsible for the operation of the computer status indicator.
Installing the power supply
It's time to install the power supply and connect the cables to the motherboard. All connectors have keys that will prevent incorrect connection, so even an inexperienced user can handle it. Each connector speaks for itself, and if it says SATA on it, then it is probably intended for a device with the same interface.
Recently, the power supply compartment has been located at the bottom of the case for better ventilation, so make sure that the wires are long enough for components located in the part of the video card remote from the unit. After installing the unit, we stretch two main cables - a 24-pin cable to the motherboard itself and an 8-pin cable to the processor. When purchasing a power supply, we advise you to immediately purchase a bundle of nylon ties so that your bundle does not get confused between PC parts.
Installing drives
There are several drive form factors: 2.5-inch, 3.5-inch and solid-state drives with an M2 connector. The latter are installed on the motherboard itself, but the first two must first be installed in the case.
Installing a drive into a slot with a slide is as simple as installing RAM, and therefore we will not dwell on this point in detail. All that remains is to connect cables to them from the motherboard and power supply unit, which have a SATA connector.
If you want to install an optical drive, then the algorithm is the same - we fix it in the 5.25-inch bay, remove the front plug and supply power.
Installing a video card
Since we set out to assemble a PC correctly, we cannot do without a paragraph dedicated to the video card. It is installed last and the power cables are pre-wired for it. The graphics accelerator needs to be installed in the very first PCI Express x16 port, but modern video cards take up two or even three slots, so access to the downstream port will be blocked.
After these procedures, all that remains is to remove the two plugs on which the radiator will be installed, and also tightly screw the video card to the motherboard and the back cover of the case. The number of power cables will depend on the power of the video card and in extreme cases you will have to add cables to the power supply or use adapters.
Laying cables and completing work
The entire list of components has been combined into a single system, so it’s time to put the finishing touches on it. If the assembly is standard, then you just need to choose what to connect the coolers to: the motherboard, reobass or power supply. After this, you just need to carefully lay the remaining cables and tie them with nylon ties, and then close the housing cover.
After that, we connect a monitor and other peripherals to the system unit, install the operating system and use the brand new assembled computer.
How to assemble a computer yourself. Instructions
We hope that our material on how to assemble a computer yourself will help you save money and choose the most successful combination of elements, without paying attention to the tricks of computer equipment sellers!
Well, if the components have already been purchased, and all that remains is to assemble your own computer from all this, then let’s figure out together what goes where and why
STAGE 1: Preparing for work
Assembling a computer yourself is not as difficult as it seems at first glance - the main thing is to do everything carefully and not to rush into anything. To build a computer you will need:
- crosshead screwdriver
- pliers
- cable ties
- wire cutters
- iodine or brilliant green with bandages
A Phillips screwdriver is the most basic tool. In principle, often only this is enough to completely assemble a computer.
Pliers may be needed, for example, for screwing in stands for the motherboard or bending some elements of the case.
Ties are needed to carefully lay and tighten the wires inside the case after assembly, and wire cutters are needed to cut the ties and break out the case plugs.
Iodine, brilliant green, and bandages may be needed if your body has sharp edges. You can simply cut yourself, this happens quite often, so it’s better to have all this at hand.
STEP 2: Understanding the main types of fastenings
Fastenings for components must be supplied with the housing. Here is the purpose of the main ones:
1. To secure the side covers of the system unit: 
2. For screwing into plastic parts. Used, for example, to secure case fans:

3. Mounting racks are screwed into the system unit case at the places where the motherboard is attached:

4. Used for attaching hard drives and floppy drives. The same screws, but slightly smaller, are used to secure the motherboard:

5. To secure all other parts inside the system unit case, for example, video card, sound card, power supply. They can also be used to tighten the side covers of the case if fasteners No. 1 are missing:

When tightening, you must avoid excessive force; you must tighten firmly, but in moderation, so as not to strip the thread.
STAGE 3: Let's start assembly
Assembly must be done as carefully as possible, without rushing anywhere. Never use excessive force to anything - all the computer parts connect and fit into each other very easily.
If something screws on or is difficult to insert, then you are doing something wrong.
Any computer assembly begins with mounting the motherboard inside the case. Open the case cover and place it on its side. On the wall you will see holes for the motherboard racks. Place the motherboard inside the case so that its mounting holes line up with the holes in the side wall of the case. Now you need to screw in racks No. 3 into all the holes in the case that fit the holes in the motherboard. This is where pliers can come in handy:

After the mounting posts are screwed on, insert the metal blank plate that came with the motherboard into the back of the case:

And only after this do you finally insert the motherboard into its rightful place and screw it on.
STEP 4: Processor Installation
Once the motherboard is installed, you can install the processor on it. Remove the plastic cover from the motherboard socket and open it. If you don’t know how it opens, find the instructions for the motherboard and look in it, everything should be shown there in pictures:


When installing the processor, please note that there are triangular marks on it and on the socket, and in some cases special grooves. They are needed so as not to confuse exactly how to install the processor. Align the marks and carefully insert the processor into the socket:


And remember - no force, neither physical nor Jedi!
The processor is extremely easy to insert and force may cause permanent damage to the socket.
After installing the processor, the socket must be closed. This is done in exactly the same way as opening, only in reverse - but I think you figured it out yourself
STEP 5: Installing RAM
There shouldn't be any problems installing memory. First, move the holders along the edges of the slots, then insert the RAM sticks until they click:

Pay attention to the cut in the middle of the memory contacts and the bulge in the memory slot on the board - they must be aligned so that the strip fits properly:

RAM is one of the few parts that are inserted with some effort. When applying force, try not to bend the motherboard too much. If necessary, support her right side with your hand.
Pay attention to the colors of the RAM slots. For example, if you have two memory sticks, then they should be inserted into slots with the same colors. Thanks to this, the computer will be able to use dual-channel memory mode, which will allow it to work somewhat faster.
STEP 6: Install CPU Cooler
Before installing the cooling, be sure to remove the protective film, if any:

Apply a very thin layer of thermal paste to the base of the heatsink and install it on the processor. You can look at the instructions that came with your cooler for installing it.
Make sure that the cooler fits tightly to the surface of the processor and that there are no distortions after installing it. Incorrect cooling settings can result in constant overheating of the processor.
After installation, do not forget to connect the fan power to the motherboard.
On the motherboard, the fan connector is usually labeled "CPU":

The “CHA” connector is needed to connect case fans.
It is possible to connect 3-pin (three-pin) fans to a 4-pin (four-pin) motherboard connector.
STEP 7: Installing the graphics card
If you don't have a video card and decide to use your motherboard's integrated graphics, skip this step and move on to the next one.
There is nothing complicated about installing a video card. Break or pull out the plug at the back of the case in the place where the video card will be installed:

Please note if there is a latch mechanism on the PCI-Express video card slot, if there is, open it before installing the card. After inserting the card into the slot, the mechanism should snap into place:

Also, do not forget to fasten the video card with screw number 5 to prevent it from accidentally falling out of the slot.
STEP 8: Installing Hard Drives and Drives
At the front of the case is a hard drive cage. Install the hard drive into it with the cover facing up, with the contacts facing the motherboard. Hard drives are secured with #4 screws.
On the front panel of the case there are removable blank elements for installing disk drives. Remove the front cover from the housing and remove the plug. Also, in the case itself, break or pull out the iron plug in the front of the basket for installing disk drives.
Reinstall the front panel of the case, and then install the drive, remembering to fasten it with screws No. 4.
STEP 9: Chassis Ventilation System
For normal cooling, constant air ventilation inside the case is required. For this purpose, additional case fans are used.
Fans recommended anterior lower And side place parts of the body on fence(blowing) air into the housing. And the fans rear And top place parts of the body on blowing air. This ensures the most optimal ventilation of the internal space inside the case.
Fans are connected to connectors on the motherboard, designated “CHA” or “FAN,” or directly to the power supply, to a MOLEX connector, depending on what type of connectors is used on the fan:

In general, designing a cooling system is a topic for a separate article. Beginner assemblers are recommended to adhere to the scheme described above - it is the most optimal and widespread. Over time, an understanding will come of which parts require more cooling and which do not require cooling at all, how best to build a cooling system for this particular computer, etc.
STEP 10: Connecting the front panel of the chassis
Each motherboard has system panel connectors, where almost all elements of the front panel are connected. You can see where to connect what, either on the board itself or in the instructions for it:


Often, all motherboards use the same symbols:
- PWR LED– computer power indicator;
- HDD LED– hard drive operation indicator;
- PWR SW– power button;
- RESET– “reset” button;
- SPEAKER– to connect a buzzer (which beeps when starting);
Be careful when connecting the PWR LED and HDD LED indicators - polarity is important for their operation, which is also indicated in the instructions. If you connect incorrectly, the indicators simply will not work. To find out what polarity the wire of the indicator you are connecting corresponds to, look at its color. Black is a minus, and any color is a plus. The system panel connectors are positioned such that the plus is always to the left of the minus, - knowing this rule, you can easily determine the polarity of wire connections.
STEP 11: Connect all other cables
Now you need to connect SATA cables, USB connectors, and audio outputs. All SATA ports on the board are numbered in order. It is recommended (but not required) to connect the system hard drive first, then the remaining drives, and after them the drive. This scheme is not fundamental, but sometimes it allows you to slightly reduce the time you turn on the computer.


If you have an additional (non-integrated) sound card installed, then you need to connect the cables to it, and not to the motherboard.
Then connect the USB port cables to the corresponding connectors on the board:

STEP 12: Install the power supply
Screw the power supply onto the top or bottom of the case, depending on its design:
 Next, you need to connect power to the motherboard and all components. To insert a cable in the wrong place, you need to have rare talent and considerable dexterity. So do not be afraid - if something is not inserted, then you are either inserting it incorrectly or in the wrong place.
Connect power to the motherboard:

Then CPU power:

Power to hard drives and drives:

If the video card has an input for connecting additional power, then connect the power there too.
If the fans are powered only by a MOLEX connector (large rectangular, with 4 pins), connect them to the power supply. If you can connect the fan to the motherboard, use it.
STAGE 13: Completion and start
Carefully inspect the entire computer assembly again. Is everything firmly in place, is everything inserted and connected completely? Drive the cat away and put on a bulletproof vest.
Connect your monitor, keyboard, mouse, power cable and get ready to start your computer for the first time.
If everything was done correctly, then when you press the power button on the computer case, it should turn on. If it doesn’t turn on, check that the front panel buttons are connected correctly to the motherboard, check again that everything is connected correctly and that the computer is plugged into a power outlet.
I hope everything worked out for you the first time, and the computer fans rustled joyfully. If you have any questions, ask in the comments.
We will look at setting up the BIOS and installing the operating system in future articles.
P.S. If you have read this huge article to the end and still can’t get enough, I suggest watching the video “How not to build gaming computers”:
Today the world of computer technology is so diverse that it is very difficult to make a choice. For example, when many people decide to get a computer, they often think that it is better to have ready-made equipment or to assemble it at home with their own hands. Of course, young people who understand at least a little technology and quickly figure out what’s what are trying to assemble a computer with their own hands. Moreover, this option is much more economical than buying ready-made equipment.
But still, if you are going to start assembling your PC personally, you should understand the advantages of this option. The first thing you need to do is purchase components that meet your requirements and needs, taking into account their compatibility. Above all, you need to decide which computer to build for gaming or work. Since today's youth are obsessed with various games, we will try to assemble the best version of a gaming computer.
The benefits of buying a PC yourself
What is the most important thing in a computer? Of course, the system unit. As a rule, when buying it in a store and asking the seller about the prices and configuration of the unit, it is difficult to find out, since no one in the store will reveal such important information to you. It's classified. Only by disassembling the block of the house can you find out whether all the components and components have been selected correctly.
Very often, store sellers claim that the system has 4 gigabytes of RAM and a gaming video card, but they do not mention the name of the manufacturer. This is because it is not profitable for them, since usually stores try to sell a system unit assembled from components from unknown or little-known manufacturers. As a result, when you bring it home, connect it, connect all the wires correctly and put the computer into operation, after a couple of months you will feel that there are malfunctions in its operation. And after a short time it may completely fail. All this is because unknown manufacturers do not try very hard with the quality of components; they believe that if they are not visible, since they are hidden inside the block, then it will do just fine, and as a rule, the result of such negligence does not take long to arrive. Therefore, an important rule: all components of the block must be produced by a well-established manufacturer.
Also, an undeniable disadvantage of buying a ready-made system unit in a store is that in the future you may not even think about making any changes to its configuration. So, you will not be able to change its design, nor add or remove a set of functions. As a result, before purchasing, think about whether to buy in a store or start your own assembly.
Independent selection of components will allow you to choose them taking into account your requirements and wishes. In addition, remember that the price of the finished system unit is greatly influenced by the software part of the PC. You've probably noticed that when you buy a computer in a store, sellers of their own free will, in addition to the main Windows system, install additional ones, the existence of which you didn't even know existed and are unlikely to ever use. But they don’t pay attention to this, because the more programs installed, the higher the cost of the system.
In addition, many sellers tell buyers that they install only licensed programs, and therefore the cost is high. But you shouldn't believe everything they say. After all, if you are familiar with software, you probably know that one copy of the licensed software is designed for only one user. In addition, it is very expensive. Therefore, a logical question arises: will stores be able to buy as many licensed programs as they have computer systems. Of course not. In fact, they install such a program on all computers, and tell customers false stories.

Some nuances
Remember, self-assembly will allow you to assemble a system unit with components that you really need and are worth. Moreover, in the future you will be able to upgrade it. Moreover, the computer industry is developing at a rapid pace these days; you just need to keep up with it. If today it seems to you that you have assembled modern and powerful equipment, then in a couple of months it may be considered obsolete.
Also remember, sellers often offer system units with “cut” versions of motherboards to mislead the buyer, but at the same time make good money. They are cheaper, and the functionality of these components is limited. It will be very difficult to modernize such systems in the future.
Assembling the block with your own hands will give you freedom of action. You can install different components at your own discretion.
Components of a full-fledged computer
We will help you and tell you what to do at each stage of component assembly.

First of all, you need to know what a computer consists of, and this is:
- frame;
- hard drive or SSD drive;
- monitor;
- keyboard;
- mouse;
- motherboard;
- CPU;
- RAM;
- power unit;
- video card.
When choosing components, remember that you do not need to buy too expensive spare parts, but very economical options will not suit you. It’s better to first get acquainted with prices and manufacturers, and only then choose a middle ground. Pay enough special attention to the processor to be able to add RAM to the video card in the future.
How to properly connect components
Once you have decided on the configuration of your future computer and bought the components necessary for assembly, you can begin work. It is worth saying that in fact, such work is not difficult only for those people who have more than once encountered assembling a PC and are well aware of all the components, some features, nuances and assembly diagrams. People who have not encountered this kind of work will have to sweat a little, since it primarily requires attention and patience. Therefore, if you are ready to start, we provide you with detailed instructions for assembling the system unit, which will help you avoid mistakes and do everything correctly.

So, first you need to check the presence of all components and ensure their integrity. You will need:
- case and power supply;
- motherboard, plug, which is included in the kit, for the back of the unit;
- CPU;
- HDD or SSD hard drive;
- video card;
- cable for connecting spare parts;
- cooling system;
- RAM;
- if necessary, an optical drive.
Lay out all the spare parts on the mat in front of you and double-check their availability again, after which you can begin installing the power supply.
power unit
Before we talk about installing the power supply, let's talk about its power. It is known that computers are used for different purposes. Some people need them purely for working with graphics or office applications, some will work on it at home on the Internet, others want to enjoy a high-quality game. Depending on the area of use, a case with a power supply is selected. So, for working with graphics and high-quality games, a power supply with a power of 500-600 W is better suited. The fact is that a lower power unit will not be compatible with a powerful video card, since the power supply must always be compatible with the video card. The approximate cost of such a block is between 50-60 dollars.
For a computer that will be used at home, working on the Internet or office applications, a unit with a power of 350-400 W will do. Its cost is usually about 30-40 dollars.
Before you begin installing the unit, you must remove the side cover from the housing. In some models the power supply is mounted at the top, and in others at the bottom. Therefore, pay attention to this detail when installing it. In addition, many wires with appropriate connectors must come from the unit to connect other equipment.

Therefore, you need to make sure that the block has the necessary connectors, so that later you do not need to purchase missing adapters. The block is secured with screws using a Phillips screwdriver. So, having considered where in the case the block is mounted, we install it and secure it firmly with screws. The first stage is completed.
Motherboard
So, we have already installed the power supply in the case, now it’s the turn of the motherboard. First, we check whether this part is damaged; if everything is in order, you can begin installing it.
First of all, you will have to install the plug that comes with the motherboard. It is worth saying that it has special holes with which it is attached to the body. In addition, very often the motherboard comes with special spare parts in the form of supports, which are designed to place the motherboard on them. If they are, then install them first, and then the main part. After all, the supports are supplied so that the motherboard is firmly and securely located in its place. In addition, sometimes the methods of mounting the board may differ; this depends on the design of the case itself.
So, if the case is universal and does not have special frills, the motherboard is mounted as follows:

It is very difficult to make a mistake here, since there is only one suitable connector.
CPU
Step three - installing the central processor. When installing a processor, you must remember that the motherboard is equipped with a connector for it, which is called a socket. The characteristics of the processor and motherboard must be similar, the sockets must be the same.
The processor is installed in a special place, which is very noticeable. It is presented in the form of a rectangular connector with a clamp and is no larger than a box.

We press the small lever, move it to the side, then open the cover as far as possible and begin installing the processor. Here comes the most important point, which requires great attention. The processor must be installed correctly. How to do it?
There is a triangle-shaped mark on the processor, and there is a similar mark in the place to which it should be attached. During installation, you need to align these two marks with millimeter accuracy. The installation should be performed as follows: we take the processor by the ribs and gently place it in its location; the landing should be light and soft, without effort or pressing. In addition, do not touch the contacts under any circumstances, so as not to damage it. When the processor is installed, carefully fix it with a clamp, returning it to its original place. At the end, we connect the power cable to the connector located nearby.

Cooling system
There are many types of cooling systems; let’s consider installing a standard cooler with snaps. First you need to prepare the cooler, use the latch to open it and remove the protective film. If there is no thermal paste on the edge, be sure to apply it to improve the thermal conduction process between the fan heatsink and the processor. It is applied in a thin and even layer.
Next, we install the cooler on the processor, and it does not matter which side will be installed. However, the installation must be done in such a way that the power cable can be connected to the connector on the motherboard.
Since the cooler has four latches, all of them must coincide with the motherboard connectors when installing it.

We place the cooler on the board, aligning the connectors, and click the latches two at a time, diagonally. Correct fixation is done if you hear clicks and the fan does not wobble or move. If you feel even slight movements, then perform the fixation again. Next, we connect the power to the fan using a cable that has a connector; it must be installed in the connector on the motherboard, which is located close to the processor.
HDD
The hard drive is installed at the front of the case. If there is only one hard drive, then it is better to install it in the lower compartment. To attach the hard drive, remove the second side cover from the unit.

We place the disk in the compartment and secure it with screws. The fastening must be made firmly and reliably. Next, connect the power and data cables to the hard drive. Let's consider connecting via the SATA interface - a flat cable, wide, intended for power supply, and a narrow one, in turn, for transmitting information. We connect the power cable to the HDD, and connect the information transfer cable in the same way. In this case, there should be no problems, since the connection system is very simple.
Optical drive
To install optical drives, remove the plugs on the outer part of the case, then install the device in a special compartment and securely fasten it using fasteners.

RAM
Installing RAM is not difficult. The connectors have latches that will need to be bent to the side before installing the RAM. Then we put the RAM stick into the slot and press it lightly. The latches return to their original place. All! We installed RAM. Important detail. Remember, there is a small connector on the RAM stick; it is not located in the middle, but slightly offset to the side. Therefore, if the memory is not in its place, then you need to try to unfold it and install it on the opposite side.

Video card
To install the video card, you will need to remove one metal plug, which is located on the back of the system unit. Next, we repeat the same steps as with installing RAM, additionally securing the video card to the case with a screw.

Wires
The most difficult assembly stage of all those described above is connecting the wires. The work is much simpler if the manufacturer has prudently labeled all the wires, so it is clear what needs to be connected to what, and it is almost impossible to make a mistake. Therefore, when purchasing wires, we recommend that you pay attention to the inscriptions on them, this will make it much easier to complete the last stage of assembly.
We check the performance of our own computer. If everything is done correctly, then when you press the button on the unit body, you will hear a single squeak. Hurray we did it! Next, install the operating system, and you can happily enjoy powerful and modern computer games.