How to change usb mode on android. How to connect an Android device to a computer with USB Mass storage mode
Modern smartphones They no longer require connection to a PC. In the first half of the 2000s, it was possible to install something new on a communicator or smartphone only using a PC. And in those days, a computer was also required for serious settings of a mobile device. Now you can connect Android to your computer without much difficulty, but this action has become required extremely rarely. And yet we will tell you how to connect your phone to a PC.
There is one wire and ground wireless methods connections. The first one is the easiest, but there are a lot of problems with it. Sometimes the computer does not see the device, which causes natural hysterics in the user. In this material we will try to help in precisely this case.
If you have connected your smartphone to your computer using a wire, but the desktop operating system does not react to this in any way, then you need to take a few simple steps:
- Replace the USB cable. The fact is that some wires serve only to transmit energy - work with information flow they simply are not capable. This is especially true for cables purchased from Chinese online stores.
- Try plugging the wire into a different USB port. It has been noted that high-speed USB 3.0 connectors sometimes do not recognize some devices connected to them. Therefore, try connecting the device to an old one USB port 2.0.
- Try connecting the gadget to another computer. It is desirable that it works using another version operating system. If such a problem occurs there, then something has happened to your microUSB connector or some other components. Unfortunately, we cannot help in this matter - you will need to have your smartphone repaired.
Other wired connection problems
Not everyone suspects this, but an unlocked device cannot be synchronized with a PC. If you decide to connect Android to your computer via USB, then first enter the code, draw graphic key or provide your fingerprint. Of course, this does not apply to those devices that do not have a secure lock.
Connecting via USB to a computer with an operating system also causes certain problems. Windows system XP. At the time of her popularity, no touchscreen smartphones did not exist, and therefore the corresponding drivers are not built into it by default. You can correct the situation by downloading the Media Transfer Protocol (MTP)

On any other computer you may also need to install a driver. It is usually installed automatically the first time you connect via USB. But there are exceptions when something interferes with the system. If this is the case for you, then go to “ device Manager" In the list you will see your device, currently unnamed, marked with a yellow exclamation mark. Right-click on it, selecting context menu paragraph " Update" Next, follow the advice in the pop-up menu. So you can produce automatic search drivers in the appropriate Microsoft database or install the driver stored on the PC (then you first need to download it from the manufacturer’s official website).
It may also make it difficult to connect to a computer. activated mode « USB modem" Disabled along the way " Settings» - « Wireless network » - « More» - « Modem mode».
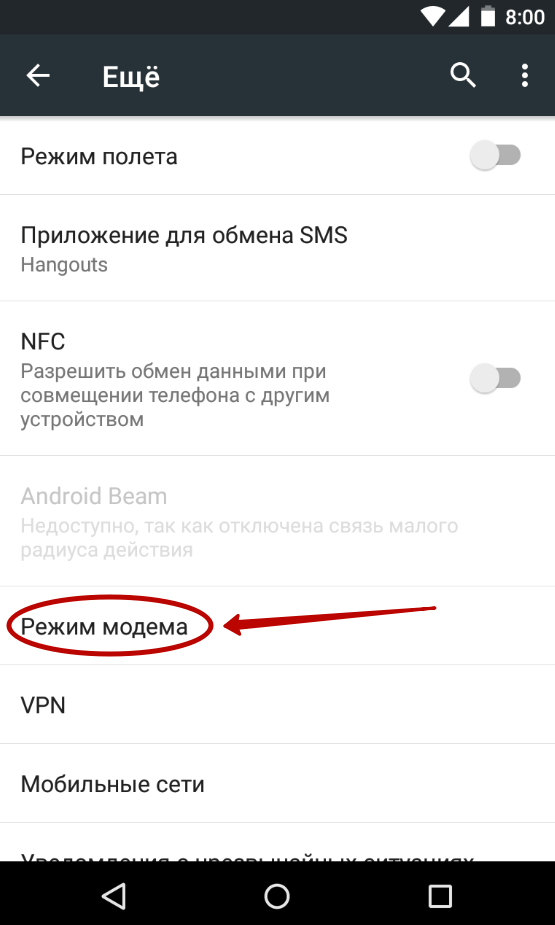
It should be noted that smartphones have several modes wired connection to PC. It is possible that you accidentally selected one that is not supported by your computer. You can change the mode by clicking on the corresponding notification (it is always displayed when the device is connected to the PC). You need to enable MTP (Media Device) mode.

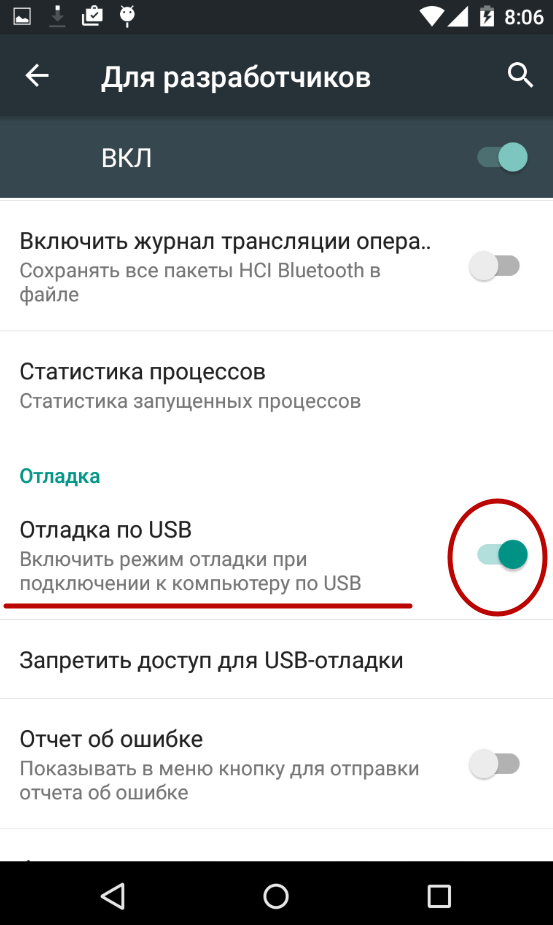
Finally, enabling USB debugging can help in some cases. To do this, do the following:
Step 1. Open the section " Settings" and find the item " For developers».

Step 2. In this subsection, activate the checkbox of the item “ USB Debugging».
Connecting to a computer via Wi-Fi
There are several ways to connect Android to a PC without using a cable. The easiest way to use for these purposes is Wi-Fi technology. Of course, your apartment should have a router, because the connection will be made with its help.
Theoretically, you can synchronize using built-in tools, but this path is too long and complicated. Therefore we recommend that you use Airdroid or some other similar application. Let's use his example to figure out how to connect to a PC over the air:
1. Install and launch Airdroid.
2. When you first start, you can register an account or press the inconspicuous button “ Login later».
3. Next, the program will offer to transfer all incoming notifications to the computer. Click the button Accept" In some cases, you will be additionally transferred to the corresponding section of the settings, where you need to check the box next to the Airdroid notification mirroring service.

4. Next, you can transfer files to your computer, record the screen, take screenshots and perform other actions. On a PC, to do this, you need to open a browser and go to the address displayed in top line applications.
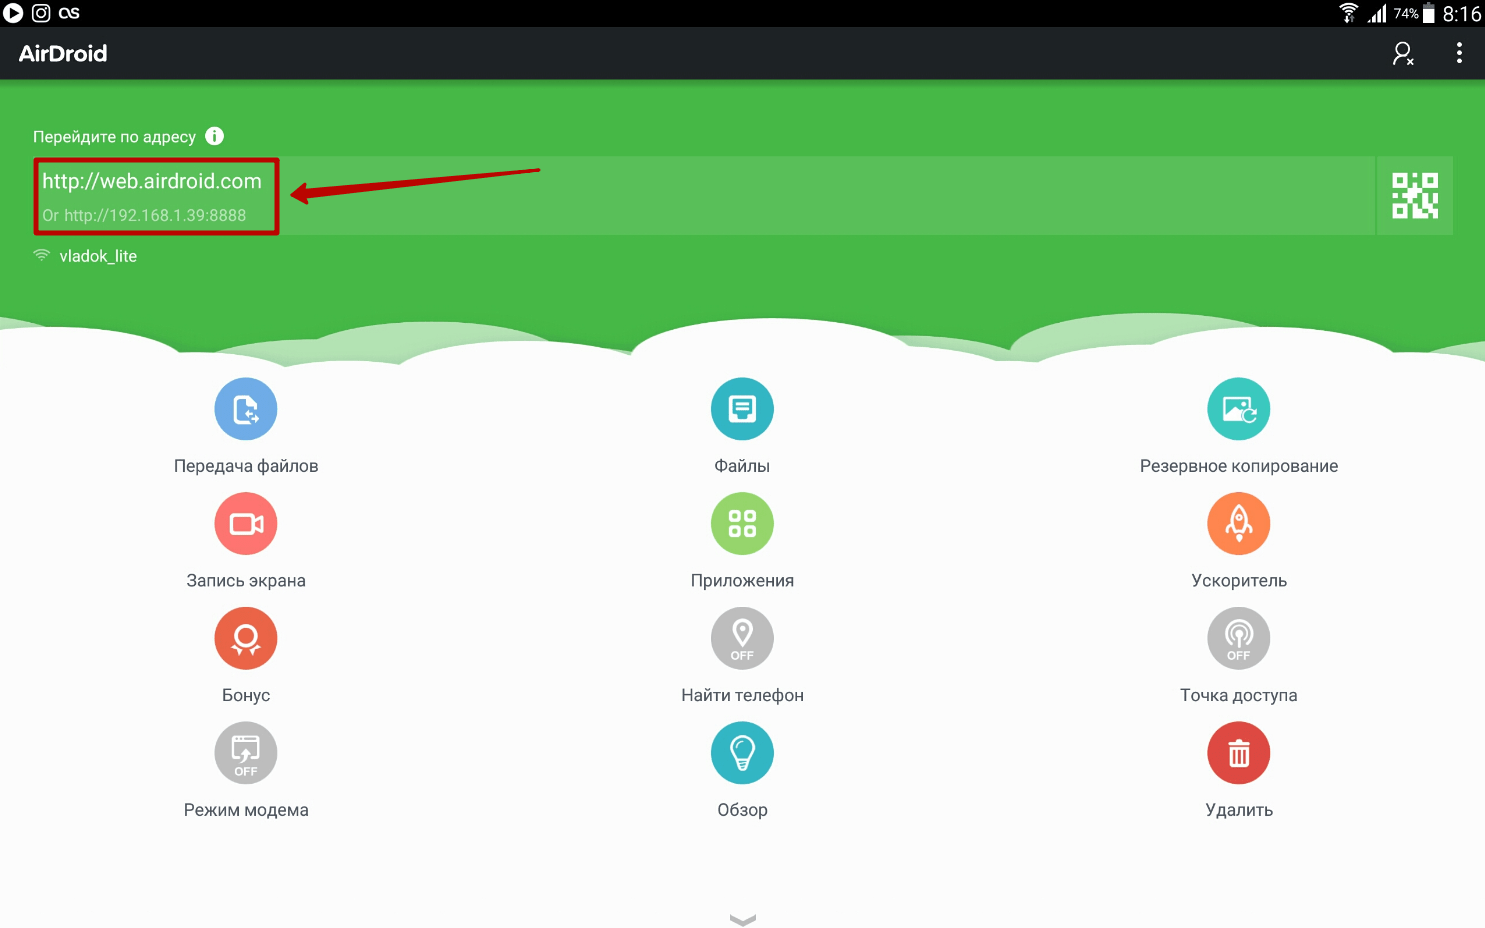
5. If you register an account, you can sync by going to a simpler URL: web.airdroid.com.

6. If you want to end the connection, go to the application and click on the “ Disconnect" You can also click on the “ Go out”, then confirming his actions.
You can enable USB ports on a laptop through the BIOS, Device Manager, Registry Editor, or Group Policy Editor. If access to USB connectors was prohibited intentionally using special software, you can unblock it in a program where the interface is blocked. All methods are available ordinary users and do not require special training.
Disabling unnecessary devices
If the USB ports suddenly stopped working and you are now looking for how to turn them on, then the first thing to do is look to see if the device is connected to the laptop too much. When using a USB hub, the laptop may not be able to supply power to all devices, causing the USB ports to become unresponsive. Before you do USB setup in the BIOS, disconnect unnecessary equipment from the laptop and check if the ports work. If nothing has changed, then reboot the laptop and go into the BIOS.
Enabling ports in BIOS
For BIOS input When loading, press Delete, F2 or another key depending on the model motherboard. You can view it on the start screen. 
In the case of a laptop, this screen does not appear because the function fast loading. You can temporarily disable this technology in the power settings:

Restart your computer. Without quick launch you will see all the stages Windows boot and you can get into the BIOS. If this doesn't work on Windows 8 or 10 with UEFI BIOS, try the following method:

After reboot, select "Diagnostics", then go to " Extra options" and open the UEFI Firmware Settings. Click "Reboot", the next time you start, the BIOS UEFI interface will appear.
To configure USB ports in UEFI, you need to go to the “Peripherals” tab and set the “Legacy USB Support” parameter to “Enabled”. If support for USB 3.0 ports is required, activate the corresponding item (USB 3.0 Support). 
In the AMI BIOS, go to the “Integrated Peripherals” section and set the four options to “Enabled”:
- USB EHCI Controller.
- USB Mouse Support.
- USB Keyboard Support.
- Legacy USB Storage Detect.
In Phoenix AwardBIOS, you need to go to the “Advanced” tab and go to the “USB configuration” section. All parameters inside must be set to “Enabled” in order for USB ports worked. 
In all BIOS versions To save the configuration, you must press the F10 key and confirm your selection by writing “Y”.
Windows setup
If in BIOS ports enabled but connected via interface USB devices are not detected by the system, then check the Registry Editor, Device Manager and Group Policy Editor. It is possible that changes were made to the system through them, due to which the ports are no longer working. You should start with the Registry Editor.

If the registry editor supports USB interface is enabled, then check the controller drivers in Device Manager.

If you see an icon next to the controller that looks like exclamation point, and you are sure that the interface is supported in the registry editor, then this means that there are problems with the drivers. First try updating the software:

If update software controller did not help, update the motherboard driver. Download it from the manufacturer's website and install it manually. Another way to update the drivers of all controllers at once is to remove them from the system. Right-click on the controllers and select "Delete". After a reboot, the system will automatically install controller drivers, so you no longer have to worry about how to enable the USB ports - they will work just like that. 
If only those connected via USB removable devices, then check in the Group Policy Editor to see if the read ban is set.

Find the option " Removable devices: Deny Reading" and set it to "Disable". Problem identifying flash drives and external drives must disappear.
Hardware damage to ports
If your laptop's USB ports are damaged or south bridge on motherboard, then no methods will help enable the interface. Therefore, if the connectors stop working after mechanical impact, liquid getting inside the housing, short circuit or other negative factors, you should take the laptop to a service center for diagnostics.
On a smartphone you will not find a full-fledged USB port into which you can insert a flash drive. Therefore, connecting a USB flash drive to Android must be done using additional equipment.
Connecting the drive
For your phone to see and open devices connected via USB, it must have On-The-Go (OTG) support. The essence of the technology is that mobile device supplies power to external equipment via a USB connector. The function is implemented in Android 3.1 and higher, so before you try to connect a flash drive to Android, you need to make sure that this is even possible. First of all, check the OS version:
To make sure there are no problems with the connection, install the USB application OTG Checker. This little program will check OTG support and if available, will issue a confirmation.  The next step is to purchase a special adapter (equipment cost starts from 100 rubles). The smartphone has a microUSB port; the flash drive physically cannot fit in it. Therefore, you need to expand the port using an OTG adapter, which can be bought at any store mobile technology. Some phones, like tablets, come with a “native” OTG cable, so manufacturers also assume that they will connect to their devices external drives and other USB devices.
  The connection procedure itself is extremely simple: one end of the adapter is installed into the microUSB connector on the phone, and a flash drive is inserted into the USB port at the other end.
  Now you can find universal flash drives with USB and microUSB, which do not require an adapter to connect.
  This is still rare, but it is quite possible that over time the ports will become universal, and users will be able to abandon adapters and other additional equipment.
To open a flash drive on a tablet or smartphone, it is usually enough to have a file manager installed on the device. The flash drive must be formatted in FAT32; data from NTFS cannot be read on Android. This primarily applies to latest models smartphones from Samsung: just connect the flash drive via an OTG adapter and find the drive through any file manager. The data will be located in the /sdcard/usbStorage directory.  However, the procedure does not always go so smoothly: even if the device supports OTG, the question of how to open a connected flash drive on Android causes difficulties. The problem is that not all mobile devices are automatic mode install external equipment, be it a flash drive, camera or mouse.
The shortcoming can be eliminated using paid application USB Media Explorer, which allows you to copy music, video photos, documents from flash drives connected to smartphones Google Nexus and other devices with Android 4.0 and higher.  The application has two drawbacks: it is paid and correct work is guaranteed only on Nexus phones and tablets, although the developers claim support for other devices. Among the advantages is file support NTFS systems, that is, you do not have to format the flash drive to FAT32 before connecting.
If you don’t want to spend money on an application for copying data, or you basically can’t install USB Media Explorer on your device due to lack of model support, then the only way to access the data recorded on the flash drive is to use superuser rights (root).
For each model it is better to look for your own separate instructions to obtain superuser rights. There are also universal methods, type of program use Kingo Root, but it should be borne in mind that obtaining root rights is a potentially dangerous operation, as a result of which the mobile device will be removed from warranty. In addition, performing the procedure incorrectly may damage the system.

If your phone has root rights, you can use free application StickMount to detect a connected flash drive on Android.
- Launch StickMount.
- Connect the flash drive to your phone.
- Set StickMount to open automatically when connected of this drive and give the application root rights.
You can view and copy the contents of the flash drive after mounting through any file manager. The information will be located in the sdcard/usbStorage directory. 
Today, modern devices play a huge role in our lives. We are not talking about computers or laptops, which are already beginning to gradually fade into the background. Smartphones and tablets - laptop computers, which have almost all the functions like laptops. Unfortunately, these modern devices are not suitable for office work. Typing text on a tablet is quite difficult, let alone on regular phones.
People began to wonder how to connect a flash drive to an Android smartphone or a keyboard, mouse and other useful devices. It turns out it can be done. However, not everyone knows how to connect an additional device to their smartphone. Let's look at this with an example regular flash drive. As a rule, this is the device that many people try to connect to their device.
How to connect a flash drive to an Android smartphone
Modern devices running under operating system control Android systems, have a standard microUSB connector. For a USB flash drive to work on your device, it must have USB On-The-Go technology installed. Manufacturers began implementing this feature in Android OS from version 3.1.
As a rule, modern tablets, and especially phones, do not have a USB connector. Therefore, you will need a USB-OTG cable. Some manufacturers include an adapter for a flash drive in the kit; if you don’t have one, you’ll have to buy it at any store that sells digital equipment.

The smartphone does not have a micro-USB connector
If you do not find a microUSB connector on your smartphone, you will need to first purchase a USB-OTG cable and then an adapter for it. Of course, this is quite inconvenient: if you need to connect an additional device, you will have to use several cables. But this the only way, which will allow you to connect a flash drive.
How to view the contents of an external drive
So, we looked at how to connect a flash drive to an Android smartphone. Now we move on to opening an additional device. How to do it? We need to download a file manager. You may already have it, since in some devices the manufacturer installs a certain set of programs. Of course, if you don't have a file manager, you'll have to install it. For smartphones running Android OS, the leading places are occupied by ES File Explorer, FX File Explorer and Total Commander. You can choose the application that you like best.

How to open a flash drive on Android
As we have already found out, we will need After installing it, we can go to this utility and find the flash drive. If you can't find external device, try entering the path to the files (/sdcard/usbStorage). After successfully opening the flash drive, you can view, copy and move files as on regular computer. Now you know how to connect a flash drive to an Android smartphone and open it, but, unfortunately, problems arise on some devices. Let's look at them and try to find ways to solve them.

Android tablet or smartphone does not see the flash drive
If you have reached this point, then you are having problems connecting the flash drive to your smartphone. This may be due to various reasons. Now we will look at the most common of them.
First. If the file manager should help him. Now there are applications that can eliminate this problem. The most effective program- paid, so we will look free alternative. Unfortunately, it requires root rights. StickMount works not only with flash drives, but also with other additional devices.
If you have installed the necessary utility, you can connect an external device. When connecting, you must agree to the StickMount rules, after which it will automatically start and see the flash drive. How to find a device? You can in file manager go to the path /sdcard/usbStorage/sda1. Do not forget to properly disconnect additional devices so that there are no problems with them in the future. To do this, go into the program and click on the “Unmount” button.

It is worth noting another high-quality application - Helper, which works on a similar principle.
The second reason. Before installation additional programs and root rights, you should make sure that the problem is not in the flash drive. What is this connected with? Your device simply does not see the flash drive, since it may be configured for another file system(possibly NTFS).
Let's say you don't have a laptop or computer: how then to connect an additional device? You need to download Paragon NTFS & HTS+ - an application that supports the desired format for reading text data. Unfortunately, this application requires root access. You can get them using the King Root program. However, you may not be able to obtain superuser rights on all devices. Remember: you do this at your own peril and risk. Because of this application your smartphone may not work correctly. If the device is still under warranty, then you do not need to get root rights, since the warranty will be lost in this case.
Conclusion
So, we looked at how to connect an external flash drive to an Android smartphone, and described some problems associated with the connection. As practice shows, issues arise on older devices. If you have new device, there shouldn't be any problems. To use a flash drive, keyboard, mouse or other applications on your device, you must follow the rules and do everything carefully.
Sometimes it becomes necessary to disable USB ports on a computer or laptop in order to limit access by connecting flash drives, hard drives and other USB devices. Disabling USB ports will help prevent the connection of any drives that could be used for theft important information or cause your computer to become infected with a virus and spread malicious software across the local network.
Restricting access to USB ports
Let's consider 7 ways, with which you can block USB ports:
- Disabling USB through BIOS settings
- Changing registry settings for USB devices
- Disabling USB ports in Device Manager
- Uninstalling USB controller drivers
- Usage Microsoft Fix It 50061
- Using additional programs
- Physical disabling USB ports
1. Disabling USB ports through BIOS settings
- Enter BIOS settings.
- Disable all items related to the USB controller (for example, USB Controller or Legacy USB Support).
- After you have made these changes, you need to save the settings and exit the BIOS. This is usually done using the key F10.
- Restart your computer and make sure the USB ports are disabled.
2. Enable and Disable USB Drives Using Registry Editor
If disabling via BIOS does not suit you, you can block access directly in the Windows OS itself using the registry.
The instructions below allow you to block access to various USB drives (for example flash drives), but other devices such as keyboards, mice, printers, scanners will still work.
- Open the Start menu -> Run, enter the command " regedit" and click OK to open the Registry Editor.
- Continue to next section
HKEY_LOCAL_MACHINE\SYSTEM\CurrentControlSet\Services\USBSTOR
- On the right side of the window, find the item “ Start” and double-click on it to edit. Enter value " 4 » to block access to USB storage devices. Accordingly, if you enter the value again “ 3 ", access will be reopened.

Click OK, close Registry Editor, and restart your computer.
The above method only works when installed driver USB controller. If for security reasons the driver has not been installed, the "Start" parameter value may be automatically reset to "3" when the user connects USB drive and Windows will install the driver.
3. Disable USB ports in Device Manager
- Right-click on the " Computer" and select the "Properties" item in the context menu. A window will open on the left side of which you need to click on the link “ device Manager».
- In the device manager tree, find the item " USB controllers" and open it.
- Disable controllers by pressing right button mouse and selecting the “Disable” menu item.

This method doesn't always work. In the example shown in the figure above, disabling the controllers (the first 2 points) did not lead to the desired result. Disabling the 3rd option (USB Mass Storage Device) worked, but this only allows you to disable a single instance of the USB storage device.
4. Removing USB controller drivers
Alternatively, to disable ports, you can simply uninstall USB driver controller. But the disadvantage of this method is that when the user connects a USB drive, Windows will check for drivers and, if they are missing, will offer to install the driver. This in turn will allow access to the USB device.
5. Prevent users from connecting USB storage devices using a Microsoft application
Another way to deny access to USB drives is to use Microsoft Fix It 50061(http://support.microsoft.com/kb/823732/ru - the link may open near the mituta). The essence of this method is that 2 conditions for solving the problem are considered:
- The USB drive has not yet been installed on the computer
- The USB device is already connected to the computer
Within the scope of this article, we will not consider this method in detail, especially since you can study it in detail on the Microsoft website using the link given above.
It should also be taken into account that this method Not suitable for all versions of Windows OS.
6. Using programs to disable/enable access to USB storage devices
There are many programs for setting access restrictions USB ports. Let's consider one of them - the program USB Drive Disabler.

The program has a simple set of settings that allow you to deny/allow access to certain drives. USB Drive Disabler also allows you to configure alerts and access levels.
7. Disconnecting USB from the motherboard
While physically unplugging USB ports on a motherboard is nearly impossible, you can unplug ports on the front or top of your computer by unplugging the cable that goes to the motherboard. This method will not completely block access to USB ports, but will reduce the likelihood of using drives by inexperienced users and those who are simply too lazy to connect devices to the back of the system unit.
! Addition
Denying access to removable media through the Group Policy Editor
IN modern versions Windows has the ability to restrict access to removable storage devices (including USB drives) using the local editor group policy.
- Run gpedit.msc through the Run window (Win + R).
- Go to the next branch " Computer Configuration -> Administrative Templates -> System -> Access to Removable Storage Devices»
- On the right side of the screen, find the item " Removable drives: Deny reading."
- Activate this option ("Enable" position).

This section of Local Group Policy allows you to configure read, write, and execute access for different classes of removable media.