How to connect two hard drives. Installing a second hard drive on your computer - clear instructions
When you run out of hard drive space, you can either delete or add more space. While external USB HDD easy to connect and as an option for additional capacity, this is not entirely suitable - they take up disk space, perhaps an additional power connector, you need to use a valuable USB port, and they tend to be slower than internal drives. Let's look at more today difficult option adding a second internal drive.
It's time to familiarize yourself with the basics of your computer. Today we will only concentrate on the hard drive, but the guide will give you great review to all the random connectors and ports that you see on the motherboard after you open the computer case.
Step 1: Determine whether you can add another internal drive or not
Unfortunately, not all computers are built equal. If you have a laptop, or an all-in-one car where the internal systems are hidden in the monitor, then your only option is to go to a USB drive and you don't need to open it. If you have a system unit, then read on, as there is a chance that you will have enough space to install a second drive. If you have full size towers, then you can easily add a second disk, or 2, or 3! But, if you are not sure, refer to the table below.
Step 2: Backup
Although we do not anticipate any problems, it is good practice to create backup copy important information before making any changes to the equipment. Here we have looked at some options for Reserve copy.
The best software backup for Windows.
The best backup programs for Windows.
Your data is fragile - and it only takes one small accident to lose all your data. The more copies you make, the better. Here we present the best free programs backup for Windows.
Step 3: Open the case
Before proceeding, disconnect power from the system unit and all peripheral devices.

In most cases, the system unit may have covers on each side that need to be removed with just two screws. You need to remove the side cover that doesn't have the motherboard on it, so look at back panel systems, find USB ports/mouse and remove the cover so look at the back of the system, find the USB/mouse ports and remove the opposite side.
Step 4: Get rid of static electricity
When touching the inside of a computer, technicians use a grounded wrist strap to reduce the risk of damage to any sensitive component from static electricity that is stored in the human body. For our purposes, touching the radiator will be enough.
Step 5: Find the hard drive and connectors for it
The insides of all computers are very similar. A hard drive is a fairly large piece of metal like this:
You have to find it, it is usually in some kind of metal box. Check now to see if you have a case to fit another hard drive. The tower of the case usually has space for 3 or 4 disks, but in a small desktop system there may only be room for one drive, in which case you're out of luck and will have to consider either upgrading the case, or using external USB disk.
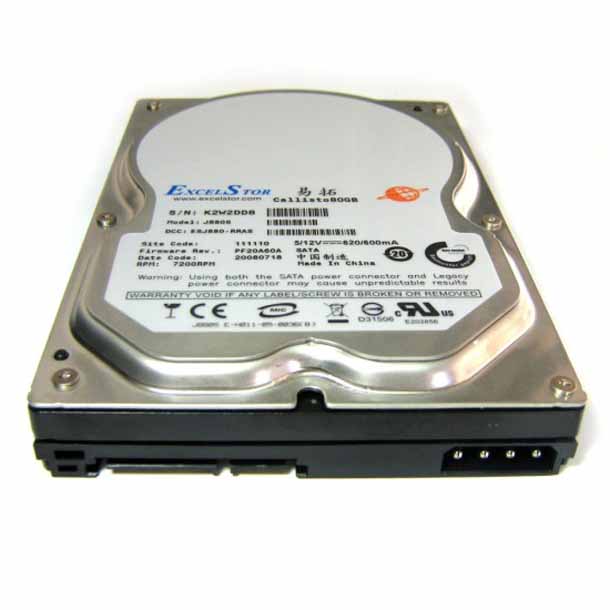
Step 6: Determine if you have a SATA or IDE drive
Take a look at the following image and compare it with your drive. If you have a drive type like the top, wide ribbon cable, then this is a very old type of connection called IDE. Ideally, your new drive will have SATA interface. If it turns out that you have an IDE disk, then you are completely out of luck, but this is beyond the scope of this article. IDE drives are becoming harder and harder to buy, which is a sign that your PC is really getting old.

Check ALL connected devices. There are two possible types of power cables, and in your system you will of course need to find a spare that you can use. It may be hidden somewhere, so keep a close eye on other power cables and try to find a spare one.

Some hard disks can accept any kind of cable, but the SATA type is easier to connect, so I use those if available. If you have a spare power cable but it's not SATA, you can still install a second drive, but you'll need to make sure it can accept the Molex type of power cable, or you can buy a Molex to SATA adapter.

Next, connect the SATA data cable to the motherboard, and see where it is connected. Various motherboards have different numbers SATA ports, and on older machines there may even be only one. Obviously, if you can only find one SATA port, then you can only connect one drive SATA drive. If you can see some spare connectors, then congratulations - you can now go out and buy a second drive!
Step 7: Buy a disc
There is very little difference between hard drive manufacturers. WITH technical side, you should search for “3.5 inch SATA hard drive”, and make sure you pick up another “SATA cable” while you're in the store, the salesperson should be able to help you with this if you can't find the hard drive you need ”, and make sure that you pick up another “SATA cable” while you are in the store and the salesperson should be able to help you with this if you cannot find such a cable.
Step 8: Installation
Installing the hard drive into the case is the most difficult part as sometimes it can be blocked by the video card or other cables. You'll need to identify the cables before you actually go any further, noting which side of the cable is facing up (the SATA data cable and power cables all have a notch on one end, which means it's nearly impossible to insert it incorrectly).
Once the drive is in place, use the screws that came with the drive to secure it - you'll need to line up the holes on the drive with the holes in the case or tray. Next, find the spare power cables and SATA cable and connect them.
In my next article, I'll cover software and configuration setup when adding a second drive - so stay tuned for that. As always, feel free to ask any questions in the comments and I will try to answer them quickly.
Hello! Please tell me to a simple user computer to deal with hard drives and the possibility of their autonomous operation...
The point is this. Now you can install it on your PC second hard disk, so that the first one is exclusively for OS + necessary programs+ frequently used files (documents, technical diagrams, etc.), and the second for home archives (videos, photos, films, rarely used files.
I successfully installed the second hard drive myself (the OS sees and maintains it well)... But one problem arises here. This hard drive should be used from time to time, but it turns out that every time you turn on and off the computer, the OS still starts it - and this affects the resource!
How to make sure that this, let’s call it “archive” hard drive, does not start up unnecessarily? Is this possible?
Nikolay | April 29, 2015, 08:40
" YUM wrote: for the sake of discussion: shouldn't we go the mechanical route? Well, for example, lengthen the power cable. Take the father/mother out and, if unnecessary, simply open the pads. The cable, however, will still stick out in the “mother”, but , I think, further than the show: " unknown device"OSKA won't work..."
As a matter of fact, this is the option I considered first and here’s why. Now my system unit stands (with its wide side) close behind the monitor and the back (free) side (for certain reasons) without a cover (i.e. there is free access to the hardware). The cables of both HDDs have easy access. In general, everything is predisposed to removing/inserting connectors. But realizing that everything would quickly become unusable, so I asked myself not a mechanical question, but software activation and turning off the HDD. Well, it turned out that this, unfortunately, is impossible.
So, YUM, I'll have to go down the already discussed path...
YUM | 19 April 2015, 15:32
By way of discussion: why not go the mechanical route? Well, for example, lengthen the power cord. Take mom/dad outside and if not needed, just open the blocks. The cable, however, will still stick out in the “mother”, but I think the OS will not go beyond the display: “unknown device”. I remember plugging fans into the free pads on the power supply. For outdoor use. One to blow on me, the second - into the body. Because it happened that both the computer and I overheated... :-)
Nikolay | 8 April 2015, 13:58
Nick Nick, thanks for the answer. From the answers, I understood that the second hard drive integrated into the PC will still be polled by the OS for any of its actions. And therefore, to eliminate “unproductive” inclusions and shutdowns, it is necessary to exclude it from the directory of one OS. That is, it is either a PC with two motherboards (and different OS), or a second PC, or an external hard drive, or a NAS...
Nick Nick | 7 April 2015, 14:47
I have done this, in the system unit there is a 500 GB disk divided into two partitions on one partition the system on the other with downloaded movies, etc. In a beautiful plastic case called external box for the HDD there is a second (standing right on the table) hard drive also at 500. Moreover, it has autonomous power supply there is a switch on the body. There are photos and archives on it and it is connected with a switch when needed, but when not needed it is turned off with a switch on the case. It is connected with computer USB(comes with the box included) The system sees the disk as a large flash drive. I took this box and watch photos and videos on DVD or wherever there is a USB.
Nikolay | 7 April 2015, 08:19
Nick, perhaps you are right in some ways. But again, I don’t need a backup disk (did I name it correctly?) that will be stored in a closet.
There were 2 HDDs available (500 GB and 2 TB). On the first one I placed the OS with accompanying programs (not all the necessary ones have been installed yet). By the way, as Dima Svinkin mentioned, system disk was divided into two logical ones - for the OS itself and for various files needed in everyday work. And the second HDD (2 TB) is gradually filled with “household stuff” (photos, videos, films, music, rarely used documents, drawings, etc.).
As a result, the “two-terabyte” after turning on the PC, after a while (as you mentioned, Nick) “falls asleep”, I don’t even know when this happens. On the one hand, this is good - the HDD is not used, but on the other hand, the problem I describe arises.
Nick, I can’t buy an external drive yet (especially now it’s very expensive, and there’s already 2 TB in stock). I just have the opportunity to get a small system unit - I’ll probably have to “dance” from this option.
By the way, Nick, I’m certainly not an IT specialist, but it’s still said everywhere that hard drives need to be treated with care, including for him better all day to "spin" than to start and stop.
So, in summary we can say the following:
1) separate control on one computer, with one OS, of two physical HDDs (without good system knowledge and access to BIOS) is almost impossible.
2) to solve the problem I am describing, it is proposed to either physically disconnect the second HDD (which is unrealistic), or use an external HDD, or you can use a second system unit of a small form factor.
Is everything correct?
Nick | April 6, 2015, 10:47 pm
For Nikolai: the “professor” on one of the IT sites advised you correctly. It is best to have 2 disks in the system. But they are used for something completely different. For example, there is only the system on one disk. And if the system crashes or you need to restore it from a backup image from six months ago, then your current documents will not be affected in any way, because they are on another drive. You won't lose anything. Or you need to check for errors or defragment the system disk - the operation will be carried out much faster in time on a small system disk (where there is only the system) than on a huge one shared drive, where in addition to the system there are a bunch of your documents, pictures, videos, etc. In short, 2 disks are used to distribute data - and this is necessary for ease of system maintenance.
I don’t know why you are afraid of turning disks on and off. There is nothing to worry about, modern disks are designed for this, they can even turn off and fall asleep if they are not accessed for a long time.
Well, if you want to disconnect the disk yourself, then buy an external disk. For example, I use an external USB-3 drive. It works quickly; to turn it off, you just need to remove the connector with the cord from the computer socket (it is inserted into the USB flash drive connector).
Nikolay | 6 April 2015, 20:54
Thanks to everyone who answered my question. A special “curtsy” for Alek55sandr5 - it seems that you immediately “grabbed” the essence of the issue.
Now it becomes clear that if two (3.4) are connected to one OS hard drives(which the system “sees” as separate physical disks), then every time you turn on, turn off or reboot the system will always launch them all (which, naturally, reduces their resource, because for hard drive one of the most difficult modes is start-up, when the spindle spins the “pancakes” Correct?)
It’s strange that at one time, some “professor” on one of the IT sites “advised” to have two separate hard drives in your PC (and not in some kind of ride-array, but precisely two separate physical ones - one for OS and related programs, and another for home video, photos, books, archived documents and other relatively rarely used files). So I “bought” this “call”.
That is, the right solution for me would be: a separate small-sized system unit, from which to make something like a NAS and connect it as needed? This is the only way I can protect the second hard drive from unnecessary startups. Right?
Dmitry | April 6, 2015, 10:59
Place a swap file and a folder for temporary files there. The disc will kick back.
Svinkin Dima | 5 April 2015, 16:43
I strongly disagree with you! Home archive need to be created and stored on an external hard drive. What size is your system (physical disk)? For an OS + various programs, 100-150 GB is usually enough, and for many users the system (logical) is even several times smaller than these sizes. If your computer had one physical disk with a nominal size of 320 GB or more, then it is unreasonable to allocate this entire volume to the OS + programs. It needs to be divided into two sections (two logical drive) C:\ and D:\. Drive C is the system drive, and on drive D:\ you should place folders for temporary files of all programs, folders for downloads from the Internet, folders for saving files created in different programs and a temporary archive of the most popular files. Any extra physical device in a computer can turn into a headache at any time - this is practice.
Alek55sandr5 | 5 April 2015, 15:50
As far as I know, unfortunately it is impossible to completely turn off the hard drive if it is connected to a PC. Every time you start the operating system, the hard drive will load along with it and its resource will slowly wear out. You can copy some files to this hard drive and remove the connected cables from its connector. This way it will be completely disabled and its resource will be greater. But of course, if this option suits you.
When purchased new HDD, the question arises of how to connect a second hard drive to a computer. This is not difficult to do, but before you get started, you need to make sure that your system unit is not under warranty. The fact is that in order to install a second hard drive, you need to remove the side cover of the computer. This will break the seal and therefore void the warranty. To avoid such a situation, you should contact a service center.
If the warranty has expired or is missing, feel free to remove the side wall. It is secured with two screws on the back of the PC. Be sure to turn off your computer and unplug it. Installation additional hard drive is performed only when the system unit is turned off. This is not a flash drive, and the HDD may simply fail.
You need to inspect the motherboard and the place where the hard drive is already installed. Majority modern computers has SATA connections. Trace where the cable of the existing HDD is connected to the motherboard. There should be at least one more similar one next to this connector. This will depend on the type of motherboard you have. Large ones have up to 5-6 connectors, small ones can only have 2.
If you are the owner standard type motherboard, then you just need to select the socket to connect. If you have a combo (that is, a small one), then slight difficulties may arise. The fact is that the first hard drive and optical drive may already be connected to the slots. And it may turn out that there is simply no other place to connect an additional hard drive. These are budget motherboards, and sometimes they do not provide the ability to connect several hard drives. How to install two hard drives in this case? You'll just have to unplug the DVD-ROM to free up the port.
If you have old computer with type IDE connections and there is only one slot left, you have the opportunity to install two equipment on one cable. This can be either 2 HDDs or a hard drive with an optical drive. When connecting on one cable, it is advisable to follow the sequence in which the system disk will be connected to the master connector, and an additional one to the slave. Master is the outermost connector on the cable, slave is in the middle. The instructions for the HDD should indicate in what position the jumpers should be set for a particular mode.
After we have figured out where to connect the second hard drive to the computer so that it recognizes it, we move on to the next point. This powers the device with electricity. Take a close look at the wires that come from the power supply. In old system units type of connections IDE, in the new ones - SATA. Some PCs have both types at the same time. If the hard drive has a SATA port, and only IDE is left free in the power supply, do not worry. You need to purchase an adapter from one connection type to another.
We found out which connectors are connected to second hard disk. Now it needs to be installed and secured. Find where the first hard drive is located. Depending on the size of your case, there may be one to three drive slots nearby. If there is a lot of space, it is advisable to connect two HDDs so that they are located further away from each other. Hard drives can get very hot during operation and require ventilation. The more free space around them, the better ventilation will occur.
IN small body installing a second hard drive will mean that both hard drives will get very hot. Especially in the hot season. Therefore, it is advisable to purchase a cooling system for them. When connecting a second drive, do not forget that it must be screwed to the case. Unlike solid-state drives, HDDs have mechanical parts that can be easily damaged. During transportation, the hard drive may fall out of the slot, and this will damage not only it, but also, possibly, the motherboard.
Second hard drive on a laptop
Winchesters on laptop computers don't have the same large capacity, as on stationary ones. And sometimes users want to increase space, but the laptop does not have a slot for an additional hard drive. in this case? This can be done by installing an HDD instead of an optical drive.
There are special adapters for this. Without them, it will not be possible to connect another hard drive, since the connectors for DVD-ROM and HDDs are different. The first thing you need to do is figure out the thickness of your drive. On different laptops it may differ. The most common are 12.7 mm and 9.5 mm. You can find out this way:
Use a program to diagnose equipment like Everest or AIDA. View the optical drive model and find the specifications on the Internet. The exact dimensions must be indicated on the manufacturer's website. Unscrew the drive and take measurements manually.
After purchasing the adapter, you can begin installing the hard drive. Unplug your computer and turn it off. It can only be untwisted when not in use. Pull out the optical drive. In most cases, it is secured with 2-4 screws.
Take the adapter and remove the stop, which is located on the opposite edge from the connectors. Some people try to turn on the second drive by connecting it to the adapter at an acute angle. This can break the contacts. The support is removable and is needed to fix the hard drive. Then press the hard drive firmly against the contacts. Sometimes this requires effort.
After installation and fixation with the stop, tighten the bolts to more firmly connect the adapter to the disk. So as not to spoil appearance laptop, you need to remove the front panel from the optical drive and attach it to the hard drive adapter. Carefully insert the device into the laptop and put all the covers back. If everything was done correctly, the BIOS will display new hard disk.
Disk system settings
You learned how to install a second hard drive in a PC. But this is not enough to fully work with it. Now you need to configure it so that the system recognizes it. After all, if the disk is new, it does not have marked areas and will not be displayed operating system. If you have Windows installed, you can do this by going to Disk Management. You can get to this menu by clicking right click mouse over the “My Computer” icon and selecting “Manage”.
All connected drives and their capacity will be displayed in the lower central part. The new disk will be labeled "Unallocated". You need to right-click on this area and click “Create simple volume”. The “Setup Wizard” will appear, following the instructions of which you will determine the space of the future disk, file system and assign a letter to it. Remember that two partitions cannot be assigned the same letters. To avoid having to deal with OS freezes and process crashes, close all unnecessary programs. At the end of the procedure, the new hard drive will be displayed in the system.
We looked in detail at how to connect an additional hard drive to a computer. By watching the video below or above in the text, you will be able to understand and consider in more detail incomprehensible points.
Articles in the same category
I’ll share with you how I solved a problem related to my hardware. I worked and worked... and there wasn’t enough space. Have you thought about how to install a hard drive on your Acer AX3910 computer? There are not enough connectors for it.
I’ve been using this computer for several years now and I’ll tell you honestly, it’s never let me down, it works super reliably, quickly, and the most important thing I like about it is its noiselessness. Works like a laptop. It's on the table and you can't even hear it.
Installing a second hard drive on an Acer AX3910 computer.
Before this model I used the same ones desktop computers, the same brand, only less powerful and with less hard drive. As they were used, the need for a faster processor and a larger hard drive arose. I have been using this model for more than two years and have no plans to change yet. Except that there wasn't enough space on the hard drive.
Computer settings:
For extra space I've been using information storage for a year now external hard“WD Elements” disc. The brand is not known to me, it is made in Thailand. 
This HDD has a USB3 connector, the data transfer speed is very high that I didn’t even need to increase the built-in hard drive.
And I wouldn’t worry if at one point he didn’t start working slowly. The time it takes to load files into my programs from this external drive has increased dramatically. And energy-intensive programs - Adobe Premier Pro, Adobe Muse. The brake became concrete.
And there was concern. When checking Windows disk announces system error on the disk, but cannot fix it. And “my whole life” is on it! Archival photos, work over many, many months. It became creepy to even think, if suddenly... I don’t even want to say this word! I handle it very carefully, blowing off the dust.
How to install a second hard drive
What to do? I decide to urgently install an additional 1 TB hard drive, leaving the original drive of the same manufacturer under the system, without reinstalling the system or changing anything. Bought for 3820 rubles. And knowing that in this compact case there is no free space, I decide to install it instead of a CD/ROM, and use an external CD/ROM, connected via a USB connector. It's not needed that often these days. And on the motherboard there are only two SATA connectors for disks.
I disassemble the case, it's easy

unscrew the CD/ROM 

Connecting a second hard drive
How to install a second hard drive programmatically. I connect the connectors to it from the CD/ROM and assemble it. I just swap the connectors of the native HDD and CD/ROM. This is done so that the new HDD does not act as the root disk. If you don't reset the connector, the computer simply won't boot the system. Tried it in setup Switching the drives didn't work, so I had to re-wire the wires. This is done quickly and is not difficult. 
Next, connect all the wires, turn it on and press on the keyboard Del. This is necessary in order to get out setup and just in case, set the boot priority from our native hard drive. 

 Exit, saving the settings.
Windows will boot, but when you open Explorer, you will not find the new disk. To do this, we will make the following assumptions:
We go out to Control Panel-Administrative Tools-Computer Management-Disk Management
.
Point the mouse at this disk 
and right-click to call up a pop-up menu in which we create a simple volume.
The Creation Wizard window will appear. simple volume, which will guide you through setting up this disk. 
During the creation process, we assign a drive letter, you can come up with a name for it. Let's format it. And a second hard drive appears on our computer. This operation is simple and intuitive. 
Thus, the computer gained new storage, essentially tripling its memory capacity. It remains to add Random access memory up to 16 GB. And you can still use it for two years.
A typical laptop configuration involves installing two drives: one of which is a hard drive, the other is a drive. optical disks. There is only one compartment for installing a hard drive.
Therefore, in order to install a second hard drive, you need to sacrifice a CD-ROM device (usually a burner drive DVD discs). For this, there are adapter devices that completely replicate the shape of the internal optical drive with a mount for a standard 2.5-inch HDD.
In this article I will tell you in detail how to replace the cd rom in a laptop with a hdd.
How to determine the thickness of the device
I know of two types optical drives used on laptops that differ in thickness. "Thick" has a height of 12.7 mm, and "thin" - 9.5 mm. You can determine the thickness of the device you have installed without disassembling the laptop. To do this, first look at the device manager and look at the product model.

I have this Optiarc AD-7580S. Now let's visit any popular internet a resource selling similar products or Yandex.market and look at the characteristics of the device.

As you can see, the thickness of the device, according to the description, is 13 mm (taking into account rounding, in reality 12.7 mm).
If in doubt, you can measure it yourself using an ordinary ruler. You can tell the difference between 12.7 and 9.5 drives with the naked eye.
Where to buy an adapter for HDD to ODD bay

It is a plastic box with small fee with connectors and chip, also included USB cord for connection and a decorative strip on the front side. For some reason, the package included a mini-CD with drivers, but Windows 7 saw the device without installing additional software. Moreover, the device is detected from the BIOS, so it can be used as a bootable CD-ROM.