How to connect wired headphones to a computer or laptop. Solving a problem with the headphone jack on a laptop
A front panel with audio and USB ports is an integral part of any modern computer. This is very convenient thing, allowing you to connect without unnecessary movements removable media, headphones or microphone. However, it is often with the front panel that problems arise, as a result of which the sound stops working and you can no longer use the computer as usual. In this article we will try to understand the possible causes of such malfunctions.
Before you start troubleshooting problems with the front headphone and microphone jacks, you need to make sure that all drivers are installed correctly and the sound is working properly on the back panel of the computer. If you connect headphones with reverse side If there is no sound in the system unit, then the problem is more global and, therefore, requires a different approach to solving and a separate conversation. We will devote this article entirely to the front panel.
Why doesn't the sound on the front panel work?
We begin diagnostics by remembering at what point the inputs stopped functioning. For example, if the computer was only recently assembled and you have never used headphones with a microphone, then perhaps during assembly the connectors to the motherboard, i.e. The front panel is simply not connected properly. If the panel worked properly before, then try to determine the action after which the problems probably began. Perhaps some settings were made in the Control Panel or BIOS. If nothing comes to mind, follow the recommendations below.
Checking the headphone and microphone input connections
This item will be relevant for those cases when the computer was disassembled/assembled and after that the sound on the front panel stopped working. You need to make sure that the panel is actually connected - the connector is connected to necessary contacts on the motherboard, and the integrity of the supply wires is not compromised. To connect the front panel, either a solid block of two types – AC’97 and HD Audio, or separate connectors with markings can be used.
The AC'97 format is obsolete and is now rare. At the same time, the HD Audio (High Definition Audio) are now used everywhere. On the motherboard, the connector for connecting the front panel HD Audio plug usually has a letter designation, for example, F_Audio.

If you are still not sure where to connect the header, use your motherboard manual. Below we provide the AC’97 and HD Audio pinouts.

Connection diagram of individual connectors to AC’97:

Front Panel Configuration in BIOS
Sometimes it happens that the front panel works according to the old AC’97 standard, but the motherboard provides a new specification High Definition Audio. By the way, both connectors are similar, and the user may not notice this discrepancy. However, no problems should arise when connecting a panel with AC’97 to a motherboard with High Definition Audio. True, in some cases you will have to change the operating mode through the BIOS.
We go into the BIOS by pressing the F2 or DEL key when booting the computer. Next, go to the “Advanced” section and look for the “Onboard Devices Configuration” item. Just below is the “Front Panel Type” parameter (it can also be called High Definition Front Panel Audio or Legacy Front Panel Audio). Switch it from the HD Audio position to the AC97 position. If your front panel uses the HD Audio standard and the BIOS is set to AC97, then switch back.

Some motherboards do not provide the ability to change the operating mode of the front panel, but only allow you to disable or enable the sound controller. The Onboard Audio Function parameter (may have a different name) is responsible for this function, providing only the “Enabled” and “Disabled” values. In such a situation, you do not need to reconfigure anything in the BIOS, and the sound should work without additional manipulations.
Setting up sound devices in the Windows 7/10 Control Panel
If you are one hundred percent sure that the front inputs for headphones and microphone are connected correctly and everything is set correctly in the BIOS, it’s time to go to the sound settings in the most Windows environment 7/10. First of all, go to the Control Panel, and then to the “Sound” section. On the “Playback” and “Record” tabs, make sure that the default devices are installed.


To display all devices, click anywhere in the window right click mouse and check the “Show disconnected devices” and “Show disconnected devices” checkboxes.

On the “Playback” tab, click the same right button on the active device and select “Properties”. In the “General” section, look at the list of connectors - the item “Front panel 3.5 mm connector” should be present.

In the same way, we check the microphone properties on the “Recording” tab.

Front Panel Configuration Using Realtek HD Manager
If all the steps done did not produce results and the front panel for headphones and microphone still does not work, try playing with Realtek settings HD. At correct installation drivers, this sound configurator must be present on your computer. We launch it using the icon on the taskbar or, if there is none, by following the path Control Panel - Realtek HD Manager.
In the program window, select the “Speakers” section and click on the yellow folder in the right top corner.

Make sure that the checkbox next to “Disable detection of front panel sockets” is checked; if it is not there, be sure to check it.

Save the settings and check if the sound on the front panel is now working. In most cases the problem should be resolved.
Here in the Realtek HD manager you can make additional device settings. Follow the corresponding link in the upper right corner of the window.

Using switches we achieve required configuration sound.

We tried to talk as fully as possible about how to act in a situation where the microphone and headphones on the front panel do not work on the computer. If none of the above helps, try reinstalling or updating your sound drivers. As a last resort, seek help from specialists.
The laptop sees disconnected headphones (pulled out of the socket)
After disconnecting the headphones, the laptop continues to see them. When entering and exiting sleep mode, the problem goes away and the headphones turn off. What to do?
After disconnecting the headphones, the sound from the laptop speakers disappears. If you turn on the headphones again, the sound returns. If the laptop goes into sleep mode and then wakes up, a notification appears that the connector is disconnected. And the speakers start working again.
If you disable and enable Realtek, the sound also returns. I updated the drivers via DriverPack, but it didn't help. Watched Windows settings Audio, also to no avail. I rolled back the settings to default, but again the same problem.
Dell laptop. OS - Windows 8.1, driver Realtek Audio High Definition.
Installed standard Microsoft drivers- you can see that the headphones are displayed as connected after I pulled them out of the connector. And they turn off when you exit sleep mode. Please help me solve the problem.
Alek55sandr5 | December 10, 2015, 16:30
It's quite clear that the problem is in the software. And from your description it is clear that you installed several versions of drivers. All these drivers need to be removed. I recommend doing this using Driver programs Fusion. After removing the drivers, install the driver from the disk that came with the laptop. Surely this disk Do you have a. And it is on this disk that you will find the drivers you need, with which your laptop will work correctly.
Seryoga | December 26, 2014, 13:02
There was a similar problem. This happened due to an incorrectly selected sound card driver. Download the driver for your laptop model from the manufacturer's website. Tear down the old one and install the correct one from scratch. It helped me.
Play games, listen to music, talk on Skype without disturbing others - all this is possible using headphones with a microphone. The gadget makes life much easier for the user of a PC or laptop.
Jacks and types of connecting headphones with a microphone
At the beginning of the article, I would like to clarify a little the situation with the connectors and sockets of headphones and a computer.
So if you bought modern headphones with a built-in microphone, then most likely they will have a combo jack that will look like this:
Please note that this jack has three dark contact strips, two of them for headphones, right and left channels, and one for the microphone. This means that if your computer or laptop has a special combo connector, then you just need to connect the headset, and everything will work. But, unfortunately, in cases with desktop computers, this is not always the case. In most cases, a computer has 2 jacks, one for headphones only (usually green) and the other only for a microphone (usually Pink colour).
This is what a regular headphone jack looks like without a microphone (only two contact strips): 
How to connect headphones with a combo jack to a desktop computer that does not have a combo jack? You will need a special adapter cord: 
In the case of a laptop, you will most likely have better luck, in modern models There are built-in combined jacks (note the icon - headphones with a microphone), which look something like this: 
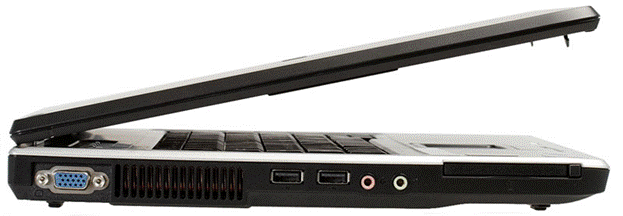
U desktop computers It’s convenient to connect the headset to the front panel; in my case it looks like this: 
It is difficult to make a mistake when connecting; all sockets have a corresponding icon. If your computer doesn’t have such sockets on the front panel, it doesn’t matter, there are definitely some on the back. If, of course, your computer has a sound card.
We connect and configure headphones to a PC running Windows XP, 7, 8, 8.1
There shouldn't be any difficulties when connecting. Everything is extremely simple - the “procedure” will take no more than 2 minutes.
The headphones have two connectors: one for the “ears” themselves (usually green), the other for the microphone (usually pink). Of course, there are models without a microphone (there is one connector), but basically all modern headphones come with a microphone. After all, voice communication via the Internet is becoming more popular than telephone communication.
You can connect the device using the front or rear panel, depending on where there are free inputs.
- Connect the ear connector. It's usually either green or has a headphone icon next to it;
- Connect the microphone jack. It is usually pink or has a microphone icon next to it;
- If you have a combined jack on your headphones and a corresponding jack on your computer, just connect and don’t need to do anything else;
- Turn on your favorite song or movie and check the sound. If there is sound, everything is fine. If not, then right-click on the speaker icon in the lower right corner of the monitor. Then select "Playback Devices":

- There will be several (or one) devices in the list, make sure that the “Speakers” device is selected and there is a green checkmark next to it:

- If not, select this device, right-click on it and select the "set as default" menu:

- Now select the speakers, and click on the “set up” button, which is located just below, then select audio channels“stereo”, you can click on the “test” button, you should hear the sound from the channel that is displayed on the screen, and click “next”:

- Check the box in the “full-range speakers” settings in the “front left and right” position and click “next”, and then “done”:

- The speakers on the right have a scale, turn on the music, if when playing music the scale does not fill and there is no sound, then something is not working correctly:

- If the scale fills up but there is no sound, check the volume level. You can do this by left-clicking on the speaker icon in the lower right corner of the monitor:

If the volume is set, the scale is filling, but there is no sound, it means that either you inserted headphones into the wrong socket, or your headphones are faulty, check them on another device that definitely works;
We connect and configure a microphone to a PC running Windows XP, 7, 8, 8.1
- To check the microphone, connect it, click on the speaker icon, which is located in the lower right corner, right-click and select “recording devices” there:

- Select your microphone and make it your default device. Most likely, it will already be one, but it doesn’t hurt to check:

- A menu will appear where your microphone should be displayed. Check if you clap your hands next to it to see if the gauge is filling:

- If not, then right-click on the device and select “properties”:

- Then go to the “levels” tab, set the value to 80, check again:

If after this the scale does not fill, then you most likely connected the microphone to the wrong connector, or your microphone is not working. If it is full, then select this device “use as default” and use it.
The headphones work properly and make the owner happy. For the most effective use and settings of the device and all sound in general, use the programs that come with your sound card, usually these are Realtek applications, but not always, so be careful.
Main features of the Realtek application:
- volume control;
- adjusting sound quality, microphone;
- Configuring front and rear panel connectors.
And many other nice additions.
We connect headphones to a laptop on Windows XP, 7, 8, 8.1
Laptops have only one connector for connecting headphones and, most likely, it will be a combined one. If not, no problem, because... Almost all laptops come with a built-in microphone.
The algorithm for connecting headphones to a laptop is exactly the same as to a computer; follow the instructions given just above:
- Connect the device;
- Checking the sound;
- You are using it.
Drivers for headphones and microphones are usually not needed.
The headphones and microphone are connected, all that remains is to configure the headphones to suit your needs.
- Adjust the microphone volume. Right-click on the speaker icon, select "recording devices", then right-click on the microphone, select "properties", then go to the "levels" tab. There is no need to set all values to maximum. You don’t want your interlocutor to hear only wheezing? Photos of the process are presented just above;
- Adjust the volume level in your ears to a comfortable level so that you can clearly hear the music or your interlocutor. However, keep in mind that it is best to adjust the volume based on the sound of the music on your computer. Quite often it happens that the interlocutor has incorrectly adjusted the microphone sensitivity level, and it will sound either quiet or loud, then, if circumstances permit, you need to tell your interlocutor about this. He must set the microphone correctly, because... if you adjust to it, you may forget that you changed the volume level, and then, when you turn on music or a movie, you may be startled by the very loud sound, or worry that the sound is very hard to hear.
Connected. Set up. Now enjoy crystal clear sound.
In today's article we will look in detail at the process of connecting headphones (including a microphone and speakers) to a computer and laptop. In general, everything is simple.
In general, this allows you to expand the ability to work on a computer. Well, of course, first of all, you can listen to music and not disturb anyone; use Skype or play online. It's much more convenient with a headset.
How to connect headphones and a microphone to a computer: understanding the connectors
All modern computers, almost always, are equipped with a sound card: either it is built into the motherboard or is a separate board. The only important thing is that your PC panel (if it has a sound card) should have several connectors for connecting a headphone and a microphone. For the former, green markings are usually used, for the latter - pink. Sometimes the name "line output" is used. Often above the connectors, in addition to the color, there are also thematic pictures that will definitely help you navigate.
By the way, on computer headphones, the connectors are also marked green and pink(usually this is the case, but if you take a headset for the player, there are no marks there). But computers, in addition, have a long and high quality wire, which last much longer, and they are more comfortable for long-term listening.
Next, all that remains is to connect a couple of connectors: green with green (or green connector with linear output on the system unit, plus pink with pink) and you can proceed to more detailed software settings devices.
By the way, on laptops, headphones are connected in a similar way. Usually the connectors are placed on the left, or on the side that faces you (sometimes called the front). Many people are often scared by excessive rigidity: for some reason, the connectors on laptops are tighter and some people think that they are non-standard and cannot be connected to headphones.
In fact, everything is just as easy to connect.
Combination connectors (also called headset connectors) began to appear in new laptop models for connecting a headset with a microphone. In appearance, it is practically no different from the already familiar pink and green connectors, except in color - it is usually not marked in any way (just black or gray, matching the color of the case). A special icon is drawn next to such a connector (as in the picture below).
Why is there no sound
After the headphones have been connected to the connectors on the computer’s sound card, most often, the sound is already played in them and no additional settings there is no need to do it.
However, sometimes there is no sound. Let's take a closer look at this.
- The first thing you need to do is check the functionality of the headset. Try connecting them to another device in the house: a player, a TV, music center etc.
- Check if installed on sound card on your PC. If you have sound in the speakers, then everything is in order with the drivers. If not, first go to the device manager (to do this, open the control panel and type in search bar“dispatcher”, see screenshot below).

- Pay attention to the lines “Audio outputs and audio inputs”, as well as to “sound devices” - there should not be any red crosses or exclamation marks there. If they are, reinstall the drivers.

- If everything is in order with the headphones and drivers, then most often the lack of sound is due to the sound settings in Windows, which, by the way, can be set to minimum! Pay attention first to the lower right corner: there is a speaker icon there.
- It is also worth going to the control panel in the “sound” tab.

- Here you can see how the volume settings are set. If the sound settings are turned down to minimum, turn them up.

- Also, based on the running sound sliders (shown in green in the screenshot below), you can conclude whether sound is played at all on the PC. As a rule, if everything is good, the strip will constantly change in height.

- By the way, if you connected headphones with a microphone, you should also go to the “recording” tab. The microphone activity is displayed there. See picture below.
The best option in in this case there will be a connection to one line output. That is, the speakers and headphones will be connected in parallel: the sound will be both there and there at the same time. Simply, when the speakers are not needed, they can be easily turned off using the power button on their body. And the sound will always be there, just if they are unnecessary, you can put them aside.
In order to connect in this way, you need a small splitter, the price is 100-150 rubles. You can buy such a splitter at any store that specializes in various cables, disks, and other small items for computers.
 With this option, the microphone from the headphones is connected as standard to the microphone jack. Thus we get perfect way: No need to constantly re-connect with speakers.
By the way, on some system units There is a front panel on which there are outputs for connecting headphones. If you have a block of this type, then you will not need any splitters at all.
Few users of modern devices do not know how to connect headphones to a computer, but not everyone can solve problems that arise during connection. Let's look at some of the nuances of connecting and setting up headphones for their high-quality operation on various operating systems.
Connecting headphones to a computer is not a difficult matter, but sometimes difficulties arise directly when setting up the equipment. Almost all PC models have sound card. It can be built into the motherboard, or you need to connect to it through a special connector. In any case, the gadget can be connected either to the back panel of the computer or to the front (if there are appropriate sockets).
By looking at the figure below, you can understand how to connect headphones with a microphone to your computer.
The headset output is always green, and the microphone input is pink. Since the plugs of gadgets are also painted in corresponding colors, it is very difficult to make a mistake and insert them into other connectors. You need to insert the green plug into the green socket, and the pink plug into the pink socket. The pink jack can be used to connect both a headphone microphone and a third-party microphone to the computer. After which the connected equipment is configured using special software (in Windows 10, as well as versions 8 and 7, the configuration should take place automatically).
On a laptop, gadgets are connected in the same way. The manufacturer may place the connectors on front panel device or on the left.
Sometimes laptop headset jacks are made tighter to increase their lifespan. Therefore, do not be afraid that the plug does not fit into the socket well.
It should be noted that it is the plugs of the headset intended for computers that have color coding, if there is a microphone on the headphones. The plugs of the rest of the headset do not have any color differences. There is a headset, for example, for phone, which has not 2 plugs, but one, which combines contacts for the microphone and audio channels. It clearly shows 3 stripes separating the contacts. Two contacts are used to connect audio channels, and one is for a microphone.

New laptop models have combination socket, to which you can connect headphones with a microphone that have one plug.

A special marking is placed near such a connector. If there is no such jack, but there are 2 standard ones, then such a headset can be connected via special adapter.

Thus, it becomes clear how to connect headphones from your phone to your computer. Headphones on the front panel are connected according to the same principle: if there is a microphone on the headphones, then it is connected to the pink jack, and audio channels to the green one.

Connecting the headset to a PC
Now you know how to connect headphones to your computer. But this action is not enough for the gadget to work properly, although most often it starts working right away and you don’t need to configure anything. But there are times when the connected gadgets do not work, so some actions need to be taken.

Connecting a headset on Windows 7
Before setting up headphones on a Windows 7 computer, you need to connect them on the back or front panel of the device to the appropriate connectors (you already know how to connect correctly). Then you need to start playing the music file. If there is sound in the headset, then the connection can be considered complete. If there is no sound, do the following using headphones on your computer (this instruction is also suitable for setting up the gadget on a laptop).

The above settings can also be applied to the Windows 10 operating system (Windows 10), if you do not know how to enable the gadget directly in it.
Microphone settings
Before you can use the microphone in Windows 7 or 8, as well as in Windows 10, you need to configure it.
There are also headphones with a microphone that can be connected to a computer via a USB connector. In most cases, after connecting them, the configuration occurs automatically.
Microsoft's new operating system is good. Compared with previous versions, Windows 10 is faster and more stable. You quickly get used to good things, so users react painfully to new problems with this OS. One of these troubles is the lack of sound in the headphones after installation or update operating system. Usually the reason lies in damaged or incompatible drivers, so you shouldn’t blame the developers of the new OS. Let's look at how to set up headphones on a Windows 10 computer and return music to the headset speakers.
Checking physical connection parameters
Sometimes no special action is taken to eliminate the problem. It is worth checking the primary causes of the problem - perhaps the solution lies on the surface.
Attention! After installing the chipset software, reinstall the audio driver.
Methods for setting up headphones
There are two methods for setting up headphones.
Driver update
This is the main way. 90% of all audio playback problems are caused by a problematic driver package.

Setting up Realtek Manager
If driver updates do not help, move on to the second method.

- Lack of codecs for playing high quality music files. You can download them.
- Physical damage to the connectors or sound card. In this case, you need to contact the service center.
That's all. Now you know how to set up headphones in Windows 10 and diagnose the causes of the problem.
Headphones are required device, which is actively used when connecting to a computer. This is not surprising, since the use of headphones can significantly expand its functionality. If there is a microphone, such a device will become indispensable when communicating on Skype or other communication services. Headphones are no less useful for those who regularly play games. computer games online, as they allow you to stay in touch with your fellow players.
Even a standard function for headphones - playing music - deserves attention from users, especially if it is not possible to listen to music through speakers, due to the risk of disturbing someone.
Briefly about connectors and outputs
The design of most computer models includes a sound card. As a rule, a sound card is built into the motherboard or connected separately. To connect headphones with a microphone, your computer or laptop must have two outputs: one for sending audio to the headphones, the other for the microphone.
Typically, headphone outputs are labeled green colors, while for the microphone it is pink, but it is not uncommon for the connection to occur linearly. As a rule, computer panels have symbols on them that will help you not to make a mistake about which connector needs to be inserted.

Headphones that are used on computers, or rather their plugs, are also marked with the colors indicated above. This significantly distinguishes them from ordinary headphones for music players, since there is no question of any marking there.
Another difference between computer headphones is their durability. Thanks to the longer and thicker cable, these headphones can last much longer than regular ones, and in addition, they are more comfortable to use.

To connect headphones, just insert them correctly into the computer connectors: the green plug into the green connector, the pink plug into the pink connector. After this, the headphones are configured using a special program.
Connecting headphones on laptops is absolutely identical. Typically, headphone and microphone jacks are located either on the left side of the laptop or on the front panel located in front of the user. By the way, if the headphones do not easily fit into the laptop jack, you should not think that they are not suitable. Most manufacturers specifically make headphone connectors tighter in their products so that they last longer.

Newer laptop models have combo jacks that allow you to connect headphones and a microphone. They may not be marked with the colors indicated above, but there are symbols near the connectors that will help you find out where the required connector is located.

Connecting headphones to a computer
After you have inserted the headphone plugs into the appropriate sockets on your computer, you need to check if they work. In most cases, after this procedure, the sound is already played in the headphones, and therefore the headphones do not require any further adjustment.
However, there are times that even after properly connecting the headphones and the computer, no sound appears. In this case, you should do the following:
1. Check if the headphones themselves work. The problem may be that they are not working. To check, it is recommended to use any working device with headphone output: TV, MP3 player, video player, tablet.
2. Another reason why connected headphones do not reproduce sound is the lack of necessary drivers. In order to check for drivers, you need to enable any sound file on the computer through the speakers. If the speakers work, then the drivers are installed on your computer, and the problem lies elsewhere.
If there are no drivers on your computer, you should go to "Device Manager" via the control panel.

Next you should find the lines « Sound devices» And "Audio outputs and audio inputs". Opposite them there should not be marks in the form of exclamation marks or crosses. If you see such symbols opposite the specified lines, you need to reinstall the drivers on your computer.

3. If you are convinced that everything is normal with the drivers and headphones on your computer, it may be that the volume on the computer is set to minimum. To fix this, you need to look for the speaker icon in the bottom right corner. By clicking on it, a mixer will appear on the screen, allowing you to control the sound level.
You can also check whether the sound is set to minimum in "Control Panel" In chapter "Sound", link "Volume Setting".

It is also worth noting that with the help of indicators that are displayed in the sound mixer, you can determine whether sound is being played by the computer. If no audio file is playing, the mixer does not move.

For those who use headphones with a microphone, it is also useful to know that you can monitor the operation of the microphone in the tab "record", which is located in the section "Sound" in the control panel.


If after performing these steps the sound in the headphones on your computer does not work, you need to familiarize yourself with the possible reasons for the lack of sound. In addition, the reason for the lack of sound may be a malfunction of the sound card, and then the computer will need the help of a specialist.
Connect headphones and speakers to the computer in parallel
There are often cases when a computer has only one connector for connecting both speakers and headphones. Obviously, constantly changing devices is not very convenient, especially since over time this will wear out the connector and it will work worse. One way to solve the problem is to connect headphones to speakers, which in turn are connected to the computer. However, this solution is only suitable for regular headphones that do not have a microphone.
The optimal solution to the problem is to connect headphones and speakers in parallel to one computer connector. This method is quite convenient, since the sound will work both in the speakers and headphones, and at the moment when you need only the headphones to work, you can easily turn off the speakers with the corresponding button.
This method is only possible if you have a special splitter, which can be purchased at a radio or cable store. The cost of such a cord is within 100-150 rubles.

Video on connecting speakers and headphones at the same time for Windows 7
How to connect headphones with a microphone
It was already mentioned above that headphones with a microphone are specially marked and have two plugs - one green (headphones) and the second pink (the microphone itself). This marking is present on most models of headphones with a microphone, and is necessary precisely so that the user can connect them to a computer device without unnecessary difficulties.
Typically it looks like this:

First of all, you need to insert the headphone plug into the corresponding connector on the computer panel, and do the same with the microphone plug. Once you have installed the headphone plugs into the appropriate connectors on your computer, you need to do the following:
1. For Windows users XP: go to the control panel, select the item "Sounds and Audio Devices", select item "Speech"


2. For Windows 7 users: go to control panel, go to section "Sound" and select an option "Playback".
If your headphones are connected to the computer correctly, then there should be green marks opposite the corresponding lines. Here you can configure the headphones in the appropriate sections.
USB works, the "rear" connector (on the motherboard) plays sound, but there is silence on the front panel. It’s not convenient to crawl under the table every time, so through trial and error I found all the possible reasons why the sound might not work!
Causes,
Front panel connector diagram on motherboard

Note:
There are 2 audio standards:AC"97 (short for Audio Codec "97) is an audio codec standard created in 1997. This standard is commonly used in motherboards, modems, sound cards and cases with audio output on the front panel. AC"97 supports sampling rates of 96 kHz when using 20-bit stereo resolution and 48 kHz when using 20-bit stereo for multi-channel recording and playback. AC"97 was replaced in 2004 Intel technology® High Definition Audio (HD Audio).
HD Audio
The sound may not work because there is simply no driver for your sound card. Or the software is not installed correctly on your audio device.
Go to Start -> Control Panel -> Sound ->

Realtek HD Manager --> Connector parameters -->

I recently assembled all my hardware into a new case. The case is equipped with a front panel with USB outputs and connectors for microphone and headphones. But here's the problem: The sound on the front panel does not work! USB works, the "rear" connector (on the motherboard) plays sound, but there is silence on the front panel. It’s not convenient to crawl under the table every time, so I found everything through trial and error possible reasons Why might the sound not work?
Causes, Why the sound may not work:
If the sound on the front panel of the case does not work, there may be several reasons for this and, accordingly, solutions:
Solution 1: Check if the front panel connector is properly connected to the motherboard.
Note:
There are 2 audio standards:AC"97 (short for Audio Codec "97) is an audio codec standard created in 1997. This standard is commonly used in motherboards, modems, sound cards, and cases with front-panel audio output. AC"97 supports sampling rates of 96 kHz when using 20-bit stereo resolution and 48 kHz when using 20-bit stereo for multi-channel recording and playback. In 2004, AC"97 was replaced by Intel® High Definition Audio (HD Audio) technology.
HD Audio
Intel® High Definition Audio is based on a specification released by Intel in 2004, delivering more channels with more high quality audio than was possible with integrated audio codecs like AC"97. Hardware based on HD Audio supports 192 kHz/32-bit audio quality in dual-channel and 96 kHz/32-bit multi-channel (up to 8 channels).Microsoft Windows Vista Only supports High Definition acoustic peripherals (such as front panel audio solutions).
Solution 2: Update your audio driver.
Download the driver from the official website of realtek or your motherboard manufacturer.
You can also use the program automatic update drivers.
The sound may not work because there is simply no driver for your sound card. Or incorrectly installed software to your audio device.
Solution 3: Correctly configure the software (driver) for your audio device.
If sound doesn't work on Windows 7, try the following:
Go to Start -> Control Panel -> Sound -> Select Digital Audio as default.

Realtek HD Manager --> Connector Settings --> check the box next to "Disable front panel socket detection"
Check the box to disable front panel socket detection.
4. Other solutions:
BIOS setup
In BIOS, you can try to enable AC"97 instead of HD Audio, or vice versa.

Replacing (soldering) the front panel
You can try connecting the audio output directly to the motherboard.
pinout on the motherboard (from Intel, usually standard)

Each case manufacturer's pinouts vary, so check the manufacturer's websites for details.
Alternatively, find a front panel from another manufacturer :)
Change case
A radical way is to change the case to a company from another manufacturer. On Thermaltake cases, the sound on the front panel always works! Confirmed by practice.