How to connect wired Internet to a router. How to connect and configure a Wi-Fi router? Step-by-step instructions for all models
Wireless Internet is gaining more and more popularity and this process can no longer be stopped. To have a demon at home wired Internet, or point Wi-Fi access. I tried to describe the connection process in detail Wi-Fi router and with photographs and videos.
In fact, there is nothing complicated here, but you will need a little care and, perhaps, the phone number of your Internet provider. The whole process can be divided into three stages: physical connection, setting up a router and setting up a computer or laptop.
Connecting the router to the computer
After you have taken the router out of the box, you need to connect it to your computer. By default, I will mean that you have a regular wired Internet.


Enter the router settings
After turning on the router, it needs time to boot and get itself in order. At this time, the lights on the front panel may light up and go out, wait 1 minute. We need to go to the administrative interface of the router and configure it. This can be done through any browser, for example Internet Explorer, Google Chrome or Opera. To log into the “admin panel” of the router you need to write in the address bar:
192.168.1.1
login: admin
password: admin

A small note: the address 192.168.1.1 is used in most routers. If you receive a “Page not found” or “Page cannot open” error, then try using a different address, for example: 192.168.0.1
If there is an ambush here, then we need to find out correct address, for example from a sticker on back side devices:

If it’s not there, then you need to look at the instructions, which may be on the included disk, or search the Internet from your phone. The same applies to the login (username) and password (password), i.e. not everyone has admin/admin. If the device is used, then maybe someone changed the default settings. In this case it is necessary. To do this, you need to find the “Reset” hole on the router and press the button inside with a match.
Network cable is not connected
Let’s say the login address and login/password are known, but you still can’t log into the admin panel due to a network error. Then you need to check the network card settings in Windows 7/10. Let's go “Start -> Control Panel -> Network and Internet -> Network and Sharing Center”. There on the left we find “Change adapter settings”. The “Local Area Connection” connection should NOT be in the “Network cable not connected” status:

If this is so, then most likely this is the problem, i.e. The cable is not connected, is connected in the wrong place or is faulty.
Also, the status should not be “Disabled”. If so, then click on the icon right click and select “Enable”.
Incorrect TCP/IP settings
If you still can’t log into the admin panel, then right-click on the connection icon and select “Properties”, and there we find “Internet Protocol version 4 (TCP / IPv4)” and double-click on it. In the protocol properties, you need to check that the “Obtain an IP address automatically” and “Obtain DNS server address automatically” checkboxes are checked. Click “OK” twice. Now wait 10 seconds and you can check.

I hope this was sorted out and I was able to log in to the admin panel of the router without any problems.
Quickly setting up a Wi-Fi connection on a router
It's more complicated here, because... All routers are different and the interface may vary greatly. Yes, and Internet settings among providers can also differ dramatically. If you have TP-Link router or another with the possibility quick setup, then you are in luck, everything can end very quickly. Find the “Quick Setup” item in the menu on the left or top and follow the instructions of the wizard:
On the first screen just click “Next”

I have a 3G router, so I'm prompted to select my preferred connection type: 3G or cable. I don't have a 3G modem so I select "WAN only"


If you don't know what to choose, then try auto mode. The router itself will try to determine the type of connection. If he succeeds, the wizard will move on to the next configuration step. But you may need to enter your login and password (in case of PPPoE connection)

or network settings (in case of “Static IP” connection type)

The provider should have given you all this information; look carefully in the contract. If the technician is unable to determine the connection automatically, then he will have to call the provider and ask, or try at random, there seem to be not many options
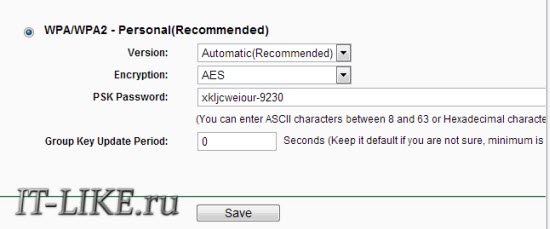
At the next step, the wizard prompts us to enable the Wi-Fi module:

- “Wireless Radio” - this is Wi-Fi, must be in the “Enabled” position
- In field " Wireless Network Name" enter any name of the point on English language
- Parameters: “Channel”, “Mode”, “Channel Width”, “Max Tx Rate” set as in the screenshot or leave it as default.
- , safety. Don't leave Wi-Fi without a password! Not only will everyone around you use your Internet and download the channel, it will be such a huge, huge hole in your security! Virtually anyone will be able to access all of your personal data. Set the switch to WPA/WPA2 and enter a complex password.
A small digression: when everything works, if it turns out that the Internet is too slow or if there are problems, then try selecting “Channel” not “Auto”, but some number from 1 to 13 and saving the settings. You can go through all the numbers to find the right one. The fact is that now there is a lot of wifi equipment around, and each device needs its own channel to work. As a result, devices operating on the same channel interfere with each other.
It’s good if you don’t have the cheapest router and it can operate at a frequency of 5 MHz. In this case, there will be a corresponding option to select a frequency of 2.4 or 5 MHz. At this frequency it works much fewer devices, and therefore the likelihood that someone will interfere decreases significantly.
Manual setting
Well, what if automatic settings it didn’t happen, then you’ll have to go through the points manually. We find a section something like “Network” and there is an item with the word “WAN”:

There should be similar settings items. Here everything is the same as for automatic setup, only we ourselves must select the type of Internet connection and enter the login/password.
- “Secondary Connection” leave “Disabled” or “Dynamic IP”, this is only needed to access internal network provider.
- “Connection Mode” set to “Connect Automatically” so that the router connects to the Internet automatically after each reboot.
If the provider requires you to specify the IP address and DNS server, then this can be done in the Advanced settings, but usually this is not necessary:

But, for example, I have a provider with problematic DNS servers and I register the Google server: 8.8.4.4 , which always works! How does a problematic DNS server manifest itself? This is when not a single site or website, but Skype or torrents work without problems! However, if you install the server on Google, then the internal sites of some providers may not open, for example, such as account replenishment and statistics.
It is here, in the manual settings, that you can specify the connection type - VPN, if you have one. To do this, select “L2TP”, enter the name/password and VPN server address (provided by the provider). If an IP address, mask, gateway and DNS are provided, then select “Static IP” and enter all the data. Don't forget to check the automatic connection box at the bottom.

That’s it, save the settings and look for the “Wireless Settings” menu section:

All settings have been described above. For Wi-Fi to work, the checkbox must be checked. "Enable Wireless Router Radio".
Next point, here we enable encryption, that is, we set up security as already mentioned above:
The router setup is complete! I advise you to save all parameters from the menu "System Tools -> Backup & Restore". Button “Backup” - saves, “Restore” - restores from a saved file. This will be useful in case everything suddenly goes to hell and all settings are lost. You can easily restore them from a file
Oh yes, I almost forgot, change the default password for logging into the admin area. This is done in the section “System tools -> Password”.
How to connect a laptop to WiFi
In Windows 8/10, you need to click on the icon at the bottom of the screen:

A panel will appear on the right where you need to select the desired wireless network. Remember when we gave the name of the network in English? This is where you need to find it. If this is a public institution and you don’t know which network to connect to, then choose any one with a higher signal level. When you hover over a network, a hint appears whether a password is required or not. If when you hover you see something like WPA/WPA2, this means that you need a password to connect to Wi-Fi networks.

You can leave the “Connect automatically” checkbox. Next, the system will connect to the router and ask Wi-Fi password, which we installed earlier. If your device supports QSS technology, then you don’t have to enter a password, but simply press the button on the router labeled “QSS”. In this case, the password will be filled in without our participation!

When the system asks about general access to files, I advise you to select “No, do not enable sharing” if you do not know why it is needed:

I made a short video tutorial on how to do this:
In Windows 7, everything is the same, only the icon and the window with found networks look “Semerovsky”

Also find here required connection, click on it and voila.
No Wi-Fi icon or not connecting
First check if the module is turned on wireless communication using the switch on the laptop body. Many Asus models, Toshiba, Sony and Acer have this switch. On some laptops, wifi can be activated using hot buttons, for example “Fn+F2” (look for the antenna icon on the F1-F12 buttons). In any case, the method works through the “Network and Sharing Center”, the same way when we “turned on” network interface to connect to the router via wire.
In more severe cases, please study.
I hope everything worked out for you! Most likely, questions will arise regarding setting up the router, because... The interface and parameter names are different for everyone. To receive an answer in the comments, immediately send a link to a screenshot of the window.
How to connect a router to a router via wifi? This question is often asked by users who want to expand the coverage area of their router.
Thanks to the use of two combined devices, you can significantly improve the quality of your Internet connection and increase your Wi-Fi coverage area by almost two to three times.
You can expand your router's coverage area by boosting the antenna. You can also not amplify, but separately buy and install a more powerful antenna.
This method is less expensive because you don’t need to buy another new router.
However, if the antenna improvement method does not bring any results, you can try setting up an access point on two routers at the same time.
First you need to determine approximate diagram mutual connection of two devices.
Schematic example of connecting two routers
If you want to link a router to transmit a signal over longer distances, you should familiarize yourself with the basic connection diagram for these two devices.
It can be used to connect a network in an apartment and in any other private sector.
An example diagram looks like this:
According to this diagram, there are only two ways to interconnect two routers: through a wire and wireless way connections. Let's take a closer look at them.
Connecting two routers using a wire
The easiest way to connect two routers to one access point is the wired method. To work, you will need the most common UTP cable, its other name is twisted pair.
You can purchase it at any telecommunications store.
The average market price of this type of cable is 20-30 rubles per meter. Appearance The twisted pair internet cable is shown in the figure below:
To connect two routers using twisted pair, follow the instructions:
- Make sure both sides of the cable have adapters. Also make sure that the cable size matches the distance from one router to another;
- Take two routers;
- Connect them using a cable. Connect twisted pair to the LAN port of the router that is configured to connect to the Internet. Connect the other end of the cable to the WAN connector of the unconfigured router. Another router will transmit the signal over a long distance;
- Now just set up a router that connects to the Internet in a standard way, and assign a dynamic ip to the other router.
Advice! The disadvantage of this connection method is that in some cases it is inconvenient to lay the cable on long distances(when you want to create coverage between several floors, for example).
Also, the cable may become susceptible to mechanical breakdowns, which cannot be corrected and then you will have to buy a new cable.
Wireless connection between two routers
This type of connection does not require any wires. However, the complexity of this method lies in the fact that it is very important to configure the equipment correctly:
- Take a router to which the Internet will be connected;
- The second router will be the access point;
- Set up the first router in the standard way, as if you were using only one router;
- Now connect your computer to another router;
- Using the Control Panel, open the Settings window wireless network, in which select the Internet protocol selection window.
Select the second router and configure the IPv protocol for it. Then click on the properties tab and enter the following text (without quotes) in the next address usage field - “192.168.1.254”; - Save your settings and open your browser. Enter "192.168.1.254" in the address bar. The settings menu for the second router will open;
- Click on the “search” button;
- A window will open with a list of available wireless networks. Select the network of the first router and press the save key;
- Reboot both access points.
Bottom line
In this way, you can connect several routers to one wireless network in order to increase Internet speed and signal coverage area.
After connecting two devices, be sure to restart them and only then connect them to subscriber devices.
More detailed diagrams The connections of the two routers can be seen in the videos below.
Thematic videos:
How to make a Wi-Fi network between routers. (WDS)
Local network between routers, set up a wireless bridge between two routers via Wi-Fi.
Setting up a wireless bridge (WDS) between two Wi-Fi routers. Wi-Fi repeater.
Briefly describes how you can configure routers to connect wireless bridge(increase Wi-Fi range network) using WDS technology.
With the development of the level and prevalence of the Internet, the number of devices that use World Wide Web. Smartphones, tablets, laptops and even TVs all require an Internet connection to comfortable work. When there are more than two such devices at home, the question arises of how to connect them simultaneously. In this case, a useful device will come to the rescue - a router, the purpose of which is to distribute the Internet connection between various devices. There are several types of routers, so before purchasing, you need to determine which one is right for you.
By type of connection
The most common type is a router with an Ethernet connection. This refers to a standard network cable (called "twisted pair") that can be connected directly to a computer. But if you want to connect several gadgets, then you must immediately connect a router (more on this below). The connection speed can reach 1 Gbit/s, it depends on the capabilities of your network card and provider.
The second type of connection is called ADSL. It is used to obtain an Internet connection via telephone networks and is more common in the private sector where it is not possible to connect via Ethernet. If you have a telephone at home, then there is no need to run additional wires. True, you won’t see speeds of more than 24 Mbit/s (this is maximum speed, subject to a high-quality modern telephone line).
LTE connection is the third type of router. With this connection, you get wireless Internet via 3G or 4G networks. This is currently the most expensive and least common connection method.
If you have decided on the type of router, then you can proceed directly to the question of how to install the router. And you should start by choosing a location.
Choosing a place
Routers come in both wired and wireless varieties. If you need to connect both your phone and tablet to the network at the same time, then you should ask how to install a WiFi router at home. Moreover, wireless router does not exclude connection using wires.
Before connecting, it is advisable to choose the optimal location of the router. Avoid placing on concrete lintels or in remote corners of the apartment, as this will reduce the usable coverage area. The ideal place is in the center of the room. Most often, the connection location is limited by the location of the incoming Internet cable. It makes sense to immediately connect and configure the router. And only if the signal level does not suit you, then start worrying about the location.
Let's start connecting

The cable must be connected to de-energized devices. For an Ethernet connection, simply plug the incoming network cable into the special jack on the back of the router (labeled WAN). If you have an ADSL connection, then you should use a so-called splitter (included) to separate the telephone and Internet signals.
For initial setup You will also need to connect a network cable (also included) to your laptop or desktop computer. This is necessary to log into the administrative panel of the router. We will consider the connection process using the example of a router manufactured by TP-Link. If you know how to install a TP-Link router, then there will be no problems connecting devices from other manufacturers, since the principle is the same everywhere.
We go to the administrative part
In order to log into the device interface, you need to have the following data: IP address, login and password. This information is printed on a label at the bottom of the router. For most models, universal login information will work. Address: 192.168.1.1, which must be entered into the address bar of the browser. After entering the address and pressing Enter keys A window for entering your login and password will appear (the default login is admin and password admin). But there may be options, as in the photo below, where the settings page address is different. Therefore, check the label or instructions for the device.

After entering your login and password, you will be taken to the administrative part, where you first need to open the DHCP Server tab. There you need to activate this server, that is, check Enable or “Enable” (depending on the interface language), and click the “Save” button.

The next step in the process of how to install a Wi-Fi router is to determine the type of connection.
Connection type
If you do not have information about the type of connection, you should check with your Internet provider. Without the correct settings, the Internet will not work. The simplest option is a type called " dynamic IP address" All you need to do is select this option and click the save button. In rare cases, you will also have to fill in the “Hostname” field.
A rarer type - with a static IP address - requires additional filling in the fields with IP address, default gateway, subnet mask and DNS server (provided by the provider). And when PPPoE connection(from the English Point-to-point protocol over Ethernet), you must fill in the fields with username, password and password confirmation.
After setting up the Internet connection, you can move on to the question of how to set the TP-Link router to wireless transmission mode?
Wi-Fi setup
To do this, you need to find a tab called “ Wireless mode"(options are possible). Then you need to enter the SSID name of the network and select mode mode. If you are not sure that all your devices support the latest n-mode, then it is better to choose a mixed bgn option.

Next, you should save the settings and reboot the router. Then let's move on to the question of how to install WiFi router into protected mode. For these purposes, the settings provide a “Network Security” section. Here you should select the WPA-PSK/WPA2-PSK encryption mode and enter a 12-digit password. In the future, this password will need to be entered one-time on each new device that you want to connect to the network.

After this step, the question of how to install a Wi-Fi router can be considered closed.
Possible problems
If you can’t log into the administrative panel, try changing your browser. For some devices different manufacturers meets poor compatibility With Google browser Chrome.
Be careful when entering the router's IP address. If the firmware was updated, it may become 192.168.0.1 instead of 192.168.1.1 (or vice versa).
If after setting up the router you have weak signal wireless network, then consider installing the WiFi router in another, more open location. Sometimes in administrative settings You can select the signal strength level. Some router models have detachable antennas. If you change them to more powerful ones, you will be able to significantly expand the coverage area without changing the router (which is much cheaper).
Conclusion
The instructions described above are universal. It will help you decide how to install a D Link, ASUS, Netgear, Linksys, etc. router. Differences may only be in the administrative panel interface or minor nuances. Provided that you did everything correctly, all that remains is to connect your gadgets and enjoy the convenience of using the Internet wirelessly.
Routers have long ceased to be something rare and unusual. Nowadays there is a router in almost every office, as well as in most homes that have the Internet. This article was written for those who recently purchased this device and are just figuring out how to connect the router to a computer.
Usually, desktop computer connect to the router using a cable. While laptops and netbooks are connected when WiFi assistance. In this article we will look at the connection process using a cable. So, for this we need the following equipment:
- The router itself. You can read about that in one of our articles;
- Network cable. To connect your router to your computer via cable, you need a Cat 5e network cable. Moreover, this is given on both sides (the compression method is direct). As a rule, the router comes with a ready-made crimped network cable about 1.5 meters long. This cable is perfect if you plan to place the router on a table next to your computer. If there is no network cable or it is too short, then you will have to purchase it separately.
- Computer with network card. This shouldn't be a problem since most modern computers(as well as laptops and netbooks) are equipped with a built-in network card.
Once you have collected everything you need, you can begin connecting the router to your computer. To do this, take a network cable and plug one end into the LAN connector on the router, and the other end into the computer’s network card.
Please note that the router may have a large number of network connectors. As a rule, these are 4 LAN connectors (connectors for connecting computers from your local network) and 1 INTERNET connector (connector for connecting to the Internet). You need to plug the cable into one of the LAN connectors (it doesn’t matter which one).

As for the network connector on the computer, there is nothing complicated here. As a rule, there is only one and is located on the rear panel system unit, next to the USB connectors.

If you are using a laptop or, then you need to look for the network connector on the sides of your device.

After you have connected the network connector on the router and the computer using a network cable, the indicator on the router should turn on, indicating that a device is connected to the router.

That's it, connecting the router to the computer via a network cable is complete. After this, the computer should work the local network and the Internet.
A special icon on the taskbar will indicate that the network and Internet are working.

If something went wrong, this icon may be crossed out with a red cross. This means the network is down.

There are a large number of problems that lead to such a situation. The most common problems are:
- Problems with network cable. The cable is not connected, damaged or incorrectly crimped;
- The network card is disabled in Windows settings;
- No network cards installed;
- The router does not work (is disconnected from the power supply or is faulty);
It is also possible that the local network is working, but there is no access to the Internet. In this case, a yellow triangle will be shown next to the icon.

There are also many reasons that lead to this situation. The most common reasons are the following:
- The router does not have access to the Internet. Not connected to the internet, incorrect or incorrect.
- Are used manual settings IP addresses.
Connecting a router is not that difficult. Enough to understand general structure connecting routers. In this article I will tell you: Basic connection diagram for a Router (aka router), What devices can be connected to the router.
Wi-Fi router connection diagram
So first let's look at back panel router. This is where the main ports and buttons are located.
- LAN(Local Area Network) - Devices operating via an “Internet cable (Ethernet cable) or patch cord are connected to these ports - this is a twisted pair cable correctly crimped on both sides with RG-45 Jacks.” That is, the router connects “ Ethernet cable"with the network card of a computer, laptop, TV, etc. devices working or having a “Network card”.
- WAN(Wide Area Network) - The port into which the Internet cable from your provider is inserted.
- Reset– button to reset to factory settings. Used if you have made a mistake somewhere in the router settings, and cannot determine where the error is, it is easier to reset the settings to standard.
- Antenna- the power depends greatly on the antenna wifi signal router So make sure your antenna is positioned correctly. Also, a small improvement in the antenna can significantly increase the router’s signal.
Having learned and understood where and which cable to connect, you can start connecting. The picture below shows the diagram wifi connection router.

Everything is very simple. Now you can select Router and start setting up your router. Or read more about what devices are connected to the router.
What devices connect to the router
We live in a progressive world and the Internet is leading it forward; more and more items in our homes require constant access to the Internet. On this moment most convenient way connecting all devices in the house is a “Wi Fi router”. And so devices that require access to the Internet that can be connected to the router.