How to clean the head on a computer disk drive. How to fix the built-in optical drive in a laptop with your own hands
Hi all. In addition to cleaning CDs with soap and water, there are many other effective ways. This article will tell you how and with what to clean compact discs (CDs and DVDs).
Often, many people have a situation when they put a disc into the drive of a computer or player, but it freezes and “doesn’t want” to play, or plays, but “in fits and starts.” What causes this? First of all, due to improper handling of the disk or the fact that the disk has been in use for a very long time. If there are scratches on the surface of the disc, then there is a high probability that it will not play correctly. In such cases, cleaning may help, although the success of this will largely depend on the extent of damage to the disc's coating. There are many “folk” ways to clean CDs and DVDs, some of which can surprise even seasoned and experienced users with their creativity.
How to clean a CD or DVD?
Use water and a soft cloth.
First of all, rinse the CD thoroughly. This is done in order to remove dust, adhering particles and greasy spots. Immerse the CD or DVD in warm water, keep it there for a while, then take a soft, lint-free cloth and wipe the surface of the CD. Do not scrub the surface too thoroughly or harshly. In order not to damage the data on the disk, there is a certain “pattern” of cleaning actions. When cleaning, you need to start from the center of the disc and move towards the edge. Never use towels toilet paper, paper towels or any other materials or things that may cause minor scratches. Let the disk dry completely, and then check whether data is read from it correctly and whether it works without failures or pauses.
Cleaning the disc surface... banana.
Most users don't even realize that...a banana can be used to clean a scratched disk. Take a fresh banana and cut it into two parts. Wipe the surface of the CD/DVD disc with it in a circular motion. The next step is to clean the surface of the disc with a soft cotton cloth. Before you start playing a disc, it will be better if you use a cleaning spray and then wipe the disc with a dry and soft cloth.
Using toothpaste or Vaseline.
The surface of the disc can also be cleaned using certain items household items, such as toothpaste or Vaseline. However, this method can be used if the scratches are not too deep. Place an appropriate amount of any of these products on the surface of the disc and wipe it gently with a soft cloth. Afterwards, for final cleaning, use a cleaning spray, wipe the disc dry and try to play it.
Use polish or a special wheel cleaner.
If the above remedies are powerless, you can use a metal polish or a set of wheel cleaners. After wiping the disc with a cloth with polish applied to it, then wipe the disc with a soft, clean cloth, let it dry, and then try to play it. If it still doesn't work properly, try last chance, use specialized fluids to clean disks.
These are just a few tools that can effectively clean the surface of CD/DVD discs. There are other methods, for example, using alcohol, soda, etc. as a cleaning agent.
You will need
- - cleaning DVD;
- - special cleaning liquid;
- - aerosol can with compressed air;
- - cotton buds;
- - ethanol;
- - water.
Instructions
Read the instructions for your device and find out if it is possible to use a special cleaning disk. Choose which treatment, dry or wet, you will use when cleaning the head. If it is wet, you will need a special cleaning liquid, which is applied to the disc in the amount of two drops.
Insert the cleaning disc with the arrow facing forward into the player or drive on your computer. The operating time will be equal to the duration of playback of a track specially recorded on the disc. A similar disc can be purchased at a specialized store that sells household appliances.
Blow off dust from the surface of the lens using a special aerosol can with compressed purified air. A thin plastic tube extending from the head of the can allows you to direct the air flow to the desired location.
To clean the laser, point the tube at the lens and “blow” for two to three seconds. Similar cans are sold in specialized stores, their cost is low, and they last a long time. If you try to remove dust with an ordinary brush, you are unlikely to succeed 100%.
Clean the surface of the lens with a cotton swab; the thinner it is, the better. You can make it yourself by taking a match, whittling it and wrapping a little cotton wool around its tip. The main thing is not to scratch the surface of the prism and try to ensure that there is no cotton wool left inside the device.
Wipe the prism with a few gentle strokes. Then reassemble the laser, aligning the marks correctly. If the contamination is very strong, use ethyl alcohol diluted with water in a 1:1 ratio.
Do not press hard - this can erase the special anti-reflective layer located on the surface of the lens and damage its mechanism.
note
If after carrying out the above operations the DVD player still does not work, most likely the laser head cannot be restored, or the fault lies elsewhere.
Sources:
- How to Clean DVD Laser Lens Head
If your drive stopped reading disks or began to read them barely, which means it is clogged. More precisely, the read head is clogged. It needs to be cleaned to drive started working again as before. But first you need to take it apart. Prepare your tools and get to work.
You will need
- Two small screwdrivers. One is flat, and the second is cross-shaped;
- A soft brush (a large one used to apply cosmetics will also work);
- Special compact vacuum cleaner for electronics.
Instructions
A brush alone will not be enough, because dirt and dust have one unpleasant feature accumulate even in the most inaccessible places. In addition, a vacuum cleaner in the household will not be superfluous, because with its help you can remove dust from all the cracks and “nooks and crannies” of the system.
Now remove the front panel from the output tray and then begin the cleaning process. You can wash the front panel with the tray with soap or just brush it with a soft brush. Only in this case, take enough time to completely dry these.
Dust accumulated on the laser lens can be swept away with a soft brush. Alcohol and cotton wool is a classic method. But it’s better not to take risks, because alcohol is not always available, and cotton wool can leave fibers on the parts being cleaned. Be careful with your hands - do not touch the lens. The pressure pad can be vacuumed. And finally, use a vacuum cleaner to go through all the insides of the drive that may contain dust.
Assembly is carried out in exactly the opposite sequence. Only here there is a small subtlety - move the movable panel located in the front part of the mechanism back and forth so that the outermost pin on it clearly fits into the guides of the receiving tray. Don't forget to put the faceplate on it too.
Video on the topic
During operation car stereo It starts to get dirty and dust gets into it. As a result, “swallowing” of the disc may begin to occur, followed by its “spitting out.” With such symptoms, cleaning the radio is necessary.

Instructions
Buy a special cleaning disc that has a cloth and liquid applied to it. Insert the disc and run it, following the instructions carefully. If this does not help, then carefully remove radio tape recorder from its normal location, unplug the electrical connector and place the device on a flat surface with good lighting to carefully examine the interior of this equipment.
Remove the top and bottom covers; if one of them is solid, then remove only the one that allows you to do this. Inspect carefully radio tape recorder and remove all dirt and small parts and objects that have fallen inside. After this, provide access to the laser head by removing unnecessary parts.
Inspect the radio head; if there are traces of dirt on it, immediately remove them using a cloth or napkin, which you have previously moistened in an alcohol solution. If you have a cassette recorder installed, then, after disassembling it, press the start and rewind buttons of the cassette several times to remove any dirt accumulated there.
Examine the lens. Clean it with a dry cloth or cotton wool. Do not use alcohol or other liquids that may darken or destroy the lens if it is made of plastic. As a last resort, use a soap solution. This is especially true for pollution caused by smoking inside the car, because smoke deposits can only be removed with the help of a liquid composition.
Collect radio tape recorder in reverse order, connect the electrical connectors and check its functionality. Repeat the procedure if necessary. In case of serious malfunctions, remove it and take it to a specialized center for repairing this type of equipment.
Video on the topic
note
In order not to experience problems in such cases, we suggest you figure out how to clean your car radio from dust and other microparticles of dirt. We place the radio on a clean and well-lit surface and begin partial disassembly - the top and bottom covers (it happens that you can remove only one, this is normal) and clean the space under them.
How to connect the radio yourself? At incorrect connection, you risk, at best, getting a sound that is not of the quality and power that is expected, and at worst, ruining the system itself and the car. If this warning has no effect on you and you have a great desire and are determined to install an audio system in your car yourself, let’s try to find out how to do it correctly.
Any equipment wears out and breaks down over time. The same fate awaits your computer drive. Due to lens clogging, it begins to read discs worse. If you do not do preventive maintenance, you will soon have to replace it with a new one. Read on to learn how to clean the drive lens.

You will need
- - liquid for washing contact lenses;
- - straw;
- - soft brush.
Instructions
Turn off the power. Remove the drive from system unit your his personal computer after that, disassemble it. Take a straw (meaning a straw for cocktails). Bring it to the lens. Press one edge of it against the drive head.
Then carefully pull the saw through the straw to clean the lens. Do not blow under any circumstances. Otherwise, the dust will mix with moist air and stick tightly to the lens and head. Also, do not touch the lens so as not to disturb its alignment.
Take a small plastic container. You will need it to pour lens care liquid into it. The container must be dry. Do not put your fingers into it under any circumstances. This can lead to some small particles getting into the liquid, which, when mixed with it, can then damage the surface of the lens.
Take a soft brush. Dip it into the liquid and run it over the lens. Select the direction that matches the direction of rotation of the disc. Please note that the liquid should flood the drive lens, but in no case should it get on the drive head itself.
Once the liquid is applied, wait five minutes. During this time, all the dirt that has accumulated in the lens should dissolve. To finally clean the drive lens, run a dry but still damp brush over it. This will remove any remaining dirt.
Dry the lens. To do this, run a dry, soft brush over it. This procedure should be repeated until the lens is visually dry. After this, cover the drive with a paper napkin (never use a cloth one). Wait 15 minutes.
How to repair a CD-DVD drive yourself?
This is a short story with pictures about how you can revive a CD-DVD, and probably a Blu-Ray drive, without resorting to the expensive help of specialists. There are several common reasons that can lead to complete or partial drive failure. Eliminating these causes is not a repair, but rather technical maintenance CD-DVD-ROM and can easily be performed by a user who has some skills in working with electronic equipment. More details on the website
The most interesting videos on Youtube
The most common causes of drive failure.
- Worn drive belt (passenger).
- Increased friction in the loading mechanism.
- The laser lens is dirty.
- Reduced laser efficiency.
To eliminate any of these causes, partial disassembly of the drive is required. The design of the drives may vary, so the accompanying pictures should not be taken absolutely.
For preventive maintenance we will need the following tools, materials and components. website

- Paper clip.
- Phillips screwdriver.
- Medium size brush.
- Calico (cotton fabric).
- Silicone grease SI-130.
- Passik.
- Cleaning cloth.
- Thin screwdriver.
- Tweezers.
Begin. Disconnect the cables from the drive and unscrew the mounting screws. We remove the drive from the system unit case.
Disassembly.

Disassembly of any CD-DVD drive begins by pulling out the tray. To pull out the tray, you first need to make a simple device from a paper clip.

Carefully, by inserting the end of a paper clip into the technological hole on the front panel of the drive, we feel for the part of the mechanism that is responsible for locking the tray. This part is located exactly opposite the hole. We press on it and the tray extends slightly. Now you can pull it out with your fingers.

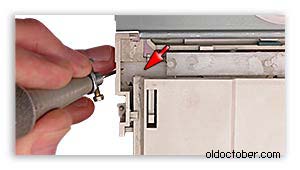
We release the latches securing the front panel of the drive. First, press out one of the side latches.

Then, press the latch located at the bottom of the drive and the other side latch.

Pull out the front panel, unscrew the four Phillips screws and remove the metal casing panels.

We press the latches and separate the tray from the main mechanism.

Thoroughly clean the mechanism from dust and dirt using a brush. If the old lubricant is heavily contaminated, then remove it using calico and apply new lubricant.
We replace the worn belt with a new one. Then we wipe the belt and the internal surfaces of the pulleys with a cleaning cloth or calico soaked in alcohol.

Wipe the laser lens with a cleaning cloth. Dust deposited on the top surface of the lens may not be visible naked eye, but she is almost always present there.
If the drive is very old or is known to have had too many discs written to it and is having a read or write problem, you can try increasing the laser current. This rather delicate operation requires patience and can take quite a long time. Do not attempt this procedure if your drive simply does not read several old discs or discs recorded on other people's drives. This can be caused by a lot of different reasons, and the laser current value is in 38th place here.

It is best to regulate the laser current when the drive is in a semi-assembled state.

To start the drive without a casing and front panel, you will have to remove the front wall of the disk tray.
Somewhere on the carriage with the laser installed there is a small-sized potentiometer, the position of the slider of which determines the laser current. The location of this potentiometer depends on the drive design.
Before turning this screw, be sure to sketch the position of the slot in order to have a reference point, and in general, so that if something happens, you can return it to its original position.
By turning the screw 10-15 degrees, first in one direction and then in the other, each time we check the reading quality in some program, for example, Nero DiscSpeed.
It is only advisable to check on several types of media at once, for example, CD-R and CD-RW or DVD+R, DVD+RW, DVD-R, DVD-RW, etc. It's probably not necessary to check all supported media types, but at least check the ones you use all the time.
Multi-purpose universal drives are quite a compromise product and therefore they often read some types of disks better and others worse. For example, by increasing the laser current, you can get an ideal CD-R reading and make half of your CD-RWs unreadable.

Assembly does not present any difficulties, except for one thing. When inserting the tray into the loading mechanism, you need to align the loading mechanism slide lock with the guide groove located at the bottom of the tray.
The slider is usually spring-loaded, so before inserting the tray into the guides, you need to fix the slider in correct position using tweezers or other suitable instrument. In the photo, the position of the slider is fixed using an awl.
How to choose the right belt for repairing a CD-DVD drive.

If, quite by chance, you happen to have a small set of belts of different diameters at your disposal, then you just need to choose a suitable copy. If you don’t have such a set, you’ll have to buy a belt.
And although the era of video and audio tape recorders has passed, you can still buy an assortment of rubber belts at all kinds of radio markets.
When buying a belt, you need to pay attention to several of its parameters, such as: cross-section, diameter, elasticity and quality of vulcanization of the rubber from which it is made.
The cross-section of the belt can also be determined by eye, since the likelihood that you will be able to find a belt with a strictly appropriate cross-section is small.
The diameter of the belt can be determined by applying the old belt to the new one and making sure that the diameter of the new one is slightly smaller than the old one.

Elasticity can be measured using a makeshift stand, like the one in the picture.

I usually check the properties of the belt by touch without any dynamometers.
The quality of rubber vulcanization can be determined by color and tactile sensations. The color of the “wrong” rubber is deep black, and the surface is smooth and highly reflective. While “correct” rubber has a slightly grayish tint and a more matte surface.
Also, the quality of rubber vulcanization can be determined by the recovery time original size. To test, you need to strongly stretch the belt with your fingers and very quickly throw it flat onto a flat surface. The faster the belt takes on its original size, the higher its quality. If you can notice by eye how the diameter of the belt changes, that is, it seems to shrink, then such a belt will not last long and it is better not to use it at all. However, it is not a fact that you will find a belt at the market High Quality, and even exactly the same as required. Therefore, in the absence of anything better, you can buy what you have, but adjusted for diameter, cross-section and elasticity.
And so, all these four parameters affect the properties of the belt. When choosing a belt, you need to take them all into account. If the cross section of the belt is slightly smaller, then you need to choose a belt that is a little shorter and vice versa. If the quality of vulcanization is low, then you need to choose either a slightly larger cross-section or a slightly smaller diameter.
If the belt is pulled too tight, it can lead to jamming or premature wear of the disk loading mechanism. If the belt is tensioned too loosely, this may cause it to slip relative to the engine pulley.
If there are several belts with similar properties at the market, then it is better to buy several different ones at once so that you can choose the most suitable one at home. The price of a belt for a CD-DVD drive can range from $0.3 to $0.7.
Related topics.
You often come across the fact that a previously perfectly playable disc suddenly stops loading or the files loaded on it simply do not open, although the drive seems to have detected their presence. What happened in this situation? Is the drive broken or is it time to throw this disc in the trash? There are several ways to try to solve this problem yourself without drastic measures to replace the drive or remove the disk itself from use.
- To determine whether the drive is the cause or not, you need to try playing several discs using it. And if he doesn’t read only a specific version, then it’s not his fault. If the situation repeats when discs stop reading or are problematic to play, then this is a problem with the drive.
- In the case of a problem disk, you must first clean it of dirt. There are many means for cleaning them, but from experience we can say that there is no point in spending money on any liquids - discs can be easily treated in warm water and soap. After this procedure, they must be blotted with a well-absorbing towel and allowed to dry before placing them in the drive again.
- In the case of a dirty laser read head of the drive, you can get by with purchasing a special “cleaning disk”. Or you can remove the drive from the computer and disconnect the protective cover by moving it backwards and upwards. Then you need to use something thin but strong, for example, a pin on the front panel through the hole, to press the latch and open the tray that blocks access to the lens by pressing on it. It is necessary to blow off large dust from the surface of the lens using a can of compressed air or even an ordinary blower, but in no case with your mouth. The pear must be without talc inside, otherwise everything will become even worse. Using a brush and lens cleaning liquid, you need to rinse the lens thoroughly, making light movements that do not press on it at all. After this, the lens should dry, and to prevent dust from getting on it again, it is better to cover it with something during the drying period. If plaque forms after drying, it must be removed with a dry soft brush. After this comes the process of assembling the drive.
The disc itself may not only be dirty, but also severely scratched, which also affects the ease of playback. It is possible to restore its surface by polishing. For large and deep scratches It’s unlikely that anything will work out, but if there are a lot of thread-like damage on it, this option can be “cured.”
The simplest method requires clean rags and goyim paste. The disc must be well wetted with water and a little paste applied to it, which must be spread evenly over the entire surface of the disc. Then, using a rag, you need to polish from the center of the disk to the edges until the paste simply disappears. The number of such processes will depend on the state of the disk after each stage. As soon as the disappearance of the most conspicuous scratches is noted, the disc can be considered to be polished. After polishing, the disc should be rinsed thoroughly, blotted and allowed to dry. After this, you can try to play back the recording.
And in the end little advice. If you need to download a driver for your printer, scanner, modem or laptop, you can always do it on the website
It may happen that we bought a film, watched it and gave it to our friends or acquaintances to watch. Then, after returning the disk, it suddenly became unreadable.
What's happened? We open the drive, look carefully at the disk and see with disappointment that scratches have appeared on it that were not there before, but what is even more strange: it is somehow all dirty, smeared with something, covered in some kind of dried stains. How can a poor man read? It’s just that a friend’s child acted carelessly with it: let’s say, he threw the disk face down on a dirty table, and, God forbid, he put some object on top of it and moved it around the table.
In no case do not wipe the CD some napkins or rags - you can scratch (damage) the working surface of the disk even more...
Well, nothing can be done about scratches. If they are insignificant, then the disk will be readable. But you can remove dirt from the disk by washing it in warm water and soap. Yes, like a regular plate, only with your hands, not with a rag or sponge.

We wet it with plain water and carefully distribute the soap solution over the surface with a soapy hand. Simply put, wash your hands thoroughly before complete removal dirty spots.

Done, washed:

Then just shake it well and let it dry, but if the water is hard, traces of hardness salts may remain after drying. To dry, we simply blot with a material that absorbs moisture well, for example, a terry towel:

It is advisable to carefully blot or wipe (rub) the CD/DVD disc, but do not. Any friction on the working surface of the disk can lead to scratching; what if a grain of sand remains in the material? So it’s safer to blot:

And if possible, do not touch the work surface with your hands:

Give the disc a few tens of seconds to dry completely and that’s it. Disk ready to eat. Try it, it may happen that those discs that were not read before will be successfully read in your drive.

By the way, if most of the discs from your collection are not readable in a CD/DVD drive, then check on another drive, for example, with friends or acquaintances. It may happen that it is time to change the drive due to mechanical displacement of the reading head relative to the surface (they say that the “eye is lost”).