How to fix a wireless computer mouse. Computer mouse repair
The mouse manipulator plays a significant role in the life of a modern person, and its failure at the wrong moment can cause trouble if there is no store nearby or a spare one. In this article we will look at the main mouse failures and how to fix them. All currently available mice can be divided into wired and wireless. We will not divide into optical and ball mice; we will only note that among optical mice, laser mice are classified as more accurate. Optical manipulators also come in the visible spectrum (they emit red light) and the infrared spectrum; the performance of the emitter of the latter can be determined, for example, using a mobile phone camera.
To repair a computer mouse we will need:
- screwdriver
- nippers (side cutters)
- multimeter
- soldering iron and solder
- heat shrink tube or other consumables depending on the type of damage detected
Typical mouse failures and how to fix them
A mouse is one of the devices whose reliability is at a high level (we are talking about devices produced by well-known brands, for example, I like the quality of A4-tech and Logitech products, and I absolutely do not like the quality of Gembird cords and buttons). Nevertheless, there are also weaknesses in this miracle of technology. Typical mouse failures include the following:
- broken wire
- button failure
- Scroll wheel is broken.
Broken wire and its repair
In 90% of cases, the breakdown of a wired mouse is associated with a bend in the wire at the base of the manipulator. This is due to the fact that it is in this place that the wire constantly bends when moving the mouse across the working surface. Signs of this breakdown are intermittent operation, or operation only with a certain “kink” in the wire. For compact “laptop” manipulators with a spring-loaded coil in the middle of the wire, wire breaks near the USB connector are also typical. Repairing a broken wire is simple: after making sure that you have localized the break point, use wire cutters to bite off the wire a couple of centimeters above and below the damaged area. Next, we solder both tails, observing the color scheme of the wires. Don’t forget to insulate them using heat-shrinkable tubing or electrical tape (as a last resort, wrap each wire in several layers of tape).

Finally, you have to fix the wire in the base of the mouse; to do this, you can carefully cut the original rubber “cable entry”, remove the old one from it, insert a new cable and pour in a little glue; it also doesn’t hurt to glue the cable to the board or case. For further maintainability, I use hot melt adhesive. See the photo to see what it looks like after repair.

Problems with buttons and how to fix them
Incorrect execution of mouse button presses can have several different reasons; you can find out the reason practically “by hearing and touch”. The most common causes of problems with button operation are:

Scroll wheel failure
In the case of scroll wheel problems, there are 2 main reasons for their occurrence:
- Problems caused by the operation of the encoder. Outwardly they manifest themselves in uneven scrolling, which is accompanied by jerking of the page up and down. This problem is solved by carefully opening the encoder and removing dust from the contacts. Another option is to loosen the attachment of the encoder basket to its base. You can see how to tighten the fastening in this video clip
- Problems caused by mechanical damage to the wheel axle. If you overdid it and broke the axle, don’t despair, there are several options for eliminating this damage: you can find a self-tapping screw of a suitable diameter, grind its head to create a semblance of a hexagon (trying it on the encoder so that there are no rotations) and, heating it over fire, screw it in instead of the missing part of the axle. The second option is to find a hexagonal key that exactly fits into the hole of the valcoder, saw it off along the length of the axle, carefully drill a hole in the scroll wheel and insert your new axle.
Finally, a few words about repairing wireless mice.
I haven’t had the opportunity to repair many of them yet, but a couple of directions for searching for breakdowns can be voiced:
- Nutrition. If the mouse is wireless, it means it has its own autonomous power source - a battery or a resonant induction power source (applies to wireless mice that work only on the surface of the USB mat that comes with them). In any case, look at what is indicated on the bottom sticker of the mouse and compare it with the measured results. Pay attention to the fact that the voltage on the battery without a load may be normal, but when a load is connected it may drop. This may indicate that the battery is discharged and needs to be replaced, or that the device consumes high current (short circuit in the circuit, or failure of some elements). In the case of using saline and low-quality batteries, it is possible that the battery may depressurize and the saline solution may get on the board. In this case, you need to wash the board with a brush and ethyl alcohol. It also doesn’t hurt to measure the current consumption and compare the resulting value with the data on the sticker.
- Emitter operation. The most obvious thing is the operation of the emitter, but it is not always possible to see it with the naked eye. If you have an infrared optical system, you can see its performance using a digital camera, webcam or camera on your phone.
- Presence of radio interference. In a modern office, there are wi-fi access points on every square meter, radio mice, keyboards, wireless window break sensors, wireless fire sensors, and even motion sensors from the store opposite can create obstacles to the normal operation of the radio mouse. If radio mice from the same manufacturer are working near you, you can try installing software from the manipulator manufacturer’s website and force them to work on different channels (similar to wi-fi access points, if such a feature is available in the software of your manipulator)
The weakest point of a modern computer mouse is the scroller, the scroll wheel. Sometimes the wheel breaks down within the first week after purchase. Scrolling becomes capricious, does not work for a short rotation, scrolling accuracy is lost, large gaps occur during intensive scrolling, etc. And sometimes it happens that the window scrolls in the opposite direction!
This will throw anyone out of balance.
Mother! She won't scroll! Again!!!
If you have 15 free minutes, then you can try to fix the mouse using a minimum number of tools. And you don't need a soldering iron here!
Even if you have absolutely no skills in “tinkering” with electronics, I recommend that before throwing away the mouse, try to fix it and gain at least minimal experience. First of all, disconnect the mouse from the computer!
Take a thin Phillips screwdriver and disassemble the mouse. Sometimes manufacturers cleverly hide screws under sliding pads.
Happened? Now take a look at your mouse. Most often there are two main designs.
1. Mouse with optical scroll wheel sensor

The photo shows a mouse in which the scroll wheel is built on an optical encoder. This is usually a sign of more expensive and high-quality mice. Distinctive features are a ribbed partition inside the scroll wheel and 2 optical elements (emitter and receiver) on opposite sides of it.
In this case, repairs are simplified. It is necessary to clean wound hairs, wool, threads from the roller axis, which impede the uniform rotation of the wheel and block the operation of the optical system. If necessary, wipe off any dust, dirt, or stains from the emitter and receiver.
2. Mouse with mechanical scroll wheel sensor

But mostly manufacturers make mice using electromechanical encoders in order to reduce the cost of the product. Next, we will consider in more detail the case of failure of such an encoder.
We remove all unnecessary things and see an electromechanical encoder, which is a bit like a tuning resistor. Here it is, with an orange octagon inside.

If you have a soldering iron and the accompanying skill, it is better to unsolder it for further disassembly and cleaning. Otherwise, you need to be very careful to avoid breaking the contact leg when bent.

Carefully bend the insides away from the frame, and if you have unsoldered the encoder, then simply disassemble it. The metal retainer is usually mounted on plastic legs. Everything is removed very easily, the main thing is to work without fanaticism.
And we see inside the true reason for the failure of the scroll wheel: the same garbage and dirt. Most likely it is a mixture of silicone grease, ground dust and hairs. The contact springs are also covered in dirt.

We take cotton wool, dip it in alcohol (isopropyl or ethyl), vodka, beer or special drink. cleaner for electronic contacts. It is better not to use acetone, because... there is a risk of dissolution and deformation of the plastic parts of the encoder.
Next, carefully wipe the contact pads and springs. Be very careful when cleaning the springs, otherwise you may ruin everything.

I think the difference is obvious. Look how much dirt has collected on the cotton wool.
Tweak the elasticity of the scroll wheel
If you want the roller to be more elastic, and its fixation when scrolling to become more rigid and clear, then you can make a small modification.The metal retainer, which helps secure the wheel, is shaped like a semicircle. Using very thin pliers or tweezers, you need to bend it along the middle of the radius to form a sharper protrusion.

Now the protrusion will fit more tightly between the teeth on the plastic ratchet.
Computer mice currently produced have good reliability. They can work without repair for several years. However, over time they refuse to work. You have to buy a new mouse or repair the old one yourself. Since the workshop charges quite a lot of money for this.
Often, mouse failure is caused by fraying of the wire at the point where it exits the case or poor contact that occurs in the mouse buttons. Often, this is the left key, since it is the one that is used most often. To repair the mouse, you will have to disassemble it.
How to disassemble a computer mouse
The first step is to unscrew the mounting screws, they are located on the bottom side. There may be several of them, but almost always it is one screw. This mouse model is held together by one screw.
If you cannot find the screw, it means it is covered with a label. Press down on the label; if it bends, the screw is located underneath it. To disassemble this mouse, I had to partially peel off the sticker.

The TECH X-701 model is held together with two screws. One of them is under the label. When an attempt was made to peel off the label, it began to tear. I had to feel for the screw and unscrew it without removing the sticker. In the photo the location is shown with a blue circle.

If there are no screws under the sticker, then they are hidden behind the thrust bearings. They should be peeled off by prying them off with a knife. After the mouse is repaired, the thrust bearings should be returned to their place. If this is not done, the mouse will not glide well on the mousepad.

After all the steps, remove the cover of the mouse on which the buttons are located.

Most often, the printed circuit board is not fixed in the mouse body. It simply slides onto plastic rods. If, when you try to remove the board, it does not budge, then you should look for screws. This mouse model uses a screw to secure two elements at once: the body and the board.

The board is removed by prying it from below, and the wheel axle should be removed from the latches.

Carefully inspect the mouse before disassembling, remember the location of the parts. Pay attention to the wheel ratchet spring, if there is one. It is similar to a clothespin spring, only smaller in size. If you don't like the rotation of the wheel, bend the ends of this spring. Then the wheel will rotate more smoothly due to reduced pressure.
Make sure that when disassembling, your fingers do not touch the optical prism and optical elements. If this happens, do not use any detergents. There are special wipes for removing grease stains. If they are not available, wipe the optical elements with a dry cloth.
How to repair a frayed mouse wire
If, while working at the computer, you begin to notice the cursor moving without permission or freezing, this may be due to a broken wire. This is easy to check. Press the wire against the mouse body and make a movement. If the cursor moves along a given axis, it's all about the explorer.

If damage is noticed at the point where the wire exits the mouse, it is the cause of the mouse failure. Here is one example of a breakdown. The photo clearly shows that the outer sheath of the wire is damaged. Some conductors simply frayed. This mouse is repairable.

If you have the skill to work with a soldering iron, repairing the mouse will not be difficult. It is enough to remove the damaged section of the wire, prepare new solder ends and solder them. All that remains is to connect the wire to the printed circuit board.
How to repair a frayed mouse wire by soldering
There are two types of wire connecting the mouse to the connector: tinsel and regular stranded. Tinsel is a more elastic and soft wire. It is resistant to bending that occurs when using a mouse. Accordingly, it lasts longer.
The wire is laid along the mouse body and connected to the printed circuit board. There are two options for attaching this wire. Using a detachable connection and by pressing into the board block. The photo shows a block that has been desoldered from the printed circuit board. The conductors are pressed into it.

In order not to forget the location of the wires on the board, it is better to take a photo. Then the connector or block is desoldered from the board. In this case, it is better not to disconnect the wires. Wire color scheme may vary. Since there is no single standard, manufacturers select wires at their discretion.
I repaired different mice and in all of them the wires had a different color. Most likely, this is due to the fact that repair of the mouse is not provided during its warranty period. After the old wires have been soldered from the board, it is necessary to remove the remaining solder. To do this, heat it up with a soldering iron and, using a thin match or toothpick, squeeze the solder out of the hole. Places for new conductors have been prepared.

Before you start soldering, you need to prepare the wires. Cut off the bad piece of wire to a length of 15-20 mm. We remove the insulation and tin the ends with solder. To ensure that the tinned edges have a round shape, the wires should be laid on a wooden stand and tinned by rotating. If this is not done, the wires will not fit into the holes on the printed circuit board. Then we insert them into the board and solder them according to the color marking.

Tinsel conductors are not amenable to tinning with rosin flux. This is because they are insulated with varnish. Acid cannot be used in this case; after some time it will destroy the conductor. It is best to take an aspirin tablet.


There are cases when the printed circuit board has a small diameter of holes for the wires. In this case, the conductors can be soldered to the contact pads. There will be no physical stress on the wire, so this type of connection will be quite rigid.

That's it, you can return the printed circuit board to its place. We lay the wire and secure the board with screws. Make sure that the wire does not touch moving parts, is not placed under button pushers, or is crushed by the housing. Before closing the case with the lid, make sure that excess dirt and hairs are removed. You can use the mouse.
How to repair a frayed mouse wire by twisting it
There is no safer way to repair a mouse wire than soldering. However, not everyone has a soldering iron and not everyone can solder. If you do not have a soldering iron, you can repair the wires by twisting them. To do this, you should disassemble the mouse and cut off the section of wire with the defect.

Using a sharp knife blade, cut the outer insulation on both ends of the wire. About 5-6 cm.


The length of the conductor must be selected in such a way that when twisting the wire, the connection points are shifted by 5-8 mm relative to each other. The ends of the insulation must be stripped.

Conductors of the same color are twisted together.

The twists must be bent along the wires. Then tuck them into the previously cut insulation. Please make sure that the twists do not touch each other.

A second piece of insulation must be applied to the resulting connection.

This will increase mechanical protection and protection against contact with parts on the mouse board.

All that remains is to insert the wire connector into the connector on the printed circuit board. Then carefully lay the wire along the mouse body.

The mouse is covered with the top cover and the screws are tightened. You can use the mouse for its intended purpose. Wires connected in this way will last another period. It happens that the mouse connector is located far away.
And the wire is not long enough to connect the mouse. Then, according to the same scheme, we increase the missing piece of wire. You can take it from an old mouse. Wires may have different color markings, since there is no single standard. Therefore, before I twist the wires, ring them. To increase the life of the mouse, make sure that the wires at the point where they exit the housing are not bent.
If the mouse wheel starts to work poorly
Sometimes, when you rotate the wheel on your mouse, you notice that the page does not turn at all or it happens in jerks. The reason for this may be dust and hair getting between the photodetector of the optocoupler and the photosensor of the wheel. So how does dirt get into your mouse? Through the gaps between the body and the wheel. Since there is a lubricant inside that improves sliding, foreign objects stick to it.

After removing hair and dust, the wheel works like new.
How to replace a microswitch
If you find that nothing happens when you press the mouse buttons, you should start repairing. The reason for this may be the failure of the microswitch or wear of the button formed at the point of contact with the pusher.
To find out the reason, you need to disassemble the mouse and inspect it. If there is a slight depression, about 1 mm, this may be the reason. Check the button pushers by pressing them. There should be a loud, clear click. If this is not the case, it is most likely the switch itself.
This is checked as follows: the disassembled mouse is connected to the computer, and by pressing the pushers, it is checked. If everything works, you need to fuse the missing piece of plastic onto the button, or pour a drop of epoxy resin. If the failure lies in the microswitch, it will have to be replaced.

It's easier to replace the entire switch than to bother with re-soldering wires. Most mice use a standard microswitch. It works on the following principle. 3 brass plates having a complex shape are pressed into the body, made of plastic. Their ends have pins that are used for soldering into the board.
The plate located on the left in the photo is the middle point of the switch. A plate having a “U”-shaped hole is attached to it using the expansion method. This plate is attached with the left side to the protrusion of the left plate on the left side. The right side is curved in an arc; it hooks onto a protrusion located on the right side of the left contact plate.
The flat thin plate is made in such a way that its right end is pushed upward. Due to this, contact is created with the thick right plate, bent into the shape of the letter “L”. When you press a key, the pusher transmits force to a thin plate. Consequently, it descends, moving away from the upper contact, and touches the lower one. The output of this contact is located in the middle of the button.
After you release the button, the thin plate returns to its original position, due to which the extreme contacts of the switch are connected. It turns out that when the button is pressed, the contacts are connected to each other. This happens to the middle and left contacts. When the button is released, the outer contacts are connected.

Since metal tends to accumulate fatigue, the spring becomes deformed and loses its properties. This is why the button refuses to work. Maybe the microswitch can be repaired.
Disassemble, remove the spring and straighten it. But I have never had to repair a switch this way. If you have an old ballpoint mouse, disassemble it and unsolder the microswitch.
It is better to solder the one located under the wheel. It is used the least often and is often in good working order. If the wheel is missing, take the right button switch. Just pay attention to how it is installed. The pins on the switch are located symmetrically to each other, it’s easy to make a mistake.
If the old mouse is missing, swap the switches. In place of the left button, install the switch from the wheel and vice versa. If the situation is extremely hopeless, there is nothing left to do but repair the microswitch.

And although computer mice have evolved significantly since the first appearance of this wonderful device, they still break. Let's talk today about computer mice, or more precisely about repairing a wireless computer mouse.
For the first computer mice, the most important problem was contamination of the very ball that transmits mechanical movement to electronic sensors. Those who remember those times know that cleaning this very ball from dirt was a dubious pleasure. In addition, such a mouse required a mouse pad, otherwise the rubberized ball would not move well on the table.
The time has come to get rid of this rudiment. Optical computer mice appeared. Everything would be fine, but the wire with which such an optical mouse was connected to the computer system unit became unusable over time, and it stopped obeying its owner. The consequences of this could be terrible, up to the complete destruction of a computer mouse against a merciless brick wall.
But even here, our botanist friends figured out how to save us from this scourge - the connecting wire. They began to transmit data from the mouse to the computer via radio waves. Everything would be fine, but the user of such a wireless mouse has to regularly replace dead batteries.
And now, it would seem, all the most malicious attributes have sunk into oblivion: the ball, the wires. What's left? Buttons! Yes, yes, it was they who began to break down most often, rendering our beloved computer mouse completely unusable. As practice shows, problems with buttons occur not only in cheap models of computer mice, but also in fairly branded ones like VAIO.
But, for an avid electronics lover, such a malfunction is not only a challenge to his experience, but also a real opportunity to delve into the insides of this interesting device. Especially if it is not a simple wired mouse, but a wireless one.
So let's get started.
Despite the fact that the development of modern means of information input leads to the elimination of various mechanical devices, computer mice still have buttons.
On the repair table is a wireless computer mouse SONY VAIO model VGP-WMS4. The diagnosis is incorrect operation of the left mouse button (LMB). Everything else works fine. The reason is also clear. When working with a computer, we more often use the left button than the right or center button (the one under the wheel).

To open the case we will need a scalpel and screwdriver. The screws that hold the case together are located under plastic tabs that reduce friction. They need to be carefully peeled off from the body and placed in a clean place. After the repair we will glue them back to the body. To unscrew the screws, I had to look for a hexagonal socket - the screws have a figured groove.

After opening, we are presented with electronic filling. It was done with dignity. The left and right buttons are three-pin buttons without locking.

If we carefully remove the scroll wheel, we will find a micro button underneath it. This is what we press when we click on the wheel - this is the third, central input button.

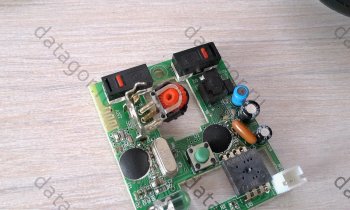
Let's take a break from repairs and at the same time study the structure of a wireless computer mouse. As you can see in the photo, several microcircuits are installed on the main board. The one in the square case is more likely to be responsible for wireless data transmission. The antenna is clearly visible on the printed circuit board, which is made in the form of copper tracks directly on the printed circuit board.

An open optocoupler acts as a rotation sensor for the central wheel. The optocoupler consists of an infrared LED - the one in a transparent case and with two terminals, as well as a phototransistor. It has a dark body and three terminals.

The wheel has through grooves.

When the wheel moves, the through grooves are replaced by partitions. As a result, infrared radiation may or may not pass through the base of the wheel. The received signals from the phototransistor enter the microcontroller, which processes the received data.
Also in the case you can find an optical system. It consists of a bright LED, a lens system and a photosensor.
All computer mouse electronics are powered by two AA alkaline batteries (1.5V). Moreover, for the mouse to operate, both 1.5V and 3V voltages are removed. A connecting wire extends from the middle contact in the battery compartment. Most likely, the 1.5V from one battery is used to power the controllers, and the 3V is used to power other parts of the circuit, such as the bright red LED that is part of the reader's optical system.
Let's get back to repairing our computer mouse. Finding a suitable replacement button can sometimes be difficult. But it doesn't matter. You can use another computer mouse as a “donor”. As a rule, the right key button of many of them is working and can be used for replacement. An optical wired mouse was used as a donor mouse. At one time, she also died a heroic death after numerous attempts to restore the connecting wire. After a short “tail” remained from the wire, it flew into the storage room.

Let's take a look at its device. As we can see on the printed circuit board there are already familiar buttons, a scroll wheel, a photosensor (a microcircuit in the middle of the board), an LED and a controller chip. It is worth noting that this computer mouse does not use an optocoupler as a scroll wheel sensor, but a multi-turn encoder.

This is not a buzz, since the encoder is an electromechanical part. And, as you know, everything mechanical is subject to wear. In the VAIO mouse, the optocoupler will work more reliably - because the optocoupler has no mechanical contact parts.
As already mentioned, it is better to use the right button as a replacement button.

Here is the result of replacing the faulty button.

It is also worth remembering that when restoring the operation of the mouse, it is worth cleaning the scroll wheel, optical system and the case itself from dust. Since a computer mouse contains optical sensors, such prevention will have a positive effect on its operation.
Often the cause of such problems is simple blockage. There are often cases when something is spilled on the mouse, and not always ordinary water, but, for example, hot sweet coffee. In such situations, there are two options: purchase a new device or try to repair the old one.
If you know how to disassemble a mouse, you can avoid downtime while working on your computer and fix the problem yourself.
The main reasons for the breakdown of a computer “rodent”
First, find out what caused the problem. You may not have to disassemble the mouse. So, the main types of breakdowns are as follows:
- technical - frayed wire, damage to USB or PS/2 connectors;
- mechanical - incorrect operation of the scroll wheel, lack of response to button presses;
- Incorrect setting for a specific application or game.
The latter situation does not require repairing the manipulator. It is enough to make the necessary settings. Before disassembling the mouse, make sure that the cord (in the case of a wired device) and the connector are intact. If the cause of the breakdown lies in them, it is useless to do this. When the manipulator does not respond to the user’s actions due to the scroll wheel not working, clogging or other reasons, there is nothing else left to do but begin repairs.
Required Tools
How to disassemble a mouse? You don't need a wide range of tools for this. All you need to do is arm yourself with a Phillips screwdriver and prepare a container to safely store the screws. Otherwise, when it comes to assembly, they may simply not be there. Carried away by his work, the master sometimes simply sweeps them away with his hand, without noticing it. But finding these small details turns out to be very difficult.
Instructions for disassembling a wired mouse
Follow these steps:
- Disconnect the mouse from the computer and turn it upside down.
- At the bottom there are mounting screws. They may not be immediately noticeable under the stickers. In this case, clean the surface of the device and unscrew the screws.
- Open the case, holding the mouse with both hands by the different halves. You need to be extremely careful, otherwise you can break off the latch, which is located on the cover near the wire.
- The scroller (scroll wheel) is removed from the base of the device. To do this, pull it up slightly. The wheel should come out with the latch or fastener.
- Remove the mouse chip or board. If it is secured with latches, use your fingers to pry them back, being careful. If screws are used, they are unscrewed and placed in a prepared container. The board is easily separated from the case if you pull it up.

Analysis of the wired mouse is completed. After troubleshooting, collection is performed in the reverse order. Be careful, some parts are fragile and can be damaged even if you apply little force.
Analysis of a wireless mouse: Logitech
Modern manipulators are not connected to the computer with a cord. Logitech occupies a leading position in the production of wireless mice. Despite all the shortcomings, which, however, have already been eliminated, these devices are considered one of the best.
So, how to disassemble a Logitech mouse:
- Unscrew the screws that secure the two halves of the housing. To do this, you will need to undermine the elastic cushions: one in front and two in the back. There is no other way to get to the screws.
- Carefully separate the two halves of the housing.
- At the top there is a small board connected to the main one using a cable. To disconnect, remove it from the connector and then pry it out with a screwdriver. plastic latch. It is an element for fixing the cable.

The question of how to disassemble a Logitech mouse has been answered. It is assembled in the same way, only the steps should be performed in reverse order.
Analysis of a wireless mouse: A4tech Bloody
The use of a high-quality laser sensor in a manipulator is an undeniable advantage. This is exactly what A4tech mice with the Bloody brand are ready to boast of. They belong to the gaming class.
How to disassemble the A4tech Bloody mouse? More on this in the instructions below:
- Unscrew the two screws that are on the case and remove the top part. To do this, pry it slightly, being careful not to damage anything.
- Turning the mouse frame over, you can see a metal plate. Unscrew it.
- Remove the mouse wheel. If there is dirt or hair, clean it. If you take the Bloody mouse apart, you will see that the wheel consists of two parts.
- To remove the board, carefully unscrew the screw.

Now it’s clear how to disassemble the A4tech mouse. To assemble it, follow the same steps, only in reverse order.
As practice shows, disassembling a computer mouse is not difficult. It is enough to follow the basic rules:
- perform all actions carefully so as not to inadvertently damage the fragile elements of the device;
- make sure that none of the parts are lost;
- if there are legs, be sure to install them in place, otherwise it will be difficult to work with the manipulator;
- If there are latches, please note that there should be a click when they are secured.
Before disassembling a wireless mouse or device with a cord, evaluate your own strengths and skills. Perhaps the best option would be to take the device to a repair shop, where it can be repaired by experienced specialists.

Considering the widespread use of computers that is observed today, the instructions “How to disassemble a mouse” will be useful in various situations.