How to reinstall windows 7 on an asus laptop. You need to protect your computer from external threats
Hello! Today I will write about the most sacred thing that can be in the computer business, this is about how to install Windows 7. I think that everyone at least once had such a problem as “Windows crashed”, and only specialists can reinstall it and charge you a considerable amount of money.
But you think so, today I will write how to install Windows 7 yourself and completely free. I've been meaning to write this article for a long time, but never got around to it. Until I myself needed to reinstall Windows 7 on my computer. I quickly figured it out and took photos for this article. I apologize in advance for the quality of the photo, I took the photo with a video camera. And then I will describe point by point what is needed for Windows installations 7 and how to actually install it.
This article describes in detail the installation process of Windows 7. But I wrote another article in which I collected. Take a look, I think you will find it useful.
What do you need to install Windows 7?
1. Naturally, we will need a disk with Windows 7. You can buy it in a store or download it on the Internet. After you download it, it will most likely be in .iso format; I wrote about how to burn a disc in the article.
2. Before installation, we need to “save” your files that are located on the disk on which your operating system is installed. Usually this is drive “C”, the fact is that during the installation process we will format it and all files from it will be deleted. If you have new computer(only from the store) then this does not concern you, but in another case you need to transfer all the files from drive “C” to another drive. Data stored on the desktop and in a folder "My Documents" will also be deleted!
3. And the last thing you need to prepare is to put it in BIOS booting from a CD/DVD drive, so that we can boot from it first (By default, the computer boots from hard drive). I wrote about what BIOS is and how to enter it here and. You can check how your computer is configured; you may already have boot from the drive installed. Just insert the Windows 7 disk into the drive and restart the computer; if the computer boots from the disk, then everything is OK (you will see the white text and dots). Well, if the PC did not boot at all, or went Windows boot, then you need to configure the BIOS. Preparations for installation are completed, let's move on to installation. I already wrote about that.
Installing Windows 7
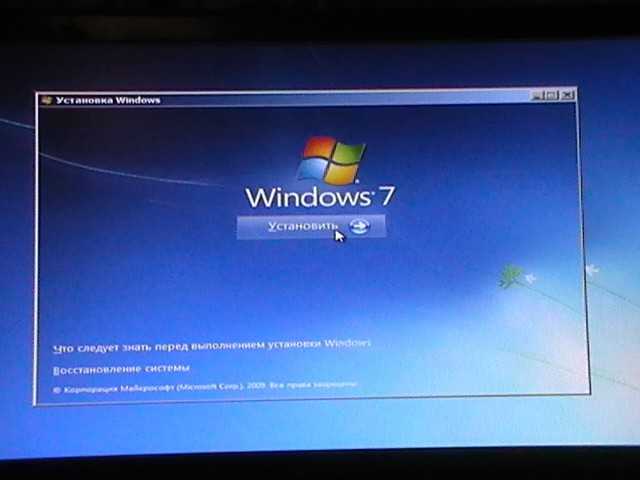
1. Place the disc in the drive and restart the computer. If you did everything correctly during preparation, then you should see a white inscription with dots. You need to quickly press any key. Next you should see this picture:


3. After this, we see this picture, on which we click “Install”


5. At the next stage, click “Full installation”

6. Now comes the fun part. If you already had an operating system, and your HDD is already broken, then we do this: We look in the list for the partition that we need (we need drive “C”), opposite it should be written “System”. The names may differ from what I have. For example, I have “Disk 0 Partition 6”, yours may be different. If you are sure of your choice, then click “Disk Settings” and “Format”, confirm, wait for completion, see that our disk is selected (Remains selected) and only after checking everything again, click “Next”. When formatting, all data from the partition you selected will be deleted!
If you have a new computer, then you will need to partition the disk. In your case, you will only have an unmarked area. I described in detail the process of partitioning a new hard drive in the article. Do this: Select it (the unmarked area), click “Disk Settings” and “Create” and enter the size of the first partition. The first partition that you will create will be a partition for the system (drive “C”), I advise you to allocate 50-100 GB for this partition. The remaining unmarked area needs to be divided, preferably twice. Let's create again and enter, for example, 200 GB, and with what remains we create another partition and you should get a picture similar to mine:


7. After clicking on the “Next” button in the previous paragraph, the process of copying files and installing Windows 7 will begin.


8. Now let's move on to the actual Windows setup 7. Enter your username and click “Next”

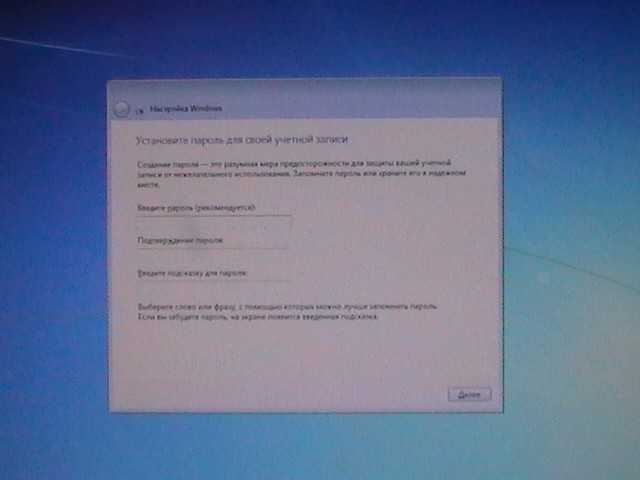
9. Enter the password, or not, as desired and click “Next”
10. If you have a key, then write it down, and if not, then uncheck the “Activate when connected to the Internet” and click “Next”


12. Last stage. Specify time zone, time and date. And of course, click “Next” :)

13. That's it, I congratulate you! Windows 7 installed, a couple more beautiful pictures and the desktop in front of you.


Updated: January 11, 2013 by: admin
How to reinstall Windows 7. Detailed description reinstalling Windows 7 from start to finish.
To reinstall Windows 7 for dummies we will need:
- Download Windows 7
- Burn Windows 7 to a disk or flash drive with Windows 7
- Set to bios First Boot Device - Cd-Rom or USB
- Install Windows 7
Step No. 1 Reinstalling Windows 7. Burning a Windows 7 disc
So, let's say you bought a laptop with Windows 7 or just want to try it out and then buy it. First, you need to download the Windows 7 image. Look carefully at which Windows 7 you need to download so that the key located on the laptop will fit. Usually the key is located either on the laptop or under it. For example, like this: Windows 7 basic OEM 32-bit(x86). Search the Internet for Windows 7 basic OEM 32-bit so that your key will fit! Because Windows distribution is illegal, we do not have the right to post original iso images from Windows 7 here. (Or - (Google search for MD5))
After downloading ISO image and Windows 7, it must be written to disk.
To do this, download the program for burning our image to disk Portable ImgBurn
After the ISO image of Windows 7 and our ImgBurn program successfully loaded:
- Take a blank DVD +-R | RW and insert into DVD rom
- ImgBurn -> click Browse-> choose our Windows ISO image, press Open
- We put minimum speed and start recording
- After the disc is burned, a window will pop up indicating that the disc was successfully burned, click OK. And your DVD rom will automatically open with Windows 7 written on it
Step No. 2 Reinstall Windows 7. Set First boot device CD-Rom in BIOS
So, after Step No. 1, we have a disk with Windows 7. On at this stage, our task is to get into the BIOS and set it to initially boot the disk with installed Windows 7. To do this: Reboot or turn on the computer and click delete key(there are other options, for example F1, F2, F8, Ins.)
The initial splash screen should usually show you which key to press to enter the BIOS
As a result, we must get to blue screen BIOS, in our case it looks like this
We set the first download from Disk, for this we go (with the usual arrows) to Advanced Bios Features -> First Boot Device select CD-Rom, press Enter, then Esc, go to Save&Exit Setup Press Enter, then Y and Enter again.
Note: if you have a different BIOS, the essence does not change. The main thing is to find First Boot Device and select CD-Rom
After step 2, the computer reboots itself and if you did everything correctly, then when you reboot, the message Boot from Cd/Dvd will appear on a black background:
And after a while Press any key to boot from Cd..
(press any key on the keyboard to boot from the disk), press the key. If a black screen appears with a Windows 7 installation bar, then at this stage you have done everything correctly
Step No. 3 Reinstall Windows 7. Formatting the partition. Installing Windows 7
After the window popped up. We wait 5-7 minutes until the language selection window appears. Select the language settings as you wish, then click Further
Click “Install”
We wait 5-7 minutes, after which a window will pop up, check the box with “License Terms”, click Further
Select “Full installation”
Select our disk, then click “Disk Setup”
Select an item "Format"
Attention! (warning about deleting data from drive C. Everything will remain on D):
This action will delete all your files from this partition, disk C:/
After "Copy" appears Windows files“We can safely go drink coffee, since no action will be required from us for 10-20 minutes
We wait until a window appears where we will be asked to enter a username. Then enter the name
Password (we don’t have to enter it, just click next)
Enter the product key (if you want to enter it later, you can click “Next”)
We choose one of three update points if desired! We recommend the first one!
All that remains is to select the time zone, which is what we do.
We wait 2 minutes, then a magic window with Windows 7 appears. Congratulations, Windows 7 has been successfully installed!
How to reinstall windows 7 for dummies. Additional articles
- Automatic driver installation
- Is it possible to put Windows 7 64bit Ultimate on a 2 GB flash drive?
- Which Windows to choose: 32-bit or 64-bit
- Where to download Windows 7 32 ⁄ 64-bit? Which version of Windows 7 should I install?
- How to install/reinstall Windows Xp from disk
- How to install/reinstall Windows Xp without a disk (from a flash drive)
- How to install/reinstall Windows 7 without a disk (from a flash drive) +UEFI
- How to install/reinstall Windows 8 from disk
- How to install/reinstall Windows 8 from a +UEFI flash drive
- How to install/reinstall Windows 10 from a +UEFI flash drive
- How to install/reinstall Windows 10 from disk
How about without a disk? This topic is relevant today. Moreover, it concerns the new OS developments that appeared not so long ago. And now in more detail! Windows 7, or simply "seven", is one of the latest operating systems from Microsoft, and at the same time the most successful of them. By at least, many experts think so.
What does installing from a boot drive mean?
7 without disk? Standard installation model any operating system happens with hard media. And in addition to a disk, a drive can be used as it. The installation option from a flash drive is quite reliable. As with a disk, the host system is installed at a lower level in the computer's software hierarchy. In other words, "from under the old system." In addition, this method of loading a new “OS” allows you to format the hard drive on which it was placed old system. This will protect the OS from old programs that may be malicious, as well as from “under-deleted” parts of files that are invisible at first glance, but remain in the system and interfere with its normal operation. Such “scraps” of unnecessary documents hinder the speed of the system. Malfunctions may occur. You should consider how to reinstall Windows 7 without a disk and without a flash drive.
If there is neither a flash drive nor a disk
The standard installation method is not always possible. For example, if there is no disk, but there is an OS file on the computer or laptop itself. What to do in such a situation? How to reinstall Windows 7 without a disk or flash drive on a computer? The system file can be presented in the form of an image, an archive, or simply an installer. To install the system from an image, you should run special program. It is necessary for reading/writing exactly this kind of formats. Eg, Daemon Tools. Having launched the image in the program and mounted it, you should select the installation file. If the OS is available as an archive, then there is no need to unpack it. How to reinstall Windows 7 without a disk or flash drive on a computer in such a situation? Click on the archive and select the installer file in It has “.exe” permission. This file is located mainly towards the end of the list of archive contents. There will be no difference in launching the installer even if the operating system is simply located in some folder.
What do you need to remember?

If installation working system is performed for the first time, some rules should be taken into account. You need to know them if you need to answer the question of how to reinstall Windows 7. Whether this will be done without a disk or with it does not play an important role.
Firstly, the installation of a new OS may occur due to the computer being infected with viruses. This is a useless process if it is not accompanied by formatting. The fact is that infected files with this type of installation working environment don't disappear anywhere. They are saved in the previous installed system. Subsequently, they will simply switch to a new shell.
Secondly, the best, and most importantly, the most in a safe way there will still be installations use of hard carrier. Reinstalling Windows 7 without a disk in such a situation is not difficult. Enough to have bootable USB flash drive. If it does not exist, then it is created using simple actions. There is a program specifically for this that writes images to media. For example, Ultra ISO. Accordingly, if the files are not in disk image format, you should create one. Usually the same Daemon Tools is used for this.
How to reinstall Windows 7 without a disk on a laptop or computer? It should be remembered that when installing a new system, you should always use only verified files. The fact is that with modern progress, handicraft assemblies are found everywhere. When downloading Windows 7 from the Internet, no one can say with confidence that it is not “hardwired” with malicious software. software.
First actions

How to reinstall Windows 7 without a disk on a laptop or computer? Let's look at how to do it the most in a simple way. Find the folder with the operating system and run installation file. After this, the installation window will open. It will display the ability to configure the following parameters:
- selecting the system language (this is the language of the displayed names of folders, files, disks, and so on);
- keyboard layout (input language);
- time format (country, time zone).
For our country, naturally, you should choose the Russian language option everywhere.
After clicking the "Next" button, a window with the "Install" button opens. By clicking on the installation, go to Accept it by checking the box next to the appropriate inscription.
The most popular types of systems
The installer may contain several system options. The most commonly used:
- home - for an inexperienced user;
- standard - for those who confidently work with a computer;
- professional - for an experienced person; it offers extensive capabilities, necessary modules and great access to files;
- maximum - provides full access to all the functionality of the operating system.
If you are wondering how to reinstall Windows 7 without a disk or flash drive on a laptop or computer, then you should understand that this is an incomplete list of possible systems.
Don't forget about the bit depth

All programs of this type differ in their bit depth, that is, 32-bit (X86) and 64-bit (X64). This parameter is indicated after the system name. For example, Windows 7 Ultimate X86.
The choice of the level of the system to be installed should be made based on the power of the computer's resources. If the laptop or PC is relatively weak, it is recommended to install X86 OS (32-bit version). It is best to install Windows 7 X64 if the size random access memory exceeds 4GB. The thing is that the 32-bit version is simply unable to “see” such a volume.
What to do when formatting is needed?
Let's get back to how to reinstall Windows 7 without a disk. The next OS installer window will offer the option to complete it on your computer and update. You must opt for a full installation. Otherwise, only an update to the pre-existing operating system will occur.
After selection preliminary parameters a window appears with the option hard choice disk. This method will not allow you to format it. This is due to the fact that the installer was launched from a running system. If it is necessary to format the disk, which is desirable when installing the OS, then this point can be bypassed. This happens as follows. Until the new “seven” is installed, take any other partition of the disk and clear it of files (move them if you need them, and just don’t touch them if you don’t need them). After that, format the partition. You should not change the drive letter in this situation. When answering the question of how to reinstall Windows 7 without a disk or flash drive on a laptop or computer, you should keep in mind that when you boot the new system, the drive letters will change automatically. The formatted partition should be selected for system installation.
If cleaning is not needed

If formatting is not necessary, you can simply select the drive to install the new system and continue. In such situation old system will remain in the folder " Windows old". It will be located on the “C” drive. You can also start and work from it. But this is not recommended, since two identical operating systems on the same disk may “conflict.” This, in turn, will lead to a failure in operation. The old OS can be removed or moved to another medium. Here is another very significant moment, which should be remembered when answering the question of how to reinstall Windows 7 without a disk on Asus laptop, Lenovo, HP, etc.
If the partition on which the new OS is installed does not have enough space for two operating systems, the installation process will not be able to start. This occurs due to the fact that the old shell is not removed and continues to occupy space. It is important to remember that frequent reinstallation of the operating system leads to disk destruction. This can be avoided by using various types defragmenters. For example, the Victoria program.
This problem is not so bad for computers. Nothing is easier than buying new hard disk and install it. This is easy to do yourself. However, if the hard drive breaks on a laptop, then, in addition to the cost of the disk itself, you will have to pay for repair services. You should know about this if you are interested in the question of how to reinstall Windows 7 without a disk from a flash drive.
What do you need to enter after installation?
Having selected the disk (partition) for installation, click “Next”, which will lead to unpacking and subsequent installation new Windows 7. This process is fully automated. It will last for 25-30 minutes, depending on the power of the computer (laptop). After completing the installation, you need to enter the following parameters:
- Username (your own name or a desired nickname).
- Computer name (any name in Latin or Russian letters).
If the input is incorrect, the system will tell you about it and ask you to correct the symbols, indicating the error.
Entering the password and key

During installation, you will be asked to assign a password and a hint in case you lose it. After this, a window appears in which you must enter the key to activate the operating system. If it is missing, simply click “Next” after unchecking the box next to “Activation while connected to the Internet.” Then it will be possible to activate the system by any in a convenient way. This is done as follows:
- You need to find the "My Computer" folder.
- You need to open it by clicking on right button mice.
- You need to click on the "Properties" tab.
- You should select the “Change product key” option.
You need to protect your computer from external threats
Let's return to the question of how to reinstall Windows 7 without a disk on a computer or laptop. The next step is the security settings. You can use the recommended service, or you can postpone the decision and configure it later. Computer protection is one of the most important moments in installing the operating system. The fact is that the security of the equipment will depend on how well you limit access parameters from other people’s devices. This menu- nothing more than offering a choice of a data protection set created by Microsoft specialists. It should be understood that they already provide and set the recommended parameters. By skipping this point, many people forget to perform the configuration manually in the future, putting their files at risk.
So, having decided on security, click “Next” and set up the time and date (time zone, etc.) in a new window.
Next, the installer displays the network parameters window. It can be either home or public. Due to this, the settings in the Internet properties are changed. Concerning common understanding, That home network looks more conservative regarding the configuration. Community Network, on the contrary, provides greater access to the resources of a laptop or computer.
What can be changed after installation?

It was last step, after which you will get an almost empty desktop of the newly installed operating system Windows systems 7. Basic settings (for example, adding the “My Computer” folder or user files to the desktop) can be made by left-clicking on the desktop space and selecting the “Personalization” tab.
You can put another one there too background picture, change the default theme (usually Windows 7 Aero), change the screen resolution and much more.
Standard licensed Windows 7 goes without additional programs. However, among the numerous assemblies you can find options that include many additional elements, software and so on.
Conclusion
This article described how to reinstall Windows 7 without a disk or flash drive. You will install it on the computer - it does not play a big role. The principle of the installation process for a new system is the same.
In the process you will format local disk, which contains the current version of Windows. Simply put, before installing there new system, you will have to erase all old data from it. The contents of the remaining disks should remain unchanged. But it’s better to play it safe and first copy to the cloud or to physical media absolutely all the data from your computer that you are afraid of losing.
If you have installed on your computer paid programs, do not forget to read in their documentation the rules for working with licenses when reinstalling Windows, otherwise you may lose them.
2. Create a boot disk or flash drive
If you want to install/reinstall a licensed version of Windows, make sure you have the appropriate activation key. Even if you are already using an activated system and just want to install the same version again, old key activation may come in handy again.
- If you already have a bootable USB flash drive or disk with the version of Windows that you are going to install, you can proceed to step 3. Otherwise, you need to download a Windows image from the Internet and burn it to any of the listed media according to the instructions below.
- Decide on the version of Windows you will be installing and check that your computer meets its system requirements. This information can be found on the official Microsoft website or on the disk with your purchased Windows. Don't forget to also check that your computer supports the bit depth new version: 32 or 64 bits. To be on the safe side, you can install a version with the same bit depth as your current version of Windows.
- To create a bootable USB flash drive with any Windows image found on the Internet, you can use the program (with UEFI support) and proceed to step 3.
And below I will tell you how to create boot disk or a flash drive with the official system image on Windows example 10.
3. Boot the system from a disk or flash drive
Now that you have physical media with in the right way Windows, you need to go into the special BIOS software environment and select a disk or flash drive here as the boot source.

Perhaps instead of the classic BIOS you will see a more modern one GUI. In addition, even in different older BIOS versions, the settings may differ. But in any case, the procedure will be approximately the same: go to the boot menu, select the desired media as the source and save the changes.
After this, the computer should boot from the selected disk or flash drive.
4. Run the installation wizard
 If you did everything correctly, the Windows Setup Wizard will appear on the screen. Further actions do not exceed the complexity of the installation of an ordinary one office program. All you have to do is follow the system prompts and wait for the files to be unpacked. Unless you have to select a local disk to install the operating system and format it.
 Also, be prepared to enter your activation key during the process. But if you reinstall an already activated one on your Windows computer 10, then the step with the key can be skipped.
Once the installation is complete, your computer should boot into normal operating mode.
5. Install drivers
Modern Windows versions download drivers themselves. But if, after reinstalling the system, you notice that the video card, speakers, or anything else is not working correctly, you can use the driver autoload utility. For example, the free Driver Booster is suitable.
Having completed all of the above, you can get to work. The computer must be ready.
When we talk about reinstalling Windows, we will briefly describe the main stages of installing Windows 7 and focus on the most difficult aspects. Although reinstalling a modern OS is no more difficult than installing a software package, certain points still require clarification.
Booting from external media
To begin, insert the installation disc into the drive and restart your computer. If it started booting from the installation disk, that's good; if not, then you need to change the BIOS settings so that the machine first tries to boot from the optical media.
At the moment when the machine starts to boot, press the Del or F2 button on your computer keyboard. It depends on the brand motherboard, computer configurations, BIOS version and other factors. But, as a rule, pressing one of these two buttons opens the screen BIOS settings.
Your BIOS settings screen will most likely differ from the one shown in the figure, as it depends on the hardware of your specific computer.
- Use the left and right arrow keys on your keyboard to select Boo t.
- Then use the up and down arrow keys to select Boot device priority and press the key Enter. The section will open Boot device priority.
- In it, select the item 1st boot device and press the key Enter.
- A window will open Options. In it, select the drive into which you inserted the OS installation disk and press the key Enter.
- To exit to the main settings menu BIOS press the key Esc.
- Select an item Exit and press the key Enter.
- In the window that appears Save configuration changes and exit now? confirm saving the settings by selecting Ok.
The computer will restart and boot from the installation disc. If this does not happen now, then something is wrong with your installation disk. It should be replaced.
Selecting a disk partition
After Windows Setup starts, you will be prompted to select your system language and familiarize yourself with license agreement. Then you need to select the installation type. Choose Full installation to be able to configure Extra options. One of the first steps is to select hard section disk on which the installation will be performed.


You can select the same partition on which the previous OS was installed. It is important to remember that for normal operation Windows 7 requires at least 20 GB free space, and for comfortable work It is advisable to have 40 GB. Windows 8 requires at least the same 20 GB disk space, but in reality, even 60 GB may not be enough for comfortable work. These facts should be kept in mind when choosing the partition on which you will install the OS.
Formatting a partition
In our case, the program does not allow you to install the OS on the same partition in which the current system is installed. And this is correct, because there is not enough free space here. Therefore, this section needs to be formatted. This will guarantee that there are no files left from the previous OS on system disk and it will not affect the newly installed system in any way.
- Before you format the highlighted partition, make sure you select the partition you want. Then click on the link Disk setup.
- will appear additional settings, among which there will be an item Format. Click on it.
- A window will appear warning you about the possible loss of important data stored on the partition being formatted. Confirm your actions by pressing the button OK.
- After formatting is complete, select the formatted partition as the drive on which the OS will be installed and click the button Further.
The installation process will begin, which will not require your intervention until a certain stage.
Selecting a username
After completing the OS file setup operations, you will be prompted to enter your username and computer name. This is generally a simple procedure, but you need to take one nuance into account. There are known cases where some applications did not work correctly with Cyrillic usernames. More precisely, not even with names, but with paths to folders, to which the system itself assigns a name identical to the user name. Therefore, to avoid problems in the future, enter the username and computer name here in Latin letters.

This is all the more important because now you are actually creating an administrator account, which will subsequently affect the work of all other accounts (of course, provided that you are not using the computer alone and create Accounts for other users).
Setting a strong password and other settings
In the next step, the installer will ask you to set a password for the user to log in to the system. If you are not the only computer user, be sure to indicate complex password, consisting not only of letters, but also of numbers and at least one special character. This will protect you from outside interference in the system.

For other users in the future, after installation is complete, create separate accounts with limited rights. This will allow you to properly restrict access to your computer and save you from the need to correct errors in the system that arose due to the fault of other users. Later in the installation process you will be required to select options automatic update. Select an item Use recommended settings. This will provide the most reliable protection for your computer. Then you should correctly specify your time zone and current date and time. Depends on correct work many programs, including antivirus.

Some time after the system produces necessary settings, you will see something already familiar and familiar to you Worker Windows table . This completes the reinstallation of Windows 7.