How to reflash Android at home. Flashing an LG Android device using the KDZ UPDATER program
Android OS has become popular for its stability. But even with her, unpleasant “surprises” happen, so to speak. Your device is at its best inopportune moment suddenly closed earlier running applications, it starts to slow down, some strange errors, glitches, etc. appear. In this case, you will need to reflash the phone. How to flash Android without a computer if you don’t have one at hand? There are two ways to flash the firmware, but before you start, decide which one is right for you.
Methods for flashing Android firmware without a PC
- Stock firmware
Released by the developers - this is an official rather optimized software and fits perfectly with most smartphones.
pros
- official firmware ensures stability and quality of system operation;
- guarantees protection against burglary;
- automatically updated in connection with the release of a new OS version;
- absence of serious problems, bugs, etc.;
- the opportunity to use repair service or exchange in a warranty case.
Minuses
- there are a lot of official firmwares unnecessary programs which cannot be deleted;
- limit in full access in device management; inability to install any additional programs.
- Custom firmware
- modernized official version of the OS created by user-programmers
- Availability open source on an Android device
- provides the opportunity to edit the operating system as it will be convenient for the user of the device
There are many custom ones, they all have their own advantages and disadvantages.
pros
- high performance;
- absence of unnecessary programs;
- availability of third-party software;
- bugs fixed;
- granting root rights.
Minuses
- many of them significantly slow down the system;
- no guarantee of data security on the smartphone;
- not suitable for all devices this firmware;
- By installing a custom one, the warranty on the phone expires in case of malfunctions on your Android service center will have the right to refuse repairs.
So, before flashing your smartphone, consider all the nuances and find the right solution.
Android firmware via recovery
Before installing stock or custom firmware, you must initially obtain root rights. After receiving, proceed to install one of the custom versions recovery menu. Better reliable version - TWRP and ClockworkMod recovery
ON A NOTE!
Note: Rooting will void your phone's warranty.
For installation TWRP menu:
- download the Goo Manager program from the Play Market
- For ClockworkMod installations download Rom Manager from Play Market
- After that, in the main menu, click “Setup recovery”
ON A NOTE!
During the flashing process, your Android device will be reset to factory settings, and in order to avoid losing all your contacts and data, we advise you to back up all data to an SD card at the beginning of the procedure
- First, download the firmware zip file to your SD card.
- But before that, you should make sure that this firmware is suitable for your device, or you risk losing it forever.
- After installing the menu and moving the firmware file to the SD card, boot the smartphone into recovery mode.
How to enter recovery to flash a smartphone?
To navigate to recovery, you can use the volume keys. So, with the device turned off, you need to hold down the “Home” and “Volume +” buttons, then, without releasing them, press the power key. The gadget will turn on in the required mode. If there is more than modern device without the Home button, repeat the process using the Volume + button and the Power button. If nothing works out for you, then you should expand the list of ways to enter recovery for different manufacturers.
Moving on to the process of the firmware itself, I will add that unofficial Android operating system files created by skilled users should be installed at your own peril and risk. If you decide to install a non-native version, you should make sure that the firmware is “written” directly for the phone that you are flashing.
If you chose stock, then don’t bother with installation CWM Recovery or TWRP. All actions that should be performed are limited to directly downloading the factory file and moving it to external card memory. After all this, the process itself will be similar to installing a custom recovery:
- you need to go to the stock menu “recovery” and select “Apply update from external storage”.
- next step - specify the firmware file and click “confirm”
- when the process comes to an end, you will need to perform an additional step to avoid glitches when turning on and operating the gadget
- After installing the firmware, you immediately need to select “Wipe data/factory reset” in the menu and then confirm
- this way you can clear information about the previous software and files that were previously available on the smartphone before the firmware was updated
- After completing these manipulations, you should select “Reboot system now”. This will reboot your smartphone and start the setup process from scratch.
- If the switching process takes a long time and the device logo “hangs”, then you should remember whether the “reset settings” item was performed after flashing.
IN Android firmware everything is very simple. But don’t try to flash it if you’re not sure you can do it yourself, otherwise you risk “killing” the device with no hope of restoring it. It's better to contact specialists.
The site administration and the author are not responsible for possible problems on your gadgets during installation.
Many smartphone holders and tablet computers At some point, they think about how to flash Android. The need to flash the device may arise due to problems with the operation of the gadget. It also makes sense to update Android in other cases, for example, to improve the functionality of the operating system and.
What to do before flashing your Android
An incorrect approach to the issue of flashing can lead to serious problems with the device, and therefore you need to prepare for this event. Before flashing Android, you must do the following:
- Before you start updating your operating system, make sure your device is fully charged. It is important to exclude the possibility of shutdown. You can connect the gadget to charger during the procedure. If your tablet or smartphone turns off during a firmware update, system and data loss will occur.
- Check the operating system version android systems, which is relevant for your device, and also find out what firmware is installed in currently. You can clarify this information in the device settings in the “About phone” section. Pay attention to the Android version, kernel version and build number.
- Now, based on this data, you need to find and download new firmware, which will fully match your smartphone or tablet computer model.
How to flash Android using a computer
It should be said that there are several ways to flash Android and in this article we will look at the most common ones. Let's start with flashing the gadget's firmware using a special program that is pre-installed on the computer. There are many applications that allow you to install on your device new version OS, however, we decided to go with the Fastboot program, since it is secure, convenient and reliable, and is also best suited for the model we will be flashing as an example. So, let's figure out how to reflash Android using Fastboot.
Note: the program for flashing Android should be selected based on the device from which manufacturer you are using. We recommend that you familiarize yourself with the following list of programs by manufacturer:
- Samsung - Odin
- Lenovo- Flash Tool
- HTC - Fastboot
- LG - KDZ Updater
- Sony - Flashboot
- Nexus - Fastboot.
First of all, you need to download this application. There will be no problems finding Fastboot, you just need to know how to use it search engines, and today everyone can do this. Download the program and unpack it to the root of drive C so that the path to the file looks like this: C:\Android.

The “Tools” folder contains the necessary utilities, and the “Driver” directory contains drivers. Now you need to connect the device that you plan to reflash to the computer and install the driver. As a rule, the device automatically finds necessary drivers, however sometimes this does not happen. In this case, you need to open the website of the manufacturer of your smartphone or tablet and download the software. Please ensure that the firmware you plan to download is suitable for your gadget model. The firmware must be downloaded in .zip format and placed in the Tools folder, which is located here: C:\Android.
Before flashing Android, you need to unlock the bootloader on your device. The bootloader unlocking process will differ depending on specific model gadget. Open the Start menu on your computer, search bar enter the value “cmd” and select the cmd.exe program.

In the window command line type cd C:\Android\Tools. Confirm the command by clicking on Enter key, after which you will find yourself in the “Tools” directory.

Now you need to enter the following command: fastboot devices.

If you were given a device code, then fastboot has identified your smartphone or tablet and you can start flashing the Android. If the message “waiting” appears in the window for device", you need to turn off the gadget and install the drivers. Now you need to enter the command for flashing: fastboot update firmware_file_name.zip After this, flashing will begin. Don't forget to restart your device after the operating system update is complete.
How to reflash Android via recovery
Another way to reflash Android is to use standard recovery or custom (TWRP\CWM). We will explain what custom recovery is in more detail below. In short, these are unofficial firmwares. So, find the firmware that suits you on the Internet, download it and save it to the root file system your device.
Reboot your device into recovery mode. The process for entering this mode may vary depending on the specific tablet or smartphone model. Most often this is done by using a combination of the power button and the volume down key. After entering recovery mode using the “up” and “down” keys, you need to open the firmware and patch installation section and specify the firmware file previously downloaded from the Internet. As a rule, this item has the following name: “apply update from externel storage”, in TWRP – Install ZIP, in CWM – “apply update from sdcard”.


Following the instructions above, you will start the flashing, after which you need to reboot the gadget and reset the factory settings. To return to factory settings, go to the settings of your device and go to the “Privacy” section, then click on “Reset settings”. After this, you can check the functionality of the newly installed firmware.
How to flash Android via ROM Manager
ROM Manager designed to perform various tasks, for example, using this application you can create backup copy systems. By the way, we strongly recommend performing this procedure before flashing the firmware in order to restore the data later. ROM Manager can also be used to flash Android.
ROM Manager will not work if you are not rooted. Similar rights can be obtained using special programs For example, the following applications are perfect: Kingo Android ROOT, Unlock Root, Framaroot or Vroot ( detailed instructions Here). In addition, custom recovery must be installed. By the way, essentially using ROM Manager you flash the device via recovery, but unlike the previous option, this one involves working with a much more convenient and clear interface.
So, find and download ROM program Manager. Now you need to download the appropriate firmware for your device. Open the ROM Manager utility and follow these steps:
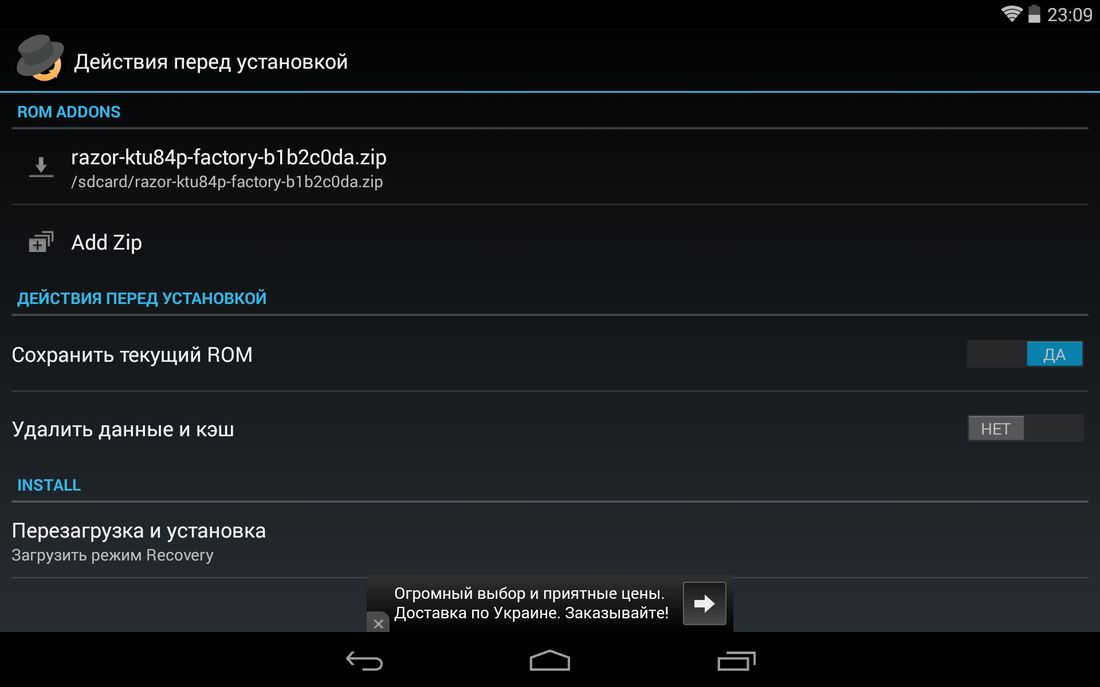
1. Place the .zip archive of the firmware in the memory of your Android gadget.
2. In the ROM Manager menu, open the “Install ROM from SD card” section.

3. Find the archive with the firmware and click on it.

4. Next, select “Reboot and Install”. In order to be able to restore in the future operating system If such a need arises, you need to check the box next to “Save current ROM”.

5. In the next window, click “OK”, after which the smartphone or tablet will go into Recovery mode and the device will begin flashing.

What is custom Android firmware?
Firmware of unofficial versions is called custom, that is, created from scratch, or modified. To install them, the receipt procedure is not always required. As you already understand, such firmware has nothing to do with the official developers, but is created by enthusiasts with the goal of improving the OS by adding additional features and removing errors. At first glance, it may seem that custom firmware offers continuous advantages and is superior in everything official versions. However, not all so simple.
The fact is that such firmware is often unstable and can lead to problems with the device. That is why, before flashing your Android using custom firmware, you need to study the reviews of those who have already done it. Only after detailed study you can download the firmware and start installing it. Regarding installation unofficial firmware, then the above options are quite suitable. In addition, detailed instructions for installing custom firmware are almost always available on the website where the firmware is located.
It should also be said that unofficial Android flashing involves some differences depending on the specific developer, therefore, the approach to flashing the firmware will be different. If you plan to use a special application for flashing the device, we recommend that you familiarize yourself with the following list of programs by manufacturer:
- Samsung - Odin
- Lenovo - Flash Tool
- HTC - Fastboot
- LG - KDZ Updater
- Sony - Flashboot
- Nexus - Fastboot.
This is where we will end this article. We hope you now know how to flash Android. If you still have questions, ask them in the comments or in the “ask a specialist” section.
Firmware is the basic software of a smartphone, which allows you to perform all the functions included in the device. Thanks to correct setting firmware can be achieved optimal performance devices: improve performance, increase time battery life or improve reception quality GPS signal and cellular communications.
How to reflash Android and what is required for this?
Taking into account the fact that currently the development of smartphones on Android is carried out by almost everyone who is not too lazy, the number of firmware options is growing, and accordingly, each device will require an individual approach, however, the main stages of firmware remain unchanged.
1. First of all: Before flashing the device to Android, you need to make sure that your the device is charged and will not sit down at the most inopportune moment.
2. Secondly: you need to look in the settings of the device itself the exact name of your device and firmware version, since the installation attempt incorrect firmware may damage your device.
3. Thirdly: you need to decide what firmware you need: official or “custom”.
Official firmware- This is the firmware that the device manufacturer develops itself, assuming that its settings are most suitable for the majority of users. As a rule, official firmware has stable work, but can be overloaded with unnecessary “garbage” consisting of pre-installed programs.
Custom firmware– firmware created from scratch, or a modification of the official firmware. Created by enthusiasts to speed up the operation of the device, add additional features and functions, as well as remove any errors found in official firmware. However, not all custom firmware may have good operating stability, so before installing them, you need to study the reviews of those who have already done it.
Once the firmware itself has been selected, you can begin the process of installing it on the device.
Let's look at some options with which you can flash Android devices.
The most common method is to flash the device's firmware using auto-update. It is suitable in cases where your device has outdated version software and there is an update for it. To check if there is an update for your device, you need to go to “settings” - “about phone” - “system update”.

If you want to install custom firmware or “roll back” to a more early versions yours, then you need to resort to using other flashing methods. U different developers smartphones different approaches For the firmware of the devices, and accordingly, different software will be required.
List of programs by manufacturer:
- Samsung - Odin
- Lenovo - Flash Tool
- HTC - Fastboot
- LG – KDZ Updater
- Sony - Flashboot
- Nexus - Fastboot.
These are not all smartphone manufacturers and, accordingly, applications for their firmware.
Video to help:
For each smartphone or tablet, there are both official and custom firmware. Their installation is carried out different ways: OTA updates arrive by air, firmware in ZIP archives are installed manually via CWM, TWRP Recovery or the ROM Manager application, using a computer, you can flash Android using the Fastboot and SP Flash Tool utilities.
After Android firmware, all data from internal memory will be erased, so to save contacts, settings and applications, first .
Android firmware via Recovery
Unofficial firmware in ZIP format, such as CyanogenMod, can be installed through custom Recovery: CWM or TWRP, as well as applications that use Recovery, for example, ROM Manager. Cores and patches are sewn in the same way. To download the official “Update.zip”, the capabilities of the standard recovery mode are enough, for more details, see the article at the link above.
Install the ZIP file in CWM
On all devices out of the box it is Stock Recovery from the manufacturer, you need to install CWM by . Then find and download the ZIP archive with the firmware. Please note that firmware of other formats cannot be installed via CWM.
1. Now go to Recovery. To do this, turn off the device and press a certain combination of buttons. Depending on the manufacturer, the key combination differs, all are presented below possible options(the new one says how to enter Recovery on specific models):
- Volume up + power button
- Volume down + power button
- Volume up/down + power button + “Home”
- Volume up + volume down + power button
Great, you are in Recovery. Movement is carried out using the volume buttons, and confirmation of the choice is done with the power button.
2. Before installing the firmware, you must first reset the settings: select “wipe data/factory reset”.


4. Great! Return to the main menu and select "install zip".

5. After that “Choose zip from /sdcard”.

6. Navigate to the folder where you saved the firmware and select it.

7. A confirmation message will appear. Click “Yes – Install...”.

8. The firmware installation process will go through and at the end the message “Install from sdcard complete” will appear at the bottom of the screen.
Great, Android is flashed. Back to the main thing CWM menu Recovery and reboot the system. To do this, select “reboot system now”.

How to install firmware via TWRP Recovery
If you prefer TWRP Recovery rather than CWM, flash it using . You can also install firmware from a ZIP archive through it:
1. Download the firmware and place it in any convenient location in your smartphone’s memory.
2. Go to TWRP. This is done in the same way as CWM.
3. Now you need to reset the system. To do this, select "Wipe" from the main menu.

4. To initiate a factory reset, drag the slider to the right.

5. When you finish cleaning your smartphone or tablet, press the “Back” button.

6. You will be returned to the main menu of TWRP Recovery. Now let's move directly to the firmware itself. To do this, select “Install”.

7. Navigate to the location in memory where the firmware is saved. Click on it.

8. Drag the slider to the right to begin installing the firmware.

9. The process will begin. It usually lasts 2-3 minutes.

10. At the end, a message indicating the successful completion of the firmware will appear. Click on "Reboot System" to boot into Android.

Considered another way to flash Android using ZIP updates. You can also use special application. More on this below.
Using ROM Manager
The ROM Manager application allows . By the way, I advise you to make a backup of the internal memory before flashing the firmware in order to restore the data later. Now we will use another function of the program: flashing the phone using ROM Manager.
Utilities are needed to work root rights– they are obtained using exploits: , or .
Must be installed custom Recovery(essentially, using ROM Manager, you flash the device through it, but at the same time you work with a simple and clear application interface, and not Recovery). Links to instructions are in the previous paragraphs.
So, install ROM Manager, find and download the required firmware for your device. Open the application and follow the instructions:
1. Place the .zip archive of the firmware in the memory of your Android phone or tablet.
2. In the ROM Manager menu, open the “Install ROM from SD card” item.

3. Find the archive and click on it.

4. In the menu that opens, select “Reboot and Install”. I advise you to check the box next to “Save current ROM” so that you can restore the system if necessary.
5. In the next window, click “OK”, after which the device will boot into Recovery mode and the firmware process will begin.

ROM Manager also has a function to search for ROMs for a device. In the main menu of the program, select “Download firmware”. Some of them are only available in the premium version of the program.

Above I talked about three ways to install firmware from ZIP archives on the device itself. Next will be information about updating Android firmware using a PC.
How to flash Android via computer
Many mobile devices are flashed using special utilities for PC: below are instructions for working with Fastboot and SP Flash Tool. Through the second program various manipulations are carried out with Chinese phones based on Mediatek processors.
Fastboot: instructions for flashing phone firmware
Many firmware must be installed from a computer using the Fastboot utility, rebooting mobile device into the same mode. The program is included in Android SDK Platform Tools, the installation of which is described in . In addition, you will need drivers (all information is available at the link).
Also, on devices from some manufacturers, you must first unlock the Bootloader:
- How to do it on HTC:
Next, download the archive from the required firmware and unzip it in the “platform-tools” folder, which contains “ADB” and “fastboot”. It should look something like this (I have the necessary components in separate folder"adb")

Then we connect Android to the computer via USB and transfer the smartphone or tablet to fastboot mode. The easiest way to do this is as follows:
- Turn on
- On the computer go to the command line
- We enter the commands sequentially and after each press “Enter”:
CD path to the "adb" file
For example, it is located in "C:\Program Files (x86)\Android\android-sdk\platform-tools". Then the path will look like this:
cd Program Files (x86)\Android\android-sdk\platform-tools
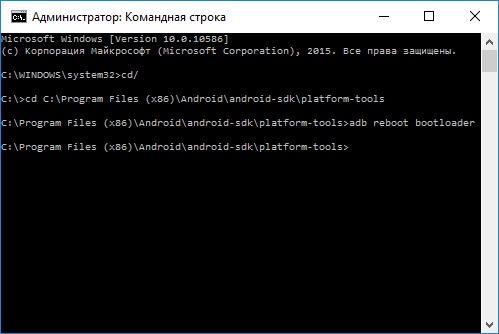
Then Android gadget will reboot into fastboot mode.
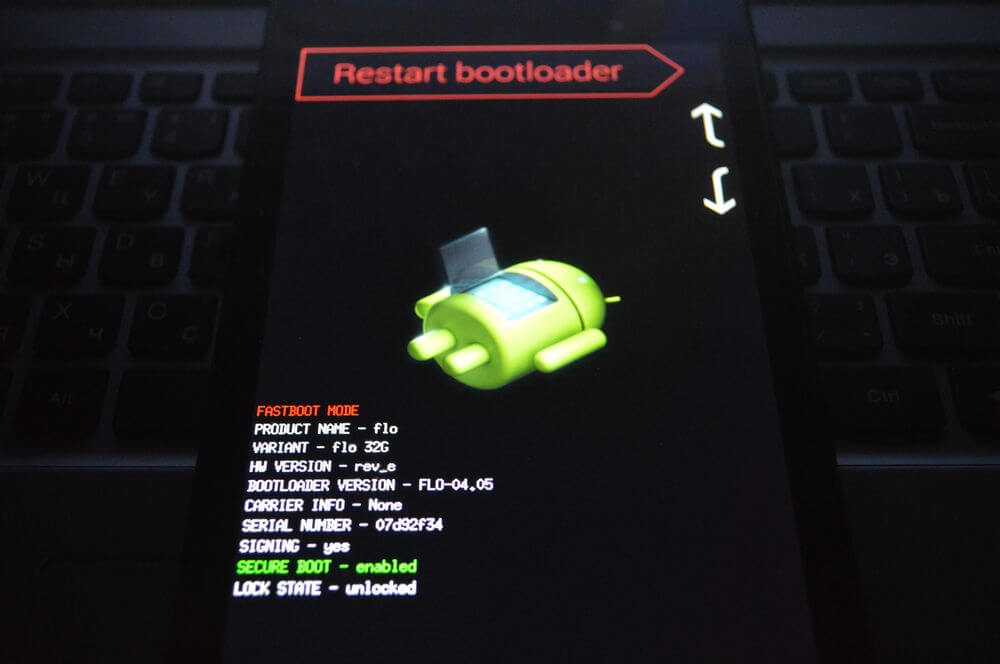
Before flashing any partition of the system, you first need to format it so that there are no problems with operation. To do this, use the commands (after entering each one, press “Enter”):
fastboot erase boot
fastboot erase userdata
fastboot erase system
fastboot erase recovery
fastboot erase cache
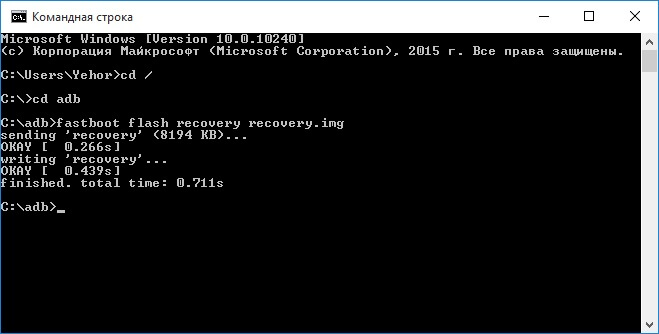
After cleaning the partitions, you can flash them. Enter commands (their number may be more - it all depends on availability certain files in one firmware or another, below is a set of basic ones):
fastboot flash boot imya-fayla.img
fastboot flash userdata imya-fayla.img
fastboot flash system imya-fayla.img
fastboot flash recovery imya-fayla.img
fastboot flash cache imya-fayla.img
“Imya-fayla.img” is the name of the corresponding firmware file. For example, since in my case Recovery is being created and its image is called “recovery.img”, I enter:
fastboot flash recovery recovery.img
Usually the firmware can be installed in its entirety, that is, flashing all the files at once. To do this, “flash-all.bat” must be located in the folder with the firmware files. If it is, then simply enter this command and the firmware installation process will begin:

As a result, at the end a message indicating the successful completion of the firmware will appear.

You can boot the system. To do this, you need to exit fastboot mode on the device itself or using a computer. In the second case, you need to enter another command:
Installing ZIP updates in Fastboot
Using Fastboot you can install ZIP firmware. To do this, download and place the firmware in the folder where “ADB” is located. Put your smartphone or tablet into fastboot mode and enter the command:
fastboot flash zip imya-fayla.zip
“Imya-fayla.zip” is the name of your firmware, replace it with your own.

Wait for it to finish Android installations and reboot your device.
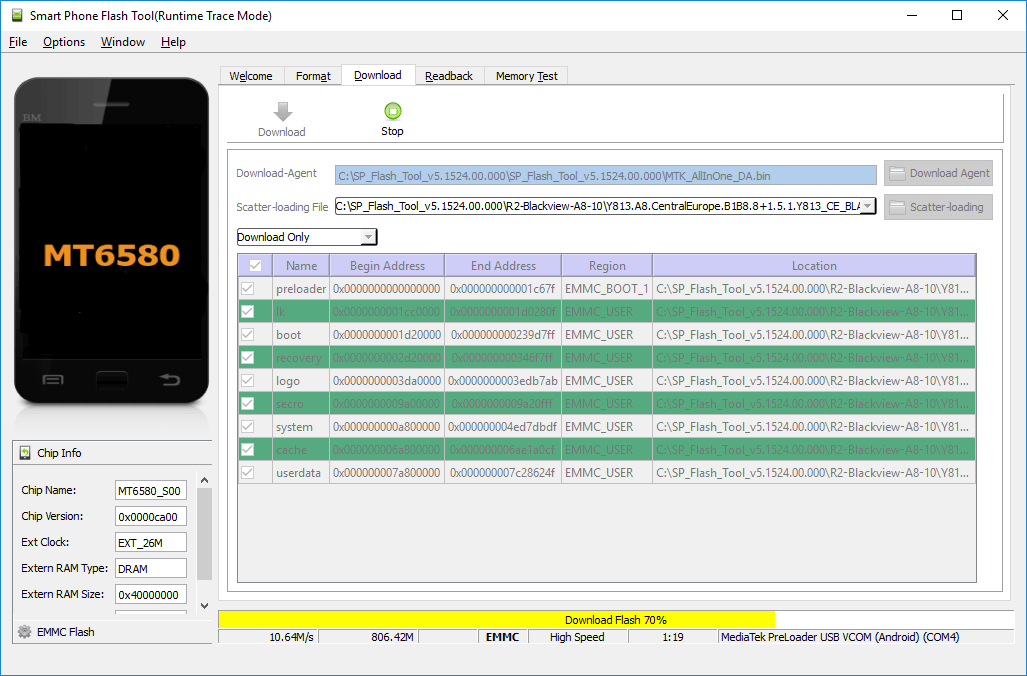
SP Flash Tool: flashing Chinese Android smartphones on MTK
Chinese Fly smartphones, Lenovo, Xiaomi, Meizu, ZTE, Doogee, Bluboo, UMI, Elephone, Oukitel, Blackview and others running on MTK processors are flashed special utility SP Flash Tool. She can sew separate sections, format the system and create backups. Models based on MT6572, MT6577, MT6580, MT6582, MT6589, MT6592, MT6750, MT6737, Helio P10, Helio P20, Helio X10, Helio X20 and other less popular chips are supported.
The current version of the program is available on the website: http://spflashtool.com/. Before starting the process, install USB drivers under processor MTK(the link to the FAQ is in the “Fastboot” section of this manual).
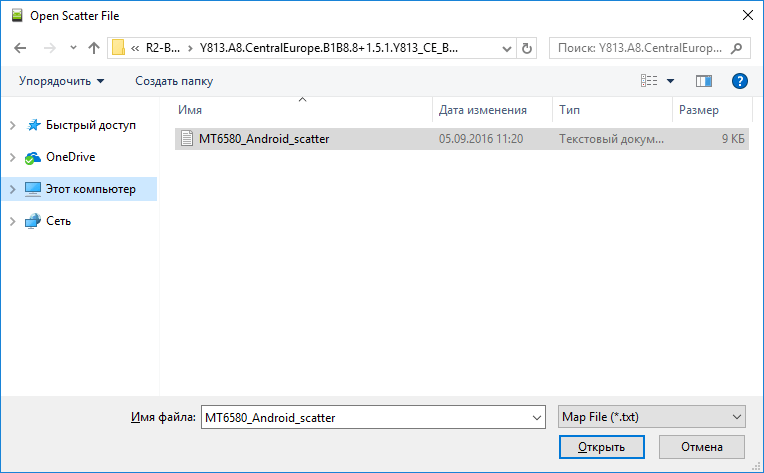
1. Unzip the SP Flash Tool folder on the “C:\” drive and place the firmware next to it. The path to the files must not contain Cyrillic characters.
2. The folder contains the file “flash_tool”. Launch it.

3. In the “Download-agent” field the path to “MTK_AllInOne_DA.bin” will already be indicated. Next, you need to click “Scatter-loading” and select the scatter file in the folder with the firmware.

4. Leave the switch on “Download Only” and mark which partitions need to be flashed (by default, all are selected).

5. Click “Download”. Then turn off the phone, remove the battery for a few seconds, insert it back and connect the switched off Android smartphone to a computer via USB.

6. First the red bar “Download DA 100%” will appear.

7. Then yellow with the firmware process. The percentages indicate how close the installation is to completion.
Provides active customer support, releasing updates and upgrades for its gadgets with varying degrees of success. In practice, the developer delivers official firmware mainly “over the air” (via OTA updates), as well as by posting special file firmware image on your website or portal.
You can flash the image using a set of special software:
- CWM Recovery.
- TWRP Recovery.
- Using a computer and a special set of programs (Fastboot, KDZ Update, Odin and other utilities).
As a rule, firmware images before updating are packaged in special archives with the extension ZIP, ISO and others.
In addition to official firmware, very often users and the gadget community form support for devices by releasing custom firmware versions and posting them on amateur forums and portals. Such updates can provide expanded or reduced functionality of official images, adding or removing unnecessary moments of them.
To begin with, before the flashing process, be sure to take care of your data on the internal memory of the device. When updating, all files are erased, which means you need to make a backup in advance and save important files on external media.
On question how to flash android We won’t stop at OTA updates “over the air”, but rather, let’s concentrate all our attention on other update methods.
Flashing your phone using CWM Recovery
The rich functionality of CWM Recovery allows you to perform many manipulations with the device, including updating the firmware. By default, devices have stock Recovery installed, which means that first you need to install the ClockWorkMod Recovery utility itself.
The general flashing process described below concerns ZIP files. Instructions:
- Go to Recovery. To do this, you need to completely turn off the device, and then press a certain sequence of buttons on the body of the device. The set of keys may vary depending on the device manufacturer. Each combination may be different. Additional information You can find out thanks to search engines by asking the appropriate question. A universal option is a set of the following clicks:
- Volume up button + power key
- Volume down button + power key
- Volume up/down buttons + Power key + Home key.
- Simultaneously hold down the volume up+down keys and the power key.
Once in recovery, you will see a central menu, which you can navigate using the volume up and down buttons, and the power key will function as an action selection.
- Before starting the device, you must complete full reset gadget to factory settings. To do this, go to the “wipe data/factory reset” item and confirm the action by clicking on the line that says “Yes – Wipe all user data".
- Returning to the main lobby, select “Install zip”.
- Next, click on the “Choose zip from /sdcard” item and in the Explorer tree, select the file with the previously saved firmware.
- Confirm your choice by clicking on “Yes – Install...”.
- The process of flashing the device will begin. At the end of the process, the user will see the message “Install from sdcard complete” on the screen.
- All that remains for the user to do is return to the main CWM Recovery lobby and complete the process of rebooting the gadget by clicking the “reboot system now” line.
After these steps, the firmware installation will begin. Don't panic, because the installation algorithm can take up to 10 minutes.

How to flash an Android phone using TWRP Recovery
For those who prefer working with a utility in the form of TWRP Recovery, we offer next instruction step-by-step installation updates in the form of a ZIP archive:
- Upload the file with the firmware image to the device memory.
- Go to recovery TWRP. This is done by analogy with CWM.
- Perform a factory reset by clicking on the “Wipe” option in the main menu. Drag the lever to the right. When you finish cleaning the gadget, return to the original lobby by pressing the “Back” button.
- In the main lobby, select “Install” and find the previously downloaded image in the file system tree. Click on it by dragging the slider to the side.
- After this, the firmware process will start. According to the standard, it does not exceed 2-3 minutes.
- Upon completion, the utility will automatically display a message indicating successful flashing. By clicking on the “Reboot System” item, reboot the device.

Installing updates using ROM Manager
With help this application, you can not only flash the firmware, but also create a backup copy of the system. Use this option so as not to lose important data and quickly restore all the functionality of your smartphone.
To get started, you will need special devices on your device that allow you to system level access internal files your device. To do this, you can use any of the presented programs.
The second important aspect when working with ROM Manager is custom recovery. All firmware actions take place directly in the Android launcher, and ROM Manager serves as a visual add-on to Recovery.
To get started, download the firmware file for your gadget and follow the instructions below:
- Transfer the firmware archive to ZIP extension to your device's memory.
- In the utility menu, go to “Install ROM from SD card.”
- Among the folders and files, select your image and click on it.
- In the new lobby, select “Reboot and Install”. Don't forget to check the "Save current ROM" checkbox. In this case, you will have the opportunity to restore the system at any time.
- By clicking “OK” your gadget will go into Recovery mode and the firmware update process will begin.
Thanks to advanced functionality ROM applications Manager users They can directly download images for their device there. You can do this by clicking on the “Download firmware” item. Access to some ROMs is only available in paid version programs.