How to open a local network in Windows 7. Configuring a local network
If you are faced with the need creating a home local network or small office networks, but do not have sufficient skills and knowledge for this, then this material is for you. You will need to complete only 5 steps, after which you will learn how to set up a local network for your home and small office.
This material is compiled in the form step by step instructions with illustrations. All you need to do is follow these instructions.
We will look at 5 steps to build a local network in the office or at home.
Step 1. Network equipment necessary to build a local network.
To build a local network between computers we need to have:
- Switch(switch) or router(router);
- Cable twisted pair (patch cord);
- Availability of a network card on each computer(nowadays every computer is equipped with a built-in network card);
Switch D-Link DES-1008A
 |  |
| Front view | Back view |
Twisted pair cable

Network card(on the right in the figure the built-in network card is shown)
 |  |
Now all that remains is to connect all the computers to the switch or router using a twisted pair cable.
We connect one end of the cable (twisted pair) to network card computer, and the other into a switch or router.
And so with all computers that will be connected to the local network.

Connection diagram for computers on a local network

Step 2. Configure IP Address, Computer Name and Workgroup
Go to the menu Start > Control Panel > Network connections , click right click mouse by icon LAN connection, then press Properties. In the list of components, select Internet Protocol (TCP/IP) and click on the button below Properties.
 |  |
In the window Properties: Internet Protocol (TCP/IP) put a tick Use the following IP address and enter the following data:
IP address: 192.168.1.2
Subnet mask: 255.255.255.0
It is advisable not to use IP addresses 192.168.1.1 and 192.168.0.1, as they are used by network devices
For those who use a router (router) to connect to the Internet in building a local network, you need to specify "Main gate" And "DNS server addresses"(usually this is the IP address of the router itself). To ensure the Internet works.
Those who use a router (router) with a DHCP server enabled may not register IP addresses, you need to check the box "Obtain an IP address automatically". IP addresses will be assigned by the DHCP server.
After you have entered the “IP address” and “Subnet mask”, click on the button OK, then Close.
NOTE: The IP address of each computer must be different from the other computer! If the first computer has an IP address 192.168.1.2 , then the second one should have 192.168.1.3 etc., but no more 254 .
Computer name and workgroup
Now we need to specify Computer name And Working group. To do this, in the Control Panel, double-click on the icon System, go to the tab Computer name and press the button Change.
In line Computer name change the computer name if necessary. Each computer on the local network must have a unique name, i.e. should not be repeated. In my case, the name of the first computer comp-1, next computer will comp-2, comp-3, comp-4 etc. You also need to indicate the Working Group, in my case HOME.
All computers on your local network must have the same Workgroup!

After you have specified the computer name and workgroup, click OK. You will be prompted to restart your computer for the changes to take effect. We agree and reboot the computer. This procedure must be done with all computers on the local network.
The parameters of the local computer network should look like this:
| First computer | Second computer | Third computer |
| IP address: 192.168.1.2
Subnet mask: 255.255.255.0 Computer name: comp-1 Working group: HOME | IP address: 192.168.1.3
Subnet mask: 255.255.255.0 Computer name: comp-2 Working group: HOME | IP address: 192.168.1.4
Subnet mask: 255.255.255.0 Computer name: comp-3 Working group: HOME |
Now you can view the computers on your local network. To do this, double-click on the icon network on the Desktop, then on the left in the navigation panel click Show workgroup computers. On the right, the local network computers that are part of your workgroup will be displayed.

Step 3. Setting up access rights and security
Computers on the local network are visible, but there is no access to them yet. If you double-click on any of the computers on the local network, a window will open Connection to comp-n (n- computer number) with a prompt to enter Username And password.

This is due to the fact that the account is disabled on the computers Guest and access rights are not configured. All that remains is to configure access rights and enable guest account.
To enable a guest account, go to Start - Control Panel - User Accounts. Click on account below Guest, then press Enable Guest account.


All that remains is to configure access rights to the computer from the local network.
Let's go Start > Control Panel > Administrative Tools > Local Security Policy. Open in the left menu Local policies> Assigning user rights

Then in the right window, double-click on policy Denial of access to a computer from the network and delete the account Guest. That's all. If you now open network and double click on any computer, you can view the shared resources of that computer.
Step 4. Set up sharing of folders and files
Our local network is working, all that remains is to open public access to the necessary files and folders for common use from the local network.
To do this, right-click on the desired folder(in my case, the Agreement folder) and select Sharing and Security


After this, the current folder and its contents will become available to everyone on the local network. In the picture below you can see that the folder "Treaty" on the computer comp-1 became available.

This way you can share folders on any computer.
Step 5: Share a local printer
We've come to last step. All that remains is to provide Printer sharing connected to one of the computers (in my case comp-1).
Printer sharing will give you the opportunity to print from all computers on the local network to one printer.
To share access to local printer, go to the menu Start - Control Panel - Printers and Faxes, right-click on our printer, from context menu choose General access.

In the window that opens, put a tick Sharing this printer and press OK. You can also enter network name printer, or leave it as default.

Now this printer can be connected to any computer on the local network. That's what we'll do.
Let's go to network, double-click on the computer to which the printer is connected (in my case comp-1), then right-click on the printer and select To plug.

In the next window, where we are warned that drivers will be automatically installed on our computer, click Yes.
The same must be done with all computers on the local network to which you need to connect the printer.
Our printer is ready for use and you can print from your local network.
On this basic setup local network finished. Now you can exchange files on a local network and use one shared printer.
Creating a local network at home is not a whim, but a necessity if you use two or more computers. the main task such a network is to connect PCs and create the opportunity for the user to conveniently use the resources of each of them, rather than switch between computers. In this article we will look at how to set up a local network connection between computers.
For example, two devices will be used: a desktop computer on Windows based 7 and a laptop based on Windows 10. The list of instructions that will be in the article can also be used on other Windows operating systems (8, 8.1).
Methods for connecting computers over a local network
Today, you can connect via a local network through a router or directly. The first method is gaining popularity, and the second is already a relic of the past, although the time period has not passed that long. Let's look schematically at how the connection occurs.
First, let's look at the first scheme “directly”. It only works when the computers are connected to each other. Data transfer occurs only in one direction, i.e. either from the first PC to the second, or vice versa. At the same time, if one computer is connected to the Internet, then the second one can be configured to provide it, but this is already inconvenient, because routers appeared.
Desktop computers are connected to the router, and mobile devices can receive data from the router or transmit it to it using wireless wired network. Thus, you can use a router (usually they are immediately connected to Wi-Fi hotspot access), connect all devices in the house into one network and use the Internet from one access point, without interfering with each other at all.
We will now configure the local network according to the “via router” principle, because it is more convenient, practical and modern, and also not very difficult even for a novice user. How to configure your router? Use the instructions from the manufacturer’s website; now they are written very clearly and accessible. Once you have configured the router, proceed to setting up the local network.
Please note that if you have been using the Internet via a modem for a long time, your desktop computer is connected to it, and the router is connected to the modem, additional settings no need to carry out. It is only important that a laptop or other PC is connected to the router using wireless Wi-Fi networks. Let's start setting up the network.
Setting up a local network on a desktop computer (No. 1)
To start using the local network, you must follow the following instructions:
- Let's go "Start" - Control Panel - Network and Sharing Center shared access»;
- Next, on the left side of the screen select “Change advanced settings...”;

- In this window you need to check the boxes next to the following:
"Enable network discovery"
"Enable file and printer sharing"
"Enable sharing to network users could..."
"Use 128-bit encryption..."
"Enable password protected sharing"
"Allow Windows to manage homegroup connections"

- Click "Save changes"(it is important that you are logged in with “Administrator” rights);
- At this step, you need to join a home group, but we will create it on a laptop, so scroll through the article to the point, and then return here;
- When the password is received, you need to enter it into the desired window. To do this, go to "Conductor", and then "Home Group";
- Click "Join", check the boxes next to all components for which shared access is provided and enter the password that was generated earlier (you should have written it down on a piece of paper);

- The password will be checked and the connection will begin. Here you need to wait until everything is configured as needed;

- When the joining is completed, you will receive a message as in the window below, and also, if you repeat step 6, you will see the message “This computer has joined a homegroup.”


Setting up a local network on a laptop (No. 2)
First of all, you need to do the same steps as on computer No. 1, namely steps 1-4. Since we have Windows 10, to enter the “Control Panel”, you need to enter “Search” and enter this query. After this, everything is done in the same way as with the first PC.
Now let's move on to creating " Home group"and further network setup:
Now, to make sure that everything works as it should, we need to check the functionality of the local network we created, which we will now do in the next part of the article.
Network health check
The main task of a local network, as we have already said, is sharing resources. Most often, such resources are faxes, scanners, printers, etc., as well as the files themselves on different PCs. We will not check the operation of the printer from different PCs, but this function should definitely become available after the above conditions are met.
Let's check the health of the network using file transfer. To do this, let's create a shared folder on the laptop. Let's go to "Conductor", and then in "Net":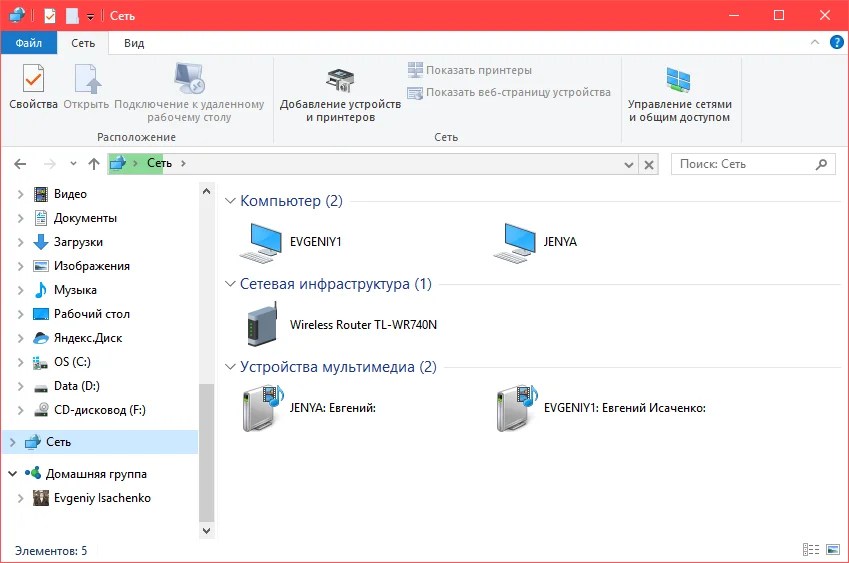
The computer named “Jenya” is our laptop, and the second computer “Evgeniy1” is a desktop computer. This verified that the computers are indeed on the same network. Now let's go to Local disk D and select a folder for sharing, let it be, for example, “Notes”. Select it, press RMB, and then "Properties":
Therefore, you need to click "Access", and then "General access". In the list of users, select the one who logs into the system on computer No. 1 using such and such a login. After this, you will receive a message that the folder is open for public access: 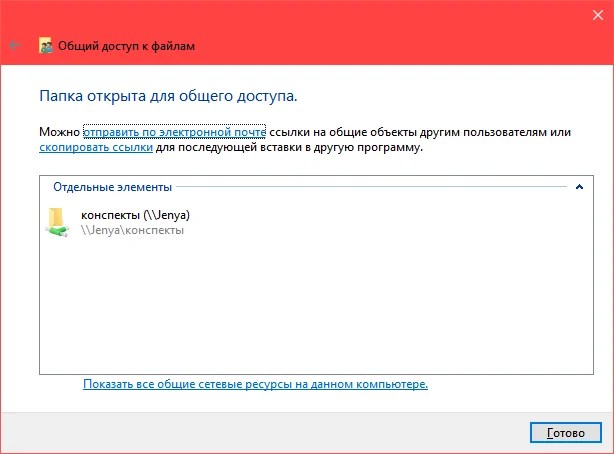
Now press again "Ready". On computer No. 1 we enter “My Computer” - “Network”, and then select our computer “Jenya”. Now our folder “Notes” has become available in the list of folders. It is important not to immediately go into this folder and check whether everything has been transferred - you need to wait about a minute after you close the “Properties” window for the changes to take effect.
U Windows users 10, at the time of connection, sometimes error 651 and similar errors occur. These are called "Internet connection errors". This occurs due to a software or hardware network failure...
The problem often arises, how to transfer files from one computer to another? You can use various flash drives, disks, etc., but the most convenient and in a fast way is the creation of a network. Let's look at how to quickly create a network between two computers. Windows example XP and Windows Vista/7. There is no difference in setup between a computer and a laptop.
To organize file sharing, you must first create a network between devices, and then set up sharing. Let's begin...

To transfer files, the most convenient and fastest way is to connect using a network cable. RJ45 network cables for creating a network are either straight or Crossover. We need a crossover cable. You can buy it in a store or make it yourself. Distinguish required cable easy, if you put the ends of one cable together, then color coding inside the connector crossover cable should not match.

It is worth noting that modern network cards are able to automatically detect the type of cable and adapt to it. In other words, if you don't have a crossover cable, you can use a straight cable. With a high degree of probability the network will work.
If for some reason using a wired network is impossible, you can create wireless Wi-Fi. The procedure for setting up access is similar.
When we have taken out the RJ45 cable, connect it to the network connectors. If everything is in order, the green lights near the connector should light up.

If your lights do not light up, then proceed as follows:
- We check whether there are any lights at all and whether the devices are turned on
- Checking whether the interfaces are enabled in Network Connections
Checking the cable. We pay attention to the order in which the wiring in the connector goes and whether the RJ45 cable itself is damaged.
Setting up a network between two computers.
Setting up a network in Windows XP
Go to Control Panel -> Network Connections

Click on Connect to local network. Notice that the connection says Connected. Right-click and click on Properties

Select Internet Protocol (TCP/IP) and click on Properties

Click OK. Network setup on one device (PC or laptop) is complete.
Let's look at how the network will be configured in Windows Vista/7.
Network setup in Windows Vista/7
Go to Control Panel -> Network and Sharing Center -> Manage network connections

Right-click on the local network connection and go to Properties:


We indicate the IP address. You can specify any of the range 192.168.xxx.xxx. The main thing is that they do not repeat on two computers. That is, if on one it is 192.168.1.1, then on the other it is 192.168.1.2. If on one it is 192.168.100.10, then on the second it is 192.168.100.20.
It should look something like this:

Now let's go to the Network and Sharing Center and look at our network. It must be private. If it is not, then click on Settings


Click Close:


That's all. We are done with setting up the network on Vista/7. Now let's move on to setting up Sharing.
Setting up sharing in Windows XP
First, go to Tools -> Folder Options:

On the View tab, enable simple file sharing:


Click the Change button on the Computer name tab and enter the name of the workgroup.
Two computers on the network must have the same Workgroup name.
On the same tab you can specify the name of the computer on the network.

Now go to My Computer and click on the folder that you want to provide access to from the network, and select Sharing and Security from the menu.... In my example, I open general access to the entire D:\ partition, that is, on another computer there will be display the entire D:\ partition of the first one (on which access was opened)

Click on the warning:

We indicate the name of the shared resource and allow (or not allow) modification of files over the network:

That's all...
Setting up sharing in Windows 7
First of all, go to Control Panel -> Folder Options and check the box:


Click on Change:

Enter the name of the computer and workgroup. Name Working Group must be the same on all computers on the network:

Now go to Computer and click on the folder that you want to provide access to from the network, and select Sharing from the menu.... In my example, I share the entire D:\ partition, that is, the entire partition will be displayed on another computer D:\ first (where access was opened)

Click on Advanced access settings:

Specify the name of the share and click on Permissions

On this tab we can specify which users will be able to open and change files on this computer from the network:

This is what it should look like:

We are done with sharing on Windows Vista/7.
How to access shared resources on another computer
Once you have set up the network and file sharing, you can already transfer files from one computer to another.
To do this, open Computer and enter \\computer_name\ in the address bar. For example: \\ASPIRE\ or \\Athlon\. You can also use Network Neighborhood or Network. If this does not work, then you can enter the IP address of another computer on the network:


If you need to constantly work with shared files, which are located on another computer, then click on shared folder right click and select Connect network drive. In this case, the folder with files on another computer will appear as a partition (disk)
Connection via router
We organized the simplest network between two computers. If you need to connect more than two PCs to the network, you should buy a router from the store. A router connects several PCs to a network and allows you to use one Internet connection for all computers.
To connect the router we use a straight RJ45 cable, not a cross cable.

The router connects to the Internet via a WAN connector. The remaining connectors on the rear wall are LAN, we connect each PC1-2-3-PC4 to them separately with a straight RJ45 cable:

Setting up routers is described in detail in the model manufacturer's manual.
The general steps are as follows:
1. In the WAN parameters we indicate the data from the InterZet provider agreement - static IP type.
2. In the LAN parameters, select the dynamic IP type, that is, each connected PC will automatically be assigned an address.

3. Set up Windows XP/Vista/7, as already described above.
Select Internet Protocol version 4 (TCP/IP) and click on Properties:


select Obtain an IP address automatically and click OK.
We repeat the remaining sharing settings for the selected Windows.
Solving possible problems
If you are unable to access files on another computer, then you need to do the following:
1) See if the network connection is working, if the lights are on
2) Launch Command Prompt and enter ping command IP address of another computer on the network. For example, ping 192.168.1.1:

If you have pings (0% loss), then you need to check the sharing settings, otherwise check the network connection and firewall settings.
Sometimes there is a need to quickly transfer from one computer to another a large number of data and here the question arises about setting up a local network under Windows 7. After all, it is not possible to use flash drives or other storage media for this task.
However, the process of setting up a local network under Windows 7 is very simple. And having done it once, in the future you will be able to do it very quickly and without problems.
First, let's look at the process of connecting two computers. To do this, you need a crimped network cable. In this article we will not consider the manufacturing process of such a cable. This is a topic for a separate article. Therefore, we will assume that you have such a cable or you bought it together with connectors already crimped.
Connect the cable to both computers into the connector network card and make sure that the indicator light next to both network connectors lights up. This means that the network cable is working and you can continue setting up the local network.
Once both computers are connected using a network cable, you can begin setting up the network connection.
- First, open the “Network Connections” window. For Windows 7, the path to this window looks like this: Start - Control Panel - Network and Internet - Network and Sharing Center - Change adapter settings.
- In the Network Connections window, you will be able to see your connection icon. If you have one network card, there should be only one connection icon in this window. Right-click on it and select “Properties”.
- In the next window you can see a list of components. Here you need to select the “Internet Protocol TCP\IP” item and click on the “Properties” button.

- After this, the properties window for the selected component should open. Here you need to check the “Use the following IP address” option and enter the required IP addresses (not to be confused with).
- For the first computer:
- “IP address” – 192.168.1.1
- For a second computer:
- “IP address” – 192.168.1.2
- “Subnet mask” – 255.255.255.0
- We leave the remaining fields empty.

- After this you need to close everything open windows by clicking on the “OK” button.
After this, setting up a local network under Windows 7 is complete and the network will be up and running within a few seconds. To check if the connection is working, you can run the ping command. To do this, on one of the computers, press the Win-R key combination and enter the “cmd” command. Then in the black window enter the ping command and the IP address of the other computer. The result of the command should be like in the picture.

This means that everything is working correctly and now you know how to set up a local network under Windows 7.
And why does the average user actually need it? Let's recall the main concepts of this lesson:
- - a local network is a system of computing devices connected by communication lines, designed to transmit information to a finite number of subscribers;
- - there are three main types of local network topology, on the basis of which more complex local communication structures are built;
- - according to the way computers interact, local networks can be peer-to-peer (when all PCs connected to the network have equal rights) and with a dedicated server.
In this article we will look at how to create a local network with the same access rights for all its users.
The advantages of such a network include simplicity of design (setting up a home network is quite tough for a beginner) and economic availability of equipment, but the range functionality such a network is very limited.
So, to create a local network between computers we need:
Several computers (in in this case Let's consider a network option that unites more than two PCs, and we'll talk about it separately), which will become nodes of our local network. Each PC needs to check the presence of a network card (although most modern devices are equipped with a built-in “network card”, but “who the hell is not joking”...).
- - Network hardware. To organize local networks, both managed (customizable) and unmanaged network equipment can be used. To make a small home network A simple unmanaged 4-6 port switch is quite suitable.
- - Network cable to connect each computer to network equipment. The total length of the cable directly depends on the final number of PCs, their distance from each other and the architecture of the room (building) in which the local network is created.
- - Connectors(RJ-45 connectors), the number of which also depends on the number of computers connected to the network. So, to crimp the cable for each PC you will need at least 2 connectors;
- - Swage(Crimper) – a tool for cable termination. (In its absence, many masters make do with improvised means (for example, a screwdriver), but it will be quite difficult for a beginner to perform this trick).
Creating and setting up a home network
1. Select the computer from which the creation of the local network will begin, and connect it to network equipment. To do this on both sides crimp the cable and using RJ-45 connectors we connect it to the ports of the switch and the network card of our computer.
An unmanaged switch does not require any additional settings: we only need to register correct settings the local network itself operating system each PC
2. To do this, go to the settings of the computer’s network card (read: windows 8 and windows XP) and write there IP-address of this PC. Typically, the following IP addresses are used here: 192.168.1., 192.168.0;
3. Repeat points 1-2 for each computer connected to the network.
Important: the last digit of the IP address of each subsequent PC must differ from the previous one (in the range indicated above): so, if the first computer was assigned IP 192.168.1.1, the second PC will have it 192.168.1.2, the third will have 192.168.1.3, and so on.
When all computers are connected, we check our local network for functionality.
You can do this in two ways:
Check for other devices connected to the network in the “ tab network» the control panel of this computer;
Ping any computer on this network with an IP address known to us. Pinging is carried out as follows:
Go to “Start→Run”, in the window that opens, assign the command “cmd” and press “Enter”;
In the window that appears command line we register ping xxx.xxx.xxx.xxx, where xxx.xxx.xxx.xxx is the IP address of the computer we are looking for.
If, after executing the command, we see a similar picture in the command line window, then the home local network we created is quite functional, but if the computer displays a message about “exceeding the timeout interval for the request” or that “the specified node is unavailable”
 - must be searched and eliminated technical issues this network.