How to disable updates in 7. Disabling Update Center in the command line
For Windows 7, as well as for other operating systems of this family, updates are released with enviable regularity. There seems to be nothing wrong with installing them, since they are designed to fix many bugs in the OS itself and strengthen the security of the system. But this is only at first glance. It is believed that shutting down in Windows 7 can be due to a variety of factors, including a lack of free space on the hard drive, small throughput when downloading packages, etc. And it is not always recommended to install the updates themselves, since many of them (especially those intended for other Microsoft products) are not needed by the average user at all.
Windows 7 automatic update problems
However, all of the above does not fully reflect the need to disable automatic updates or remove already installed packages updates. The most serious problem is that some updates themselves are unfinished, which is why very often there is a malfunction of the system itself. operating system, even with the impossibility of its subsequent loading or the appearance of so-called blue screens of death. Another reason is the availability of user computers unlicensed versions of the OS, which, after installing the recommended packages in automatic mode They just start to get blocked. But it is very easy to remove such updates, cancel their installation, or completely disable the main service responsible for searching and installing them.
What is the easiest way to cancel?
To begin with, let's assume that the automatic update activated in system settings by default, the user did not disable it, and the updates were already installed. How to remove automatic Windows updates 7 after all operations have been completed? Apparently, many users know that in fact simple case you need to roll back the system to the state it was in before installing the latest packages (as a rule, Windows itself creates backup copy with a rollback point immediately before their installation).
To do this, use the system recovery section in the “Control Panel” and start the recovery process by selecting either the last or any other previous point.
Manual removal of unnecessary or faulty update packages
If we talk about how to remove automatic updates in Windows 7 without using Windows rollback, which may affect the programs installed after they are integrated into the system, one more method can be used.

It consists of going to the programs and components section, then selecting to view installed updates, sort them by installation date and remove them manually. It seems simple. But here you need to clearly understand that if the Update Center itself and the service responsible for its operation are located in active state, which, in fact, is the case, will still be completed after a certain period of time new search followed by installation of the found packages. But more on that later.
Automated uninstallation of updates
Alternatively, to remove installed packages, you can use specialized uninstaller programs like iObit Uninstaller.

Their use is justified by the fact that they remove not only the update packages themselves, but also clean up residual components after they are uninstalled in automatic mode (you will need to enable it yourself).
How to remove automatic updates in Windows 7 or another system once and for all?
Finally, let's move on to deactivating the search and installation of updates, since without this, whether you like it or not, attempts to search and install from the operating system will still be made. How to turn off automatic updates in Windows 7 in the simplest way?

To do this, you need to go to the “Windows Update” section in the “Control Panel”, and disable it in the settings settings automatic search by selecting the appropriate mode from the drop-down list, and also uncheck the line automatic installation recommended updates. At the same time, you can deactivate the installation of updates for other Microsoft products. In particular, this applies to the office suite. But that's not all.
Despite the actions taken, the underlying service is still active.

Now you need to call the services section (services.msc in the “Run” console), find “Update Center” there, double-click to edit parameters, stop the services and select the disabled start type from the drop-down list.
Many users stop there, but in vain. The point is that for complete shutdown To search for and install updates, you also need to deactivate two more services: “ Windows Installer" and "Installer Windows modules" Only after this can you restart the computer and make sure that the search for and installation of updates is completely disabled.
Note: for the last two components it is also sometimes advisable to install manual type startup to avoid incorrect behavior of the operating system.
Additional utilities for managing updates
How to remove automatic updates in Windows 7 using improvised means, we figured it out a little. As mentioned above, the search for updates even before the main service is turned off can be done again. If there is no need to deactivate receiving updates after removing unnecessary or faulty packages, you should immediately set manual search available updates, and then exclude from the list of those found those that cannot be installed, remembering the numbers of the removed packages. But such a procedure looks very labor-intensive, especially since updates can be installed immediately. In this situation the best option is to use a tiny portable utility called Show or hide updates, developed by Microsoft Corporation specialists.

After starting the application, you just need to select the Hide updates item, after which the program will hide automatic Windows 7 updates, instructing the operating system to ignore them during further search and installation.
Greetings to all those who use the operating room Windows system 7 because today's article will talk about how to disable automatic updates in Windows 7.
In general, in most cases this is necessary for those people who use pirated version operating system so that Windows does not try to connect to its servers. The results of such updates are an inscription on the desktop that your Windows is not licensed. However, many users who use a license also dream of disabling updates, since not everyone has unlimited Internet or for their own reasons. However, if you have unlimited Internet And licensed Windows, then I recommend that you set up automatic updates for your own safety.
Now let's see clearly who is going to disable Windows updates.
Disabling updates
First of all, go to the “Start” menu, then to “Control Panel”. We find ourselves in a window called “Configure computer settings.” A little further, to the right of this inscription, there is another one - “View”. Set the “Small icons” option there (you can select “Large”, I just like it better).

So, to get started with the settings to disable updates, click on the left: “Customize settings.”

A list of update methods appears before us. To completely disable updates, the appropriate parameters must be set in each of the following sections:
Important updates . In the drop-down list, select: “Do not check for updates (not recommended).”
Who can install updates. Leave everything as default.So, now you have understood in practice how to disable automatic updating of Windows 7, but in order to be completely calm that Windows will definitely not download updates, disable the service that is responsible for this. The procedure is as follows: click right click mouse over the “Computer” icon on the desktop. If you do not have it, find the inscription of the same name in the Start menu. Next you need to click on the item: “Management”.

I would like to point out that if you are trying to do this under account Without administrator rights, you will not be able to perform these actions. After you have managed to enter “Management”, you will notice a list on the left. We look for “Services and applications” there, and in it - “Services”.
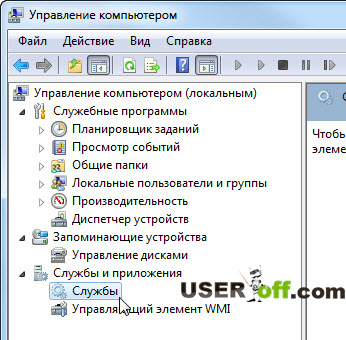
Now we turn our attention to the list that appears on the right. We are looking for “Windows Update” there. This service is almost at the very end of the list.

Double-click on it with the left mouse button and select “Startup Type”: “Stopped” and click “Stop”. Then click on the “OK” button.
That's all for today! Good luck to everyone, bye everyone!
Thanks to the function automatic update the system is receiving fixes software errors, protection against found vulnerabilities and new functions. Therefore, it is not recommended to disable it.
On the other hand, auto-updates can occur at inconvenient times and distract you from your work. And if you do not have a licensed version of Windows, but a dubious build, then the next update can break the entire system. In such cases, it is better to disable automatic updates for a while or even forever. There are the following ways to do this.
Method 1. Through the system services manager
This method is the simplest and is suitable for everyone - except the oldest - Windows versions: from 10 to XP.
To use it, open the Run window ( Windows key+ R), copy into the field services.msc and click OK. When the service manager opens, go to the bottom of the list and double-click the Windows Update service. Then change its startup type to “Disabled” and click OK.
The changes will take effect when you restart your computer. If you want to enable updates again, repeat the above steps, selecting the startup type “Automatic” or “Manual”.
Method 2. Through the update center
In Windows 8.1, 8, 7, Vista and XP, you can disable the update in the Control Panel settings. Use this method if the previous one suddenly does not work for you (which is unlikely).
Although Microsoft has stopped supporting Windows Vista and XP and, most likely, will not update them; just in case, we will provide instructions for these versions as well.
Windows 8.1, Windows 8, Windows 7
Use system search to find “Windows Update.” Or open it through the Control Panel. Then click “Customize settings” and in the “Important updates” list select “Don’t check for updates.” Uncheck “Receive recommended updates in the same way as important updates” and click OK.
Windows Vista
Go to Start → Control Panel → Security → Windows Update. Then click “Customize Settings” and check “Don’t check for updates.” Uncheck “Include recommended updates when downloading, installing, and updating notifications” and click OK.
Windows XP
Go to Start → Control Panel → Automatic Updates. Check "Disable automatic updates" and click OK.
By default, Windows 7 automatically downloads and installs updates. The operating system downloads updates from the Microsoft server every time you access the Internet from your computer. In theory, automatic updates are useful, as they are designed to patch system “holes”, modify files and optimize Windows operation, but in practice there are a number of reasons why you should disable Windows updates. It's constant annoying notifications about updates or downloading updates at the most inopportune moment.
For example: you are watching a movie or playing a game online game and then the next update starts downloading. All your traffic starts to be consumed by downloading these updates, since the updates Windows priority more than your browser or game and everything starts to slow down! And for some, because of updates, even Windows crashes...
You can only turn off automatic Windows 7 updates. You will still have the option to download updates manually. To do this, go to Start -> Control Panel ->system and safety -> Windows Update . Click "Settings" in the left menu.

In the window that opens, select “Do not check for updates (not recommended)” and uncheck all the boxes below. Click "OK".

Windows 7 automatic updates are now disabled. For manual loading updates, you can go to Windows Update at any time and click the “Check for updates” button.
Now let's finally disable Windows updates in Services. To do this, click Start -> Control Panel -> system and safety -> Administration -> Services .

Scroll to the bottom of the list and open the Windows Update service. In the window that opens, select the startup type “Disabled” and click the “Stop” button. To save the changes, click “OK”.

Windows 7 update is now completely disabled. If necessary, updates can be enabled in a similar way.
Automatic update is important functional feature any operating system. Thanks to it, the computer receives important updates on time, making the system more stable and secure. In Windows 7, the function is activated initially. This means that if there is a connection with Microsoft servers, the update service checks for the availability of fresh packages, downloads them and installs them. Usually, all processes proceed virtually unnoticed by the user, but when constant offers to upgrade to 10 appear, this is already overkill.
Theoretically disable automatic download not worth updating. It is useful because it closes security gaps, optimizes the operation of the OS, and adds new features to it (regarding the “tens”). There is also a list of reasons why the auto-update service should be disabled:
- The user does not like that during the update the Internet speed drops and/or the PC cannot be turned off for a long time.
- The computer has expensive or limited wireless Internet.
- Problems after launching the updated OS.
- Failures during the installation of update packages.
- On system volume there is not enough space to accommodate the increase in volume of Windows 7, which grows with each update.
Kinds
Still, before you disable the Windows 7 update, think about whether it is really necessary. In addition to deactivating the service, it can be switched to the following operating modes.
- Fully automatic - operations proceed without user intervention, only notifying the user that the installation of packages is complete.
- Searches and downloads the latest fixes on a schedule, and the installation of packages is carried out by the user.
- Automatic checking and notifying the user about the availability of updates.
- Self-update is disabled. Everything is done manually.
Options are selected in the Update Center component.
Disconnection methods
Settings any Windows are stored in its register. You can gain access to the key responsible for the Update Center settings in a few simple and a couple more difficult paths. Let's look at them all.
Change Update Center settings
Let's start by setting up the service for ourselves. To access the configuration interface, you need to open the “Update Center” using one of the following methods.
System
- Through context menu My computer, call it “Properties”.
- In the left vertical menu Click on the appropriate link located at the bottom of the window.

- Go to the “Control Panel”.
- Open the “System, Security” section.

- Call the element of the same name.

If control panel items are rendered as icons rather than categories, a link to the item will appear in the main window.
- So, after getting into desired window Click “Settings parameters”.

- Move to the “Important updates” section and select the appropriate option from the drop-down list.

The only way to completely disable receiving updates on a computer with Windows 7 is to stop the service.
Disabling the service
Management of services in the “seven” occurs through:
- direct editing of registry keys, which is very inconvenient;
- third-party programs for configuring the OS (we’ll skip this option);
- MMC console snap-in;
- system configuration;
- command line;
- editor group policies(present in Windows 7 Ultimate, Enterprise).
Removing a service from autostart
The fastest way to disable updates is through the system configurator.
- Execute “msconfig” in the command interpreter window, which will open after holding down the Win + R keys or clicking on the “Run” button in Start.

- Go to the “Services” tab.
- Find "Windows Update" (maybe Windows Update) and remove the checkbox next to it.

- Save the new settings.

Until the end of the current session, the service will work, properly performing the tasks assigned to it. To use a new Windows configuration 7 needs to be rebooted.
Let's use the MMC console snap-in
The system console snap-in of the same name provides access to managing all services on the PC. It starts like this.
- Open the context menu of the “My Computer” directory.
- Call the “Manage” command.

- In the left vertical menu, expand the “Services and Applications” item. Next, click on the “Services” link.

More simple option calling the same window will launch the “services.msc” command through the “Run” dialog.
- Scroll to the very end of the list of services and open the “Properties” of the Windows Update service.

- In the “Startup type” drop-down list, select “Disabled” instead of “Automatic” in order to say goodbye to automatic updates forever. If you need to disable the service now, be sure to click “Stop”. Save the new settings with the “Apply” button and close all windows.

The PC does not need to be rebooted to apply the settings.
Group Policy Editor
Customize any system parameter Another MMC snap-in called the Local Group Policy Editor will help.
IN home edition"Seven" it is not available!
- The tool is launched by running the “gpedit.msc” command through the “Run” window.

- In the “PC Configuration” subsection, expand the “Administrative Templates” branch.

- Open " Windows components"and look for an update center.
- On the right side of the window we find a parameter whose name begins with “Setting auto-update”.
- Call up its settings.

- Move the checkbox to the “Disable” position and click “OK” to close the window and save the changes.

Let's use the command line
Through the command line, all the same operations are performed as using GUI, and even more, but in text mode. The main thing is to know their syntax and parameters.
The “cmd” command is responsible for calling the command line.
- Open the command interpreter and execute it.

- In the black window we enter text command“sc config wuauserv start= disabled” – it sets the service startup type as “Disabled” - and press “Enter”.

The service is stopped with the command “sc stop wuauserv”.

Registry Editor
The last way to remove the annoying installation of updates is to disable the service responsible for this directly, through the system registry editor.
- It is launched with the “regedit” command.

- In Explorer, go to the HKLM section.
- We follow the path indicated in the screenshot to the “Windows” directory.

- Open the WindowsUpdate directory.
- Double-click on the “DisableOSUpgrade” parameter or call up the dialog for editing it through the context menu.

- Enter one as the value and press “Enter”.

When the PC is restarted, updates will no longer bother you.
The service is enabled by changing the key value back to zero. If the specified section or there will be no key, create them yourself via the context menu. Key type: "DWORD 32 bit value".
However, keep in mind that security updates should be installed manually at least periodically to maintain a stable system.