How to set up Internet on a laptop. How to connect the Internet from a router to a computer (laptop) via a network cable? How to connect WiFi on a laptop without a module
Today, it is perhaps impossible to find a socially active young city resident who does not have access to the World Wide Web. IN Lately there is active dominance of wireless Wi-Fi connection, but if you prefer the good old wired Internet, connecting it won’t be too difficult.
Connection
To connect to the network, you first need to choose the most suitable operator.
Criteria for selecting a service provider operator:
- availability of access points near your home;
- reasonable connection cost;
- high communication speed at an affordable price;
- efficiency of work technical support;
- other factors (discounts, bonuses, Special offers etc.).
Many people choose Beeline as their service provider. The technical support specialist will be able to connect wired Internet to your laptop after you leave a request over the phone, on the website or at the provider’s office.
Each laptop has a special slot (hole) for a network cable on the side, back or front. The network card, as a rule, is already built into the device. A cable is inserted into the slot, which leads to a distribution device, or SWITCH, located in the entrance, in the attic of the house or in a neighboring house. Typically, several cables extend from the switch to to different subscribers. This creates a local computer network, providing Internet access on all laptops connected to it.
Settings
But connecting the Internet to a laptop is not enough to enjoy the unlimited benefits of the World Wide Web. After you place the cable in the slot, you need to configure it. And if the first action cannot be performed independently, then even a novice user can easily cope with the second.
Let's look at the basic principles using the example of setting up the Beeline Internet on a computer with operating system Windows7.
Procedure:
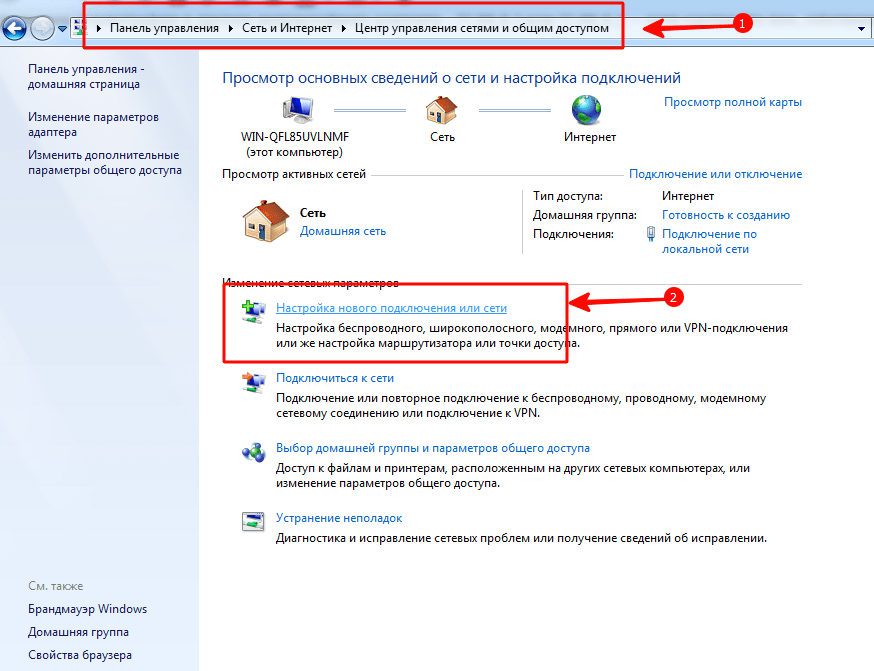
- Click the "Start" button and go to the "Control Panel". In the window that appears, select “Network and Internet”, then click on “Network and Sharing Center” shared access».

- Select "Set up a new connection or network."

- Click “Connect to a Workplace” and then “Next”.

- Select "Use my Internet connection (VPN)"

- In the place where you need to enter the Internet address, write tp.internet.beeline.ru, and in the place where you need to enter the destination name - Beeline. Then you need to check the box next to the words “Do not connect now, only install to connect in the future” and click on “Next”.

- Next, you should enter your username and come up with a password that you will enter to connect to the network.
- When the process is complete, click the Close button and return to the Network and Sharing Center. There, click on the item on the left side of the screen “Change adapter settings”.

- Click on the created Beeline connection right click mouse, go to “Properties” and make sure that tp.internet.beeline.ru is written in the address bar of the VPN server.
- After that, go to “Options” and uncheck the box next to “Include Windows login domain.”

- Go to the “Security” tab and expand the VPN Type floating list. Select L2TP IPSec VPN from it. Check the box next to “CHAP Password Verification Protocol” and click “OK”.

- To go online, click on the Beeline connection shortcut and enter your username and password.
As you can see, setting up Beeline Internet on a computer is not so difficult, so you have a real chance to save own funds and gain new knowledge. Only a technical support technician who has access to the distribution equipment can connect to the wired Internet, so you should not try to do this yourself.
Do you want to know how to earn 50 thousand monthly online?
Watch my video interview with Igor Krestinin
=>>
Information business and making money via the Internet require mobility. One computer is not enough, since you often have to conduct business away from home. A laptop helps out in this situation.
The laptop is convenient and useful electronic device, is an indispensable tool, some for remote work, others for communication and entertainment.
Personal computers and laptops are often replaced by tablets and smartphones, but they will not replace them because the capabilities and power of a laptop are much higher than mobile devices.
A laptop without the Internet is like a car without fuel: beautiful, stylish, but useless, especially if you are in the information business. For beginners, a natural question arises: How to connect a laptop to the Internet? There are several ways to make the connection. Let's look at everything in order.
How to connect a laptop to the Internet via wifi
Let's look at the situation when it was purchased new laptop, I want to visit as soon as possible " world wide web", but you don't have a home network, what should you do?
First you need to find a provider, conclude an agreement with him, choose, buy a good, high-quality router (wifi router).
Many providers provide their services, set up a home network, connect the Internet themselves, installing their own routers. All you have to do is wait for the visit of a company representative and pay for his services.
Providers such as Rostelecom, Beeline send network settings for the router automatically. In this case, the “Receive automatically” checkboxes are checked everywhere.
Connect Wi-Fi router to the electrical network, the Internet cable is connected to a special connector, which differs in color from the other connectors.
When installing the router, you should take the setup instructions and follow all the instructions. A little advice when choosing a place for wifi installation router, pay attention to the following factors:
- Availability of connection to the mains (220V socket);
- Relative proximity of stationary consumers (computer, TV);
- Close distance to mobile devices(For best welcome signal);
- There are no objects in the path of the router signal that create interference. Such interferences that drown out the signal can be: electrical appliances, an aquarium, concrete barriers.
Wireless laptop connection
Now you can do wireless connection laptop to the Internet. Go to "wireless" settings Wi-Fi network" Look for information about login parameters on your router, or look at its instructions. Enter the IP address, login, password.
If you are connecting for the first time, quick settings will be offered. Select your place of residence, the name of the provider, fill in the remaining fields provided. If you did not find your provider in the proposed list, then select the connection type in the settings (check with your provider), enter your login, password, save, connect.
Make sure your laptop has a driver wireless module WiFi. The presence of the driver must be checked by going to: “Device Manager”.
When the module is installed correctly, the name is displayed in full. When the driver is missing, undefined, next to the name: “ wireless adapter" you will see Exclamation point, yellow color. Download drivers from the official website of the laptop manufacturer.
Pay attention to the bottom of the screen (right corner), find the Internet icon - an image of an antenna (maybe a computer icon). Click the icon, select " wireless network", enter the password, click "Connect".
Let's look at the option if there are no connectivity options fixed Internet. For example: countryside, where there is no telephone line, the Internet is not available, or you travel a lot around the world.
How to connect a laptop to the Internet via a modem
In this situation, a 3G or 4G modem will help out, appearance which resembles a flash drive with a SIM card installed.
The connection process is very fast and simple. When you turn on the system for the first time, it will launch the connection setup program. If you bought a modem from official communications representatives, everything is initially configured for Internet operation from an official company.
You don't have to enter anything manually. The only thing you will need to do is determine the tariff, use the menu to activate the SIM card, balance, and then connect.
The next time you connect, you need to connect the modem to the laptop, then click the “Connect” button.
Most USB modem models include the " WiFi router", which converts the modem into an access point for connecting all possible devices.
How to connect a laptop to the Internet via wifi in public places
Let’s say there is a need to connect to the Internet via wifi while in an office or cafeteria, how to do this? Very simple!
Click on wifi icon on the taskbar (bottom right), a small window will open displaying a list of all available in this WiFi hotspot networks. In this list, you need to click on the WiFi network you need, then click on the “Connection” button that appears.
If the network is locked with a password, a tab will appear asking you to enter the password. Check the password with the cafe (office) employee, after entering the password, click “ok”, you are online!
How to troubleshoot occasional connection problems
What should I do if there is no Internet connection icon on the panel?
This sometimes happens when disconnected wifi module. Open the “Control Panel”, then the “Network and Internet” section, then “Network and Sharing Center”, find “Adapter parameter changes”. Next, look for a connection called “Wireless Network Connection”, turn it on with the right mouse button - “Enable”
Another problem that often arises is “no available connection" The “connected to the network” icon, in this case, is covered with a red cross, which means there is no connection.
The Wi-Fi module may have turned off; you need to connect it. Find the battery icon on the taskbar, right-click, activate “Windows Mobility Center”.
A window will open, click the “Enable wireless connection” button.
From this article you learned how to connect a laptop to the Internet via wifi. Using the recommendations described above, you can easily organize a home network.
Moreover, home network can connect other than a laptop – Personal Computer, smartphone, tablet, even modern TV. In general, there is nothing complicated, so we take it, do it, use it.
P.S. I am attaching screenshots of my earnings in affiliate programs. And I remind you that everyone can do it, even a beginner! The main thing is to do it correctly, which means learning from those who are already making money, that is, from professionals.
Do you want to know what mistakes beginners make?
99% of beginners make these mistakes and fail in business and making money on the Internet! Make sure you don't repeat these mistakes - “3 + 1 ROOKIE MISTAKES THAT KILL RESULTS”.Do you urgently need money?
Download for free: " TOP - 5 ways to make money online" 5 the best ways making money on the Internet, which is guaranteed to bring you results of 1,000 rubles per day or more.Here is a ready-made solution for your business!
And for those who are used to taking ready-made solutions, there is “Project of ready-made solutions for starting to make money on the Internet”. Find out how to start your own online business, even for the greenest beginner, without technical knowledge, and even without expertise.


The article describes how to set up cable Internet on a computer.
Many users use Wi-Fi at home for connecting to the Internet, which is very convenient, especially if you have several devices (computer, tablet, smartphone). But it also happens that you need to connect your computer to the Internet directly via a cable, without using a router. In this case, a direct connection is established between your provider and the PC’s network card (Internet speed increases).
In addition, you may just need to connect wired Internet to the new computer you want to install at home. We'll talk about all this in this review. All computers that run " Windows» ( 7, 8, 8.1, 10 ) will be configured in the same way, the instructions below are suitable for all these cases.
First, let's note some points. The Internet connection that providers provide to their users is usually divided into static and dynamic. A static connection is when you are given your own permanent, unchanging IP address. A dynamic connection automatically selects an IP, which can change every time.
Many modern companies provide just such options when connecting to the Internet, but there are also providers that use a PPPoE connection, which requires entering a password and login. The provider offers to establish such connections by sending its specialists to clients. But this often happens long history, so we will learn how to connect cable Internet to a computer ourselves.
Connecting the Internet to a computer via cable using static and dynamic IP
In order to connect an Internet cable to a computer, as you know, it needs to be plugged into the Ethernet port on the rear panel. This creates a direct connection from the Internet provider to the computer’s network card. Next, you will need to configure the connection in the operating system.
To set up the Internet on your computer in this way, you need to take the following steps:
- Through the menu " Start" go to " Control Panel»

How to install and configure Internet on a new computer via cable
- In the window that opens, go to the network control center

How to install and configure Internet on a new computer via cable
- Next, in the left column, click on “ Change adapter settings»

How to install and configure Internet on a new computer via cable
- You will be taken to a folder where all your Internet connections are located (if any, we’ll talk about how to create a new connection below). Right-click on Ethernet connection, and in the window that opens - to “ Properties».

How to install and configure Internet on a new computer via cable
- The next step is to highlight the protocol with the mouse “ IP version 4 (TCP/IPv4)» from the suggested list. Select it and click on “ Properties».

How to install and configure Internet on a new computer via cable
- Now there is, as they say, the final touch. If you wish to have an Internet connection with a static IP, then you will need to fill in the fields in the new window as shown in the screenshot. We show standard settings. The settings of your particular Internet provider may differ slightly. Your best bet is to call him and ask what settings your provider offers.

How to install and configure Internet on a new computer via cable
- If you want to connect to the Internet with a dynamic IP, then do not touch anything in the new window that opens. All settings will be set automatically by the system. Just click on " OK", and setting up the Internet cable connection to the computer can be considered complete.

How to install and configure Internet on a new computer via cable
How to install and configure Internet via cable on a new computer?
If you want to create a connection from scratch, that is, for example, on a new computer, then in this manual we will explain how to set up such a connection. Physically, you will just need to plug the Internet cable directly into the computer's network card on the back panel.
- Let's go to the control panel again (we'll show an alternative option in the screenshot)

How to install and configure Internet on a new computer via cable
How to install and configure Internet on a new computer via cable
- Then we will again want to go to the control center for our networks

How to install and configure Internet on a new computer via cable
- After that, select the connection settings, which can be wireless, modem, or VPN

How to install and configure Internet on a new computer via cable
- Next, in the new window, click on the top option “ Internet connection" and click " Further».

How to install and configure Internet on a new computer via cable
- Next we will select high speed connection to the Internet

How to install and configure Internet on a new computer via cable
- Now a window will open where you will need to fill in all the required fields. We check the boxes as shown in the screenshot, and also enter your username and password that your Internet provider gave you. Naturally, you will use this password and login to access the Internet. Press " To plug».

How to install and configure Internet on a new computer via cable
- As a result, if you did everything correctly, you will see your connection icon in the lower right corner of the screen on the taskbar.

How to install and configure Internet on a new computer via cable
Video: How to set up Internet on a new PC?
So, you have finally concluded an agreement with a new provider, and a cable with a plug has been installed in your apartment - a real window to the world. All you have to do is connect it to your computer - and the Internet is at your service. However, if it was enough to insert the plug into the socket, you would not need to read this article.
Let's look at how to connect the Internet to a computer via cable, in the very simple case. Let's say you have only one computer, and you will use it as a router (if you suddenly need it or a tablet). Or (alternatively) you are going to later, so you turn off the router to make it easier remote access.
Let's say you have a network card on your computer (it doesn't matter whether it's separate or built into the motherboard), and you've just connected an Ethernet cable to its input. We assume that you enjoy the most current Windows 10. Although for the right ones Windows settings 8/8.1 or even 7, these instructions are also suitable: the principle is the same.
Of course, you can always call a specialist to do everything the right job for you. But specialists are not always free. In addition, you will not only save money on calls on your own, but also learn how to set up the Internet on your computer via cable. In our world, such knowledge can come in handy at any time.
Dynamics vs. Statics
Now check with your provider what kind of connection they offer on your tariff plan: dynamic or static.
With dynamic connection your IP address may change depending on your ISP settings (and if you intend to subsequently connect to your workplace remotely, this may interfere with you). But manipulations with entering parameters are reduced to a minimum: the provider sets the IP address, subnet mask and default gateway independently. In this case, just insert the cable into the computer and that’s it, you will have access to the Internet.
Static connection provides a static IP address assigned to your computer (or router, if you choose to connect through one). In this case, you will have to manually enter the IP address, subnet mask and default gateway in the connection settings. Usually all these incomprehensible numbers and letters are included in the access agreement or in an appendix to it. If necessary, you can clarify them with the technical support service by providing your details.
In some cases, access also requires a login and password (do not confuse Internet access as such with access to your personal account on the provider’s website - for personal account data is required).
How is the connection made?
Let's look at the procedure step by step.
- Insert the plug of the Ethernet cable brought into the apartment into the corresponding port of the computer. Even if you have never done this before, you will not be able to confuse this type of connector and plug with something else.

- Right-click on the “Start” button and find the “Control Panel - Network and Internet - Network and Sharing Center” section. In the left column, select the “change adapter settings” tab. A list of your adapters will appear in the main window (more precisely, in our case, one adapter “Connecting via local network"). Again, use the signature “right-click” technique and select “Properties”.

- A small pop-up window contains an entire column different lines with properties. Select the line “IP version 4 (TCP/IPv4)”. While it's selected, click the Properties button below the list box.

Now our instructions branch out. Have you checked with your provider what IP is provided to you? If not, check now.
- If dynamic, then trust the automatic selection in the IP address and DNS server settings.
- If it is static, you will have to enter the values manually. As a rule, you need to specify “IP address”, “Subnet mask”, “Default gateway” and “DNS server”. When you have completed entering your data, click OK to save your selection.
Important points:
- If the connection requires a modem, enter its default address as the IP address; this is usually 192.168.1.1. If the modem has a different IP (which is rare), it is indicated on the bottom of the modem itself or in its instructions.
- Usually the ISP provides the DNS server details, but sometimes this is omitted. Then you can use the universal ones:
1) Public DNS from Google: 8.8.8.8 or 8.8.4.4 - universal solution generally suitable for all computers
2) OpenDNS – 208.67.220.220 and 208.67.222.222
3) Yandex DNS with its own anti-virus filter - 77.88.88.88 or 77.88.8.2 - if you trust the Yandex anti-virus policy (although sometimes it may consider a completely decent site unreliable)
4) Yandex DNS with a filter for pornography and other obscene content - 77.88.8.7 or 77.88.8.3 - although it depends on what you actually need from the Internet, hehe.
- Let us repeat: if remote access is important to you, make sure that your provider’s support ensures that your IP will not change.
If your ISP offers L2TP access, this may require some additional actions from your side. Usually the provider provides instructions for setting up this specific type of connection, but it wouldn’t hurt to duplicate it on our part either.
So, to configure L2TP, you need:
- Go to the already known section “Network and Sharing Center” and select creating a new connection
- Unlike previous options, here you should go to “Connect to your workplace”
- When the system prompts you to create a new connection, select this item
- Select "Use my connection"
- Enter the server address provided by your provider. You should not select the immediate connection option. You can assign a name that you like.
- In the next window, enter the username and password provided to you. Don't forget to check the box next to "Remember password"
- Connect now when the system prompts you to do so
- Return to “Adapter Properties” (as discussed above) and select the “Security” section
- In the VPN Type drop-down options, select L2TP IPsec VPN. Below is the line “Data Encryption”, here you need to select “Optional”
- Under the "VPN Type" line, click the "Advanced Options" button
- Enter this same key in the “Key” field. You must have it from your provider.
- That’s it, you can click “OK” with peace of mind and use the connection.
This instruction works for Windows 7 and newer versions.
Why all this complexity? - you ask. This solution has advantages: for you - increased security connections (compared to a regular LAN), for the provider - simplification of the billing system.
Setting up PPPoE
Before setting up the Internet on your computer, check with your provider about the type of access it offers. Access via PPPoE requires not only correct settings, but also authorization using a login and password. You will need this connection method if you do not use a modem or router, but insert the cable from the provider directly into the connector on the computer, without intermediaries.
To do this, you again go to the “Network Control Center” and select there and use it to create a new connection.
In the wizard that launches, you select the first item - “Connect to the Internet” - and click “Next”. Then in the window that appears, you must select “High Speed (with PPPoE)”.
The final step remains. In the final window, you need to come up with a name for the connection and enter the login and password issued by the provider. If your computer is used by several people (for example, family members), each under their own account, and you want to give them all access, then check the box “Allow other accounts to use this connection.”
Now make sure your Internet connection is working. And if so, then hello world!
Today there are two types of Internet connections. The first type is a wired connection, using a cable called twisted pair. The second type is a Wi-Fi connection, which provides an Internet connection using radio waves. Wi-Fi connection has become widespread nowadays. However, wired Internet has a number of advantages that are relevant in large organizations and offices. At home, it also makes sense to make a wired connection to at least one computer. For a stable Internet connection and efficient work you need to correctly configure its connection parameters.
Benefits of a wired Internet connection
Over the past 15 years, the Internet has rapidly penetrated into all areas of our lives. It is necessary in banking sector, trade, production, and is also indispensable for the exchange of information and personal communication. The most common ways to connect to global network today are wired connection and Wi-Fi connection.
For a wired connection, an optical cable or twisted pair is used. The first type of cable has a significant advantage, as it provides information transmission speeds of up to 1 GB per second. Over twisted pair cable the maximum speed reaches 100 MB per second.
The speed of information transmission through the cable depends on its type and on network card that receives the signal. This affects work desktop computers, game consoles, TVs and other devices united into one network. Streaming information does not require constant exchange between devices, which significantly increases processing speed. Speed in local connection between workstations has great importance when working on a corporate network. This is taken into account if necessary fast transfer large quantity information.
With a Wi-Fi connection, the connection to the Internet is carried out using radio waves operating in certain range. Therefore, Wi-Fi is more in demand at the household level. It is convenient because it allows you to immediately connect to the Internet from a smartphone, tablet or laptop anywhere there is an access point. However, signal reception is affected by neighboring devices operating in the Wi-Fi connection frequency band, and by objects in the path of radio waves.
A Wi-Fi connection does not require any cabling, but it is highly susceptible to radio interference, and the further you are from the access point, the more worse reception signal
A wired connection has a number of advantages over a wireless one:
- the speed of receiving and sending information with a wired connection is approximately 2 times higher than that of Wi-Fi;
- when exchanging files with the server, the delay is minimal, which is important in online games that require maximum speed actions from the user;
- a wired connection is more resistant to network interference; it is not affected by gadgets operating on the Wi-Fi frequency band or nearby sources of electromagnetic radiation;
- signal power at wired connection does not depend on obstacles along the path and the influence of external factors.
Errors that occur during connection wired connection, may be indicated by codes that indicate the cause of the problem.
Video: why a wired Internet connection is better than Wi-Fi
How to connect a cable to a computer or laptop
Even an untrained user can connect an Internet cable to the computer’s network adapter connector on his own. Used for connection standard cable(twisted pair) with crimped RJ-45 connectors on both ends of the cable.
You can connect the cable as follows:
- Prepare a network cable of the required length.
- Connect one connector to any LAN connector on the router.
First, connect the cable connector to any LAN connector of the router
- Connect the other connector of the cable to the connector of your laptop or computer.
Now you need to connect the second connector of the cable to the LAN connector of the computer
- When using an older type of modem, connect the incoming cable from your provider to the yellow Internet connector on the modem.
In older type modems, the provider cable should be connected to the yellow connector of the modem
- Connect the connecting LAN cable to any Ethernet connector of the modem and the network connector of the device.
The connecting cable from the device must be connected to the Ethernet connector of the modem
- After connecting the computer to the router, the indicator LED on the latter will light up, indicating that communication between the devices has been established.
When connecting to a computer, the indicator LED on the router's display panel will light up
Connecting the cable is not very difficult, since all connectors have connectors that fit only into the corresponding sockets on the computer's connector panel. Making a mistake in this process is extremely difficult even for a novice user.
Dynamic and static Internet connection
After connecting the cable connectors and creating a connection between network adapter computer and the provider’s equipment, you can debug the Internet connection. First of all, you need to choose a method of connecting to the backbone network, based on specific goals. There are 2 connection methods:
- A dynamic connection is a method in which an individual IP address assigned to a computer is configured automatically and changes when the initial parameters are transformed. The provider company’s equipment independently assigns values to the computer network address and the main gateway. When a computer is connected to the main line, the connection to the global network occurs immediately, without requiring additional identification data from the user. The only inconvenience with such a connection is the possible representation remote connection to your address. In this case, you must first connect to the trunk line directly, bypassing the router;
- A static connection is a connection method where the individual IP address provided to the computer remains constant and is designated when concluding an agreement with the provider company. During such a connection, the user sets the address in manual mode, and also independently registers the values of the main gateway and DNS servers. If such information is not in the contract, you can find it out in the technical support department of the provider company. Some ISPs may require you to enter a username and password for online licensing. This information is usually indicated in contractual documents or determined by the subscriber independently.
How to create a dynamic connection
For correct creation To make a dynamic connection, you need to perform a series of sequential actions:
From the Start key menu, navigate to " Network connections»
- In the “Parameters” section that opens, in the “Change” block network parameters» select “Configure adapter settings”.
In "Options" go to the option "Configure adapter settings"
- In the Network Connections console, right-click the Ethernet connection.
- In the menu that opens, select “Properties”.
From the Ethernet connection drop-down menu, select Properties
- In the Connectivity Console, highlight the IP version 4 (TCP/IPv4) component and click Properties.
In the properties panel, you need to highlight the line IP version 4 (TCP/IPv4), and then open “Properties”
- In the TCP/IPv4 protocol attributes console, enable the “Obtain an IP address automatically” and “Obtain a DNS server address automatically” radio buttons.
On last step activate the switches “Obtain an IP address automatically” and “Obtain a DNS server address automatically”
- Click OK to complete.
The dynamic connection is now ready for use.
How to create a static connection
To create a static connection, you need to follow these steps:

That's it, the static connection is established.
Currently, most subscribers home internet A dynamic connection is used, since the main method is to connect through a router. A static connection is used for a modem connection or when direct connection.
When using an ADSL modem connection, only static addresses assigned by your ISP are used.
Video: Creating a Static and Dynamic Connection
How to set up an L2TP connection in Windows 10
The L2TP tunnel protocol, used to connect to the global network, is a symbiosis of old PPTP protocols from Microsoft and L2F from Cisco. It is easy to process network devices and has high speed exchange of information due to reduced processor load. It has great connection stability and high security. Capable of creating tunnels to work in any network. The L2TP protocol is usually used in corporate networks, as it allows you to create a network connection on top existing network. This ensures a stable connection between the organization's main office and regional offices.
To set up an L2TP connection, you need to perform a number of sequential steps:
- Right-click on the Start icon.
- In the menu that appears, click on the “Network connections” line.
From the Start menu, select Network Connections
- In the Settings section that opens, select Network and Sharing Center.
In Settings, open Network and Sharing Center
- Here, select the “Create a new connection or network” option.
In the menu of the “Network and Sharing Center” section, you must select the first item - “Create a new connection or network”
- In the “Configure a connection or network” panel, highlight the line “Connect to a workstation” and click “Next”.
Highlight the line “Connect to a workplace”, then click “Next”
- In the Desktop Connection console, select the Use my Internet connection (VPN) tab.
Click on the “Use my Internet connection (VPN)” tab to continue setting up
- In the console that opens, enter the server address, check the box next to the option “Allow other users to use this connection” and click “Create”.
Enter the server address and don't forget to check the last box to allow other users to use the connection
- In the console that opens, enter your username and password, then connect to the backbone network.
- Go to "Network Connections".
- Right-click on the generated VPN connection.
- Select "Properties" from the menu that opens.
In the console, right-click on the generated VPN connection and go to “Properties”
- In the “VPN connection: properties” console tabs, open the “Security” option.
- In the "VPN Type" field, set the value to L2TP with IPsec (L2TP/IPsec), and in the "Data Encryption" field, select "optional." After that, open "Advanced options".
The VPN type must be set to L2TP with IPsec (L2TP/IPsec), select “optional” for data encryption
- Enter the key provided by your ISP for authentication.
The authentication key must be provided to you by your ISP
- Click OK to complete.
If you did everything correctly, then the L2TP connection is ready for use.
Video: how to set up an L2TP connection in Windows 10
The created L2TP connection increases the level of security for the subscriber and makes more simple connection with the provider's equipment.
How to set up a PPPoE connection in Windows 10
The PPPoE Internet protocol is used when connecting to a backbone network using Ethernet technology. This method has a number of advantages, for example, extended spectrum additional features, compression of information during transmission, carrying out authentication and encryption operations with information packets. Connection requires authorization on the network (entering a username and password). Used for direct connection to the backbone network and provider equipment.
To connect to the Internet using the PPPoE protocol, you must perform a number of operations:
- Open Network and Sharing Center.
- Here, select “Create and configure a new connection or network.”
In the “Network and Sharing Center” section, click on “Create and configure a new connection or network”
- In the “Setting up a connection or network” console, highlight “Internet Connection” and click “Next”.
Select the first item - “Internet Connection” and click “Next” for further settings
- Select the "High Speed (with PPPoE)" tab.
In "Internet Connection" select the connection "High Speed (with PPPoE)"
- Next, enter the username and password received from the provider and click “Connect”.
Enter the username and password received from the provider and click “Connect” to complete the setup
You now have a PPPoE connection established.
Video: how to connect and configure a PPPoE connection
Giving permission to other users to use the connection is only worth it when installing home Internet, since the number of users is limited.
Ways to troubleshoot wired Internet connection problems
When connected wired internet Errors occur periodically due to equipment malfunctions, a break in the backbone network, or incorrect user actions. In most cases, connection problems arise due to careless actions of the user himself.. To determine and eliminate the cause of the problem, you need to perform simple steps according to the following algorithm:
- Launch Network and Sharing Center.
- In the Network Connections tab, select Troubleshooting.
Go to the “Network and Sharing Center” and open the “Troubleshooting” section
- Select "Internet Connections".
For further settings, select the "Internet Connections" option
- Next, click on the line “Run the troubleshooter.”
Wait for the problem detection process to complete
- After the process is completed, in the window that appears, select the “Troubleshoot Internet Connection” tab.
Select "Troubleshoot Internet Connection Problems" and wait for the diagnostic process to complete
- At the end of the troubleshooting process, close the console if no problems are identified. If problems are found, follow the further instructions in the pop-up windows.
- Once the verification process is complete, in the Incoming Connections console, select Find this computer on the network and click Next.
Check "Find this computer on the network" and continue troubleshooting using the "Next" button
- The troubleshooter will check to see if a firewall is blocking this computer on the network.
Wait for the network gateway configuration check to complete
- During the troubleshooting process, follow the instructions that appear on the console.
- If no problems are found, close the console.
- If problems are found, follow the program instructions to resolve them.
Run the troubleshooter by clicking on the appropriate line
This completes checking incoming connections.
The following instructions show how to detect one incoming connection problem. You can find out more about the problem by clicking on the “View additional information” line.

The above method of searching for connection errors is classic and was developed by Microsoft Corporation specialists. In reality, everything can be much simpler, since a problem with the Internet connection can be caused by other reasons that can be eliminated mechanically.
This algorithm helps to resolve the problem of lack of Internet connection in most cases:
- Restart your computer.
- Unplug your router and wait 10-15 seconds.
- Turn on your router.
- If the connection is not restored, click on Reset button to reboot the router.
To avoid problems with your Internet connection, it is recommended to periodically disconnect your router from the network and give it time to recover.
Video: troubleshooting errors when connecting to wired Internet
Currently, all Internet providers prefer to establish a dynamic connection to the backbone network. This is more convenient for the network subscriber and for the provider company, since it does not require reconfiguring parameters in case of any changes in the network equipment. If you plan to frequently use remote access to your computer, then it is certainly better to choose a direct connection, bypassing a router or modem. For home Internet, you can always change the router settings and connection type initially set by the provider’s specialists. In the future, if you change the system configuration or complete reinstallation network parameters are set automatically. When connecting directly, the settings will need to be set manually. All this must be taken into account by users when choosing the type of Internet connection.