How to change the background image on your computer. How to change the picture on the “Desktop”: what every user should be able to do
When using a computer for a long time, any user sooner or later becomes puzzled by the fact that the system is cluttered, residual files they don’t want to leave voluntarily, and the laptop loads at the speed of a wounded snail. Also, some viruses, although treatable at first glance, still leave their tiny traces. Subsequently, it grows exponentially and affects the entire system completely. Therefore, the user begins to ask the pressing question: “How to reinstall Windows 7?”
Of course, to solve these problems, you can use the services of plugins or start using a new antivirus, but such a solution will be temporary, and in a few weeks the situation will not only repeat itself, but will also worsen. In addition, sometimes the computer simply leaves no choice, threateningly greeting you with a “blue screen of death” with farewell instructions.
Reinstallation operating system it costs a lot in a specialized salon, so today we will save a couple of thousand and learn how to reinstall the OS ourselves. But before you reinstall Windows 7, there are several steps you should take.
Preparing and saving data
How to properly reinstall Windows 7? In order to protect yourself from loss important files After reinstalling the system, it is worth spending a little time and saving on a flash drive or disk those documents that may be needed in the future.
For example, not everyone wants to lose their achieved results in their favorite game. You just need to find and save one small file, which is located in the AppData folder of the user. If a folder with this name is not displayed, you need to go to “Computer” - “Local Disk” - “Users” - “your name” and there click on “Arrange”, then select folder and search options in the drop-down menu.
And put a marker on “Show hidden folders and files."

How to save favorites and links from the browser
- For browser Mozilla Firefox you will need to go to “Local Disk” - “Users” - “User Name” - “Favorites” and save the entire folder.
- To save data Google Chrome go to “Local Drive” - “Users” - “Username” - “AppData” - “Local” - “Google” - “Chrome” and save User folder Data.
- For Internet Explorer Just save the “Favorites” folder located in “Local Disk” - “Users” - “User Name”.
- When working with Opera, we go to the well-known path to the AppData folder and then Opera, you only need to save the bookmarks.adr file.
Saving torrent files
To save torrent files, go to AppData, find the uTorrent folder there and copy it completely. After reinstalling the system, the saved folder must be placed in the same location. This also applies to saved games and bookmarks in browsers.
When all the necessary data, photographs and other necessities have been successfully saved, we begin reinstalling the OS to the beat of the drums.
How to properly reinstall Windows 7
If you have a disk with an operating system, then insert it into the drive, after which the automatic reinstallation of the OS should begin, although in 60% of cases this does not happen. What to do in such a situation to understand how to reinstall Windows 7? “BIOS” is a mystical word, upon hearing which many begin to get nervous. In fact, there is nothing wrong with the BIOS if you don’t touch anything unnecessary (and even in this case, all parameters can be restored). In order to get to your destination, you need:
- restart the computer;
- Press the del key 2-3 times until Windows screensaver. If the transition to the BIOS does not occur, simply repeat the procedure again.
So, if everything is done correctly, the following image should appear before your eyes:

Next, find First Boot Device and set the value to CD-ROM. This means that when your computer starts, it will automatically load data from the disk first. It is very important after installing the software not to forget to return everything as it was, or the computer will continue to install the system forever (if you also forgot to remove the disk).

Press f10 to save changes. If all conditions have been met, the system will begin reinstalling.
The next window prompts us to select the language, date and set the time. We set some simple parameters, and feel free to click “next”, “install” and accept the license agreement.
type of instalation
- Upgrade - suitable only if the system is reinstalled for minor reasons. If the decision was made in connection with the “screen of death” or the computer was clearly malware, definitely choose full installation.
- Full installation (custom) - reinstalls the OS literally from clean slate, mercilessly destroying everything that could harm her.

Disk configuration
Here you have to choose which disk will appear as local, i.e. the one on which the software will be installed.

Logically speaking, the volume of the system disk should be within 35 GB, but not less. It’s worth considering that many of us like to save files using the “throw it on the desktop for now so as not to forget” principle. All documents, pictures, etc. that are located on the desktop are stored on system disk, as well as files from the Downloads folder. Thus, when calculating local disk space, it is worth being more generous.
Click “Next” and go have a snack, we have at least 45 minutes. During installation, the computer will reboot several times, which will kindly warn you. You shouldn’t interfere with him in this, unless unforeseen situations occur in the process, after 45-50 minutes new Windows 7 will be installed successfully.
The next step is the username and computer name. If at some point you need to change these settings, this can be done simply: “Start” - right-click on “Computer” - “Properties”. We find “Computer name, domain name and settings working group" and then click "Change settings".
It is not necessary to set a password, so you can skip this step by clicking “Next”.
You will also need to enter your product key. You can find it on the bottom of the laptop or on a special sticker on system unit(if you purchased the equipment along with a licensed disk).
If the software was installed from another disk, then the key should be indicated on the box. Well, if the system was installed illegally, you can skip this point and forget about this issue for about a month. After 30 days Nice picture the desktop will be replaced by a black screen, and some functions and devices may be disabled. If this doesn’t bother you, then you can safely work with the system further or be puzzled by searching for a suitable key on the Internet.
When choosing the type of update installation, it is best to use the recommended settings. If the system is not automatically updated, then sooner or later minor problems may arise in working with the most frequently used programs. The update eliminates minor bugs and optimizes the operation of the OS.
How to reinstall Windows 7 without a disk or from a flash drive
Sometimes it happens that there is no disk with Windows, or the CD-ROM is blind and categorically refuses to cooperate. Don't despair, there are no hopeless situations. There are several ways to install the system using other media. For example, you can reinstall Windows 7 from a flash drive.
Reinstalling the system using a flash drive
First, download the OS image to your computer. After that, install the Ultra Iso program or you can use Daemon Tools, the algorithm is approximately the same.

Next, take a flash drive or memory card, but it’s worth noting right away that the BIOS will not see any of the drives installed via the USB-3 connector, so be careful and use USB-2. Externally, the connectors do not differ; in some devices, USB-3 is marked in blue. If there is no identification mark, then everything is simple. We find in any search engine information about the characteristics of a laptop or computer and then information about which side the connectors we need are installed on.
In order to prepare a flash drive for further work, it must be formatted, even if there is nothing on it. Next we perform the following steps:
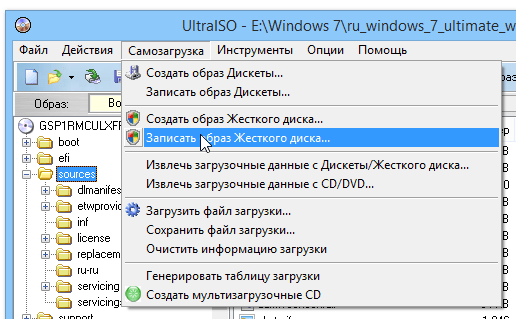
- Open in UltraIso Windows image 7, which we have already downloaded (“File” - “Open” - select the program image).
- Find “Self-unloading” in top menu and select “Record image of a tough disk."
- In the window that opens, indicate the formatted flash drive.
- We confirm the check, and set the recording method to USB-HDD+.
- Click “Record”.
- We agree with the fact that all files will be erased from the flash drive (even though we formatted it, we still set it to “Yes”).
- Voila! If we see “Recording complete”, then the job is done and you can start reinstalling.
- We go to the BIOS in the known way described above, and in First Boot Device we select the recorded flash drive.
Reinstalling Windows 7 using an image recorded on a DVD disc
Another method will tell you how to reinstall Windows 7 via CD-ROM without a license disc.
Why DVD? Everything is elementary, a regular CD will not work for one simple reason - there is not enough space, and the OS image “weighs” about 3 GB.
If for these purposes you decide to use a DVD that already has something on it, then, as in the situation with a flash drive, you need to resort to formatting.
Now open the already well-known UltraIso program, go to “File” - “Open” and find the downloaded Windows image.
Next, go to the “Tools” menu and click “Burn CD image”, in the window that appears, check the “Check” box, humbly accept the fact that everything on the disk will be destroyed and click “Burn”.
That's all, after the message “Recording complete” appears, our disk is ready. We think everyone has already guessed what to do next. That's right: go to the BIOS and select the recorded disk as First Boot Device.
How to go back from Windows 7 to XP
Sometimes it is difficult for users to master a new system, so for some it is easier to reinstall Windows 7 on XP. The installation procedure is not much different from that described earlier, with the exception of a few points:
- After proceeding to the installation, the system prompts you to select which partition (that is, which disk) the OS will be installed on. In order to completely destroy a previously installed Windows 7, you need to select the appropriate partition. After this, there will be 4 formatting options to choose from, the only correct one of which is “Format partition in NTFS system" After this, the computer usually restarts and begins installing the system.
- If there is a strong desire to install two operating systems on one computer or laptop at once, then, on the contrary, select the partition that is not occupied system files. This is usually drive D.
Reinstalling Windows 8 to 7
Despite the fact that most users rated the seventh version positively software from Microsoft, the “eight” received quite contradictory responses. Because newest version is fundamentally different from all previous ones, sometimes there is a desire to replace the OS.
In order to reinstall Windows 8 to 7, you will need to go into the BIOS and set the primary priority to the CD-ROM (how to do this was described earlier).

After this, save the changes and proceed to boot from disk or other media. Installation type when changing Windows 8 by 7 can only be " New installation", since the OS is different, there is no need to talk about any updates.
It is also necessary to delete all partitions, including hidden ones. After that, no longer thinking about how to reinstall Windows computer 7, do the rest:
- indicate the time, date and keyboard layout;
- agree to the terms, indicate the user name and computer name;
- enter the key, etc.
After installation (drivers)
As a rule, reinstalling Windows 7 on a laptop or computer is quite easy, but after the process of replacing the OS, many users have a number of questions. For example:
- "Why after installation new system Has the image quality deteriorated?
- “Why doesn’t my computer or laptop see the flash drive?”
- “Why has the sound gotten worse?” etc.
All this happens most often when the reinstallation was carried out by downloading the OS or purchasing a disc from someone else (you don’t have to think about how to reinstall a Windows 7 computer, but some “jambs” still pop up). In order to solve the series similar problems, just download the drivers from the manufacturer’s official website. Or pay attention to the drivers before reinstalling the system.
Let's look at it with an example. Let's say before you reinstall Asus Windows 7, the user was not puzzled by the issue of saving data from his laptop, or he simply did not have the opportunity to do so. What should I do?
It’s simple, just type in the search engine the model (the manufacturer’s company is enough) of the device and add the treasured phrase “Download drivers from the official website.” Then go to the link of the manufacturer’s website and indicate the full model of the laptop in the appropriate form. Next, you need to download all the presented drivers one by one and install them on the laptop one by one. There are no installation tricks, since the drivers install themselves where they should.
If for one reason or another the drivers have gone wild and are installed in the wrong place, you can go to the device manager and force them to update.
In order to get to the remote control, you can simply type “Device Manager” in search bar pops up when you click Start. Next, right-click on the driver that is marked with an exclamation mark. And select “Update drivers”, in the new window all that remains is to indicate that the required files must be searched on the computer itself and indicate the location where they were installed.
If all drivers are installed normally in the device manager, the image will improve and the screen resolution will increase to the required level.
Finally
The computer can “fly” at any moment, so it’s worth thinking about organizing backup storage for high-value files before reinstalling Windows 7. This way you can save a lot of time after installing the system, because it’s quite possible that even the most basic programs ( Word, etc.) will have to be searched and installed again.
Reinstalling Windows 7 on a laptop or computer is not difficult; even a novice user can cope with this task. The main thing is to approach the issue responsibly and spend an hour trying to save all useful information from the computer even before reinstalling the OS.
I first encountered the question of how to install Windows on a computer at checkout 4. There was no Internet where I lived, so this question was especially difficult for me. At the end of 4th grade, my father bought me a book, I don’t remember exactly what it was called, something like “Master a Computer from A to Z”
It was a big book. It was difficult for me to install Windows on my computer for the first time, but thanks to her I was able to do it. If the process of installing the operating system causes difficulties for you, then I suggest reading my article from which you will learn all the details about installing Windows. Please note that all versions of Windows have a similar installation process, so I will not focus on a specific version of Windows OS. I’ll say right away - thanks to the convenient and clear interface Installing Windows will not cause much difficulty; the most important thing is not to interfere with the system being installed on the computer.
Don’t be afraid even a schoolboy can handle installing the OS, I could do it, so you can too.
Before we move on to the practical part of the article, I would like to prepare you.
The preparatory stage of installing Windows on a computer
Each of us is so accustomed to a PC that most files: photos, videos, documents, music are stored on the computer. Many of us store files in standard folders Videos, Images, Documents, Music, Contacts, etc., which are located in the drive (C:). Why did I say all this, and besides, we need to save our information on external media: disks, flash drives, portable hard drives.


- Files that are on the desktop.
I think that up to this point, everything is clear. Go ahead.
To install windows on a computer we need a disk with Windows distribution. I'll explain what it is. This is the disk from which we will install Windows.
“Where can I find him?” you asked to yourself.
You can find it on the Internet, but most likely you will download a pirated one.
A few upload rules:
- You must have Anti-Virus installed
- When choosing a distribution, choose clean builds, i.e. you don’t need, for example, Windows and adding someone else’s assembly. It is impossible to say 100% that there are no viruses.
Of course, it is better to buy a licensed disc Windows. Don't think that if you download pirated version, which means you are saving. No, usually a pirated build does not work for more than 2-3 months, while a licensed one can work uninterruptedly for several years. Also, licensed software provides updates, which is also important.
If you downloaded Windows from the Internet, then you probably noticed that the file you downloaded is in .iso or .mdf format. Don't be afraid, this is normal. This is a disk image. You just need to write it down.
We will need the Alcohol 120% program. Use the old method, download from the same Internet.
Algorithm for installing windows on a computer
1. Insert our disk into the drive and restart the computer.

2. After our computer has turned off and started to boot again, press the del button until it appears BIOS menu. Finding the section Advanced Bios Featured or something related to the word Bios. Next look First Boot Device, That’s how it is for me, yours may be something different, but the meaning will be Hard disc. Change it to CD-ROM.
3. Now our disk will open when you restart the computer. Our disk has opened and we are given the opportunity to choose an installation method, select Automatic installation windows. Yes, if available Automatic installation with all drivers, then choose this method. We will have to wait about 10 minutes, depending on everyone, for some this moment passes in 2-3 minutes, and for others in 10-20 minutes. Do not worry.
4. Preparation for installation has been completed. Now the installation of Windows on the computer begins. Before us blue screen, we need to select the partition in which we will install Windows. You should always select the drive (C:). If you saved all necessary information of this disk on external media, then everything is fine, if not, then cancel the installation by pressing the F3 button, since it is impossible to restore later, or rather, it is possible, but you will have to spend a lot of money. 
We selected the drive (C:). We are offered to format the drive. We are not afraid of anything, we format it.
Format in NTFS or NTFS fast. And press Enter. 
5. At this point, your participation in installing windows stops. You don’t have to do anything further, but it’s better to check every 10 minutes.
Personally, at this moment I go off to watch TV for about 40 minutes, depending on the power of the computer, the time may vary. 
40 minutes later I go to the computer and hurray, the Windows installation is complete!
Errors when trying to install Windows on a computer
- After formatting the disk is completed and new files are copied to it, the computer will restart and our disk will open. Your actions are such that you are afraid that if you press again Automatic installation then the installation will start from the beginning. Yes it is. Your actions should be " don’t press anything, just wait, it will close itself«
- When installing Windows, a sign may appear asking you to select drivers. You don’t know which ones to choose and cancel Windows installation. Your actions should be like this: “Select all drivers and click OK«
- If you install licensed Windows, then you will also have to register it. Many users, due to inattention, do not know where this registration code is. Usually the registration code is on the disc box.
Install OS Windows on your computer yourself is quite possible and easy. Today I will tell you about this process in detail.
There is an opinion that installing an operating system is an incredibly complex process, and in this case it is impossible to do without a specialist. This is a massive misconception, and I will try to prove it to you in this instruction.
Here's everything you need for such an operation:
- computer (laptop)
- installation disk with Windows OS (these operating systems will be discussed today)
- step-by-step instructions (this article is what it is)
- and, of course, attentiveness!
Worth knowing: installation problems Windows may arise if installation disk was recorded incorrectly or the build quality of the operating system on it leaves much to be desired.
If you had to use an installation disk not from the original box of your device and you bought it in a store, then make sure that you purchase original disc. It can also be found on the Internet. This will be the key to correct installation of the operating system and its successful functioning in the future.
It is strongly recommended not to use disks with assemblies of “free artists” during installation; they may contain errors that are incompatible with the life of the computer or laptop. If you decide to install from such a disk, you do so only at your own risk. The consequences of such actions may become irreversible.
I also advise you not to use disks for installation. Windows There are several reasons for this:
- Discs become unusable over time (Abrasions can damage the disc).
- Installing from a disk will take much longer than installing using a flash drive.
- Disks cost money (This is especially true if you need to install the system a couple of times, they also have a bad impact on the environment).
Therefore, I advise you to write down your installation flash drive With Windows according to this instruction: (If installing from a flash drive, in the instructions, instead of a drive with a disk, select the flash drive you recorded).
Preparing for installation
First you need to decide which one hard sections disk you place this system, as a rule, this is the C:\ drive. Before starting the installation, be sure to make sure that there is no important personal, work or other information left on the C:/ drive or on the Desktop (which is also located on this drive). All files that you would like to keep must be transferred to removable media or just move it from the C:\ drive. Because everything on this disk will be completely lost.
Programs located here will also be lost. But you shouldn’t move all this to other segments or to removable drives. It will be much more convenient to install all the software again on your clean new system.
Important point! Before you start installing the OS, be sure to take care of the drivers; your device will need them. Drivers are usually included in the package computer equipment and laptops. But if there are no such discs in your set, it’s okay. You can find them on the Internet and download them; it is better to use the official websites.
There is no guarantee that the updated Windows will be equipped with the drivers required by your network card. In such a case, you may lose the ability to access the Internet. Also, the device may lose the ability to reproduce sounds, etc.
Let's move on to the beginning of the installation
To begin, insert the installation disk into the drive. Windows files and start the process of rebooting your device. If your device does not have a disk drive, there is no need to panic; the operating system can be installed using the same scheme from a flash drive or other removable media.
The next step is to help the computer boot from the connected device. There are two methods: select a DVD disc in the boot menu, or change the priority in the BIOS from the hard drive to the disc from the drive.
The second method is less convenient, because After installing the OS, you will have to change the boot priority again. First way additional actions won't require it. On some not very new computers, unfortunately, you won’t be able to use the first method, so only through the BIOS.
So let's get started!
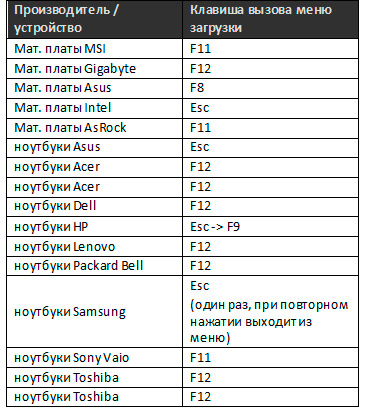
The reboot process has begun. As soon as signs of life appear on the monitor and you see the logo, press and hold the key F8.
It is worth mentioning here that this key is not the only one that allows you to enter the boot menu. It is also possible to use other keys or groups of keys. Unfortunately, this process is not universal, so it is better to clarify this nuance in the instructions for your motherboard.
Here good list keys that fit different models motherboards (Look at the third column “Boot menu key”):
Now you have reached the boot menu. All that remains is to select the download source from the list provided. 
If you have done everything correctly so far, and the installation disk is of high quality, then the download will begin immediately after selecting the disk. This is the first method I described - through the installation menu.
Now let's pay attention to the BIOS method. In this case, when you reboot, a prompt " Press DEL to enter setup", as you understand, to enter the BIOS, you just need to press Delete. If up to this point you have done everything correctly, then you already see a shell that is very reminiscent of old DOS.
There may be minor differences in the interface of this shell, depending on the author, but the controls are standard in all versions: use the arrows, +/- and Enter.
Let's see how to behave in the menu from the AMI authors

Sign in Boot menu, then to the Boot Device Priority item. This is where we will change the priority of your computer so that it boots from the installation disk, and not from its hard drive. To do this, use the navigation keys to move the CD/DVD drive to top line list. After installing the OS, don’t forget to return everything to its place.
Now let's take a moment for the Phoenix-Award version

Here, to change priorities, you need to make the DVD drive become the download source. We enter the point " Advanced BIOS Features" And navigation keys "First Boot Device"change to" CDROM".
I hope everything worked out for you at this stage! Let's continue.
Now everyone should see a window with the following content: " Press any key to boot from CD or DVD".
Press absolutely any key of your choice (Except for the shutdown and restart key).
Attention: you need to press once and only here and now!
The next step is to see the "" window .

The files are now being extracted. Next, a window appears with the text " Starting Windows"and finally, the operating system installation process window Windows systems!!!
Let's stop for a second, select a user-friendly language and continue with the installation.

The next step is to select the edition of the operating system. Select the edition for which there is a key or which you are activating. If you have a laptop, you can find the key on a sticker on the bottom of your device. The serial number is not needed yet, it will come in handy at the end of our process.
A little about the numbers:
- If RAM your computer exceeds 4 GB, then we will install the 64-bit version;
- If the device's RAM is less than 4 GB, then the 32-bit (86) version is suitable.

Our next step is to familiarize ourselves with and agree to the proposed clauses of the license. After which you have to select the type of installation of the system, we need " Full installation".
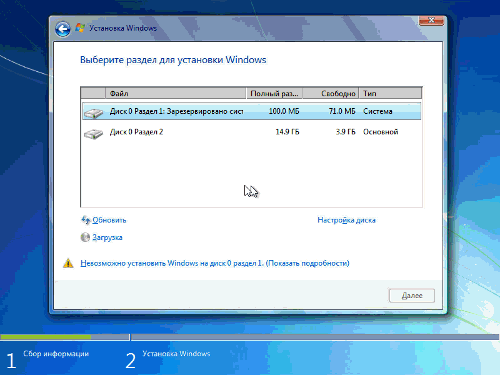
Then we do what we talked about at the beginning, select a partition to install our Windows.
It happens that the required partition is reserved by your system (then the unit of measurement will be MB, not GB). In this case, select Disk 0 Partition 2.
 To be on the safe side, before starting the installation process, you should look at how much space is allocated to the C:\ drive.
 If your HDD consists of one partition, but at the same time exceeds 250 GB, it would be better to divide it into two parts: one personally for the OS (50-100 GB in size), the other for your information.
Mini instructions on how to create a partition on a disk during installation Windows:

Important!!! Don't name sections " empty place" or "don't go here." Label drives and partitions with numbers. Otherwise, the system simply will not detect these sections.
At this step (if not already done) we create a section and Apply the changes.
If in this part of the installation Windows 7 asks you for a driver or is unable to independently detect the hard drive of your system, it is recommended to manually switch the operating mode of the SATA controller from AHCI to IDE by returning to the BIOS.
Or, if you were ready for this, install the hard disk controller driver.
If your hard drive already has more than one partition, then you can simply skip the above point. Just select the System section and allow formatting.
Now we will see a message that frightens some, threatening to delete all of our data that has been acquired for so long. But this is our goal, we want to install a new and clean operating system! Therefore, we agree and wait a few more seconds. At the next stage we see a global increase in the number free memory and move on to Next.
Here the actual installation process starts - we did it! 
After 20-25 minutes of waiting, the system has completed the installation and asks you to enter your device login and user login - we obey.

If necessary, you can add a password and code word.
Next you will need serial number(if available) or skip this item by unchecking auto-activation when establishing contact with the Internet. 
Adapt the security settings to suit you (If you hack Windows then I strongly recommend choosing the last item - “Postpone decision”). 
We deal with the time zone of stay. 
If the device has contact with the Internet and the driver is active network card, the system will ask you to specify the type of network.

All! The installation process is complete! And your device is now brand new and clean! 
There is one last step left; for those who changed priorities in the BIOS, you need to return booting from the hard drive (HDD) there.
The instructions are quite lengthy, but this should not make you scared and give up. After all, it describes in detail many small points for different versions, which in your particular case will not be needed.
The article was created for all categories of users, including beginners who will be installing the Windows operating system on their own for the first time.
That's all! 😉
Successful Windows installation.
If you still have any questions, feel free to ask them in the comments to this article and the author will definitely answer you.
If you have reached this page, it means you have decided to reinstall Windows 7 and need help with the installation. Below I will tell you in detail all the stages, starting with Windows boot on your computer and ending with Windows Activation and a short introductory video. And so let's get started. The first thing you need to do is download the Windows 7 image itself; there are two types: 32x and 64x. How to understand what bit depth you need, very simply in the computer properties there is information about your hardware, we are interested in the RAM line ( installed memory). If you have 4 GB or more installed, you need a 64-bit version, everything below is 32-bit.
When we have already decided on the bit depth, we move on to downloading Windows images 7. Click on the green button “Download Windows 7 Ultimate” and a torrent file called ru_windows_7_ultimate_with_sp1_x86.iso.torrent will be downloaded to your computer. We launch it to proceed to downloading via torrent program. If the file asks you to open it through any program, then uTorrent is not installed. follow the link to download it.
While Windows is in the process of downloading, we will download and install UltraISO program. Using it, we will write the image to a disk or flash drive.

After installing UltraISO and loading Windows, let's start recording to a disk or flash drive. Launch UltraISO and perform the actions as in the screenshot:

Open the image with the program and perform recording.

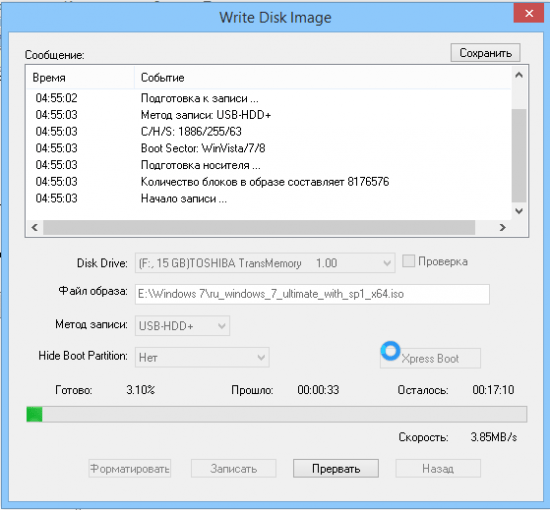
We wait for the process to complete and close the program window. Now your flash drive or disk is ready to start outside the system.
Well, now the most interesting thing is, we need to tell the computer to start from our media; for this we need to call the BOOT MENU. Usually these are the DEL or F8 keys, but there are exceptions, it all depends on the manufacturer of your motherboard - below are the buttons from which you can call the BUTMENU from various motherboards.
If you did everything correctly, you will see a type of menu with a boot selection, control using the arrows and the ENTER key.

After selecting the BOOTMENU, it will begin copying the “loading in Windows file” files to start installing Windows 7. In the first installation window, you must select a language and click Next.

In the next window, click Install.

Selecting the installation type, click “Full installation (advanced options)

And here is the most important window, selecting the partition on which the installation will be performed. For correct installation you must format the system drive C where your old Windows. Ideally, it is better to delete it and also the partition where the MBR is stored; it usually weighs 100 MB. To do this, select the section and click Delete. “Unallocated disk space” will appear. Click “Create”, specify the disk size or leave it unchanged and click “Apply”
Now it’s a matter of time, as soon as you click Next, copying files to install Windows 7 will begin. You can remove the flash drive or disk after the first reboot and watch the installation process until the Select user name window appears. Enter any desired name and click Next.

In the key entry window Windows product, uncheck “Automatically activate Windows when you connect to the Internet” and click Next.

That’s the whole simple installation process, a familiar desktop will appear in front of you - which means that Windows 7 Ultimate is installed.
Another important and mandatory process is Windows activation. On the desktop, find a shortcut called “Activator”, launch it and do everything as shown below in the screenshots.
In this article you will learn how to properly install Windows 7 on your computer or laptop. In addition, I will tell you how to prepare for this process so that everything goes smoothly. negative consequences. Follow all the steps, be careful and you will succeed.
Before you properly install Windows 7, you need to make sure that everything is ready for this. Four requirements must be met:
- You must have a reliable installation disk with Windows 7 or bootable flash drive with her.
- Make sure that on local disk, on which the system will be installed, there are no important files that you need. This drive will be formatted and all data will be deleted.
- Make sure that necessary drivers devices at your disposal, or before installing Windows 7,.
- Make sure you have setup files for all the programs you need. They will need to be installed after successful installation of the system.
How to install Windows 7 correctly
The installation is divided into three stages:
- BIOS setup;
- Preparation hard drive and installation;
- Completing Windows installation.
Let's look at each of these stages.
BIOS setup
Before you install Windows 7 correctly, you need to understand that a disk or flash drive with the distribution kit is not enough. You also need to configure the computer to boot from this disk (or from a flash drive), and not from the hard drive. By default, most computers are configured to boot from the hard drive.
There are many BIOS versions, and setting the boot order of devices is different everywhere. You can find out how popular ones are configured BIOS version for loading from external media.
Start installation
Finally got to installing Windows. When your BIOS is set to boot from required device, connect this same device (that is, a disk or flash drive) and restart the computer. Booting from removable media should begin.
If you install original Windows, then before loading the message “Press any key to boot from CD...” will appear. While it is lit, you must press any key to start the installation. If you don’t have time, the normal download from the hard drive will begin. If you are installing any Windows assembly, then such an inscription may not appear. Instead, there may be a menu where you need to select the installation of Windows 7.
The installation begins. The first step is to select a variety of language options and then click “Next”.
Choose language
After this a window appears. Click Install.
Start installation
Before you properly install Windows 7, you need to choose which version you will install. This is done at this step. You need to select the desired OS version from the list. The system capacity is also determined here. After selecting the version, you need to click “Next”.
Select Windows version 7
Now check the box that you agree to the license and click the “Next” button.
Agree to the license
Now you need to choose: update the system or perform a full installation. To install Windows 7 correctly, select the full installation.
Select full installation
Before you install Windows 7 correctly, you need to work with hard drive. Click Disk Setup.
At this stage of installation, you will have a utility at your disposal with which you can operate hard disk partitions. So, using the buttons you can delete, create and expand partitions, as well as format them.
Click "Settings"
Select (or create) a partition on which Windows will be installed and click the “Format” button. A warning will appear stating that now everything will be deleted from this section - we boldly agree, because we have prepared for the installation and have saved everything we need in another place.
Format the drive
Once formatting is complete, click Next.
And wait for the process to complete. This may take a long time.
Wait for the installation to complete
Completing the Windows installation
When everything you need has been copied and unpacked, Windows 7 will prompt you to enter names for the user and computer. Enter these details and click “Next”.
Enter your username and computer name
Now, if necessary, you can create a password. You can leave all fields blank and click Next.
Enter a password if required
You may then be asked to enter a code Windows activation. Enter and click Next. If there is no code, then you can skip this step and activate Windows later.
Enter your Windows activation code
After that, select the desired security mode on your computer and click “Next”.
