Cable for connection to the LPG control unit. Manufacturing a universal cable for programming LPG controllers
Production of a universal cable for programming LPG controllers
The secret is that every manufacturer of automotive gas equipment seeks to make a profit by selling additional equipment - a special cable for programming controllers. If you are installing gas equipment, you have probably noticed that the vast majority of installed equipment has two types of diagnostic connectors:
1) AGIS, ALTIS, STAG 150, OMVL are some other types of gas equipment.

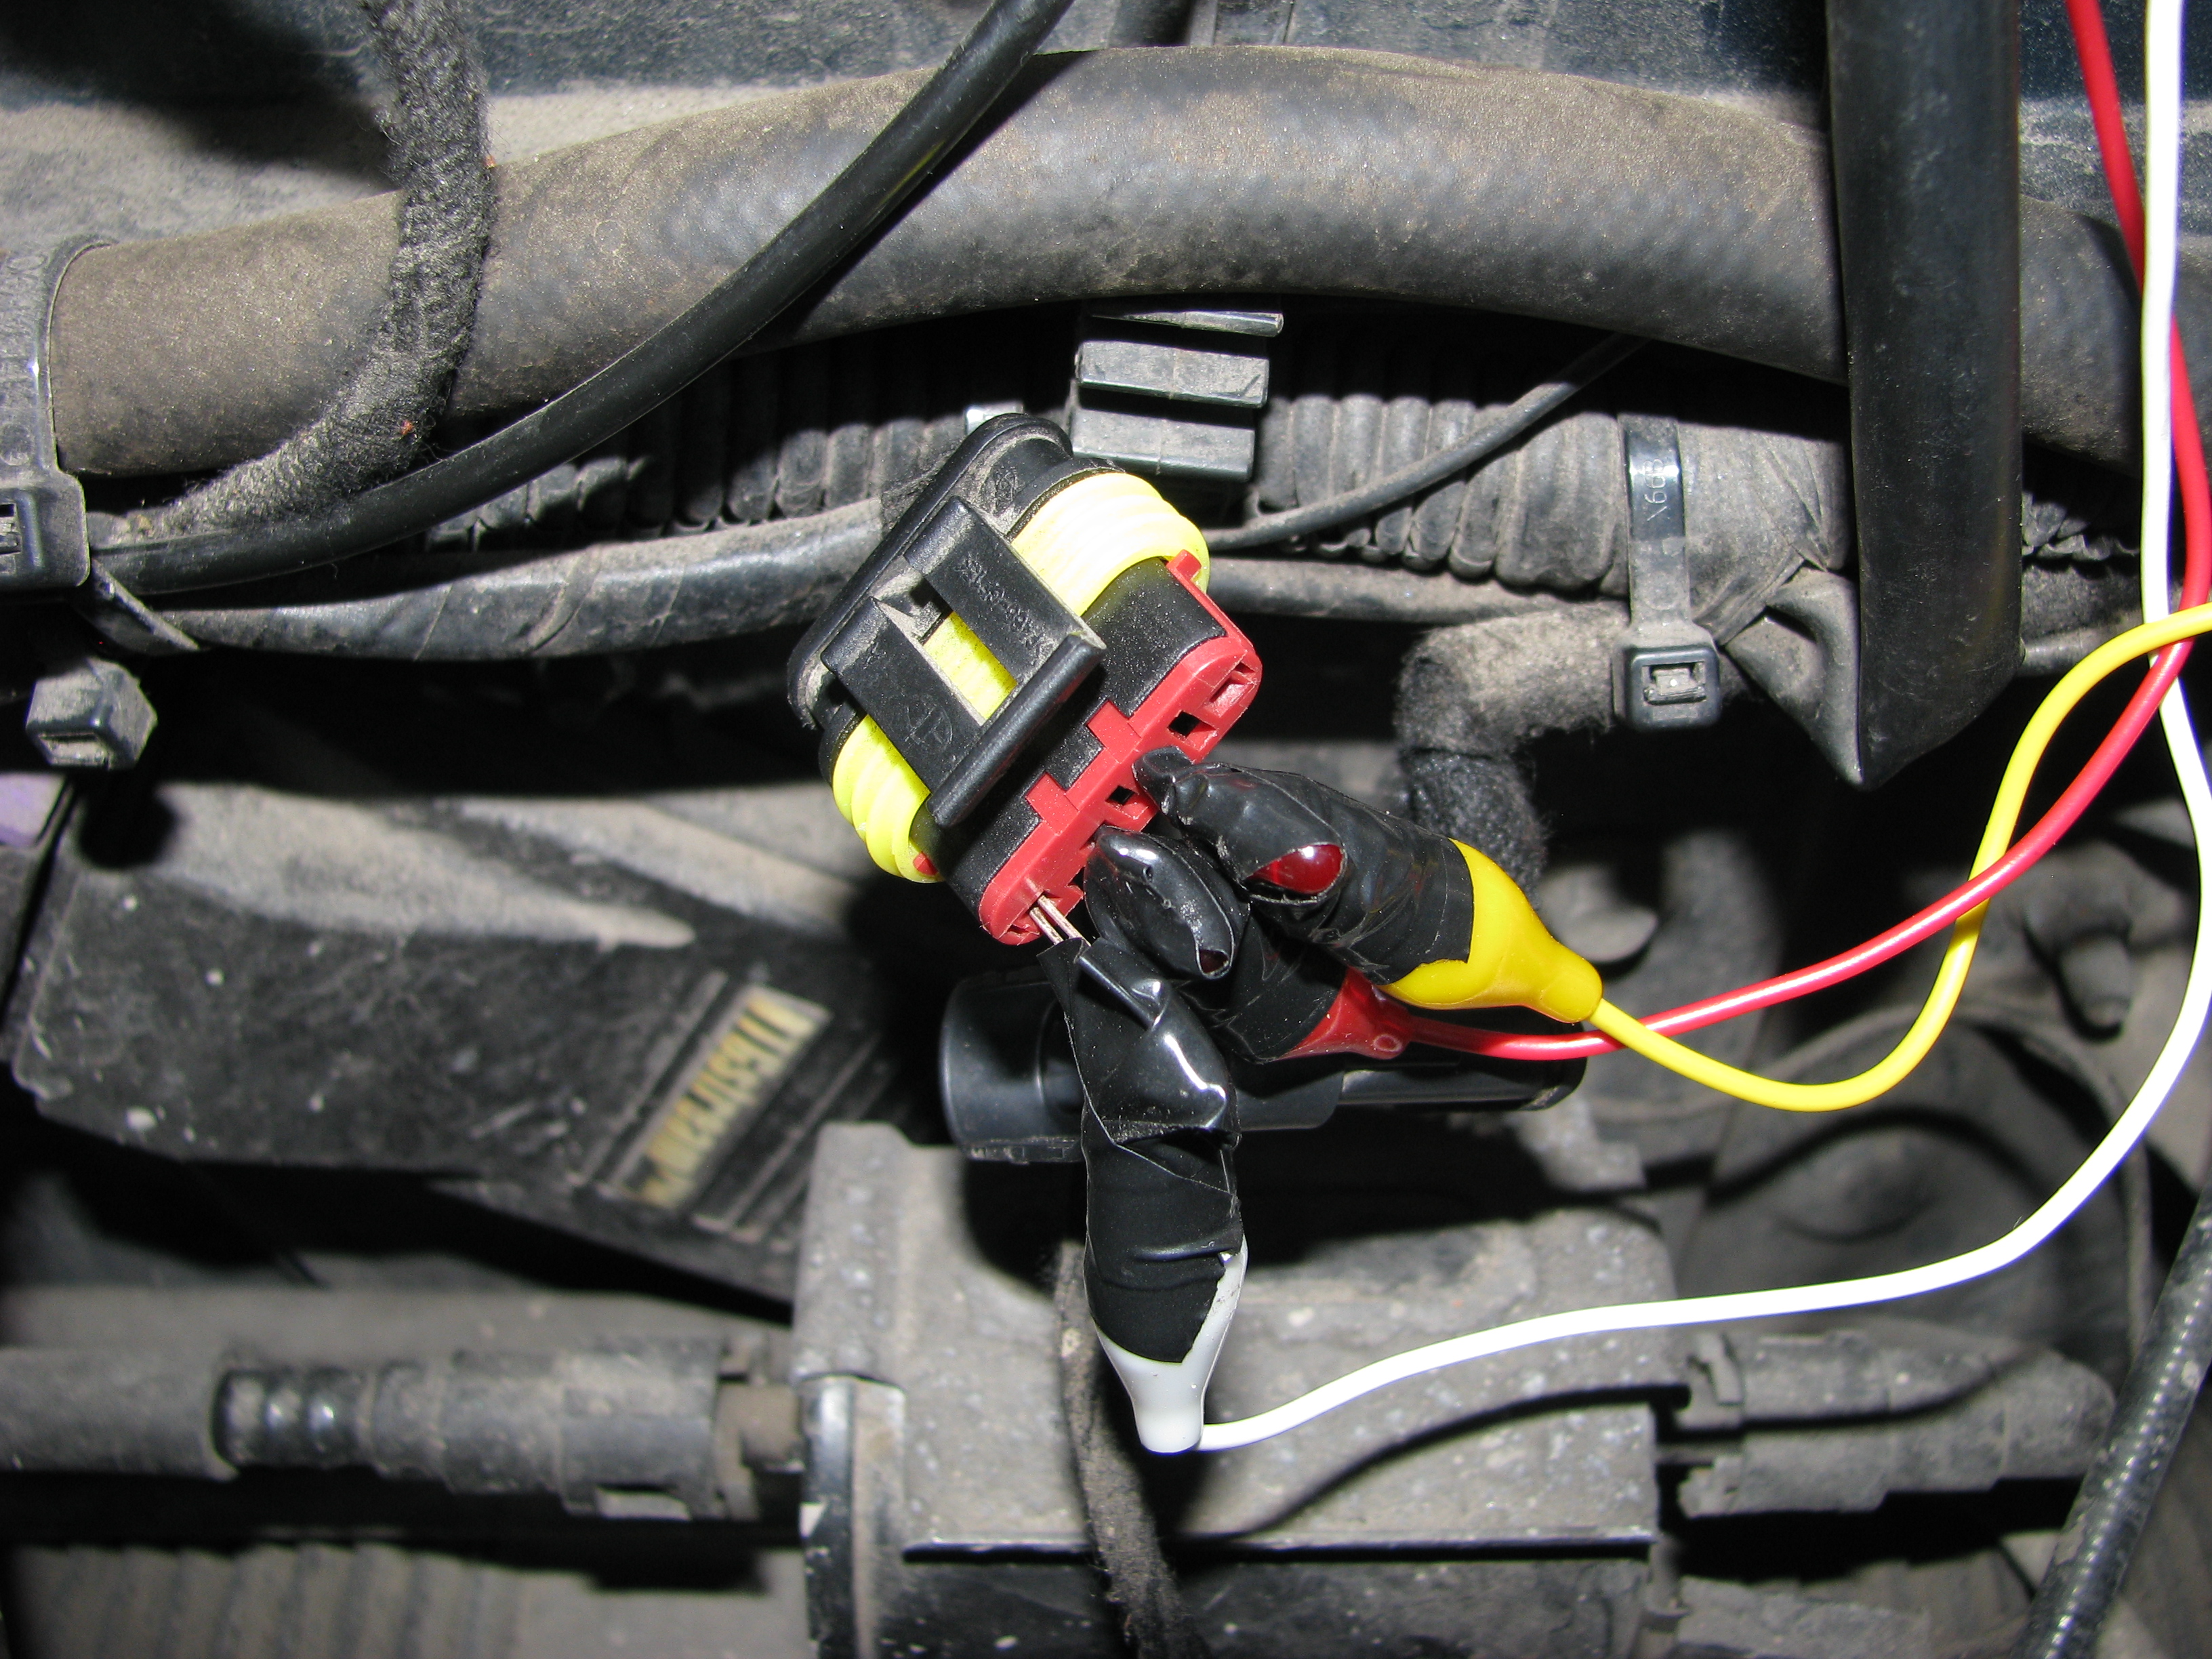
2) Zenit, Stag-300, Stag-4, and others (in the photo the connector coming out of the control unit) (pinout is shown for the Zenit system, in Stag +12 and Gnd are swapped).
The photo shows 4 wires going into the connector. Two of these wires are (+) and (-), and two wires carry the Rx and Tx signal. The whole difference is in the location of these wires in the diagnostic block, i.e. Each manufacturer, in order to sell a cable of its own making, places the contacts in the diagnostic block differently (for example, when connecting a cable for Stag-300 to Zenit, the cable is damaged because the positive and negative wires in the block are mixed up).
To solve the problem, it is enough to make a universal connector. For example this:

In order to save yourself from the problem of repairing the cable if it is connected incorrectly, before connecting using a multimeter, you need to check the diagnostic connector pins on the equipment (some systems supply power to the diagnostic connector only when the ignition is on).
Having correctly connected (+) and (-), then we connect the signal wires.
Sometimes there are cases when the diagnostic block has simply rotted or there is no longer a plus or minus on it. In this case, the CABLE power wires are connected to the battery, and only the signal wires are connected to the diagnostic block.
Warning
You should always carefully check the polarity of the power connection to the cable.
Where to get the Lovato-Stag cable terminal from

When making a cord for HBO diagnostics, the question arises - “Where can I get the connector?” For the Lovato-Stag HBO cable, you can use the connector from the fuel pump domestic cars - GAZ, VAZ. The full name of this connector is AMP series Superseal 1.5 (4-pin).
Where to get the terminal for OMVL and others.
Puzzling over where to find the connector for the OMVL HBO diagnostic cable, I came to the conclusion that it was impossible to find such a connector... BUT, while doing a little revision of the wires, I came across a wonderful thing. Connector for powering the motherboard from an old 300-watt power supply, an old system unit. and lo and behold! This connector fits with some modifications. Namely: first of all, you need to find a number of pins of the desired shape and then cut off the rest, unnecessary part of the connector. small photo report. I apologize for the photo quality...


P.S. It is important that the pin configuration is exactly the same as on the factory cord.
Manufacturing diagrams and cable testing for HBO
How to assemble a cable for diagnostics of HBO on Zenit and Diego Leonardo, Voila Plus, Millenium, Bingo, BRC, Diego, AKME, Digitronic, Vector, Altis, Agis, Zavoli, Nicolaus, Tartarini, Autronik (A-mon), Lovato (Lov- Eco2), Les 98 (Landi).

I was faced with the task of assembling a cable for diagnosing HBO on Zenit and Diego (the pinout cable is not suitable for STAG, +12V and Gnd need to be swapped). I started poking around on the Internet and found a clear answer - “take a k-l-line adapter and use it.” I assembled the adapter from the master kit and let’s connect it, but it doesn’t work even if you crack it!!!
I dived into the Internet and it turned out that all HBOs have a regular RS232 COM port. RS232 implies signals with amplitudes from -12 to +12 volts. Moreover, logical “1” corresponds to the level -12V, logical “0” - +12V. This is necessary for noise immunity; signals “around zero” are considered noise and are not used. There are no such signals in the gas brain block itself. Such (or compatible) signals exist (still exist) in computers, but they are not present in modern laptops.
In the gas control unit, the interface has output signal levels (roughly, not really true) “0”=0V, “1”=5V (TTL levels). For this you need a TTL level converter for max232. This is exactly the microcircuit that is included in the data cables for the Lovato LPG.

Photo of a disassembled Lovato HBO cable.
Chip MAX23
socket for the MAX232 microcircuit (if you solder the wires directly to the microcircuit, you can damage it by overheating it with a soldering iron or by accidentally static voltage, so we buy a socket)
Diode 1N4004 (wasn’t in the store, bought 1N4005)
Voltage stabilizer L7805CV
Capacitor 470uF 16V
Capacitor 47uF 16V
4 capacitors 10uF 16V
DB-9F socket 9 pin (com port female)

I have a cord lying around at home from a Siemens DCA-510 on a PL-2303 chip, let’s tinker with it and lo and behold, the software works and sees the HBO.


And so in order - any USB COM port cable will suit NOKIA DKU-5, CA-43 CA-45, etc., set the speed to 9600.
How to check if the cable is working - take your cable, connect it to the computer, close RX and TX, open HyperTerminal in Windows XP, in Windows 7 there is no HyperTerminal, but there is an option to copy two files hypertrm.dll hypertrm.exe from Windows XP to the same place and run it and everything works Same
Open, check your settings, set everything to default in the system, then launch (Start -> Programs -> Standard -> Communications) HyperTerminal.

Set the default speed, as in the picture all the settings .

And here is the pinout of the DR-73 cable, this is a Stag (Digitronic) cable plus OMVL Lovato. Only +12 V and Gnd are shown.

Nothing bad will happen if you confuse RX and TX. Be careful, measure with a tester where you have +12V and don’t stick anything there (in the native wire, black is always then zero, and red is +12V) there is nothing complicated here, find 3 wires (zero) (RX) and (TX ) your tester will show some symbolic voltage greater than zero. Before connecting, it is better to remove the key from the ignition, connect the cable to the LPG, then connect the USB and turn the key so that the instrument lights up and then start the program.
In any case, nothing bad happened to me when I connected the USB and then the diagnostic connector, but it’s better to do as I wrote above.
Well, then you launch your diagnostic program and work with it.
If you are professionally engaged or want to start setting up gas equipment, then this universal interface is exactly what you need.
The device is compatible with the following types of HBO
Company/Model
AC / STAG 100, STAG 150, STAG L, STAG XL, STAG PLUS
AG / SIROCCO, RAZMUS, CZECH
AG CENTRUM / JZ-2005 ZENIT, ZENIT PRO
AG CENTRUM / JZ-2009 ZENIT, COMPACT, new SIROCCO models
BIGAS / SGlS N, ELC"92, ELC PEGASO
CARGAS/SOLARIS
EUROPEGAS / OSCAR N, OSCAR N MINI
D.T. GAS / DATEC BASIC, DATEC SUPE, GAS-TECH
ELPIGAZ / LEONARDO, MILENIUM, NICOLAUS, STELLA/ELIZA, VIOLA PLUS
EMMEGAS/ICS-03
KME / AKME, BINGO, BINGO M, S, DIEGO, DIEGO G3 (until April 2009)
LANDI RENZO / LAMBOA CONTROL A/1-V05-ER
LECHO / AGNES, MAXI-LAMBDA, SEC, SEQUEL, DREAM XXI N
LPGTECH / TECH 100, TECH 200, TECH 300
OPTIMA / OPTIMA 1.03
ATIKER / FAST, MULTIFAST, SAFEFAST
ESGI/ESGI
MILANO / MILANO
TAMONA / TG STREAM NEW
PROTEC DIGITAL / ORION
OMVL / DREAM XXI-E
TAMONA / TGSTREAM, TGSTREAM-P, TGSTREAM-PM, PROGAS, PROGAS-P
TARTARINI / SEQUENTIAL (BLACK ECU)
VERSUS / VERSUS
ULTRA-GAS / ULTRAGAS OLD
UNIGAS/ISU
V-TEC / V-TEC
ZAVOLI/ALISEI, REGAL
A-MAX/KING
AUTOGAS ITALIA / EASY JET, DREAM JET, POWER JET
AUTRONIC / MISTRAL I, MISTRAL II.
CARGAS, Bardolini / NEW
EMMEGAS / ECU-07 ICS-03, ECU-07
MIMGAS/S2000U, MIMGAS_V1.20
Agis / OBD/CAN, Mini
BIGAS / SGISN, SGISN OBD...AEB GREEN
LANDI-RENZO / IGS, LES PLUS, LSI_NSI, LSI
LANDI-RENZO / IGSYSTEM, LCS/2, LCSA1/05, LCSE, LCS04
LANDI-RENZO / OMEGAS, OMEGAS PLUS, OMEGAS PLUS MAX
MINT-XI ULTRAGAS / MINT-XI ULTRAGAS
OMVL / DREAM XXI-N/P, DREAM XXI-N/P EOBD
ROMANO / RISN, RISN EOBD
ENERGY REFORM / ENERGY REFORM
TARTARINI / TEC 99 EVO
ULTRA-GAS / ULTRA-GAS, RSI+
VOGEL/VGI
AGIS / AGISM210, AGIS P13
AC/STAG 200, 300, 400, PLUS, PREMIUM, 4, ISA2, 400DPI, Q-BOX
KME / AKME, BINGO, BINGO M, S, DIEGO, DIEGO G3, NEVO (after 04.09)
LOVATO / FAST, SMART, EASY
VECTOR / VECTOR
4GAS / 4GAS
AEB / KING (found in older models, adapter No. 1)
The kit includes a table of adapter color compatibility with each LPG; you simply select the LPG model and connect the connector of the appropriate color
The main distinctive features of this model are:
- length 3 meters, you will not be tied to the car, but will be able to move freely when setting up the gas equipment.
- the presence of several connectors, ready-to-use connectors already have the necessary pinouts and are color coded, which creates additional convenience in using the device. You don’t have to look for the required pinout, you simply select the ECU you need from the list included with the device and connect to it.
- availability of a branded disk with the necessary software, instructions and technical documentation for the work. You no longer need to waste time searching, you just need to select the desired item in the disk menu that is always at hand.
- quality of workmanship, we took a responsible approach to the quality of components, due to which the wires have increased wear resistance in a car service center, all connections are sealed with heat shrink.
- honest guarantee for the device and technical support. We will tell you honestly about the operation of the device, and if any difficulties arise, we will solve them.
When your car drives poorly and constantly torments you with something, then you don’t get any pleasure from driving. By the time you get to work, you’re tired; when you leave work, tired, you arrive like a squeezed lemon. And if the “CHECK” lamp is also on, then the mood drops below the baseboard.
If the engine error light comes on correctly or it’s just driving poorly, you need to head to the service station. As time and experience show, there are fewer and fewer professionals at service stations. Of course, there are still grandfathered mechanics who can determine by ear the degree of compression of the block head, but what will they do with the smart electronics of modern cars? That's right, you need to go for computer diagnostics. And you will be very lucky if you come across an intelligent diagnostician with knowledge of the structure of an internal combustion engine.
One day I got a Lanos car with installed LPG (gas cylinder equipment) for a couple of weeks. The car is not new, 2002, but it drives briskly on gasoline. On gas there is constant jerking and sluggish acceleration. In general, by the time you get to work across half of Kyiv, you will spend a lot of nerves. But when you drive slowly in the suburbs, it’s babble. The big city doesn’t like sluggish driving, so I decided to drop in to see the “professionals”. The engine mechanics said there were problems with the gas system, and the gas technicians said that you should set it up on gasoline first. In general, it turned out to be a vicious circle.
I decided to figure it out myself. After googling and reading the forums, I checked all the sensors - they are working. How to check the correct operation of the HBO is the question. And the answer is this: you need a cable and a program in your laptop. Gas brains Tamona Tgstream-PM, here’s a box:
Buying a branded cord is a toad, I didn’t want to buy a non-branded one either. What if it doesn’t work, you have to wait and it’s also worth the money. Having googled the same thing, I found out what can be done from a data cable from an old mobile phone. Interestingly, the cable from the mobile phone fits to the HBO controller. As it turned out, the HBO controller communicates with a PC via the UART protocol (in common parlance rx-tx. Where can I get a data cable from my mobile phone? About 10 years ago it was somewhere, but now? Literally at the next search engine link they suggest making a cable from a Chinese whistle TTL to USB. Unfortunately, I don’t have this, I use a USB ISP.
As it turned out, there are no radio amateurs among car enthusiasts, which is why I wrote this article. Everyone cuts cables from mobile phones and orders “specialized” adapters. BUT! All modern radio amateurs know about the existence of the Arduino platform. In particular, Arduino UNO is programmed and communicates with a PC simply via a bare USB cord, and precisely via the UART protocol. Any Arduino that is sewn without a programmer, on the board of which the CH340T chip is soldered, will do.
We collect our cord on the knee. A minute of working with a soldering iron, we need to short-circuit the reset foot to ground, thereby turning off the microcontroller and essentially we get the same TTL to USB. We connect the wires to the rx, tx and gnd pins. We are looking on the Internet for the pinout of the diagnostic connector of your HBO. I have Tamona Tgstream-PM and here is its connector (male connector):

Tamona Tgstream-PM
Of course, I didn’t have such a connector. I took crocodile jumpers, one end “bit” the wires from the Arduino, and the other end the future plug that will be inserted into the connector. The LED acts as a plug. Its two legs act as spring-loaded contacts. I quickly insulate all exposed areas with electrical tape.


We push our board into the case so that it doesn’t short out. Well, that's all, the cable is ready!


We search and download the necessary software. For HBO Tamona we download, for another HBO you will have to look for it yourself. Download the driver for Arduino on the Chinese CH340T chip, there are good instructions for installing it.
Now connect to the car. In the Tgstream control unit, the programming connector is combined with the control button connector. Let's disconnect it. First of all, we turn on the ignition and look for the positive wire, we found +12V and firmly forget about it, under no circumstances do we push anything into it, otherwise we can even burn a laptop. +12 can be temporarily plugged with a match or a piece of toothpick, just in case. Next, we look for the ground in the connector and connect the Arduino ground to it. Then we connect rx and tx in accordance with the found circuit or the scientific method, they can be swapped and everything will be fine. The correct connection is indicated by a signal about an established connection in the HBO setup program.

Well, that’s actually the entire cable for diagnosing and programming the HBO. Now look up how to set up the gas system on the Internet, I’m not your advisor here. Let me just say that, using tips and recommendations from the Internet, I managed to achieve excellent performance of the car on gas compared to previous installations by crooked craftsmen.
In the end, I spent a whopping 0 money and 15 minutes of manual work on soldering and wrapping the wires. The design is not particularly beautiful, but if you need it right now and for free, it will do just fine. Of course, the idea arose in my head to make a normal cable. To do this, you will have to order a TTL to USB whistle and connector from China. According to the Internet, the connector comes from the fuel pump of a VAZ car.
In addition, I would like to say that this cable can also be used to diagnose a car’s ECU if the control unit supports the UART protocol.
The secret is that every manufacturer automotive gas equipment seeks to make a profit by selling additional equipment - special controller programming cable. If you are installing HBO, you probably noticed that the vast majority of installed equipment has two types of diagnostic connectors:
1) AGIS, ALTIS, STAG 150, OMVL – some other types HBO.

2) Zenit, Stag-300, Stag-4, and others (in the photo the connector coming out of the control unit) ( The pinout is shown for the Zenit system, in Stag +12 and Gnd are swapped).
The photo shows 4 wires going into the connector. Two of these wires are (+) and (-), and two wires carry the Rx and Tx signal. The whole difference is in the location of these wires in the diagnostic block, i.e. Each manufacturer, in order to sell a cable of its own making, places the contacts in the diagnostic block differently (for example, when connecting a cable for Stag-300 to Zenith, the cable is damaged because the positive and negative wires in the block are mixed up).
To solve the problem, it is enough to make a universal connector. For example this:

To save yourself the hassle of repairing cable If the connection is incorrect, before connecting using a multimeter, you must check the diagnostic connector pins on the equipment (some systems supply power to the diagnostic connector only when the ignition is on).
Having correctly connected (+) and (-), then we connect the signal wires.
Sometimes there are cases when the diagnostic block has simply rotted or there is no longer a plus or minus on it. In this case, the power wires CABLES They are connected to the battery, and only signal ones are connected to the diagnostic block.
Warning
You should always carefully check the polarity of the power connection to the cable.
Where to get the Lovato-Stag cable terminal from

During production cord for HBO diagnostics, the question arises - “Where can I get the connector?” For HBO cable Lovato-Stag You can use the connector from the fuel pump of domestic cars - GAZ, VAZ. The full name of this connector is AMP series Superseal 1.5 (4-pin).
Where to get the terminal for OMVL and others.
Puzzling over where to find the connector for HBO diagnostic cable OMVL, I came to the conclusion that it is unrealistic to find such a connector... BUT, while doing a small revision of the wires, I came across a wonderful thing. Connector for powering the motherboard from an old 300-watt power supply, an old system unit. and lo and behold! This connector fits with some modifications. Namely: first of all, you need to find a number of pins of the desired shape and then cut off the rest, unnecessary part of the connector. small photo report. I apologize for the photo quality...


P.S. It is important that the pin configuration is exactly the same as on the factory cord.
Manufacturing diagrams and cable testing for HBO
How to assemble HBO diagnostic cable on Zenit and Diego Leonardo, Voila Plus, Millenium, Bingo, BRC, Diego, AKME, Digitronic, Vector, Altis, Agis, Zavoli, Nicolaus, Tartarini, Autronik (A-mon), Lovato (Lov-Eco2), Les 98 ( Landi).

I was faced with the task of collecting HBO diagnostic cable to Zenit and Diego (cable according to pinout not suitable for STAG, +12V and Gnd need to be swapped ). I started poking around on the Internet and found a clear answer - “take a k-l-line adapter and use it.” I assembled the adapter from the master kit and let’s connect it, but it doesn’t work even if you crack it!!!
I dived into the Internet and it turned out that all HBOs have a regular RS232 COM port. RS232 implies signals with amplitudes from -12 to +12 volts. Moreover, logical “1” corresponds to the level -12V, logical “0” - +12V. This is necessary for noise immunity; signals “around zero” are considered noise and are not used. There are no such signals in the gas brain block itself. Such (or compatible) signals exist (still exist) in computers, but they are not present in modern laptops.
In the gas control unit, the interface has output signal levels (roughly, not really true) “0”=0V, “1”=5V (TTL levels). For this you need a TTL level converter for max232. This is exactly the microcircuit that is in data cables for LPG Lovato.

Photo of disassembled HBO cable Lovato.
- Chip MAX23
- socket for the MAX232 microcircuit (if you solder the wires directly to the microcircuit, you can damage it by overheating it with a soldering iron or by accidentally static voltage, so we buy a socket)
- Diode 1N4004 (wasn’t in the store, bought 1N4005)
- Voltage stabilizer L7805CV
- Capacitor 470uF 16V
- Capacitor 47uF 16V
- 4 capacitors 10uF 16V
- DB-9F socket 9 pin (com port female)


I have a cord lying around at home from a Siemens DCA-510 on a PL-2303 chip, let’s tinker with it and lo and behold, it works, the software sees HBO.


And so in order - any USB COM port cable will suit NOKIA DKU-5, CA-43 CA-45, etc., set the speed to 9600.
How to check if the cable is working - take yours cable connect to the computer, close RX and TX, open HyperTerminal in Windows XP, in Windows 7 there is no HyperTerminal, but there is an option to copy two files hypertrm.dll hypertrm.exe from Windows XP to the same place and run it and everything works too
Open, check your settings, set everything to default in the system, then launch (Start -> Programs -> Standard -> Communications) HyperTerminal.

Set the default speed, as in the picture all the settings.


If you did everything correctly, the program will print the characters that you enter from the keyboard.

This is what the terminal looks like cable for HBO AKME diego:
Terminal k HBO Zenit. Same terminal for AC Gaz Stag ( but +12 and Gnd need to be swapped ):
And here is the pinout of the DR-73 cable, this is a Stag (Digitronic) cable plus OMVL Lovato. Only +12 V and Gnd are shown.

Nothing bad will happen if you confuse RX and TX. Be careful, measure with a tester where you have +12V and don’t stick anything there (in the native wire, black is always then zero, and red is +12V) there is nothing complicated here, find 3 wires (zero) (RX) and (TX ) your tester will show some symbolic voltage greater than zero. It is better to remove the key from the ignition before connecting cable to HBO then connect the USB and turn the key so that the dash lights up and then launch the program.
In any case, nothing bad happened to me when I connected the USB and then the diagnostic connector, but it’s better to do as I wrote above.
Remember that you perform all actions at your own peril and risk. The resource administration is not responsible for damage to your property.
HBO cable for programming 4th generation gas injection systems, such as KME Diego, Zenit, Stag, DREAMJET, Landi Rrenzo, Tartarini and others.
Making a universal cable for programming LPG controllers with your own hands
The secret is that every manufacturer of automotive gas equipment seeks to make a profit by selling additional equipment - a special cable for programming controllers. If you are installing gas equipment, you have probably noticed that the vast majority of installed equipment has two types of diagnostic connectors:

1) AGIS, ALTIS, STAG 150, OMVL – some other types of gas equipment.
2) Zenit, Stag-300, Stag-4, and others (in the photo the connector coming out of the control unit) (pinout is shown for the Zenit system, in Stag +12 and Gnd are swapped). The photo shows 4 wires going into the connector. Two of these wires are (+) and (-), and two wires carry the Rx and Tx signal.
 Assembling a cable for setting up a car's gas system is an interesting and exciting task.
However, if you are limited in time, there is no opportunity or space to assemble such a cable, you can purchase a ready-made kit! For example - !
The link on the banner leads to the price page for Spider devices, where in the section " Injector cleaning, emulators, LPG adapters, diagnostics, tools» there is also an assortment of cables for setting up HBO.
The whole difference is in the location of these wires in the diagnostic block, i.e. Each manufacturer, in order to sell a cable of its own manufacture, places the contacts in the diagnostic block differently (for example, when connecting a cable for Stag-300 to Zenith, the cable is damaged because the positive and negative wires in the block are mixed up and were specially swapped by the equipment manufacturers).
To solve the problem, you can make a universal connector. Or make a cross-adapter:

In order to save yourself from the problem of repairing the cable if it is connected incorrectly, before connecting using a multimeter, you need to check the diagnostic connector pins on the equipment (some systems supply power to the diagnostic connector only when the ignition is on). Having correctly connected (+) and (-), then we connect the signal wires. Sometimes there are cases when the diagnostic block has simply rotted or there is no longer a plus or minus on it. In this case, the CABLE power wires are connected to the battery, and only the signal wires are connected to the diagnostic block.
Where to get the Lovato-Stag cable terminal from

When making a cord for HBO diagnostics, the question arises - “Where can I get the connector?” For the Lovato-Stag gas pump cable, you can use the connector from the fuel pump of domestic cars - GAZ, VAZ. The full name of this connector is AMP series Superseal 1.5 (4-pin).
Where to get the terminal for OMVL and others.
Puzzling over where to find the connector for the OMVL HBO diagnostic cable, I came to the conclusion that it was impossible to find such a connector... BUT, while doing a little revision of the wires, I came across a wonderful thing. Connector for powering the motherboard from an old 300-watt power supply, an old system unit. and lo and behold! This connector fits with some modifications. Namely: first of all, you need to find a number of pins of the desired shape and then cut off the rest, unnecessary part of the connector. small photo report. I apologize for the quality of the photo...


P.S. It is important that the pin configuration is exactly the same as on the factory cord.
Manufacturing diagrams and cable testing for HBO
How to assemble a cable for diagnostics of HBO on Zenit and Diego Leonardo, Voila Plus, Millenium, Bingo, BRC, Diego, AKME, Digitronic, Vector, Altis, Agis, Zavoli, Nicolaus, Tartarini, Autronik (A-mon), Lovato (Lov- Eco2), Les 98 (Landi).

I was faced with the task of assembling a cable for diagnosing HBO on Zenit and Diego (the pinout cable is not suitable for STAG, +12V and Gnd need to be swapped). I started poking around on the Internet and found a clear answer - “take a k-l-line adapter and use it.” I assembled the adapter from the master kit and let’s connect it, but it doesn’t work even if you crack it!!! I dived into the Internet and it turned out that all HBOs have a regular RS232 COM port. RS232 implies signals with amplitudes from -12 to +12 volts. Moreover, logical “1” corresponds to the level -12V, logical “0” - +12V. This is necessary for noise immunity; signals “around zero” are considered noise and are not used. There are no such signals in the gas brain block itself. Such (or compatible) signals exist (still exist) in computers, but they are not present in modern laptops. In the gas control unit, the interface has output signal levels (roughly, not really true) “0” = 0V, “1” = 5V (TTL levels). For this you need a TTL level converter for max232. This is exactly the microcircuit that is included in the data cables for the Lovato LPG.
We recommend that the adapter for HBO be made on the CP2102 chip from Silcon Labs. This chip has greater noise immunity, unlike the PL2303 chip. This is primarily due to the difference in the operating logic of these chips. The CP2102 chip from Silcon Labs sends signals three times per bit and selects the average value. But the frankly Chinese chip PL2303 sends a signal once. That is why it is easy to “confuse” it with external interference. The picture below shows this schematically.


This is what the cable terminal for the AKME diego HBO looks like:
Terminal for Zenit HBO. Same terminal for AC Gaz Stag (but +12 and Gnd need to be swapped):
And here is the pinout of the DR-73 cable, this is a Stag (Digitronic) cable plus OMVL Lovato. Only +12 V and Gnd are shown.

Nothing bad will happen if you confuse RX and TX. The main thing is to pay attention to where you have +12V and don’t put anything there (in the original wiring, black is always “minus”, and red is “+12V”).
You can also check which wire has 12 volts with a tester.
There is nothing complicated here. Take three wires of the cable: (GND) (RX) and (TX). First connect GND to the black wire pin, then RX and TX. Next, launch the program and try to work with gas brains. Even if you make a mistake with RX and TX, nothing bad will happen and nothing will burn out. The program just won't work. In this case, it is enough to swap RX and TX.
P.S. If you are not confident in your abilities, or do not have the time or desire for the experiments described above, you can buy a ready-made one at an affordable price.