Iphone 5 requires a SIM card. How to activate iPhone without SIM card
When you turn on any of the Apple tablets and smartphones for the first time, you need activate. New iPhone and iPad users are unaware that the activation procedure is quite simple - they are willing to pay sellers to take the right steps.
Initial setup service Apple technology– one of the most expensive; in different salons, consultants charge from 500 to 1,000 rubles for activation. This article will tell you how to properly set up your iPhone the first time you turn it on. on one's own, and will relieve the user of the need to enrich communication stores.
Before you start initial setup Apple device, you need to take the following measures:
- Recharge your device. It is necessary that the gadget's battery is filled at least 30%.
- Insert the SIM card into the tray using a special needle. Without a SIM, it was possible to activate gadgets with a pre-installed iOS operating system lower than version 7 by making an emergency call to 112. New operating system iOS 10 does not provide this feature.
- Connect your smartphone to Wi-Fi distribution or to the mobile Internet. If 3G (or LTE) appears next to the network signal indicator and the operator's name, you will be able to do without Wi-Fi. If you have an EDGE signal (letter E), you will have to connect to the router.
- Download and install iTunes on your PC latest version. You can find the program here - http://itunes.apple.com/. If the user does not have access to a Wi-Fi network and does not have a SIM card with “unlimited”, he is able to perform the initial setup via a PC / laptop with installed iTunes and wired internet.
After completing all of the above steps, you can proceed directly to activating your iPhone.
How to set up iPhone for the first time?
You need to activate your Apple gadget as follows:
Step 1. Turn on the device by holding the “Power” button for 2-3 seconds. The Apple logo will appear on the screen first, followed by a welcome message. different languages(“Hello”, “Hello” and so on).
Be scared of hieroglyphs on at this stage no need - if the greeting is in Chinese, this does not mean that the iPhone is fake.
Step 2. Swipe your finger from left to right along the bottom of the display and on the next screen select from the list available languages Russian.

Step 4. Select an available Wi-Fi network and connect to it.

If the network you would like to use for activation is not in the list, add it - click the “Select another network” button and enter the SSID.
If you wish to use for initial setup Mobile Internet, click on the button “ Use cellular connection", located just below the list of networks.
Step 5. Enable/disable location services. Many of iPhone applications are associated with geolocation - if you refuse it, you will not be able to use, for example, a navigator. On the other hand, geolocation consumes a lot of energy - therefore, it is still recommended to turn it off during activation (“ Disable»).

Whatever decision you make at this stage, it will not be fatal. Location services can be activated or deactivated at any time.
Step 6. The iPhone will prompt you to create an Apple ID or sign in with an existing account.

Click on the button " Skip this step" and then confirm your decision by clicking " Skip».

Step 7. Accept Apple's terms of use - click " I accept" You can familiarize yourself with them in advance, but this will not bring you much benefit - there is nothing remarkable or interesting in the text.

Step 8. If you are the owner of an iPhone 5S or more modern model, the device will prompt you to configure Touch ID- fingerprint sensor. At this stage you have 2 options: " Tune" And " Set up later».
It is clear that by choosing the first option, you agree to configure the fingerprint sensor immediately, and if you prefer the second one, you postpone the procedure. It is recommended that you set up Touch ID the first time you activate it. This will not take much time and effort - the user only needs to apply the index or thumb to the button " Home" You can be sure that the procedure has been completed correctly if the message “ Successfully» (« Success»).

Image: everythingicafe.com
Step 9. Create a numeric password. This code will allow you to unlock your device if for some reason Touch ID is unable to recognize your fingerprint. Enter 4 numbers that you will definitely remember, twice.

You can leave creating a security code “for later” - to do this, click on the “ Don't add a password».
Step 10. The final step is to choose whether you want error data to be sent to Apple company. The manufacturer recommends choosing the option " Send automatically“- according to representatives of the Apple company, reverse information allows you to create more advanced products.

Information that goes to Apple includes geodata. This essentially means that the manufacturer will know where and when you were.
This completes the initial iPhone setup process. The welcome message “ Welcome!».

Click " Get started"and start exploring your new device!
Common problems when activating an iPhone and how to solve them
Most often, problems arise when activating an iPhone because of the SIM card. If the user sees the message “ Activation Error", he needs to make sure that the SIM card is working.

Image: infoidevice.fr
To do this, just move the card to another phone and see if the network is detected.
If the SIM is OK, you should try to fix the error as follows: by pressing the " Home"Call the bottom menu and click on " Start Over" This will not take you to the first settings page - try activating it again. You may have to do this procedure 6-7 times in order to get rid of “ Activation Error».
During the initial setup, you may encounter another error - “ Could Not Activate iPhone."

Image: ipadappsbuzz.com
The reason for this error is high load to the Apple server. It is best to wait 2 - 3 minutes and try to activate again. If this doesn’t work, you should change the way your gadget connects to the Internet - for example, use 3G instead of Wi-Fi. You can also write a complaint to Apple support, but you will have to wait several days for a response from the company’s specialists.
Finally, the third common problem is that beginners are unable to set up Touch ID - the sensor simply does not respond to finger touches. The solution to this problem lies on the surface - it is necessary to remove the factory film from the front edge of the device. The desire to protect new iPhone from scratches is commendable, but for this you need to use a special film, and not the one that comes with the kit.
How to set up your iPhone like new?
The need to set up a used iPhone like New occurs when the device begins to freeze and slow down. The gadget's memory becomes clogged - this leads to slow and unstable work apparatus. Helps you quickly get rid of “garbage” in your memory full reset iPhone. There is no need to worry that as a result of the reset all user data will be deleted - after all, you can first “pack” valuable information into backup copy.
Correctly configure your Apple device like new you need this:
Step 1. Check if Apple offers you to update the operating system of your gadget. To do this, follow the path " Settings» — « Basic» — « Software Update" If you see what's underneath iOS version written " Latest software installed", carry out further actions.
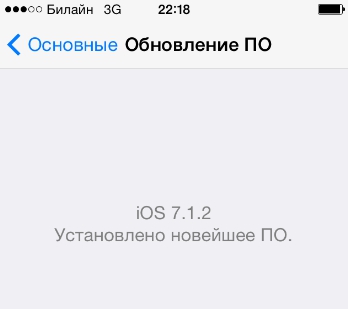
If available updates yes, install the latest version of iOS
On a jailbroken iPhone, you can only update the operating system through iTunes.
Step 3. Disable iMessage and the " Find iPhone" The messenger is deactivated in the " Messages" V " Settings" To turn off " Find iPhone"you need to go to the section " iCloud».

Step 4. Start cleaning your device. Follow the path " Settings» — « Basic» — « Reset" In the last subsection you will find the item “ Erase content and settings“—that’s what you need.

Click on this item and enter your security password.

Then confirm that you want to erase your iPhone - click on the appropriate button.

Next, wait for the gadget cleaning procedure to complete. If at the end of the procedure the screen appears welcome message, then you did everything right. Set up your iPhone according to the instructions in this article, and then restore your data from backup. Through such manipulations, you can significantly increase the performance of the gadget without losing any important information.
Conclusion
At initial setting up iPhone opening takes the most time Apple account ID. Another difficult step in the past was registration in Game Center– however, this application is no longer available in iOS 10. You can complete all other stages of iPhone activation in 5 minutes - they are simple and do not require programming skills from the user. For this reason, pay for starting setup Apple gadget the money that consultants are asking for is completely unreasonable.
Before using your iPhone, you must activate it. The iPhone activation process cannot be skipped. We have written detailed instructions for activating an iPhone. The instructions are universal for everyone iPhone models 5.5S (iPhone 4S,4 and 3GS) and even iPad.
Important! When activated Iphone availability Wi-Fi is a must!
Instructions. iPhone activation process.
Step #1. Clamp top button and turn on the phone. Move the slider to the right and begin activating the iPhone.
Step #2. Set the language and select the country where you actually live. Click next or “Next”.

Step #3. Choose a connection to available network Wi-Fi. Turn geolocation on or off. I recommend turning on geolocation to determine your location to make it easier to find the right places or establishments that are near you.

Step #4. Settings Iphone parameters. There are three settings options:
1. Set up like a new iPhone - Use if you have never used an iPhone or iPad before.
2. Restoring from an Icloud backup - Use if you have previously used the device ( old model or newer) and you made a backup copy. In this case, all programs and settings will be automatically downloaded to your phone.
3. Restore from backup iTunes copies - Use it if you have previously used the device and made a backup copy to your computer.

Step #5. Create or enter old Apple ID. If you had an Apple ID before, simply enter it. If you have not previously registered an Apple ID, click create and fill out simple form(date of birth, password, email, etc.). After successful registration, enter Apple data ID.

Important! The Apple ID will be used for many things on your device (games, apps, iCloud and more).
Step #6. Enabling iCloud. You have to decide whether you need backup storage or not. ICloud will provide free 5GB of Internet space to store your data.
Pros of using iCloud:
Find My iPhone (locating your device on the map in case of loss);
Storing photos and files;
Sync contacts, calendar, reminders, notes, etc.
Choose exactly how and how often you want to make a backup. Click next.

Important! I recommend using iCloud. If you lose or buy a new device, you can restore a backup copy of all data on the new device. And if you have an iPad, all data on the two devices will be synchronized.
Step #7. Activation of Find My iPhone. Allows you to find your phone in case of loss or theft and displays the location of the phone on the map.
How to use iPhone without SIM card?
As you know, to begin with using iPhone you need two things:
- SIM card;
- Working Wi-Fi network.
It is the presence of these two parameters that distinguishes the operation of an iPhone from a regular iPod. Without active card operator cellular communications the user will not be able to continue working with the device. Let's take a closer look at how to bypass this limitation and activate an iPhone without a SIM.
Turning on an iPhone without a SIM card may be necessary at the stage of purchasing a phone, when you need to check its functionality, but there is no time to rearrange cards from other devices. Also, bypassing the restriction will be simply necessary if your operator’s SIM card is not suitable for Apple gadgets.
All the methods presented below are official and legal options for unlocking phone functions without a network connection. mobile operator.
Method 1- Using iTunes
This option for unlocking phone functions involves using the desktop version of iTunes. The application can be installed on any computer running Windows control or Mac OS.
We advise you to make sure that your PC comes pre-installed with the most current update iTunes. This will get rid of possible errors and bugs at the setup stage. Follow the instructions to use Athos without a SIM card:
- Launch iTunes on your computer and wait for its main window to load;
- Then connect mobile device to a PC using a charging cable;
- A message about the new device should appear in the program window, and in the upper left part of the window you will see an icon for the phone model you are using;
- Once the program recognizes the smartphone, you will see the settings window for the new device. Follow all instructions to unlock your phone.
iTunes will not check to see if you have a carrier card installed on your phone. iPhone activation will happen automatically and you will be able to use the gadget without any restrictions. The only caveat is that working with GPS networks and mobile Internet will not be available, since the gadget is not tied to mobile operator. You can correct the situation by inserting a working card into the SIM tray.
Method 2 - Quickly turn on the phone
You can bypass the restriction without using third party programs. All you need is a smartphone. You can activate its operation without a mobile operator card or connection to work network Wi-Fi. Follow the instructions:
- Take the turned on iPhone and press the “Power” key;
- Wait for it to appear Apple logo and start turning on the mobile device;
- Immediately after the “welcome message” appears on the display, press the “Home” button;
- The “ Emergency call" In the dialing field, enter the combination “112” and click on the “Dial a number” shortcut;
- When the call starts, press the “Power” key. A window will appear indicating that there is no SIM card. In it, click on the “Cancel” field.
The call will end and the iPhone desktop window will appear on the display. Now you can use your phone without connecting to a cellular operator. Also, there will be no need to enter the router network data.
Immediately after purchase iPhone smartphone, before you start using it, you must first activate and configure it. This process is completely simple and will not take much time.
In contact with
What is iPhone Activation?
iPhone activation- a process in which a new iPhone communicates with Apple servers via the Internet and receives permission or prohibition to use a smartphone with an installed SIM card.
What is a locked (unlocked, carrier-locked, factory unlocked, SIM Free) iPhone?
- iPhone that was purchased with a carrier contract(synonyms: locked, contract, locked, tied to the operator, operator, SIM-locked) can only be activated with the SIM card of the operator to which it is linked. In other words, such an iPhone cannot be activated and used with any SIM cards.
- iPhone purchased without being tied to an operator(synonyms: officially unlocked, official, factory unlocked, SIM Free ) can be activated with a SIM card of any mobile operator.
How are Activation and Apple Warranty related?
The iPhone activation process automatically starts the clock Apple warranty. In other words, countdown warranty period for the new iPhone will start not from the date of purchase, but from the date of activation of the smartphone.
ATTENTION! Inscription " Hello" (Hello, etc.) on the screen the first time turning on iPhone does not mean that the iPhone is really new. The article at the link below will help you check that you have purchased and activated a new iPhone:
2. Turn on iPhone
After the working SIM card is placed in the slot, turn on the iPhone (press and hold the Inclusions within 3-4 seconds), wait until the welcome screen appears and press the " Home"to open preliminary settings;

3. Then select your language and indicate your region of residence;

4. After that, connect to Wi-Fi networks or, if there is no access to one, to the cellular network (button Use cellular network ) or to a computer with a pre-installed iTunes program(you can download) and with the ability to access the Internet.

5 . Starting with iOS 11, it became possible quick setup, which consists of copying credentials from your other device running iOS 11 or later.

6. In the next window, configure touch sensor ID by storing your fingerprint. This will allow you to unlock the device in the future by simply touching the sensor, as well as make purchases online and quickly log in to various resources.


Then enter a four to six character password that will be used to unlock your device. By pressing the button Passcode options you can choose the type of password code;

7. The next window will ask you to restore programs and data from a copy in iCloud / iTunes or transfer data from Android.


If this is not necessary, then you should select “ Set up like a new iPhone»;
8. After this, a window will open with a field for entering your Apple ID, but if Account has not been previously created by the user, then you should not register an account directly at this stage.

To refuse registration, click on the buttons " No Apple ID or forgot it», « Configure later in Settings" And " Do not use».

Correctly create an Apple ID without being tied to credit card will help you;

Today we will be for the first time turn on and activate our iPhone, in my case it's an iPhone 5S. I will tell you in detail how this is done, and also point out the errors and problems that I encountered during the process of activating my iPhone.
Preparing to activate your iPhone
Before we start the first switch-on, we need to prepare in advance so that the process goes smoothly and without errors.
What we need:
- At least 20-30% charge.
- Access to the Internet via Wi-Fi or via a PC/Laptop with the latest version of iTunes and connected to the Internet.
- Nano SIM card.
If your device is completely discharged, take USB cable and connect it to your computer or electrical network through the adapter that comes with the kit.
if you have WiFi, then check that it is available and you have Internet access.
If it is not there, then you will need your computer or laptop, which will be connected to the Internet. You need to download and install the latest version of the application on it (your computer) iTunes from the official website, link: http://itunes.apple.com/.
After the preparatory stages, you can begin activation.
iPhone activation
We will activate the iPhone with a SIM card, and accordingly the activation will consist of the following steps:
- Inclusion
- Basic settings
- Connecting to a computer and activation
- First start
IMPORTANT! If your phone is locked, then to activate it you will need a SIM card from the operator to which it is locked!
Turning on the device
In order to turn on the device, you need to press and hold the button for a few seconds. "inclusions", which is located on the top of the device. See photo below.

If everything was done correctly, then iPhone screen a silver apple will appear, which means you can proceed to the next stage.

Basic iPhone settings
After turning on the device, you will see a welcome message on the screen. various languages. Now, with a slight movement of your finger, from left to right, we drag along the bottom of the screen.

Then we select the language we need, it can be any from the list. 
In the next step, select your country. 
Next, we need to connect to Wi-Fi or connect our device to a computer/laptop (PC) for further activation. 
If you have Wi-Fi, then select it from the list and enter the password. For those who do not have it, you will need activation through iTunes on your PC.
Connect the phone to the computer and continue activation
We'll need ours USB cable And computer/laptop (PC). We connect the cable to the iPhone and then to your PC. 
After which you should see a picture on the screen of your phone as in the photo below: 
The first thing you need to do after connecting is to enable or disable it. They are necessary for using GPS, Google maps and so on. They can be enabled now or later, after installation. I decided to turn them on right away. 
In the next step we select the item “set phone as new”, since this is our first turn on and we have nothing to restore yet. 

For iPhone 5S owners, there is one item that can be completed immediately or postponed until later. I decided to do it right away, if you do too, then click on "Set Up Now"
Now we need to press and release the button several times (about 10-20) "home", as shown on the screen of your smartphone. If you did everything correctly, you will see a picture and a message like in my photo below. 
Since we have set up a fingerprint, we need to set a password. After all, we won’t always have the opportunity to remove it. For example, you may be wearing gloves or have a dirty finger that you need, who knows what. Therefore, for convenience there is digital combination, which also needs to be set and remembered.

Next and last step This "diagnostics", i.e. you need to decide whether or not to allow the phone to send data to Apple servers. This could be error data or something else. I decided not to do this, and accordingly I chose "Don't Send"(do not send).
After this, you will see the long-awaited greeting on your screen! This means that you have successfully installed and activated your iPhone! Congratulations!

If something didn’t work out for you, then I advise you to look at the problems that arose during my first launch, and also watch the video where I explained everything in detail.
iPhone activation problems and solutions
I will describe the problems that I had when activating my IPhone 5S, as well as their solutions.
- If you do not remove the factory film from the phone, then it is almost impossible to press the “Home” button (round, on the front, bottom of the phone). Therefore, when the phone was automatically locked, I had to press the power button (on top of the phone).
- Due to the lack of Wi-Fi, a computer was needed.
- Since I had old version iTunes, I couldn't connect my phone to my computer. I had to first download and update it to the latest version.
- For iTunes updates it must be closed, otherwise it will not update and will give an update error.
- To remove a fingerprint, you need to remove the factory film, otherwise nothing will work, since the sensor does not recognize it from under the film.
These are the problems I encountered during my activation and first launch, I hope my experience will allow you to avoid them.
I also advise you to look at the “Apple support” page, there are already many answers to activation problems, link: http://support.apple.com/kb/ts3424?viewlocale=ru_RU&locale=ru_RU.
Tutorial video “Activate iPhone”
You can leave your questions and comments in the comments below.